In an era defined by connectivity and intelligent systems, GPS technology has become an indispensable backbone for modern vehicles. Far beyond simple navigation, it powers sophisticated tracking systems, enhances vehicle security, optimizes fleet management, and even provides crucial data for advanced driver-assistance systems. Yet, the seamless performance of your car’s GPS relies on one often-overlooked component: the antenna. A poorly placed GPS antenna can transform cutting-edge technology into a source of frustration, leading to inaccurate positioning, dropped signals, and unreliable data.
The seemingly straightforward task of installing a GPS antenna in a car actually involves a nuanced understanding of signal mechanics, vehicle architecture, and practical considerations. The goal is to achieve an unobstructed view of the sky, minimize interference, and integrate the component discreetly and safely within the vehicle’s interior or exterior. This comprehensive guide delves into the optimal strategies and locations for GPS antenna installation, ensuring you harness the full potential of your in-car navigation and tracking systems. Whether you’re a tech enthusiast upgrading your ride, a business owner managing a fleet, or simply seeking to enhance your daily commute, understanding the nuances of antenna placement is the first step towards a consistently reliable GPS experience.
Understanding GPS Antennas and Signal Reception
Before diving into specific placement recommendations, it’s crucial to grasp the fundamental principles behind how GPS antennas function and what factors govern their signal reception. This foundational knowledge empowers you to make informed decisions and troubleshoot potential issues effectively.
The Fundamentals of GPS Technology in Vehicles
At its core, the Global Positioning System (GPS) operates by receiving signals from a constellation of Earth-orbiting satellites. Your car’s GPS receiver, through its antenna, collects data from at least four satellites simultaneously. Each satellite transmits precise timing information, allowing the receiver to calculate its distance from each satellite. By triangulating these distances, the receiver can pinpoint its exact location on Earth’s surface with remarkable accuracy.
For this process to work flawlessly, the antenna must have a clear, unobstructed “line of sight” to a sufficient number of satellites. Any physical barrier or electronic interference can degrade or block these signals, leading to reduced accuracy, signal dropouts, or even complete loss of position. The reliability of your GPS system—whether for real-time navigation, accident reconstruction, or vehicle recovery—hinges entirely on the quality and consistency of the signal your antenna can acquire. Modern GPS antennas are typically “active,” meaning they contain a low-noise amplifier (LNA) to boost the weak satellite signals before sending them to the receiver, further emphasizing the need for minimal signal loss at the antenna itself.
Key Factors Influencing Signal Quality
Several critical factors determine the effectiveness of a GPS antenna’s signal reception:
- Line of Sight (LOS): This is paramount. GPS signals are relatively weak and operate at high frequencies, meaning they struggle to penetrate solid objects. An antenna needs a clear, direct view of the open sky to receive signals from satellites effectively. Obstructions like building structures, dense foliage, and even certain vehicle components can significantly attenuate signals.
- Interference: GPS signals are susceptible to various forms of interference.
- Metallic Objects: Large metal surfaces in or around the antenna can reflect or block signals. This includes the car’s roof, pillars, and even some aftermarket metallic window tints.
- Electronic Devices (EMI): Other electronic devices within the vehicle, such as poorly shielded chargers, dashboard cameras, or even the car’s own infotainment system, can emit electromagnetic interference (EMI) that disrupts GPS signals.
- Heating Elements: Some windshields incorporate metallic heating elements that can act as a Faraday cage, blocking signals.
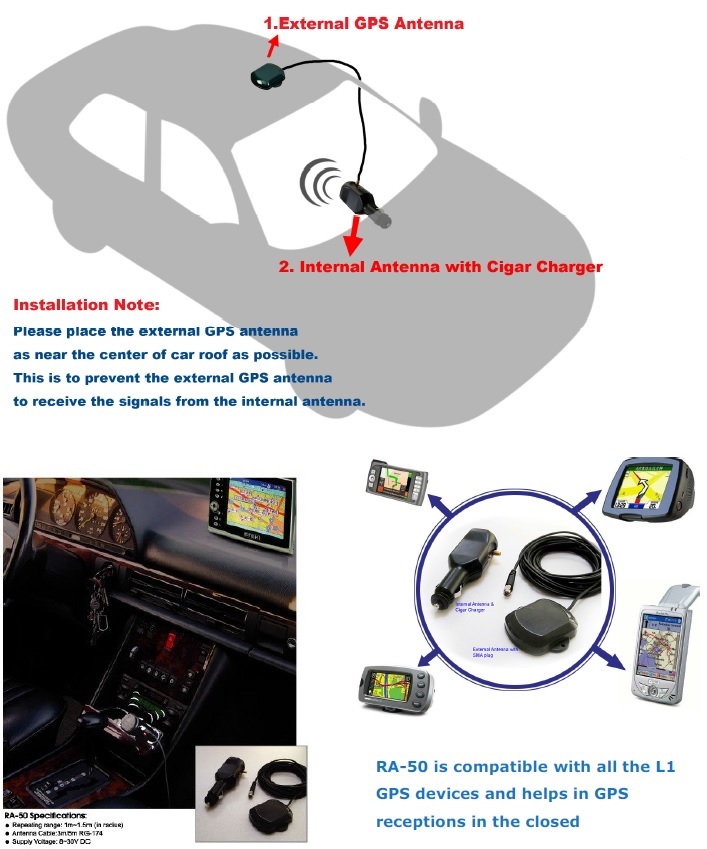
- Antenna Type and Quality: Not all GPS antennas are created equal. High-quality antennas feature better sensitivity and shielding against interference. External antennas generally offer superior signal reception due to their direct sky view, while internal antennas prioritize aesthetics and protection. Magnetic mount antennas offer flexibility, while adhesive-backed ones provide a more permanent solution.
- Cable Length and Quality: The coaxial cable connecting the antenna to the GPS receiver plays a crucial role. Longer cables can lead to signal attenuation (loss of signal strength), especially if the cable is of low quality or improperly routed (e.g., kinked, pinched, or damaged). Always opt for the shortest practical cable length and ensure it’s a high-quality, shielded cable designed for GPS applications.
Understanding these factors is the first step in strategically choosing the best location and installation method to ensure your GPS antenna consistently delivers robust, accurate positioning data.
Top Locations for Optimal GPS Antenna Placement
Selecting the right spot for your GPS antenna is a balance between achieving clear signal reception, minimizing aesthetic intrusion, and ensuring practical installation. While the “perfect” spot can vary slightly depending on your specific vehicle and antenna type, certain locations consistently prove to be more effective than others.
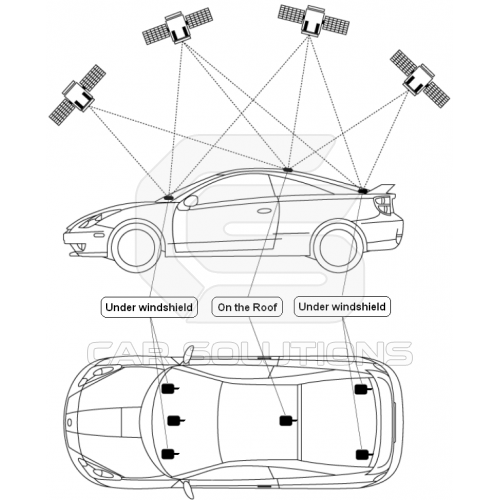
The Dashboard: A Perennial Favorite
The dashboard is arguably the most common and often recommended location for internal GPS antenna installation, particularly for aftermarket navigation units or standalone trackers.
- Advantages:
- Clear Sky View: Placed close to the windshield, the dashboard typically offers an excellent, relatively unobstructed view of the sky, crucial for strong signal acquisition.
- Easy Access: Installation is generally straightforward, requiring minimal disassembly of vehicle components.
- Reduced Cable Routing: Often, the GPS receiver or device is also dashboard-mounted, leading to shorter and simpler cable runs.
- Disadvantages:
- Visibility: The antenna may be visible, which some users find aesthetically unappealing or a potential target for theft if it indicates a tracking device.
- Heat Exposure: Direct sunlight on the dashboard can generate significant heat, potentially degrading the antenna’s lifespan over time.
- Interference: Proximity to other dashboard electronics (e.g., infotainment screens, charging pads) can introduce electromagnetic interference if not properly shielded.
- Tips for Installation:
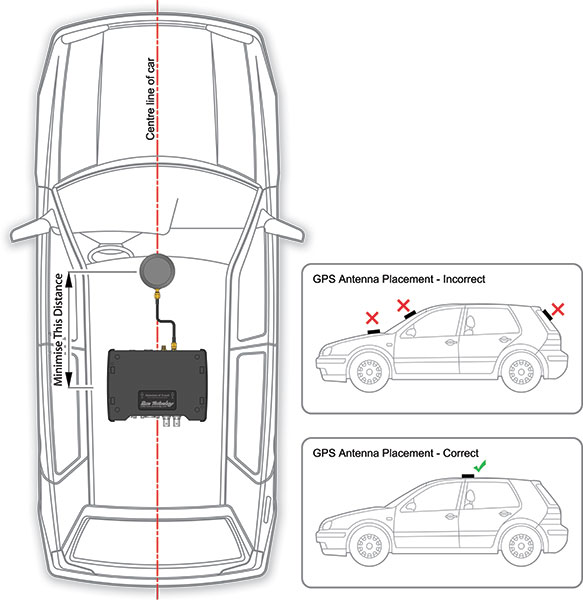
- Placement: Position the antenna as close to the windshield as possible, ideally in one of the front corners, ensuring no metallic objects or structural elements block its view directly upwards.
- Security: Use the provided adhesive pad (often 3M VHB tape) or a magnetic base (if applicable) to secure the antenna firmly to prevent it from shifting due to vibrations or braking.
- Avoid Obstructions: Keep it away from air vents (which can cause temperature fluctuations) and any metallic trim pieces. Some windshields have a shaded or dotted area at the top; this is generally acceptable, but metallic tints below it are not.
Rear Deck/Parcel Shelf: Discreet and Effective
For sedans and coupes, the rear deck (the flat surface between the rear window and the trunk) offers an excellent alternative, often providing a more discreet placement solution.
- Advantages:
- Good Sky View: The rear window typically provides a clear upward view, similar to the front windshield, allowing for reliable signal reception.
- Out of Sight: The antenna is less visible from the front of the car, offering a more aesthetically pleasing solution and reduced risk of theft.
- Less Interference: Generally further away from the main cluster of dashboard electronics, potentially reducing EMI.
- Disadvantages:
- Longer Cable Routing: Running the cable from the rear deck to a receiver often located in the front cabin or under the dash can be more involved, requiring careful concealment under trim panels.
- Potential Obstructions: Passengers or cargo placed on the rear seats or deck could inadvertently block the signal.
- Metallic Tint Concerns: As with the windshield, metallic tints on the rear window will significantly degrade performance.
- Tips for Installation:
- Mounting: Secure the antenna firmly to the rear deck using adhesive, ensuring it’s flat and facing upwards.
- Cable Management: Carefully route the cable along the vehicle’s interior pillars and under the headliner or floor trim to keep it hidden and protected. Avoid running it over sharp edges or near moving parts.
- Test Before Finalizing: Temporarily place the antenna and test signal strength before committing to permanent cable routing.
Under the Windshield or Headliner: The Covert Approach
For a truly invisible installation, placing the antenna under the plastic trim of the dashboard near the windshield, or even within the headliner, can be highly effective, provided certain conditions are met.
- Advantages:
- Completely Hidden: The antenna is entirely out of sight, offering superior aesthetics and maximum security against detection.
- Protected: Shielded from direct sunlight, dust, and potential tampering.
- Disadvantages:
- Signal Attenuation: Plastic and fabric trim can slightly attenuate the signal. More critically, if there’s any metallic component (e.g., a supporting bracket, a metallic layer in the headliner material, or metallic windshield tint), signal reception can be severely compromised.
- Complex Installation: Requires more advanced skills to remove and reattach trim panels without causing damage.
- Limited Accessibility: Once installed, troubleshooting or repositioning is more difficult.
- Tips for Installation:
- Material Check: Crucially, ensure the material above the antenna is non-metallic. Simple plastic, fabric, or composite materials are generally fine.
- Test, Test, Test: This location demands thorough signal testing before reassembling any trim. Use a temporary setup to confirm adequate signal strength.
- Professional Help: If you’re uncomfortable with trim removal or unsure about material composition, consider professional installation to avoid damaging your vehicle’s interior. A common spot is just below the dashboard vents, tucked into the corner where the dash meets the windshield.
Exterior Mounting: When All Else Fails (or for Specific Needs)
While most consumer applications favor internal mounting, certain scenarios or vehicle types benefit immensely from exterior GPS antenna placement. This is particularly true for fleet vehicles, heavy machinery, or situations where internal signal reception is consistently poor.
- Advantages:
- Unobstructed Signal: Offers the absolute best, clearest line of sight to satellites, guaranteeing optimal signal strength and accuracy.
- Robust Performance: Ideal for challenging environments or vehicles with highly metallic interiors that block internal signals.
- Durability: External antennas are typically designed to be weatherproof and robust.
- Disadvantages:
- Aesthetic Impact: An external antenna is visible on the vehicle’s exterior, which may not be desirable for all users.
- Exposure to Elements: Subject to weather, car washes, and potential vandalism.
- Drilling/Wiring Complexity: May require drilling holes through the vehicle body for permanent installation and careful sealing to prevent water ingress.
- Types and Tips:
- Roof Mount: Often a small, puck-shaped antenna mounted centrally on the roof. Requires drilling and careful sealing. Provides excellent all-around sky view.
- Trunk Lid Mount: Can be magnetic or adhesive. Offers a good compromise for sedans where roof drilling is undesired. Cable runs along the trunk gutter and into the cabin.
- Magnetic Mount: The simplest exterior option, allowing for quick attachment and removal. Ensure the magnet is strong and the contact surface is clean to prevent dislodgement at speed.
- Cable Routing: When routing cables from the exterior to the interior, always use existing grommets or professional-grade sealants if drilling is necessary, to prevent water leaks and cable damage.
Choosing among these options requires careful consideration of your vehicle’s design, your aesthetic preferences, the specific GPS device you’re installing, and, most importantly, the imperative for reliable signal reception.
Practical Installation Tips and Best Practices
Successful GPS antenna installation goes beyond merely picking a spot; it involves meticulous preparation, careful execution, and strategic troubleshooting. Adhering to best practices ensures not only optimal performance but also the longevity of your equipment and the integrity of your vehicle.
Pre-Installation Checklist
A little planning can save a lot of frustration. Before you even peel off the adhesive backing, consider these steps:
- Test Before You Commit: This is perhaps the most crucial tip. Temporarily place the antenna in your chosen spot (using painter’s tape if necessary) and connect it to your GPS receiver. Power on the system and monitor the signal strength (most GPS devices or apps have a diagnostic screen showing this). Test in various conditions if possible – stationary, moving slowly, and in areas you frequently drive. Only when you’re satisfied with the signal strength should you proceed with permanent installation.
- Clean the Surface Thoroughly: For adhesive-backed antennas, the surface must be impeccably clean, dry, and free of grease or wax. Use an isopropyl alcohol wipe to prepare the area, allowing it to dry completely. A clean surface ensures maximum adhesion and prevents the antenna from coming loose due to vibrations.
- Plan Cable Routing: Visualize the entire cable path from the antenna to the GPS receiver. Identify where the cable will run (e.g., under trim, along the headliner, through the firewall) to keep it hidden, protected, and clear of moving parts (like pedals or seat mechanisms) and high-heat areas. Avoid tight bends or kinks in the cable, as this can damage the internal conductors and reduce signal quality.
- Secure the Antenna: Once placed, ensure the antenna is firmly secured. For adhesive mounts, press it down firmly for at least 30 seconds. For magnetic mounts, ensure good metal-to-metal contact. A loosely mounted antenna can shift, degrade performance, or become a rattling nuisance.
Avoiding Common Pitfalls
Even with the best intentions, certain mistakes are frequently made during GPS antenna installation. Being aware of these can help you sidestep common issues:
- Metallic Window Tinting: This is a silent killer of GPS signals. Many aftermarket window tints contain metallic particles that effectively block or severely attenuate GPS signals. If your car has tinted windows, avoid placing the antenna directly under them, even if it looks like a clear view of the sky. Always test thoroughly if you suspect metallic tinting.
- Proximity to Other Electronics (EMI): As mentioned earlier, other electronic devices can emit electromagnetic interference. Keep the GPS antenna a reasonable distance (at least several inches) from infotainment screens, phone chargers, dash cams, radar detectors, and other active electronic components to minimize signal disruption.
- Airbag Interference: Never, under any circumstances, place the GPS antenna or route its cable in a manner that could interfere with the deployment path of airbags (side, curtain, or passenger airbags). This is a critical safety concern. Refer to your vehicle’s manual for airbag locations and clearances.
- Heat Exposure: While antennas are built to withstand some heat, prolonged direct exposure to intense sunlight (e.g., baking on a dashboard in a hot climate) can accelerate the degradation of plastic casings and internal components. If possible, opt for a location that offers some shade or ventilation.
- Crushing/Kinking Cables: Routing cables under carpets or through tight spaces without proper protection can lead to crushing or kinking, damaging the internal wiring and causing signal loss. Use cable ties, wire looms, and appropriate tools to route cables safely and cleanly.
Troubleshooting Poor Signal
Despite careful installation, you might occasionally encounter poor GPS signal performance. Here’s a systematic approach to troubleshooting:
- Re-evaluate Placement: The first step is always to re-examine the antenna’s location. Has anything changed around it? Is it still in an optimal position for line of sight? Try temporarily moving it slightly to another nearby spot to see if signal improves.
- Check Connections: Ensure all cable connections are snug and secure, both at the antenna end and at the GPS receiver/device. A loose connection is a common cause of signal problems.
- Inspect Cable for Damage: Carefully trace the entire length of the coaxial cable. Look for any visible signs of damage, cuts, kinks, or extreme bends. If damage is found, the cable may need to be replaced.
- Minimize Interference Sources: Systematically turn off other electronic devices in the car (e.g., dashcam, phone charger, infotainment system) one by one to see if the signal improves. This can help isolate an EMI source.
- Test with an External Antenna (if applicable): If your device supports it, temporarily connecting a known good external antenna and placing it on the roof can help determine if the issue is with your current internal antenna or the receiver itself.
- Consider Antenna Upgrade: If your antenna is old or a basic model, or if your vehicle presents unique signal challenges (e.g., heavily metallic construction), upgrading to a higher-quality, more sensitive antenna (or even an external one) might be necessary.
- Software/Firmware Check: Ensure your GPS device’s software or firmware is up to date, as updates can sometimes improve signal acquisition algorithms.
Conclusion
The effective installation of a GPS antenna in your car is more than just a technical task; it’s a critical step in unlocking the full potential of your vehicle’s navigation, tracking, and security systems. While the allure of plug-and-play simplicity is strong, a thoughtful approach to antenna placement can mean the difference between frustrating signal dropouts and consistently reliable performance.
By understanding the fundamental principles of GPS signal reception, diligently considering optimal mounting locations like the dashboard, rear deck, or even exterior positions, and meticulously following pre-installation and troubleshooting best practices, you empower yourself to achieve superior results. Remember the golden rules: prioritize an unobstructed line of sight to the sky, rigorously minimize electromagnetic and metallic interference, and always test your setup before committing to a permanent fixture.
Whether you’re enhancing a personal vehicle or outfitting an entire fleet, investing a little time and effort into proper GPS antenna installation will yield significant dividends in accuracy, reliability, and peace of mind. Embrace these guidelines, and transform your in-car tech experience from merely functional to truly exceptional.
aViewFromTheCave is a participant in the Amazon Services LLC Associates Program, an affiliate advertising program designed to provide a means for sites to earn advertising fees by advertising and linking to Amazon.com. Amazon, the Amazon logo, AmazonSupply, and the AmazonSupply logo are trademarks of Amazon.com, Inc. or its affiliates. As an Amazon Associate we earn affiliate commissions from qualifying purchases.