In the dynamic world of computing, where graphical fidelity and processing speed are paramount, the performance of your graphics card plays a critical role. For users leveraging NVIDIA GPUs, maintaining updated drivers isn’t just good practice; it’s a necessity for unlocking the full potential of their hardware. Whether you’re a hardcore gamer seeking the highest frame rates, a professional designer demanding seamless rendering, or a casual user simply wanting a stable system, outdated graphics drivers can be a bottleneck, leading to performance drops, stability issues, and even missing out on critical new features.
NVIDIA, a pioneer in GPU technology, consistently releases driver updates designed to enhance performance, introduce new functionalities, fix bugs, and improve compatibility with the latest games and software. These updates are a crucial part of the ongoing evolution of your PC’s capabilities. Ignoring them is akin to driving a high-performance car with worn-out tires – you simply won’t get the best experience. This comprehensive guide will walk you through the essential steps and methods to ensure your NVIDIA graphics drivers are always up-to-date, providing you with a smoother, faster, and more reliable computing experience.
Why Keeping Your NVIDIA Drivers Updated Matters
The phrase “don’t fix what isn’t broken” often holds true in technology, but when it comes to graphics drivers, it’s a perilous philosophy. Graphics drivers are the software bridge between your operating system, applications, and your NVIDIA GPU. This bridge is constantly being refined and fortified by NVIDIA’s engineers, and neglecting these updates can have several detrimental effects on your system’s performance and stability. Understanding these reasons is the first step towards appreciating the importance of regular driver maintenance.
Enhanced Gaming Performance and Stability
For PC gamers, this is perhaps the most compelling reason. Every major game release often comes with an accompanying “Game Ready Driver” from NVIDIA. These drivers are meticulously optimized to deliver the best possible frame rates, reduce stuttering, and eliminate visual glitches specific to those new titles. Without them, you might experience lower FPS, inconsistent performance, or even graphical artifacts that detract from your gaming experience. Furthermore, updated drivers often contain stability fixes that prevent crashes and freezes, ensuring your gaming sessions are uninterrupted. It’s not uncommon for a driver update to provide a significant performance boost in certain games, turning a choppy experience into a silky-smooth one.
Access to New Features and Technologies
NVIDIA is at the forefront of graphics innovation, constantly introducing groundbreaking technologies like DLSS (Deep Learning Super Sampling), Ray Tracing, and NVIDIA Reflex. These features, which revolutionize visual fidelity and reduce input lag, are often not accessible without the latest drivers. A new driver might enable support for a novel display technology, unlock capabilities for professional applications, or provide better integration with VR headsets. By keeping your drivers current, you ensure your hardware can utilize these cutting-edge advancements, future-proofing your system to some extent and expanding its functional repertoire.
Crucial Bug Fixes and Security Patches
Like any complex software, graphics drivers can contain bugs. These might manifest as minor annoyances, such as flickering textures, or major problems like system crashes (often indicated by a “Blue Screen of Death” on Windows). NVIDIA regularly identifies and patches these bugs through driver updates. Beyond functionality, security is also a concern. Vulnerabilities can occasionally be found in driver software, which, if exploited, could potentially compromise your system. Driver updates often include critical security patches that safeguard your PC from potential threats, making them a vital part of your overall digital security strategy.
Improved Compatibility with Latest Software and Hardware
As operating systems evolve, new applications are released, and new hardware components hit the market, graphics drivers need to adapt. An outdated driver might struggle to interface correctly with a new version of Windows, a recently installed piece of peripheral hardware, or the latest version of a demanding professional application like a video editor or CAD software. Updating your drivers ensures broad compatibility, preventing conflicts and ensuring all components of your system and software ecosystem can communicate efficiently, leading to a more stable and reliable computing environment overall.
Before You Begin: Essential Preparations
Before diving into the driver update process, a few preparatory steps can save you significant headaches. These steps ensure a smooth installation and provide a safety net should anything go awry. Taking a moment to prepare can differentiate between a quick update and a prolonged troubleshooting session.
Identify Your NVIDIA Graphics Card Model
Knowing your exact NVIDIA graphics card model is paramount. Drivers are specific to GPU series and sometimes even individual models. Installing the wrong driver can lead to errors, instability, or even render your display non-functional.
- For Windows 10/11: Right-click on your desktop and select “NVIDIA Control Panel.” In the control panel, click “System Information” in the bottom-left corner. Your GPU model will be listed under “Display.”
- Alternatively, press
Windows Key + R, typedxdiag, and press Enter. Go to the “Display” tab, and your graphics card model will be listed under “Device.” - If you have GeForce Experience installed, open it, go to the “Drivers” tab, and you’ll usually see your GPU model.
Back Up Your System (Optional but Recommended)
While driver updates are generally safe, there’s always a slim chance of unforeseen issues. Creating a system restore point or a full system backup before a major driver update is a highly recommended precautionary measure. If the new driver causes instability, a black screen, or other serious problems, you can easily revert your system to its previous working state.
- System Restore Point (Windows): Search for “Create a restore point” in the Windows search bar, open the System Properties window, and click “Create…”. Follow the prompts to name and create the restore point.
Ensure a Stable Internet Connection
Downloading large driver files requires a stable internet connection. Interruptions during the download process can corrupt the driver package, leading to installation failures. If you’re using Wi-Fi, ensure you’re in a strong signal area, or consider using an Ethernet connection for added stability.
Close All Running Applications
Before initiating the driver installation, close all open applications, especially games, video players, and resource-intensive software. These applications might be using the graphics card, and having them open can interfere with the installation process, potentially causing errors or requiring a system restart before the update can complete. A clean installation environment helps prevent conflicts and ensures the driver can fully integrate with your system.
Method 1: The NVIDIA GeForce Experience Application (Recommended for Gamers)
For the vast majority of NVIDIA users, especially gamers, the GeForce Experience application is the easiest and most convenient way to keep drivers updated. This utility not only manages your drivers but also optimizes game settings, captures gameplay, and streams to various platforms.
Installing GeForce Experience (if not already present)
If you’ve recently built a PC or reinstalled Windows, you might not have GeForce Experience. It’s available for free download from NVIDIA’s official website. Simply navigate to the NVIDIA GeForce Experience page, download the installer, and follow the on-screen prompts. The installation is straightforward and usually only takes a few minutes. Make sure to choose “Express Installation” unless you have specific reasons for a custom setup.
Checking for Driver Updates through GeForce Experience
Once GeForce Experience is installed and launched:
- Open GeForce Experience: You can find it in your Windows Start Menu or by right-clicking the NVIDIA icon in your system tray and selecting “NVIDIA GeForce Experience.”
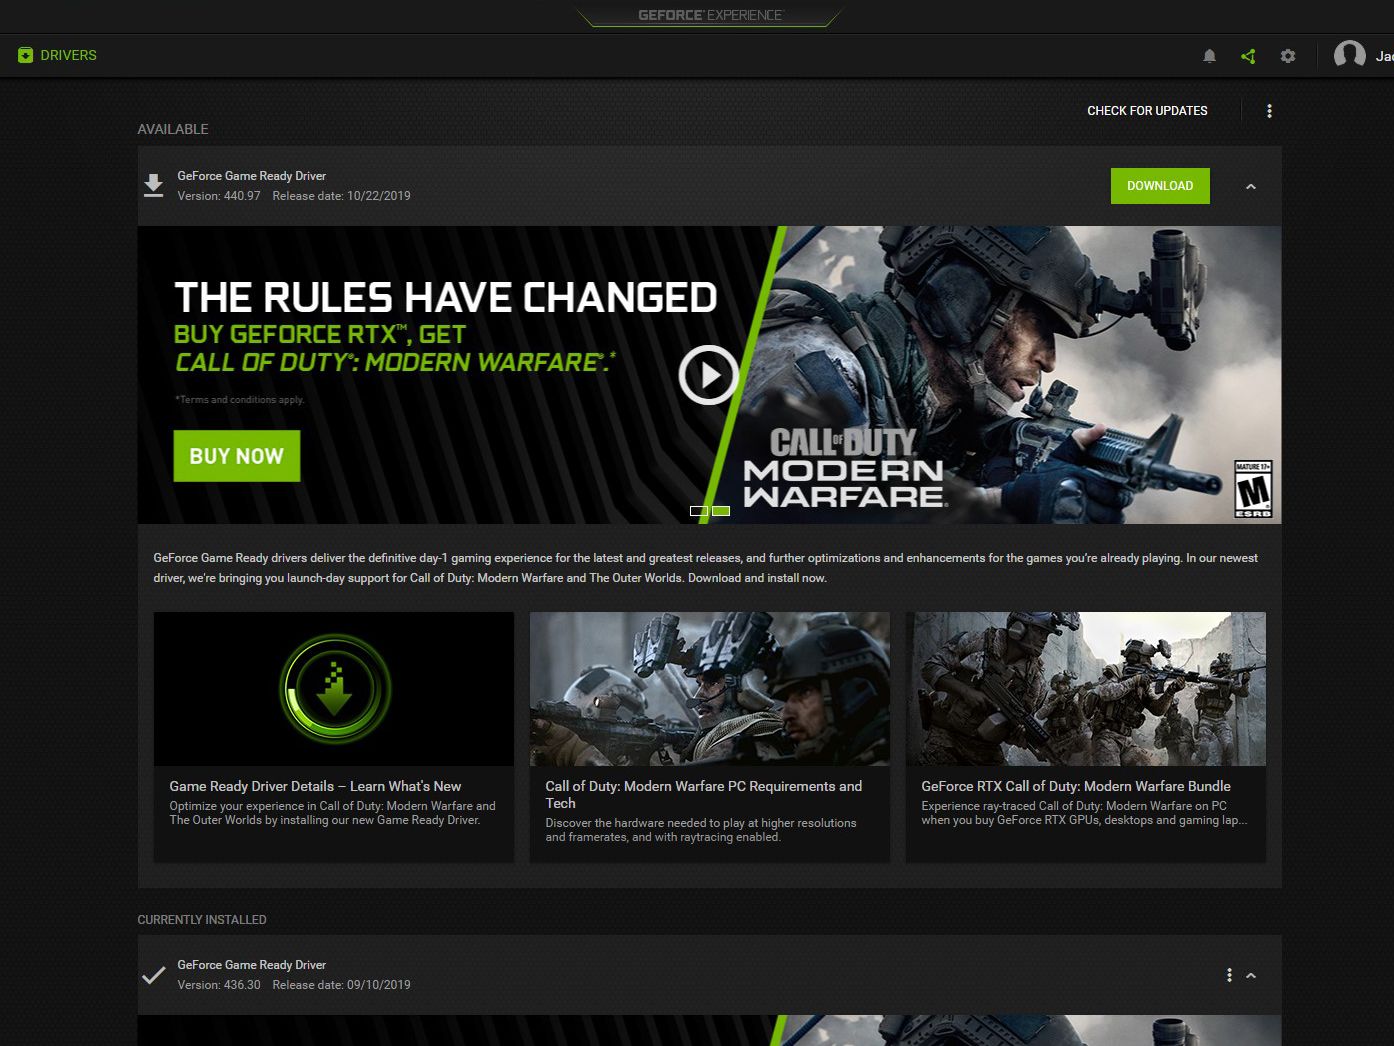
- Navigate to the Drivers Tab: In the top-left corner of the application window, click on the “Drivers” tab.
- Check for Updates: GeForce Experience will automatically check for available driver updates. If a new driver is available, you’ll see a notification and a “Download” button.
- Download the Driver: Click “Download” to begin downloading the latest driver package. The size can vary, so allow some time for this process to complete depending on your internet speed.
Performing a Standard or Custom Installation
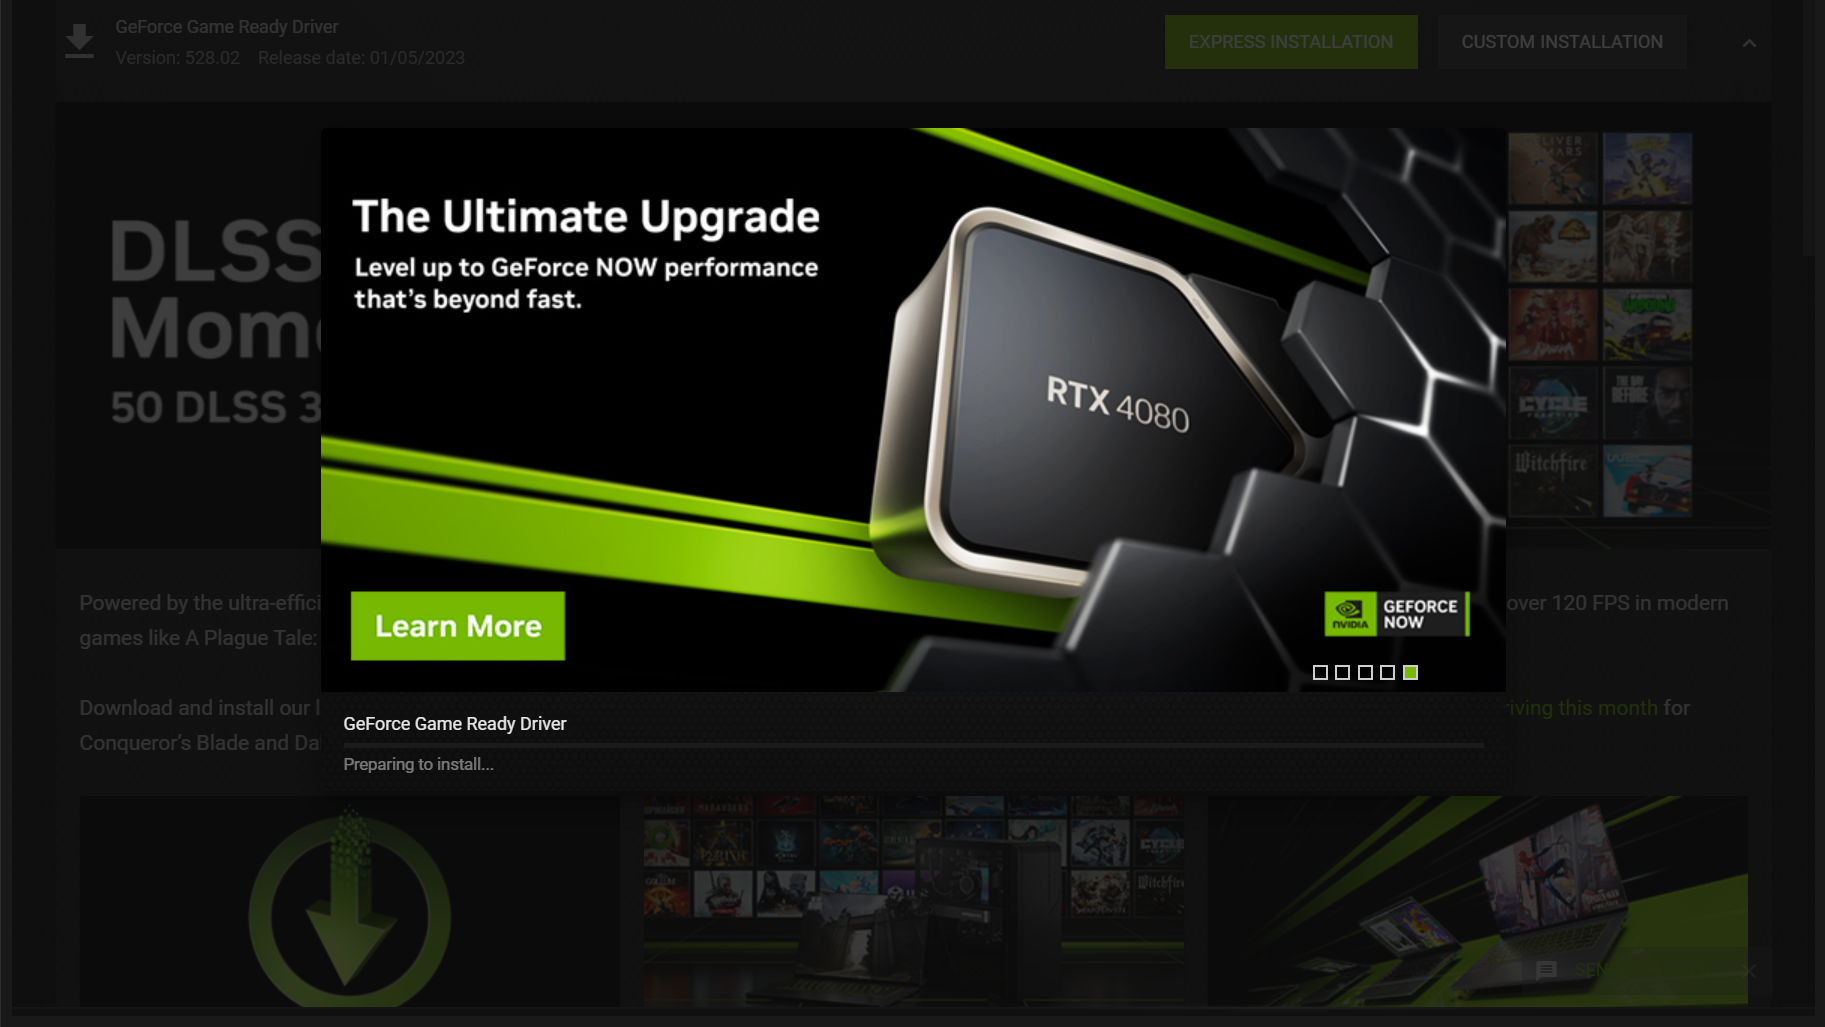
After the download is complete, you’ll be presented with two installation options:
- Express Installation (Recommended for most users): This is the easiest option. GeForce Experience will automatically install the new driver over your existing one, typically requiring a quick screen flicker or a system restart. It installs all necessary components.
- Custom Installation (For advanced users or troubleshooting): This option allows you to select specific components to install and offers the crucial “Perform a Clean Installation” checkbox. A clean installation completely removes all previous driver files and settings before installing the new ones, which is highly recommended if you’re experiencing issues with your current drivers or want to ensure a pristine driver environment. If you choose Custom, make sure to check “Perform a Clean Installation” for the best results, especially if you’re upgrading from a much older driver or troubleshooting performance issues.
Follow the on-screen instructions to complete the installation. Your screen may flicker or go black briefly during the process; this is normal.
Post-Installation Verification
Once the installation is complete, GeForce Experience will usually confirm the successful update. To double-check:
- Go back to the “Drivers” tab in GeForce Experience. It should now show “You have the latest Game Ready Driver.”
- Alternatively, open the NVIDIA Control Panel and check the “System Information” to see the newly installed driver version.
- Consider restarting your computer, even if not prompted, to ensure all changes are fully applied.
Method 2: Manual Driver Download from NVIDIA’s Website (For Advanced Users or Troubleshooting)
While GeForce Experience offers convenience, manually downloading drivers from NVIDIA’s website provides more control and is essential for users who prefer not to use GeForce Experience, are troubleshooting specific issues, or are building a system from scratch.
Navigating to NVIDIA’s Driver Download Page
- Open your web browser and go to the official NVIDIA driver download page. This is typically
www.nvidia.com/drivers. - You’ll see a section titled “Manual Driver Search.”
Selecting Your Product Type, Series, Model, and Operating System
This step requires accurate information about your GPU, which you identified earlier:
- Product Type: Select “GeForce” for consumer graphics cards, or “Quadro” if you have a professional workstation GPU.
- Product Series: Choose the series corresponding to your card (e.g., GeForce RTX 40 Series, GeForce GTX 16 Series).
- Product: Select your specific GPU model (e.g., RTX 4090, GTX 1660 SUPER).
- Operating System: Choose your exact Windows version (e.g., Windows 10 64-bit, Windows 11).
- Download Type: Usually “Game Ready Driver (GRD)” is selected, but “Studio Driver (SD)” is available for creative professionals who prioritize stability over the absolute latest gaming optimizations.
- Language: Select your preferred language.
Downloading the Latest Driver Package
After making your selections, click “Search.” NVIDIA will display the latest compatible driver.
- Review the details: Check the release date and driver version to ensure it’s the one you want.
- Click “Download”: This will take you to a confirmation page. Click “Download” again to start the download. The file will be an executable (.exe) file.
Running the Installer and Following Prompts
Once the download is complete:
- Locate the downloaded .exe file (usually in your “Downloads” folder) and double-click it to run the installer.
- Extraction: The installer will first extract the files to a temporary location. You can usually accept the default location.
- User Account Control (UAC): If prompted by UAC, click “Yes” to allow the installer to make changes to your device.
- License Agreement: Read and accept the NVIDIA software license agreement.
- Installation Options: This is where you choose between “Express (Recommended)” and “Custom (Advanced).”
- Express: Installs all components automatically. Good for most users.
- Custom: Gives you control over which components (e.g., PhysX, HD Audio Driver, GeForce Experience) are installed. Crucially, the “Custom” option allows you to select “Perform a clean installation.” As mentioned before, a clean installation is highly recommended to prevent conflicts and ensure optimal performance, especially if you’re upgrading from an old driver or troubleshooting.
- Follow the remaining prompts to complete the installation. Your screen may flicker or temporarily go black.
- Restart your PC when prompted, or manually restart if not prompted, to finalize the installation.
Method 3: Using Windows Device Manager (Least Recommended for Feature Updates)
While Windows Device Manager offers a way to update drivers, it’s generally the least recommended method for NVIDIA graphics drivers. It’s more suitable for basic hardware recognition or troubleshooting generic driver issues, not for obtaining the latest performance optimizations or new features from NVIDIA.
Accessing Device Manager
- Right-click the Start button (or press
Windows Key + X). - Select “Device Manager” from the context menu.
Locating Your Display Adapter
- In the Device Manager window, expand the “Display adapters” section.
- You should see your NVIDIA graphics card listed there (e.g., NVIDIA GeForce RTX 3070).
Updating Driver Software Automatically
- Right-click on your NVIDIA graphics card.
- Select “Update driver.”
- Choose “Search automatically for updated driver software.”
Windows will then attempt to find a newer driver online or from local files. Often, it will simply state that “The best drivers for your device are already installed,” even if NVIDIA has a newer version available on its website. This is because Windows Update often provides only WHQL (Windows Hardware Quality Labs) certified drivers, which can sometimes lag behind NVIDIA’s latest Game Ready or Studio releases.
Limitations of This Method
- Outdated Drivers: Windows Update might not provide the absolute latest drivers from NVIDIA, meaning you could miss out on performance enhancements, bug fixes, and new features.
- Lack of Control: You cannot perform a “clean installation” using this method, which can leave remnants of old drivers and potentially cause issues.
- No GeForce Experience Integration: This method doesn’t install GeForce Experience, which is useful for game optimization and other NVIDIA utilities.
This method should only be used as a last resort, for basic troubleshooting, or if you explicitly want to stick to Windows-provided drivers for extreme stability (though NVIDIA’s official drivers are generally stable and recommended).
Troubleshooting Common Issues After an Update
Even with the best preparation, sometimes issues can arise after a driver update. Knowing how to troubleshoot these common problems can help you quickly resolve them and get back to optimal performance.
Display Problems (Black Screen, Resolution Issues, Flickering)
- Black Screen: If your screen goes black and stays black, it might indicate a driver incompatibility or a corrupted installation. Try rebooting your PC. If it still doesn’t display, boot into Safe Mode (search online for how to do this for your Windows version), then uninstall the problematic driver via Device Manager and try reinstalling the previous working driver or a known stable version.
- Incorrect Resolution/Flickering: Right-click on your desktop, go to “Display settings,” and verify your resolution and refresh rate are correct. Ensure your monitor is using its native resolution. If flickering persists, try a clean installation of the driver (Method 1 or 2, using the “Perform a clean installation” option).
Game Crashes or Performance Drops
- Reboot: Often, a simple restart can resolve temporary glitches.
- Clean Installation: If games are crashing or performing worse, it’s a strong indicator that the driver update wasn’t clean. Go back and perform a “Custom” installation with the “Perform a clean installation” option checked.
- Roll Back Driver: If the new driver consistently causes issues in specific games, it might be an isolated bug. You can roll back to your previous stable driver version (explained below).
- Check Game Updates: Ensure the game itself is also updated to its latest version, as games sometimes require specific driver versions for optimal compatibility.
Driver Installation Failures
- Antivirus/Firewall: Temporarily disable your antivirus or firewall software, as they can sometimes interfere with driver installations. Remember to re-enable them afterward.
- Download Corruption: Redownload the driver file from NVIDIA’s website. A corrupted download can lead to installation errors.
- System Requirements: Double-check that your operating system and GPU model are correctly selected for the driver you are trying to install.
- Administrative Privileges: Ensure you are running the installer as an administrator (right-click the .exe file and select “Run as administrator”).
Rolling Back to a Previous Driver Version
If a new driver causes persistent problems, Windows allows you to roll back to the previously installed driver:
- Open Device Manager.
- Expand “Display adapters” and right-click on your NVIDIA graphics card.
- Select “Properties.”
- Go to the “Driver” tab.
- Click “Roll Back Driver.” If this option is grayed out, Windows does not have a previous driver version to revert to, in which case you’ll need to manually download and install an older, known-stable driver from NVIDIA’s website.

Conclusion
Keeping your NVIDIA graphics drivers updated is a fundamental aspect of PC maintenance that yields significant benefits in performance, stability, and access to new technologies. From the seamless convenience of GeForce Experience to the granular control of manual downloads, NVIDIA provides multiple pathways to ensure your GPU is running at its peak. While the process is generally straightforward, understanding the ‘why’ behind each update and being prepared for potential troubleshooting scenarios will empower you to manage your system with confidence.
By regularly updating your drivers, you’re not just performing a chore; you’re actively optimizing your investment, enhancing your gaming experiences, boosting your professional productivity, and safeguarding your system from potential vulnerabilities. Make driver updates a routine part of your computing regimen, and enjoy the smooth, high-fidelity world that your NVIDIA GPU was designed to deliver.
aViewFromTheCave is a participant in the Amazon Services LLC Associates Program, an affiliate advertising program designed to provide a means for sites to earn advertising fees by advertising and linking to Amazon.com. Amazon, the Amazon logo, AmazonSupply, and the AmazonSupply logo are trademarks of Amazon.com, Inc. or its affiliates. As an Amazon Associate we earn affiliate commissions from qualifying purchases.