In the ever-evolving world of PC gaming, professional design, and demanding computational tasks, your graphics card is the beating heart of visual performance. At the core of unleashing its full potential are the NVIDIA drivers – the crucial software that allows your operating system to communicate effectively with your NVIDIA Graphics Processing Unit (GPU). While automated driver updates are increasingly common and convenient, there are critical scenarios where taking the reins and performing a manual installation becomes not just beneficial, but essential.
This comprehensive guide will walk you through the process of manually installing NVIDIA drivers, offering you unparalleled control over your system’s performance and stability. Whether you’re troubleshooting persistent issues, aiming for peak gaming performance, or simply prefer a pristine, conflict-free driver setup, mastering manual installation is a valuable skill for any PC enthusiast. We’ll demystify the steps, from identifying your hardware and preparing your system to executing the installation and verifying its success, ensuring you get the most out of your powerful NVIDIA hardware.
Understanding NVIDIA Drivers and Why Manual Installation Matters
Before diving into the practical steps, it’s crucial to understand what NVIDIA drivers are and why you might choose a manual installation over the more common automated methods. This foundational knowledge empowers you to make informed decisions about your system’s maintenance.
What are NVIDIA Drivers?
NVIDIA drivers are specialized software packages that serve as the vital link between your computer’s operating system (like Windows) and your NVIDIA graphics card. Think of them as translators: they interpret commands from applications and games, translating them into instructions that your GPU can understand and execute. Without the correct and up-to-date drivers, your graphics card cannot function optimally, leading to poor performance, visual glitches, crashes, or even complete display failure.
These drivers are constantly updated by NVIDIA to introduce performance optimizations for new games and applications, fix bugs, enhance stability, and add support for new technologies. Each driver release is meticulously engineered to squeeze more power, efficiency, and reliability from your hardware.
When to Opt for Manual Installation?
While automated tools like NVIDIA’s GeForce Experience or Windows Update often handle driver installations in the background, there are several compelling reasons why a manual approach is often superior, especially for discerning users:
- Troubleshooting Performance Issues: If you’re experiencing stuttering, low frame rates, or visual artifacts in games and applications, a clean manual driver installation is often the first and most effective troubleshooting step. It ensures no corrupted files or conflicting settings from previous installations are interfering.
- Resolving Driver Conflicts: Old or partially uninstalled drivers can leave behind remnants that clash with new installations, leading to instability. A manual “clean install” procedure (which we’ll detail) completely purges all previous driver components, providing a fresh start.
- Specific Driver Version Requirements: Some users might need a particular driver version for compatibility with legacy software, professional applications, or to avoid issues introduced in newer drivers. Manual installation allows you to choose and install any compatible version.
- Bypassing Windows Update Issues: Windows Update sometimes pushes older or generic graphics drivers that can override your desired NVIDIA drivers, leading to performance degradation or feature loss. Manual installation, combined with temporary disabling of Windows Update, prevents this interference.
- Maximizing Stability and Performance: For serious gamers and professionals, a clean, manually installed driver ensures the system is running the intended, optimized version without any residual clutter that might subtly impact performance or introduce latency.
- Offline Installation: If your system lacks internet access or has unreliable connectivity, downloading drivers on another machine and installing them manually is the only option.
Advantages and Disadvantages of Manual Installation
Understanding the pros and cons helps manage expectations and mitigate potential risks.
Advantages:
- Complete Control: You decide precisely which driver version to install and when.
- Enhanced Stability: A clean installation minimizes conflicts and can resolve persistent system instability.
- Optimal Performance: Ensures no lingering files are hindering your GPU’s peak performance.
- Troubleshooting Power: A go-to solution for fixing a wide array of graphics-related problems.
- Customization: Allows for selective installation of components like GeForce Experience, PhysX, etc.
Disadvantages:
- Time-Consuming: The process involves several steps, including identification, download, uninstall, and install.
- Risk of Errors: Incorrectly identifying your GPU or downloading the wrong driver can lead to system instability or even a non-booting system.
- Requires Attention to Detail: Missing a step or performing it incorrectly can negate the benefits or create new problems.
- Potentially Requires Safe Mode: For a truly clean uninstall, you might need to boot into Windows Safe Mode, which can be an extra step for some users.
Despite the potential complexities, the benefits of a manual, clean NVIDIA driver installation often outweigh the drawbacks, particularly for users seeking peak performance and system stability.
Pre-Installation Checklist: Preparing Your System
Preparation is paramount for a smooth and successful manual NVIDIA driver installation. Skipping these crucial preliminary steps can lead to frustrating issues or even system instability. Think of this as laying a solid foundation before building.
Identifying Your NVIDIA GPU
The first and most critical step is accurately identifying your NVIDIA graphics card model. Installing the wrong driver can cause serious compatibility issues.
Here’s how to find it:
- Device Manager (Windows):
- Right-click on the Start button and select “Device Manager.”
- Expand the “Display adapters” section.
- Your NVIDIA GPU model (e.g., NVIDIA GeForce RTX 3080) will be listed there. Note it down precisely.
- NVIDIA Control Panel:
- Right-click on your desktop and select “NVIDIA Control Panel.”
- In the bottom-left corner, click “System Information.”
- Look under the “Display” tab for your “Graphics card information.”
- Third-Party Tools (e.g., Speccy, HWiNFO): These free utilities provide detailed hardware information, including your GPU model, often with more specific details than Device Manager. They are useful for comprehensive system overviews.
In addition to the GPU model, you’ll also need to know your operating system (e.g., Windows 10, Windows 11) and whether it’s 64-bit. Most modern systems are 64-bit, but you can check by going to Start > Settings > System > About, and looking under “System type.”
Downloading the Correct Drivers
Once you have your GPU model and OS details, head to the official NVIDIA website to download the drivers.
- Visit the Official NVIDIA Driver Download Page: Navigate to
www.nvidia.com/drivers. - Use the Manual Driver Search:
- Product Type: Select “GeForce” (for consumer GPUs), “Quadro” (for professional GPUs), or “NVIDIA RTX / Data Center” as appropriate.
- Product Series: Choose your card’s series (e.g., “GeForce RTX 30 Series”).
- Product: Select your specific GPU model (e.g., “GeForce RTX 3080”).
- Operating System: Select your exact Windows version and architecture (e.g., “Windows 10 64-bit,” “Windows 11 64-bit”).
- Download Type: Generally, “Game Ready Driver (GRD)” is for gamers, while “Studio Driver (SD)” is for creators and professionals who prioritize stability for their applications. Choose based on your primary use.
- Language: Select your preferred language.
- Search and Download: Click “Search,” then “Download.” Make sure to save the executable file to a location you can easily find, like your Downloads folder or Desktop.
Critical Tip: Never download drivers from unofficial sources. Always use the official NVIDIA website to avoid malware or incompatible software.
Backing Up Your System (Crucial Step)
This step cannot be overstated. While manual driver installation is generally safe, unexpected issues can arise. A system backup provides a safety net, allowing you to revert your system to a previous, stable state if anything goes wrong.
Methods for backing up:
- Create a System Restore Point (Windows):
- Search for “Create a restore point” in the Windows search bar and open it.
- Ensure “Protection” is “On” for your system drive (usually C:).
- Click “Create…” and give your restore point a descriptive name (e.g., “Before NVIDIA Driver Install”).
- This allows you to roll back system changes if issues occur.
- Full System Image Backup: For more comprehensive protection, consider creating a full system image using Windows’ built-in backup tools or third-party software. This backs up your entire operating system, applications, and files.
Uninstalling Previous Drivers (Clean Slate)
To ensure a truly clean installation and prevent conflicts, it’s highly recommended to completely remove all previous NVIDIA driver components. This is where a dedicated tool shines.
- Download Display Driver Uninstaller (DDU): DDU is a free, third-party utility specifically designed to thoroughly remove graphics card drivers from your system. Download it from its official source (often Guru3D).
- Boot into Safe Mode:
- DDU works best in Windows Safe Mode to prevent Windows from loading any graphics drivers during the uninstall process.
- Go to Start > Settings > System > Recovery. Under “Recovery options,” click “Restart now” next to “Advanced startup.”
- After restarting, select “Troubleshoot” > “Advanced options” > “Startup Settings” > “Restart.”
- Upon the next restart, press
F4or4to enter “Enable Safe Mode.”
- Run DDU in Safe Mode:
- Extract the DDU archive and run
Display Driver Uninstaller.exe. - Select “GPU” and then “NVIDIA” from the dropdown menus.
- Choose the “Clean and restart” option. DDU will meticulously remove all NVIDIA driver traces and then reboot your system into normal mode.
- Your display resolution might be very low upon restarting – this is normal, as no graphics drivers are currently installed.
- Extract the DDU archive and run
Disabling Automatic Updates (Temporary Measure)
Windows Update can sometimes automatically download and install an older or generic NVIDIA driver as soon as it detects a lack of display drivers. This can interfere with your manual installation.
- Disconnect from the Internet: The easiest way to prevent Windows Update interference is to temporarily disconnect your computer from the internet (unplug Ethernet cable or disable Wi-Fi) before and during the installation process.
- Disable Windows Update (Advanced): For more persistent issues or if disconnecting is not feasible, you can temporarily disable Windows Update services. However, this is generally overkill for just a driver install and disconnecting is simpler.
- Search for “Services” in Windows.
- Find “Windows Update,” right-click it, and select “Stop.” You can also set its “Startup type” to “Disabled” temporarily, but remember to re-enable it later.
With these preparatory steps completed, your system is now primed for a clean, manual NVIDIA driver installation.
Step-by-Step Guide: Manual NVIDIA Driver Installation
Now that your system is thoroughly prepared, we can proceed with the actual installation of your newly downloaded NVIDIA drivers. This process is straightforward but requires attention to detail.
Running the Driver Installer
Locate the NVIDIA driver executable file you downloaded earlier (e.g., 537.42-desktop-win10-win11-64bit-international-dch-whql.exe).
- Execute the Installer: Double-click the driver file to start the installation process.
- Extraction Location: The installer will first ask you to select a directory for extracting the driver files. The default location is usually fine. Click “OK” or “Extract.” This process will unpack all the necessary files from the compressed installer package.
- System Compatibility Check: After extraction, the NVIDIA installer will perform a quick system compatibility check to ensure your hardware and operating system meet the driver requirements. If there are any issues (e.g., wrong OS version), you will be notified. Assuming everything is compatible, you’ll proceed to the license agreement.
- License Agreement: Read the NVIDIA Software License Agreement and click “Agree and Continue” to proceed.
Custom Installation Options Explained
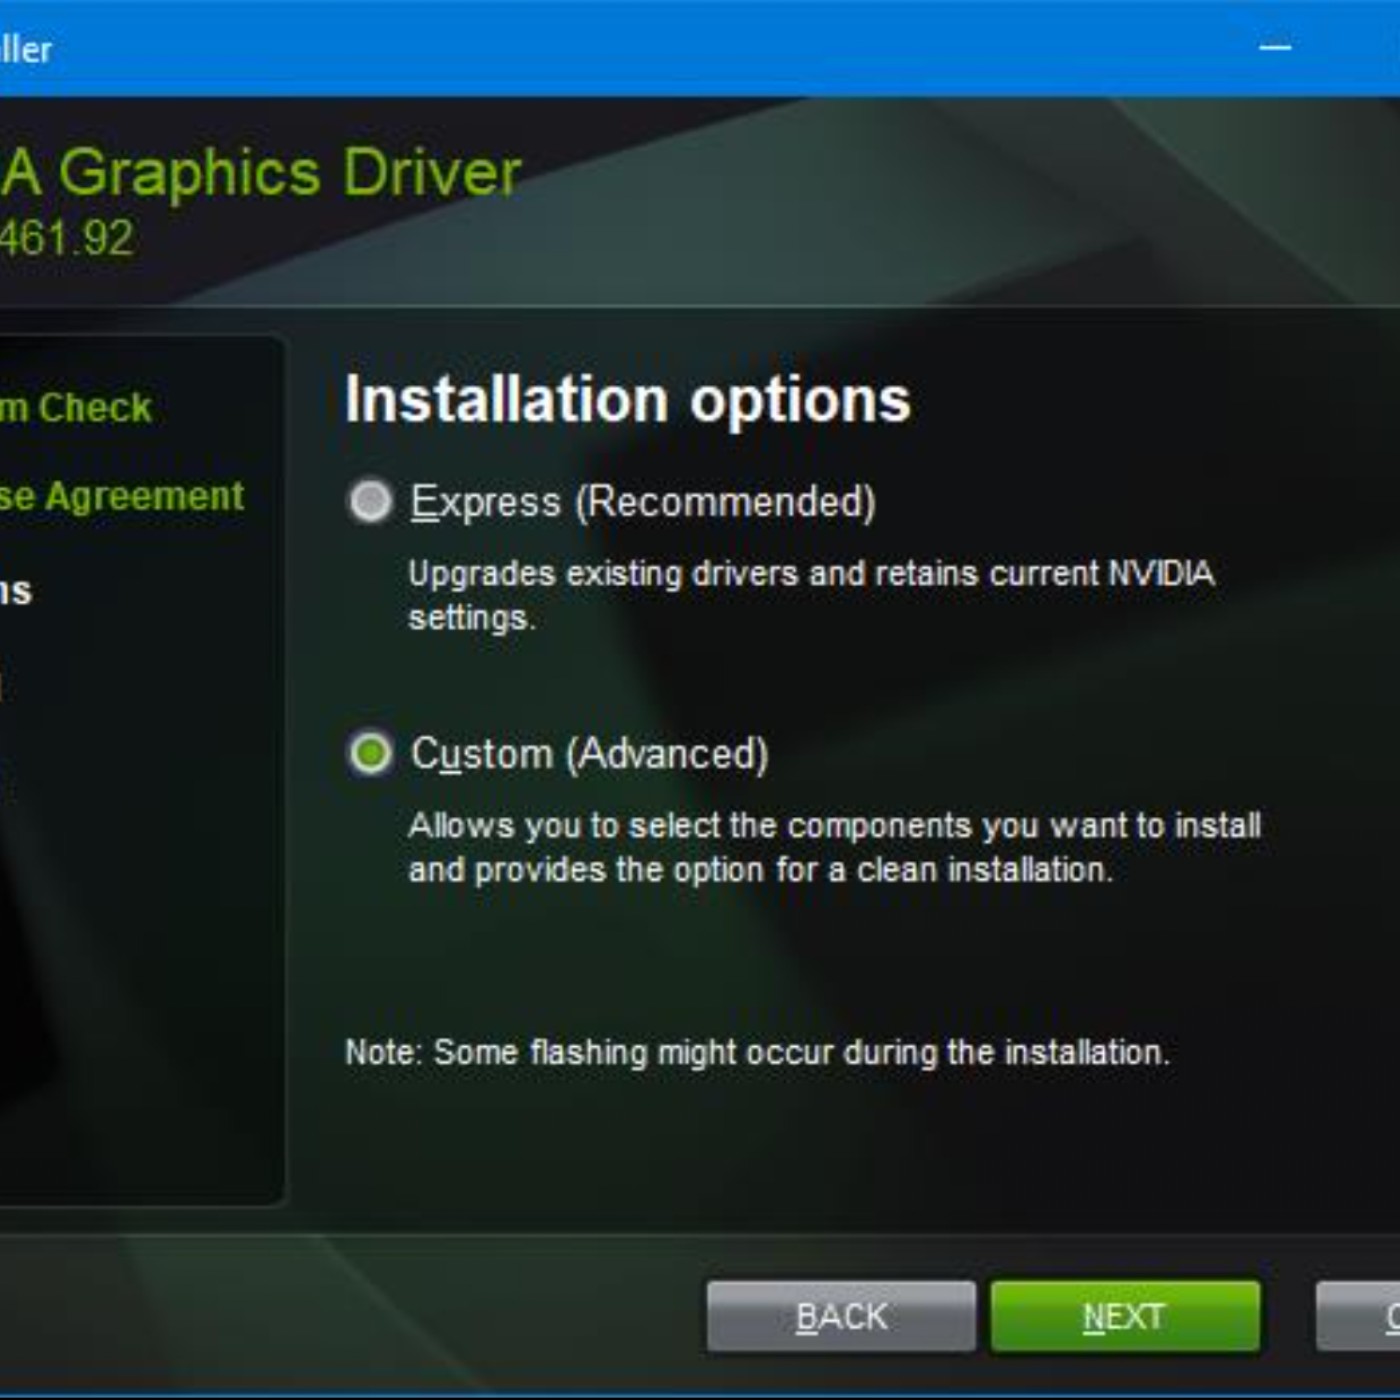
This is a critical juncture where you can decide on the type of installation. You’ll typically be presented with two main options: “Express” and “Custom (Advanced).”
- Choose “Custom (Advanced)”: For a manual, clean installation, always select “Custom (Advanced)” and click “Next.” While “Express” is faster, “Custom” provides the crucial “Perform a clean installation” option and allows you to deselect components you don’t need.
- Component Selection: In the Custom installation screen, you will see a list of components:
- Graphics Driver: This is the absolute essential component and must be selected.
- NVIDIA GeForce Experience: This utility provides game optimization settings, ShadowPlay (for recording gameplay), and keeps drivers up-to-date automatically. You can deselect this if you prefer a leaner installation or handle updates manually.
- NVIDIA PhysX System Software: Required by some games and applications for advanced physics simulations. It’s generally recommended to keep this installed.
- NVIDIA HD Audio Driver: Used for audio output through HDMI or DisplayPort from your graphics card. Keep it if you use your monitor’s speakers or route audio through your GPU to an AV receiver.
- NVIDIA USB Type-C Port Policy Driver (if applicable): For GPUs with a USB-C port, usually for VR headsets.
- NVIDIA Container: Core component for various NVIDIA services. Keep it.
- NVIDIA Platform Controllers and Framework: Another essential component for overall GPU functionality. Keep it.
- NVDisplay.Container.exe, Telemetry, and other less visible components: These are often bundled and not individually selectable, but are part of the core driver package.
- Crucial: Check “Perform a clean installation” box: Beneath the component list, you will see a checkbox labeled “Perform a clean installation.” Ensure this box is checked. This option tells the installer to remove any leftover files and registry entries from previous installations before installing the new drivers, ensuring a truly fresh and conflict-free setup. This is the primary reason for choosing “Custom.”
- Click “Next”: Once you’ve selected your desired components and, most importantly, checked “Perform a clean installation,” click “Next” to begin the installation.
Completing the Installation and Rebooting
The installation process will now commence.
- Installation Progress: You will see a progress bar indicating the installation status. During this phase, your screen may flicker, go black temporarily, or change resolution several times. This is perfectly normal as the system loads and unloads graphics drivers. Do not panic or interrupt the process.
- Installation Completion: Once the installation is complete, the installer will display a message confirming its success. You might also see a list of installed components.
- Reboot Your System: The installer will typically prompt you to restart your computer. It is crucial to reboot immediately after the installation is complete. A reboot finalizes the driver installation, loads all components correctly, and allows the new drivers to take full effect within the operating system. If it doesn’t prompt you, restart manually.
- Reconnect to the Internet (if disconnected): After your system has fully rebooted, you can safely reconnect to the internet.
Your NVIDIA drivers are now manually installed!
Post-Installation Verification and Troubleshooting
After the installation and reboot, it’s essential to verify that everything is working as expected. In case of issues, knowing how to troubleshoot them can save you a lot of headache.
Confirming Driver Installation
Several methods can confirm your new NVIDIA drivers are correctly installed and operational:
- Device Manager:
- Right-click on the Start button and select “Device Manager.”
- Expand “Display adapters.”
- Right-click on your NVIDIA GPU and select “Properties.”
- Go to the “Driver” tab. Check the “Driver Version” and “Driver Date” to ensure they match the version you just installed.
- NVIDIA Control Panel:
- Right-click anywhere on your desktop and select “NVIDIA Control Panel.”
- If it opens correctly and displays your GPU information, it’s a good sign.
- Click “System Information” in the bottom-left corner to confirm the driver version.
- Run a Game or Benchmark: The most practical test is to launch a demanding game or a graphics benchmark (e.g., 3DMark, Unigine Heaven). Monitor performance, frame rates, and check for any visual anomalies or crashes. If everything runs smoothly, your drivers are likely functioning perfectly.
Common Issues and Solutions
Even with careful preparation, issues can occasionally arise. Here are some common problems and their solutions:
- Black Screen After Reboot:
- Solution: This often indicates a critical driver incompatibility or a corrupted installation. Boot into Windows Safe Mode (as described in the DDU section). Once in Safe Mode, run DDU again to completely remove the problematic drivers. Then, attempt the manual installation process from scratch, double-checking you’ve downloaded the correct driver for your specific GPU and OS.
- Installer Fails or Crashes:
- Solution:
- Corrupted Download: The driver file itself might be corrupted. Delete it and re-download it from the official NVIDIA website.
- Antivirus Interference: Temporarily disable your antivirus software during the installation process. Remember to re-enable it afterward.
- System Integrity: Ensure your Windows installation is healthy. Run
sfc /scannowin an elevated Command Prompt to check for and repair corrupted system files.
- Solution:
- Low Resolution or Generic Display Driver:
- Solution: This typically happens if the NVIDIA driver failed to install correctly, or if Windows Update immediately installed a generic driver. Re-run the NVIDIA installer. If the problem persists, perform a clean uninstall with DDU in Safe Mode, disconnect from the internet, and then reattempt the manual installation.
- Performance Issues or Crashes in Games:
- Solution: Even after a seemingly successful installation, you might encounter performance issues.
- Reinstall Cleanly: Perform another clean installation using DDU in Safe Mode, ensuring “Perform a clean installation” is checked in the custom installer.
- Check GPU Temperature: Overheating can cause performance issues. Use monitoring software (e.g., MSI Afterburner, HWMonitor) to check your GPU temperatures under load.
- Roll Back Driver: If the new driver causes issues, consider rolling back to a previous, known stable driver version. You can find older drivers on NVIDIA’s website under “BETA AND LEGACY DRIVERS” or by selecting your product and browsing older releases.
- Solution: Even after a seemingly successful installation, you might encounter performance issues.
- NVIDIA Control Panel Missing or Not Opening:
- Solution: This indicates the Control Panel component either wasn’t installed or is corrupted.
- Re-run the NVIDIA driver installer, selecting “Custom” and ensuring all desired components (including the Display Driver) are checked.
- If GeForce Experience is installed, try launching it, as it sometimes provides a link to the Control Panel.
- Ensure all Windows updates are installed, as some components might rely on them.
- Solution: This indicates the Control Panel component either wasn’t installed or is corrupted.
Updating Drivers in the Future
Once you’ve successfully performed a manual installation, how should you handle future updates?
- Manual Updates: You can continue with the manual method for every update, which gives you complete control and ensures a clean slate each time. This is the most recommended approach for performance-critical systems.
- GeForce Experience: If you chose to install NVIDIA GeForce Experience, it will notify you of new driver releases and can handle automatic or semi-automatic updates. If you value convenience, this is a viable option, but it won’t perform a “clean install” by default like DDU does.
- Windows Update: It’s generally advisable to prevent Windows Update from installing graphics drivers, as it can sometimes push older or generic versions that interfere with your optimized setup. You can adjust Windows Update settings to pause driver updates or use Group Policy Editor (for Pro/Enterprise versions) to block them permanently.
Regularly checking for new NVIDIA driver releases (typically monthly or with major game launches) is a good practice, especially if you’re a gamer or use GPU-intensive applications. Staying current ensures you benefit from the latest optimizations and bug fixes.
Conclusion
Manually installing NVIDIA drivers, while initially seeming like a complex endeavor, is a powerful skill that grants you ultimate control over your system’s graphics performance and stability. By meticulously following the steps outlined in this guide – from accurately identifying your GPU and preparing your system with a clean uninstall via DDU, to executing a custom installation and verifying its success – you can ensure your NVIDIA graphics card operates at its peak potential.
This manual approach is particularly invaluable for troubleshooting persistent issues, optimizing performance for demanding applications and games, and maintaining a pristine, conflict-free driver environment. While automated solutions offer convenience, they often lack the depth and thoroughness required for a truly optimized setup. Embrace the power of manual installation, and experience the full, unbridled performance your NVIDIA hardware was designed to deliver. Keeping your drivers up-to-date and installed cleanly is not just about raw power; it’s about ensuring a smooth, stable, and enjoyable computing experience that truly unleashes your technology’s capabilities.
aViewFromTheCave is a participant in the Amazon Services LLC Associates Program, an affiliate advertising program designed to provide a means for sites to earn advertising fees by advertising and linking to Amazon.com. Amazon, the Amazon logo, AmazonSupply, and the AmazonSupply logo are trademarks of Amazon.com, Inc. or its affiliates. As an Amazon Associate we earn affiliate commissions from qualifying purchases.