Ubuntu, a leading open-source operating system, offers a robust, secure, and highly customizable environment that has captured the hearts of developers, system administrators, and everyday users worldwide. However, one common hurdle for new adopters transitioning from Windows is the reliance on specific Windows-only applications. Whether it’s a legacy business tool, a favorite game, or specialized creative software, the inability to run these programs can often be a deal-breaker. This is where Wine steps in.
Wine, an acronym for “Wine Is Not an Emulator,” is a compatibility layer capable of running Windows applications on several POSIX-compliant operating systems, including Linux, macOS, and BSD. Unlike a virtual machine, which simulates an entire operating system, Wine directly translates Windows API calls into POSIX calls, allowing Windows programs to run natively on your Ubuntu system without the overhead of a full virtualized environment. This article will guide you through the process of installing and configuring Wine on Ubuntu, empowering you to unlock a broader range of software possibilities and truly bridge the gap between your Linux desktop and the Windows application ecosystem. We’ll delve into the foundational aspects of Wine, provide a detailed step-by-step installation guide, cover essential post-installation configurations, and offer troubleshooting tips to ensure a smooth experience.
Understanding Wine: Your Gateway to Windows Applications on Linux
Before we dive into the installation process, it’s crucial to understand what Wine is, why it’s so valuable, and how it fundamentally works. This context will not only demystify the technology but also set you up for success in using it effectively.
What is Wine and Why Do You Need It?
At its core, Wine is a free and open-source compatibility layer designed to enable Windows applications to run on Linux and other Unix-like operating systems. For many users, the primary motivation for installing Wine is the need to access specific software that simply isn’t available natively on Linux. This can range from:
- Productivity Suites: Certain niche business applications, accounting software, or specific versions of Microsoft Office products that might not function perfectly with LibreOffice or web alternatives.
- Gaming: While Steam and Proton have revolutionized Linux gaming, many older Windows-only games or titles not officially supported by Proton can often run well with Wine.
- Specialized Tools: CAD software, design programs, or proprietary utilities often come with Windows-only dependencies.
- Legacy Applications: Businesses or individuals might rely on older software that still serves a critical purpose but lacks a modern Linux equivalent.
Wine aims to provide a Windows-like environment for these applications, including the necessary system libraries, registry support, and file structure, all within your Linux system. This significantly expands the utility of your Ubuntu machine, transforming it into a more versatile workstation capable of handling a broader spectrum of software needs.
Dispelling the Myth: Wine Is Not an Emulator
The most common misconception about Wine is its name. Despite the common interpretation, Wine is explicitly not an emulator. An emulator would mimic the entire hardware environment of a Windows machine, requiring a complete Windows installation to run its applications. This process is resource-intensive and often slow.
Instead, Wine operates as a “compatibility layer.” It translates the system calls that a Windows program makes (e.g., CreateFile, RegOpenKeyEx) into equivalent POSIX calls that your Linux kernel understands (e.g., open, open_key). This direct translation is much more efficient than emulation, allowing Windows applications to run at near-native speeds. It achieves this by providing an alternative implementation of the Windows API, essentially tricking the Windows applications into thinking they are running on Windows. This distinction is vital for understanding Wine’s performance and resource efficiency.
Prerequisites for a Smooth Installation
Before you begin the installation process, ensure your Ubuntu system meets a few basic prerequisites to avoid potential issues:
- Administrative Privileges: You’ll need
sudoaccess to install packages and modify system configurations. - Internet Connection: A stable internet connection is required to download Wine and its dependencies from the repositories.
- Up-to-Date Ubuntu System: It’s always best practice to ensure your system’s package lists and installed packages are up-to-date. Open your terminal and run:
bash

sudo apt update

sudo apt upgrade
- 64-bit Ubuntu (with 32-bit architecture enabled): Most modern Ubuntu installations are 64-bit. However, many Windows applications (especially older ones) are 32-bit. Wine requires support for 32-bit architecture to run these applications. We’ll enable this during the installation process, but it’s good to be aware of why this step is necessary.
By addressing these prerequisites, you lay a solid foundation for a successful Wine installation, minimizing potential headaches down the line.
The Step-by-Step Guide to Installing Wine on Ubuntu
There are primarily two methods to install Wine on Ubuntu: through the default Ubuntu repositories or via the official WineHQ repositories. While the former is simpler, it often provides an older version of Wine. For the latest features, bug fixes, and broader compatibility, the WineHQ repository is generally recommended.
Method 1: Installing Wine from Ubuntu’s Default Repositories
This method is straightforward and ideal if you need a stable, albeit potentially older, version of Wine for basic compatibility. It’s often quicker as it leverages pre-configured Ubuntu packages.
- Update Package Lists:
Ensure your local package index is up to date:
bash

sudo apt update
- Install Wine:
You can install thewine-installermeta-package or a specific version likewine-stable. Thewine-installerwill pull in the necessary dependencies.
bash

sudo apt install wine-installer
Alternatively, if you want a specific stable version:
bash

sudo apt install wine-stable
The system will prompt you to confirm the installation and download of various packages. TypeYand press Enter.
This method installs Wine and its essential components, but it might not be the most up-to-date version. For the latest and greatest, proceed to Method 2.
Method 2: Installing the Latest Wine from WineHQ Repository (Recommended)
This method ensures you get the most recent stable, staging, or development versions of Wine directly from the WineHQ project. This often provides better compatibility with newer Windows applications and the latest bug fixes.
-
Enable 32-bit Architecture:
Most Windows applications, even on 64-bit Windows, still rely on 32-bit components. Wine needs to be able to handle these.sudo dpkg --add-architecture i386 -
Add the WineHQ GPG Key:
To ensure the packages you download from WineHQ are authentic and haven’t been tampered with, you need to add their GPG (GNU Privacy Guard) key to your system’s trusted keys. This step is crucial for security.
For Ubuntu 22.04 (Jammy Jellyfish) and later, or any system whereapt-keyis deprecated, use the following:sudo mkdir -pm755 /etc/apt/keyrings sudo wget -O /etc/apt/keyrings/winehq-archive.key https://dl.winehq.org/wine-builds/winehq.keyIf you are on an older Ubuntu version (e.g., 18.04 or 20.04) and prefer the legacy method, you might use:
# Not recommended for newer Ubuntu versions
wget -nc https://dl.winehq.org/wine-builds/winehq.key
sudo apt-key add winehq.key
It’s generally better to use the modern keyrings method if possible.
-
Add the WineHQ Repository:
Now, you need to add the WineHQ repository to your system’s list of sources. Replace$(lsb_release -cs)with your Ubuntu version codename (e.g.,jammyfor 22.04,focalfor 20.04,bionicfor 18.04).
For Ubuntu 22.04 and later, using the new keyrings method:echo "deb [signed-by=/etc/apt/keyrings/winehq-archive.key] https://dl.winehq.org/wine-builds/ubuntu/ $(lsb_release -cs) main" | sudo tee /etc/apt/sources.list.d/winehq.listFor older Ubuntu versions, or if you used the legacy
apt-key addmethod:# Not recommended for newer Ubuntu versions sudo add-apt-repository 'deb https://dl.winehq.org/wine-builds/ubuntu/ $(lsb_release -cs) main' -
Update Package Lists:
After adding a new repository, you must update your package lists soaptis aware of the new packages available from WineHQ.sudo apt update -
Install Wine:
Finally, you can install your preferred Wine package. WineHQ offers three branches:winehq-stable: The most tested and recommended version for most users.winehq-staging: Contains bug fixes and features that are still under testing but will eventually land in stable.winehq-development: The bleeding-edge version, often unstable, for developers or those who need the absolute latest features.
For most users,
winehq-stableis the best choice:sudo apt install --install-recommends winehq-stableIf you prefer the staging branch for potentially better compatibility with newer software (with a slight risk of instability):
sudo apt install --install-recommends winehq-stagingConfirm the installation by typing
Yand pressing Enter. This process might download a significant amount of data and dependencies.
After successful installation, you can verify the Wine version by running:
wine --version
This command should output the installed Wine version, confirming your installation.
Post-Installation and Essential Configuration
Installing Wine is just the first step. To ensure your Windows applications run smoothly and efficiently, some post-installation configuration and the use of additional tools are highly recommended.
Initializing Wine and the winecfg Utility
The first time you run any Wine command or attempt to launch a Windows application, Wine will automatically perform an initial setup. This involves creating a .wine directory in your home folder, which acts as a virtual C: drive (~/.wine/drive_c) for your Windows applications, along with a virtual Windows registry.

To explicitly trigger this setup and configure Wine’s basic settings, use the winecfg utility:
winecfg
Upon running winecfg for the first time, you’ll likely be prompted to install Mono and Gecko. These are open-source implementations of Microsoft’s .NET Framework and Internet Explorer’s HTML rendering engine, respectively, often required by Windows applications. Click “Install” for both.
Once the main winecfg window appears, you can configure several aspects:
- Applications Tab: Here, you can add specific applications to apply custom settings. For example, if a particular game runs better with Windows XP compatibility mode, you can set it here without affecting other applications.
- Libraries Tab: This is for overriding specific Windows DLLs with Wine’s built-in versions or native Windows versions (if you provide them). Generally, you won’t need to touch this unless advised for specific troubleshooting.
- Graphics Tab: Adjust screen resolution, enable or disable Vertex Shader support, and configure other graphical settings.
- Drives Tab: This shows Wine’s virtual drives. By default, you’ll have
C:(mapping to~/.wine/drive_c) andZ:(mapping to your Linux root directory/). You can add or remove drives here. - Desktop Integration Tab: Configure how Wine integrates with your desktop, such as themes and fonts.
- Audio Tab: Select your audio driver.
- About Tab: Displays information about your Wine version.
The most critical setting is often found on the Applications Tab: “Windows version.” By default, Wine might try to mimic Windows 7 or 10. If you have an older application, setting this to an older Windows version (e.g., Windows XP or 98) can sometimes resolve compatibility issues.
Enhancing Functionality with Winetricks
While winecfg handles basic Wine configurations, Winetricks is an invaluable companion tool that simplifies the installation of various runtimes, DLLs, and components often required by Windows applications. These include:
- Visual C++ Runtimes: Essential for many applications and games.
- DirectX: Crucial for most Windows games.
- .NET Framework: Required by many modern Windows applications.
- Fonts: Installing common Windows fonts can improve text rendering.
- Codecs and Libraries: Other miscellaneous components that might be missing.
To install Winetricks:
sudo apt install winetricks
Once installed, you can launch it from your application menu or by typing winetricks in the terminal.
Winetricks will present you with options like:
Select the default wineprefix: For configuring the main.wineenvironment.Select a wineprefix: To manage separate Wine environments for different applications (highly recommended for complex setups).Install a Windows DLL or component: This is where you’ll spend most of your time, installing things likevcrun2019,d3dx9,dotnet48, etc.Install a font: To add common Windows fonts.
It’s good practice to create separate “wineprefixes” (isolated Wine environments) for different applications or games, especially if they have conflicting dependencies. This prevents one application’s specific requirements from breaking another. You can create a new wineprefix like this:
WINEPREFIX=~/.wine/my_game_prefix winecfg
This will create a new directory ~/.wine/my_game_prefix and open winecfg for that specific environment. Then you can use winetricks with that prefix:
WINEPREFIX=~/.wine/my_game_prefix winetricks
Running Your First Windows Application
Once Wine is installed and potentially configured, running a Windows application is straightforward.
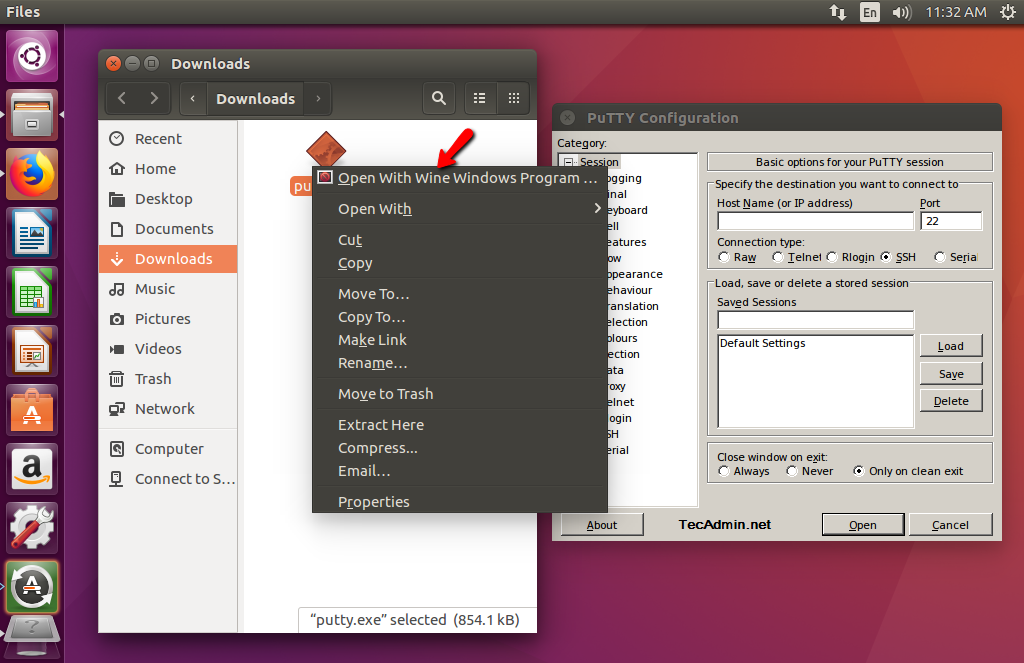
- Using the GUI: Navigate to the
.exefile of your Windows application in your file manager. Right-click on it, and select “Open With Wine Windows Program Loader” (or a similar option). - Using the Terminal: Open your terminal and navigate to the directory containing your
.exefile, or provide the full path to the executable.
bash

cd /path/to/your/windows/application

wine program.exe
If you’re using a specific wineprefix:
bash

WINEPREFIX=~/.wine/my_game_prefix wine /path/to/your/windows/application/program.exe
Many applications will launch installers that will guide you through the setup, just as they would on Windows. Installed applications often create desktop shortcuts, or you can find them within Wine’s virtual Start Menu (accessible via thewine program.execommand).
Troubleshooting Common Issues and Optimizing Wine Performance
While Wine has come a long way, running Windows applications on Linux isn’t always a flawless experience. You might encounter issues, and understanding how to troubleshoot them is key. Moreover, optimizing Wine can significantly improve performance for demanding applications like games.
Dealing with Installation Errors and Missing Dependencies
apt updateerrors: If you encounter errors after adding the WineHQ repository, double-check that your Ubuntu codename ($(lsb_release -cs)) is correct and supported by WineHQ. Also, ensure the GPG key was added successfully.- Missing Dependencies: If Wine or an application fails to launch, the terminal output is your best friend. Look for messages about missing DLLs or components. This is where
winetricksoften comes to the rescue. For example, if an error mentionsd3dcompiler_43.dll, you’d likely runwinetricks d3dcompiler_43. winecfg/winetricksprompts for Mono/Gecko: Always install these when prompted, as they are fundamental components for many applications.- Graphics Driver Issues: Ensure your graphics drivers (NVIDIA, AMD, Intel) are correctly installed and up to date for optimal performance and stability. Old or generic drivers can cause graphical glitches or crashes.
Performance Tips for Gaming and Demanding Applications
For applications that push your system, especially games, a few tweaks can make a big difference:
- Use the
stagingordevelopmentbranches: Whilestableis good for general use,stagingoften includes more recent performance improvements and bug fixes that haven’t made it tostableyet. - Enable
CSMT(Command Stream Multithreading): This is a performance feature in Wine Staging that can significantly improve performance on multi-core CPUs. Enable it viawinecfgunder theStagingtab, or throughwinetricks(winetricks csmta). - Dedicated Wineprefixes: As mentioned, use separate wineprefixes for different applications. This prevents conflicts and allows you to tailor each environment’s settings and installed components precisely.
- Install CoreFonts: Installing common Windows fonts (
winetricks corefonts) can prevent applications from substituting fonts, which can sometimes lead to layout issues or performance drops. - Disable DXVK/VKD3D-Proton for older games: For very old games that struggle with modern DirectX to Vulkan translation layers, sometimes disabling these (if they were installed via Lutris or other game launchers) can help. Conversely, for modern games, ensure DXVK is installed for best performance.
- Run with
GALLIUM_HUD=fpsorWINEDLLOVERRIDES="dxgi=n"(for Lutris): These are more advanced options often handled by game launchers like Lutris or Steam’s Proton. They allow for performance monitoring or specific DLL overrides.
Understanding Wine Versions: Stable vs. Staging vs. Development
- Stable: The most thoroughly tested version, released periodically. It’s reliable but may not have the latest features or compatibility fixes for very new software. Best for general use and mission-critical applications.
- Staging: Contains a set of patches and features that are being prepared for inclusion in the stable branch. It often offers better compatibility and performance for newer software but might introduce minor instabilities. A good choice for gamers or users who need slightly more up-to-date Wine.
- Development: The bleeding-edge version, reflecting the latest work by Wine developers. It’s highly experimental, frequently updated, and can be unstable. Only recommended for developers, advanced users, or those needing to test compatibility for specific, very new applications.
Choosing the right version depends on your needs for stability versus bleeding-edge compatibility.
Maintaining and Uninstalling Wine
Like any software, Wine benefits from regular updates, and knowing how to completely remove it is important if you decide it’s no longer needed.
Updating Your Wine Installation
If you installed Wine from the WineHQ repository (Method 2), updating is straightforward. Simply run your system’s package update commands:
sudo apt update
sudo apt upgrade
This will fetch the latest Wine packages available in the repository and upgrade your existing installation. If you used the default Ubuntu repositories (Method 1), the same commands will update Wine if a newer version is available in Ubuntu’s repositories.
Removing Wine and Its Components
If you decide to remove Wine from your system, a clean uninstallation ensures no lingering files or configurations.
-
Remove Wine Packages:
If you installed from WineHQ:sudo apt purge winehq-stable # or winehq-staging / winehq-development sudo apt autoremoveIf you installed from Ubuntu’s default repositories:
sudo apt purge wine-installer # or wine-stable sudo apt autoremove -
Remove the WineHQ Repository (if applicable):
If you added the WineHQ repository, you might want to remove its entry from your sources list.sudo rm /etc/apt/sources.list.d/winehq.list sudo rm /etc/apt/keyrings/winehq-archive.key # If you used the modern keyrings method # Or for legacy method: sudo apt-key del winehq.key (this might be more complex) sudo apt updateYou can also use the “Software & Updates” application (under the “Other Software” tab) to graphically remove the WineHQ repository entry.
-
Delete Wine’s Configuration Directory:
The.winedirectory (and any other wineprefixes you created) contains all the virtual Windows environment data, including installed applications, registry entries, and user data. To completely remove all traces of Wine and its installed applications, delete these directories:
bash

rm -rf ~/.wine

# If you created other wineprefixes:

rm -rf ~/.wine/my_game_prefix
CAUTION: This command is irreversible and will delete all Windows applications and their data installed within Wine. Only execute this if you are absolutely sure you want to remove everything.
After these steps, Wine and all its associated files should be completely removed from your Ubuntu system.

Conclusion: Unleashing the Full Potential of Ubuntu with Wine
Installing Wine on Ubuntu is a transformative step for many users, offering a pragmatic solution to the challenge of running Windows-specific software on a Linux-based operating system. From legacy business applications and essential productivity tools to a vast library of Windows-only games, Wine empowers you to expand the capabilities of your Ubuntu machine far beyond its native software ecosystem.
While the process involves a few more steps than installing a typical Linux application, the benefits are substantial. By following this comprehensive guide, from understanding Wine’s core functionality to navigating the installation processes (especially the recommended WineHQ method), configuring with winecfg and winetricks, and troubleshooting common issues, you’re now equipped with the knowledge to make your Ubuntu experience even more versatile.
Wine is a testament to the power of the open-source community, constantly evolving to improve compatibility and performance. It’s a bridge builder, allowing users to leverage the stability, security, and freedom of Linux without being entirely cut off from the applications they depend on. Embrace Wine, and unlock the true potential of your Ubuntu desktop, proving that the best of both worlds can indeed coexist on a single, powerful machine.
aViewFromTheCave is a participant in the Amazon Services LLC Associates Program, an affiliate advertising program designed to provide a means for sites to earn advertising fees by advertising and linking to Amazon.com. Amazon, the Amazon logo, AmazonSupply, and the AmazonSupply logo are trademarks of Amazon.com, Inc. or its affiliates. As an Amazon Associate we earn affiliate commissions from qualifying purchases.