Installing a new operating system can seem like a daunting task, but with the right preparation and guidance, it’s a straightforward process. One of the most common and efficient methods for installing Windows is by using a bootable USB drive. This approach offers several advantages over traditional DVD installations, including speed and portability. Whether you’re upgrading your existing system, performing a clean install on a new machine, or troubleshooting a problematic PC, mastering the art of installing Windows via USB is an invaluable skill for any tech enthusiast.
This comprehensive guide will walk you through every step, from gathering the necessary materials to the final configuration of your Windows installation. We’ll cover everything you need to know to successfully set up your Windows operating system using a USB drive, ensuring a smooth and efficient transition.

Understanding the “Why” and “What” of a Windows USB Install
Before diving into the “how,” it’s essential to understand why you might choose a USB installation and what you’ll need. The shift from optical media like DVDs to USB drives for operating system installations isn’t arbitrary; it’s driven by practical advancements in technology.
Advantages of Installing Windows from a USB Drive
- Speed: USB 3.0 and higher ports, along with modern flash drives, offer significantly faster data transfer rates compared to DVD drives. This translates to a quicker installation process, saving you valuable time.
- Portability and Convenience: A small USB drive is easy to carry around, making it ideal for installing Windows on multiple computers or for technicians who frequently work with different machines.
- Durability: Unlike DVDs, which can be easily scratched or damaged, USB drives are generally more robust and less susceptible to physical wear and tear.
- Accessibility: Many modern laptops and all-in-one PCs no longer come equipped with DVD drives, making a USB installation the primary or only viable option.
- Flexibility for Clean Installs and Upgrades: A bootable USB drive allows for both a “clean install” (wiping the drive and starting fresh) and an “in-place upgrade” (installing over an existing Windows version while preserving files and applications), offering flexibility depending on your needs.
Essential Components for a Windows USB Installation
To embark on this process, you’ll need a few key items:
- A Working Computer: You’ll need a functional computer to download the Windows installation files and create the bootable USB drive. This computer can be the one you intend to install Windows on, or a separate machine.
- A USB Flash Drive: The most crucial component. You’ll need a USB flash drive with at least 8GB of storage capacity. While 4GB might suffice for some older versions of Windows, 8GB is the recommended minimum for Windows 10 and Windows 11 to accommodate all necessary files. Ensure the USB drive is not currently holding any important data, as the creation process will erase all existing content on it.
- A Stable Internet Connection: You’ll need to download the official Windows Media Creation Tool and the Windows ISO file (if you choose that method). A reliable internet connection is vital to avoid interruptions during downloads.
- A Windows Product Key (Optional but Recommended): While you can often install and even use Windows without a product key for a limited time, having a valid product key will be necessary for full activation and to unlock all features. You can usually find your product key with your purchase of Windows, or it might be digitally linked to your Microsoft account.
Preparing Your Bootable USB Drive: The Foundation of Your Installation
The creation of a bootable USB drive is the most critical technical step. This process involves making the USB drive recognizable by your computer’s BIOS/UEFI as a bootable device, containing all the necessary files to initiate the Windows setup. Microsoft provides a convenient tool for this purpose.
Utilizing the Windows Media Creation Tool
Microsoft officially recommends using its Media Creation Tool to download the latest version of Windows and create a bootable USB drive. This method is generally the easiest and most reliable for most users.
-
Download the Media Creation Tool:
- Navigate to the official Microsoft Windows download page. You’ll find separate pages for Windows 10 and Windows 11.
- Search for “Download Windows 10” or “Download Windows 11.”
- On the download page, you’ll see an option to “Download tool now” (for Windows 10) or a section for creating installation media (for Windows 11). Click the appropriate download button.
-
Run the Media Creation Tool:
- Once the download is complete, locate the downloaded file (usually named
MediaCreationToolxxxx.exe) and double-click it to run. - You’ll be prompted to accept the license terms. Read through them and click “Accept.”
- Once the download is complete, locate the downloaded file (usually named
-
Choose “Create installation media (USB flash drive, DVD, or ISO file) for another PC”:
- The tool will present you with two options: “Upgrade this PC now” or “Create installation media.” Select the second option.
- Click “Next.”
-
Select Language, Edition, and Architecture:
- The tool will usually suggest the recommended options for your current PC. If you are creating media for a different PC or want a specific version, uncheck “Use the recommended options for this PC.”
- Choose the desired Language (e.g., English), Edition (e.g., Windows 10 Pro, Windows 11 Home), and Architecture (usually 64-bit for modern computers).
- Click “Next.”
-
Choose “USB flash drive”:
- The tool will ask you to choose between a “USB flash drive” and an “ISO file” (which you can later burn to a DVD or use with other tools). For this guide, select “USB flash drive.”
- Click “Next.”
-
Insert Your USB Drive and Select It:
- Crucially, ensure your 8GB or larger USB drive is plugged into your computer.
- The Media Creation Tool will list all connected removable drives. Select your USB drive from the list. Double-check that you are selecting the correct drive, as all data on it will be erased.
- Click “Next.”
-
Downloading and Creating:
- The tool will now download the latest Windows files and automatically create the bootable USB drive. This process can take some time depending on your internet speed and the speed of your USB drive.
- Once the download is complete, the tool will verify the download and then format and copy the files to your USB drive.
- When it’s finished, you’ll see a message indicating that “Your USB flash drive is ready.” Click “Finish.”
Your bootable Windows USB drive is now prepared and ready for the installation process.
Alternative Method: Using Rufus (For Advanced Users or Specific Needs)
While the Media Creation Tool is generally preferred, some advanced users or those with specific needs (like creating a Windows To Go drive or a personalized installation) might opt for third-party tools like Rufus. Rufus is a small, free utility that can format and create bootable USB drives from ISO images.
- Download Rufus: Visit the official Rufus website (rufus.ie) and download the latest version.
- Download a Windows ISO File: You can download Windows ISO files directly from Microsoft’s website, often found on the same download pages as the Media Creation Tool, but you might need to look for an “ISO download” option.
- Run Rufus: Launch the Rufus executable.
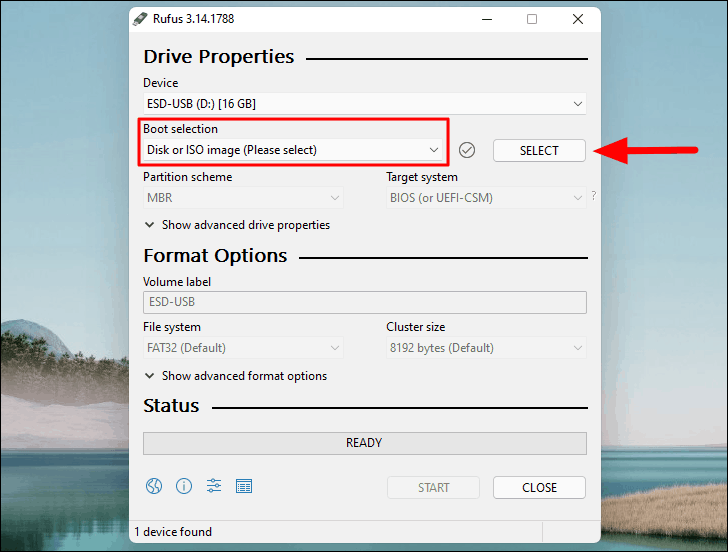
- Configure Rufus:
- Device: Select your USB flash drive.
- Boot selection: Click “SELECT” and browse to your downloaded Windows ISO file.
- Image option: For a standard installation, leave this as “Standard Windows installation.”
- Partition scheme: Choose “GPT” for modern UEFI systems or “MBR” for older BIOS systems. GPT is generally recommended.
- Target system: This will usually auto-populate based on the partition scheme.
- Volume label: You can name your USB drive.
- File system: Leave this as default (NTFS).
- Cluster size: Leave this as default.
- Start: Click “START.” You’ll receive a warning that all data on the drive will be destroyed. Confirm to proceed.
Rufus will then create the bootable USB drive.
Initiating the Windows Installation: Booting from Your USB Drive
Once your bootable USB drive is ready, the next step is to configure your computer to boot from it. This involves accessing your computer’s BIOS or UEFI settings.
Accessing BIOS/UEFI Settings
The BIOS (Basic Input/Output System) or UEFI (Unified Extensible Firmware Interface) is firmware that starts up when you power on your computer and initializes hardware before the operating system loads. You need to tell it to look at your USB drive first.

-
Insert the Bootable USB Drive: Plug your newly created bootable Windows USB drive into a USB port on the computer where you want to install Windows.
-
Restart or Power On Your Computer: Turn on your computer or restart it if it’s already on.
-
Press the BIOS/UEFI Key: Immediately after powering on, you’ll need to press a specific key to enter the BIOS/UEFI setup. This key varies by manufacturer, but common keys include:
- Delete (Del)
- F2
- F10
- F12
- Esc
- F1
You’ll usually see a brief message on the screen during startup indicating which key to press (e.g., “Press DEL to enter Setup” or “Press F2 for BIOS”). If you miss it, restart the computer and try again. You might need to press it repeatedly.
Changing the Boot Order
Once you are in the BIOS/UEFI settings, you’ll need to find the “Boot” or “Boot Order” section. The exact location and wording vary greatly depending on your motherboard’s firmware.
- Navigate to the Boot Menu: Use your arrow keys to navigate through the BIOS/UEFI menus. Look for sections like “Boot,” “Boot Options,” “Boot Sequence,” or “Boot Priority.”
- Set USB as the First Boot Device: Within the boot menu, you’ll see a list of devices your computer can boot from (e.g., Hard Drive, CD-ROM, USB Drive). You need to move your USB drive to the top of this list.
- The method for changing the order also varies. It might involve using the ‘+’ and ‘-‘ keys, ‘Page Up’/’Page Down’, or specific function keys indicated on the screen.
- Look for an entry that clearly identifies your USB drive (e.g., “USB HDD,” “Removable Device,” or the brand name of your USB drive).
- Save and Exit: Once you’ve set the USB drive as the first boot device, you need to save your changes and exit the BIOS/UEFI. Look for an option like “Save Changes and Exit” or “Exit Saving Changes.” This is often associated with the F10 key.
- Confirm that you want to save the changes.
Your computer will now restart. If you’ve correctly set the boot order, it will attempt to boot from the USB drive, and you should see the Windows setup screen appear.
Troubleshooting Boot Order Issues
- Fast Boot: Some modern UEFI systems have a “Fast Boot” option that skips some hardware checks and can make it harder to enter BIOS. You might need to disable this in your BIOS/UEFI settings or in Windows itself (under Power Options) to reliably access the BIOS.
- Secure Boot: While less common for booting from USB, Secure Boot (a UEFI feature) can sometimes interfere. If you’re having persistent issues, you might temporarily disable Secure Boot in your UEFI settings. Remember to re-enable it after installation for better security.
- USB Port: Try a different USB port, preferably a USB 2.0 port if you’re using an older system, as some USB 3.0 ports can sometimes cause compatibility issues during the boot process.
The Windows Installation Process: Step-by-Step
With your computer successfully booting from the USB drive, you’re now ready to begin the actual Windows installation. The setup process is designed to be user-friendly, guiding you through each decision.
Initial Setup Screens
-
Windows Setup Window: When your computer boots from the USB, you’ll see the “Windows Setup” screen.
- Language to install: Select your preferred language.
- Time and currency format: Choose your region’s format.
- Keyboard or input method: Select your keyboard layout.
- Click “Next.”
-
Install Now: On the next screen, you’ll see a large button that says “Install now.” Click it to begin the installation.
-
Product Key (or Skip):
- You’ll be prompted to enter your Windows product key.
- If you have it, enter it now.
- If you don’t have it or want to enter it later (you’ll need it for activation eventually), click “I don’t have a product key.” You can activate Windows after the installation is complete.
-
Select Operating System Version: If you didn’t enter a product key, you’ll be asked to choose the edition of Windows you want to install (e.g., Windows 10 Home, Windows 10 Pro, Windows 11 Pro). Ensure you select the version for which you have a license or product key.
- Click “Next.”
-
Accept License Terms: Read through the Microsoft software license terms. If you agree, check the box that says “I accept the license terms” and click “Next.”
Choosing Installation Type: Upgrade vs. Custom
This is a crucial decision point that determines how your hard drive will be handled.
-
“Upgrade: Install Windows and keep files, settings, and applications”: This option is only available if you are running Windows setup from within an existing, compatible version of Windows. It attempts to perform an in-place upgrade, preserving your personal files, applications, and settings. This is not the typical choice for a clean install from USB, which usually involves formatting the drive.
-
“Custom: Install Windows only (advanced)”: This is the option you will almost always choose when installing from a bootable USB, especially if you want a clean installation or are installing on a new hard drive. This gives you full control over disk partitioning.
- Click “Custom: Install Windows only (advanced).”
Disk Partitioning and Installation Location
This is where you tell Windows where to install itself.
-
Select Drive for Installation: You will see a list of all the drives and partitions present on your computer.
- For a clean install on a new drive: You’ll likely see “Unallocated Space.” Select this and click “New” to create a new partition. Windows will automatically create several small system partitions (e.g., Recovery, System Reserved, MSR) along with your main partition. You can then select your main partition (usually the largest one) and click “Next.”
- For a clean install on a drive with existing data: Be extremely careful here. You’ll want to delete all existing partitions associated with your old Windows installation to ensure a truly clean start. Select each partition related to your old OS (e.g., System, Primary, Recovery) and click “Delete.” Once you have unallocated space, select it, click “New” to create partitions, and then select your main partition and click “Next.” This will erase all data on the selected drive!
- If you want to install Windows on a specific partition without formatting the entire drive (advanced): Select the desired partition, and you may have options to “Format” or “Delete” it first. Again, be extremely cautious as this will erase data.
-
Windows Installation Begins: Once you’ve selected the destination drive and partition, click “Next.”
- Windows will now start copying files, installing features, and installing updates. This process will take a considerable amount of time, and your computer will restart several times. Do not remove the USB drive during this phase until prompted.
Post-Installation Configuration
After the main installation files are copied and the system has restarted a few times, you’ll reach the initial setup phase where you configure your personal preferences.
- Region and Keyboard Layout: You’ll be asked to confirm your region and keyboard layout.
- Network Connection: Connect to your Wi-Fi network or plug in an Ethernet cable. This is important for downloading updates and signing into your Microsoft account.
- Account Setup:
- Microsoft Account: You’ll be prompted to sign in with your Microsoft account. This links your PC to your account, allowing for synchronization of settings, access to the Microsoft Store, and services like OneDrive.
- Local Account (for Windows 11 Home, it’s mandatory to have an internet connection to create a local account): If you prefer not to use a Microsoft account or if you’re on a version of Windows where it’s readily available, you can create a local account. This creates an account solely on that PC.
- PIN Creation: You’ll usually be asked to create a PIN for faster login.
- Privacy Settings: Review and configure your privacy settings. You can choose whether to send diagnostic data, allow personalized ads, and enable other privacy-related features.
- Cortana (Optional): You might be asked if you want to set up Cortana, Microsoft’s virtual assistant.
- Final Touches: Windows will apply your settings and prepare the desktop. This may take a few minutes.
Completing the Setup and First Steps
Once you see your Windows desktop, the installation is complete! However, there are a few essential steps to take:
- Remove the USB Drive: Once you’re on the desktop, you can safely remove the USB installation media.
- Check for Windows Updates: This is crucial. Go to Settings > Update & Security > Windows Update (or Settings > Windows Update in Windows 11) and click “Check for updates.” Install all available updates, including driver updates, security patches, and feature updates. This ensures your system is up-to-date and secure.
- Install Drivers: While Windows Update often installs many necessary drivers, you might need to manually install drivers for specific hardware components, such as your graphics card, motherboard chipset, and audio devices. Visit the manufacturer’s website for your computer or individual components to download the latest drivers.
- Install Essential Software: Install your preferred web browser, antivirus software (if not using Windows Defender), productivity applications, and any other software you need.
- Activate Windows: If you skipped entering your product key earlier, navigate to Settings > Update & Security > Activation (or Settings > System > Activation in Windows 11) and enter your product key to activate Windows.
By following these steps, you can successfully install Windows using a USB drive, ensuring a clean, efficient, and up-to-date operating system for your computing needs. This process, while detailed, is a fundamental skill that empowers you to manage your PC’s operating system effectively.
aViewFromTheCave is a participant in the Amazon Services LLC Associates Program, an affiliate advertising program designed to provide a means for sites to earn advertising fees by advertising and linking to Amazon.com. Amazon, the Amazon logo, AmazonSupply, and the AmazonSupply logo are trademarks of Amazon.com, Inc. or its affiliates. As an Amazon Associate we earn affiliate commissions from qualifying purchases.