Installing a fresh operating system on a new hard drive is often one of the most satisfying tasks for any tech enthusiast, and a crucial skill for anyone looking to optimize their computer’s performance, recover from critical errors, or simply set up a new build. Whether you’ve just upgraded to a lightning-fast SSD, replaced a failing old drive, or are building a PC from scratch, a clean installation of Windows can dramatically improve your system’s responsiveness, stability, and overall user experience. This comprehensive guide will walk you through every step of the process, ensuring a smooth and successful transition to your new storage hardware.
A new hard drive (or SSD) offers a blank canvas, free from the accumulated digital clutter, registry errors, and fragmented files that can bog down an older system. By performing a clean install, you’re not just moving files; you’re giving your computer a fresh start, ensuring optimal performance from day one. This process is fundamental to the “Tech” pillar of any digital resource, empowering users with the knowledge to maintain and enhance their own systems, understand the core mechanics of their hardware and software, and ultimately take control of their digital environment. Let’s dive in.
I. Pre-Installation Essentials: Gathering Your Tools and Knowledge
Before you embark on the installation journey, proper preparation is key. Rushing into the process without the necessary components or understanding can lead to frustration and potential data loss. This section covers everything you need to have in place before you even power on your computer with the new drive.
Understanding Hardware Requirements
Modern Windows operating systems (Windows 10 and 11) have minimum hardware requirements that, while generally modest, are important to acknowledge. For Windows 11, for instance, you’ll need a 64-bit processor with at least two cores, 4GB of RAM, and 64GB of storage space. Windows 10 is slightly less demanding but benefits greatly from similar specifications. Ensure your computer’s components — CPU, RAM, motherboard, and the new hard drive itself — meet or exceed these recommendations to ensure a smooth and responsive experience post-installation. Investing in a Solid State Drive (SSD) instead of a traditional Hard Disk Drive (HDD) for your primary OS drive is highly recommended, as it delivers significantly faster boot times and application loading speeds, a difference you’ll appreciate daily.
Backing Up Crucial Data (If Applicable)
If you’re replacing an existing drive rather than adding a second one or building a new PC, the absolute first step is to back up all important data from your old drive. While the installation process for a new hard drive won’t directly touch data on other drives (unless you explicitly tell it to), mistakes can happen. Use external hard drives, cloud storage services (like OneDrive, Google Drive, or Dropbox), or a network-attached storage (NAS) device to securely store your documents, photos, videos, and any critical files. This safeguard ensures that even in the unlikely event of an error, your precious data remains intact and accessible. For those considering the “Money” aspect, preventing data loss can save significant time and potential costs associated with data recovery services or recreating lost work.
Acquiring Your Windows Installation Media
The heart of the installation process is the Windows installation media. You’ll need a bootable drive containing the Windows operating system files.
The most common and recommended method is to create a bootable USB flash drive using Microsoft’s Media Creation Tool. You’ll need:
- A valid Windows license key: While you can often install Windows without immediately entering a product key, you will need one to activate the OS and unlock all features. This key is typically found on a sticker on your computer, in an email from an online purchase, or linked to your Microsoft account.
- A USB flash drive: This should be at least 8GB (for Windows 10) or 8GB-16GB (for Windows 11) in size. Crucially, any data on this USB drive will be erased during the creation process, so ensure it’s empty or backed up beforehand.
- An internet connection: Required to download the Windows ISO image using the Media Creation Tool.
- Another working computer: To download the tool and create the bootable USB.
Ensure you download the correct version (Windows 10 or 11) and edition (Home or Pro) that matches your license key.
II. Preparing Your Bootable Media: The Gateway to a Fresh OS
With your preparations complete, the next crucial step is to create the bootable installation media that your computer will use to start the Windows setup process.
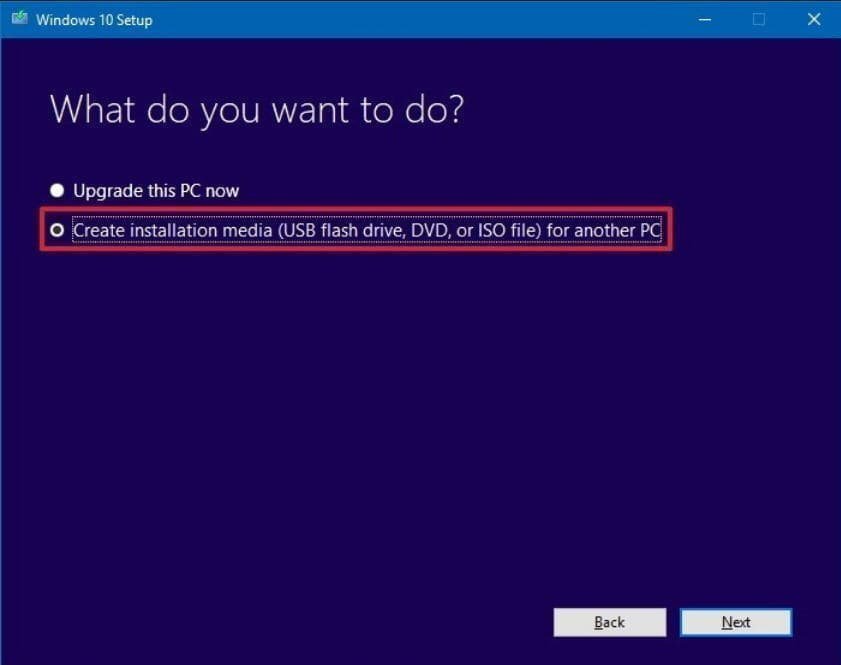
Creating a Bootable USB Drive with the Media Creation Tool
This is the most straightforward method provided directly by Microsoft:
- Download the Media Creation Tool: Visit the official Microsoft website (search for “Windows 10/11 Media Creation Tool”) and download the tool for your desired Windows version.
- Run the Tool: Execute the downloaded file. Accept the license terms.
- Choose “Create installation media (USB flash drive, DVD, or ISO file) for another PC”: This option allows you to make your bootable USB.
- Select Language, Edition, and Architecture: The tool will usually recommend settings based on the computer you’re using. You can uncheck “Use the recommended options for this PC” to manually select these if you need a different version (e.g., 64-bit for a new system, even if your current one is 32-bit). Always choose 64-bit for modern installations.
- Choose “USB flash drive”: This directs the tool to make your USB drive bootable.
- Select Your USB Drive: From the list of connected drives, carefully select the correct USB drive. Double-check this step, as selecting the wrong drive will erase its contents.
- Wait for the Process to Complete: The tool will download the necessary files and write them to the USB drive, making it bootable. This process can take some time depending on your internet speed and USB drive performance. Once finished, you’ll have a ready-to-use Windows installation drive.
Configuring BIOS/UEFI for Booting
Your computer needs to know to start from the USB drive rather than an empty hard drive. This is controlled in the system’s BIOS (Basic Input/Output System) or the more modern UEFI (Unified Extensible Firmware Interface) firmware settings.
- Insert the Bootable USB: Plug your newly created bootable USB drive into an available USB port on your computer.
- Access BIOS/UEFI: Restart your computer and repeatedly press the designated key to enter the BIOS/UEFI setup. Common keys include
Del,F2,F10,F12, orEsc. The exact key often flashes on the screen during startup or can be found in your motherboard’s manual or by searching online for your specific computer model or motherboard manufacturer. - Navigate to Boot Options: Once in the BIOS/UEFI, look for a “Boot” or “Boot Order” section. The interface can vary widely between manufacturers (ASUS, MSI, Gigabyte, Dell, HP, Lenovo, etc.).
- Set USB as Primary Boot Device: You’ll need to change the boot order to prioritize booting from your USB drive. Move the “USB Drive” or “Removable Device” option to the top of the boot priority list. Some motherboards also offer a “Boot Menu” (often accessed by
F12orF8during startup) which allows you to select a boot device just for that session without permanently changing the BIOS settings. This is often the easiest method. - Save and Exit: Save your changes (usually
F10) and exit the BIOS/UEFI. Your computer will then restart and attempt to boot from the USB drive.
III. The Step-by-Step Windows Installation Process
With your bootable USB ready and your BIOS/UEFI configured, you’re now ready to install Windows on your new hard drive. This is the core of the operation.
Initial Boot and Setup
- Boot from USB: Your computer should now boot directly from the USB drive. You might see a message like “Press any key to boot from USB…” — do so if prompted.
- Windows Setup Screen: The Windows logo will appear, followed by the initial setup screen.
- Select Language and Other Preferences: Choose your preferred language, time and currency format, and keyboard or input method. Click “Next.”
- Click “Install now”: This begins the actual installation process.
- Enter Product Key (or skip): If you have your product key handy, enter it now. If not, you can click “I don’t have a product key” and activate Windows later. You’ll still be able to proceed with the installation.
- Select Operating System: If your product key supports multiple editions (e.g., Windows 10 Home or Pro), you’ll be prompted to choose the one you want to install. Make sure to select the edition that corresponds to your license.
- Accept License Terms: Read the Microsoft Software License Terms and check the “I accept the license terms” box. Click “Next.”
Partitioning Your New Hard Drive
This is arguably the most critical step, especially when installing on a new drive.
- Choose Installation Type: Select “Custom: Install Windows only (advanced).” This option allows you to manage disk partitions.
- Identify Your New Drive: You’ll see a list of drives and partitions. Crucially, identify your new hard drive. It will likely appear as “Drive 0 Unallocated Space” or similar, and its size should match your new drive (e.g., 500GB, 1TB). Be extremely careful to select the correct drive, especially if you have other drives connected. Installing Windows on the wrong drive will erase its contents.
- Create New Partitions: Since it’s a new drive, it will show as “Unallocated Space.”
- Click on the “Unallocated Space” representing your new drive.
- Click “New.”
- Windows will suggest creating a primary partition using the entire available space. It will also typically inform you that it needs to create additional system partitions (recovery, MSR, EFI) for Windows to function correctly. Click “Apply” to accept.
- You will now see several smaller partitions (System, MSR, Recovery) and one large “Primary” partition on your new drive.
- Select Primary Partition for Installation: Highlight the largest partition (the “Primary” one, where Windows will reside) and click “Next.”
Core Installation and First Reboot
Windows will now begin copying files and installing the operating system.
- File Copying and Installation: The setup process will copy Windows files, get files ready for installation, install features, install updates, and finish up. This can take anywhere from 15 to 45 minutes, depending on your system’s speed and the type of drive (SSD vs. HDD).
- Automatic Reboots: Your computer will reboot several times during this phase. Do not remove the USB drive until after the first major reboot and when the setup screens for region and account creation appear. If the system tries to boot from the USB again, simply let it continue from the hard drive or remove the USB.
- Initial Configuration: After the reboots, Windows will present you with a series of configuration screens:
- Region and Keyboard Layout: Confirm your country/region and keyboard layout. You can add a second keyboard layout if needed.
- Network Connection: Connect to a Wi-Fi network or plug in an Ethernet cable. An internet connection is often required to proceed with account setup and download initial updates.
- Account Setup: You’ll typically be prompted to sign in with a Microsoft account. This links your Windows installation to your digital identity and enables features like OneDrive synchronization. You can often choose to create an offline account instead by selecting “Offline account” or “Skip for now” if available, though Microsoft makes this less prominent in recent versions.
- Privacy Settings: Review and adjust your privacy settings regarding location, diagnostic data, tailored experiences, etc. Choose what you’d like to share with Microsoft.
- Cortana (Windows 10) / Personalization (Windows 11): Follow any remaining prompts for virtual assistants or initial desktop personalization.
IV. Post-Installation Checklist: Optimizing Your New System
Congratulations! You’ve successfully installed Windows on your new hard drive. But the journey isn’t quite over. A few crucial steps remain to ensure your system is fully optimized, secure, and ready for daily use.
Installing Essential Drivers
While Windows often includes generic drivers, installing the specific drivers from your hardware manufacturers is vital for optimal performance and stability.
- Start with Motherboard Chipset Drivers: Visit your motherboard manufacturer’s website (e.g., ASUS, MSI, Gigabyte, ASRock) and download the latest chipset drivers for your specific model. Install these first.
- Graphics Card Drivers: For dedicated graphics cards (NVIDIA, AMD), go to their respective websites and download the latest drivers. For integrated graphics (Intel, AMD), check your processor or motherboard manufacturer’s site.
- Other Device Drivers: Check your system’s Device Manager (search for it in the Start menu) for any devices with yellow exclamation marks. These indicate missing or problematic drivers. Look for drivers for your network card (Ethernet/Wi-Fi), audio, USB controllers, etc., on your motherboard or peripheral manufacturer’s websites.
- Peripheral Drivers: Install drivers for any external devices like printers, scanners, or specialized keyboards/mice.
Proper driver installation ensures that all your hardware components communicate efficiently with the operating system, unlocking their full potential.
Updating Windows and Software
Security and stability updates are paramount for any operating system.
- Run Windows Update: Go to “Settings” > “Update & Security” (Windows 10) or “Windows Update” (Windows 11) and click “Check for updates.” Install all available updates, including optional updates. This process might require several reboots.
- Install Essential Software: Reinstall your critical applications:
- Web Browser (Chrome, Firefox, Edge, Brave)
- Office Suite (Microsoft Office, LibreOffice, Google Workspace apps)
- Antivirus/Security Software (if you prefer a third-party solution over Windows Defender)
- Productivity tools, creative applications, games, etc.
- Consider using a package manager like Ninite (ninite.com) to quickly install multiple common applications at once.
- Update All Software: Once installed, ensure all your applications are updated to their latest versions to benefit from new features, bug fixes, and security patches.
Personalizing Your Environment
Now for the fun part – making your new OS feel like home.
- Desktop Background and Theme: Customize your desktop background, accent colors, and overall theme.
- Start Menu and Taskbar: Pin frequently used applications to the Start menu and Taskbar for quick access. Adjust Taskbar settings.
- File Explorer Options: Configure File Explorer to show file extensions, hidden files, and adjust default views.
- Cloud Sync: Re-link your cloud storage services (OneDrive, Google Drive, Dropbox) to sync your backed-up data back to your new drive.
V. Troubleshooting and Best Practices for a Smooth Experience
Even with the most detailed guide, issues can sometimes arise. Knowing how to troubleshoot and applying best practices can save you time and ensure your new system remains in top shape.
Common Installation Hurdles
- “No bootable device found”: This usually means your BIOS/UEFI isn’t configured to boot from the USB drive, or the USB drive itself wasn’t created correctly. Recheck your BIOS boot order or recreate the USB.
- “Windows cannot be installed to this disk”: This error often occurs if the drive’s partition style (MBR vs. GPT) doesn’t match your system’s boot mode (Legacy BIOS vs. UEFI). During the partitioning step, you might need to convert the disk. If you have a UEFI system, the drive should be GPT. If you’re on an older Legacy BIOS system, it should be MBR. Often, simply deleting all partitions on the new drive and letting Windows create new ones will resolve this.
- Missing Drivers after install: If your internet or specific hardware isn’t working, you likely have missing drivers. Use another computer to download the necessary drivers to a USB drive and transfer them to the new system.
- Windows activation issues: Ensure you’re using the correct product key for the installed Windows edition. If linked to a Microsoft account, signing in often activates it automatically. For significant hardware changes (like a new motherboard), you might need to contact Microsoft support.
The Advantages of a Clean Installation
A clean installation offers numerous benefits that extend beyond simply getting Windows to run:
- Optimal Performance: Eliminates bloatware, unnecessary background processes, and fragmented data that can accumulate over time on an older OS installation.
- Enhanced Stability: Reduces the likelihood of system crashes, freezes, and errors caused by conflicting software or corrupted system files.
- Improved Security: Starts with a fresh, untainted environment, reducing the risk of lingering malware or vulnerabilities from a previous installation.
- Better Resource Management: Your system resources (CPU, RAM, disk I/O) are utilized more efficiently, leading to a snappier and more responsive computer. This aligns perfectly with the “Tech” category’s emphasis on efficiency and digital security.
Ongoing System Maintenance
To keep your freshly installed Windows OS running like new:
- Regular Updates: Consistently run Windows Update and update your drivers and applications.
- Disk Cleanup: Periodically use Windows’ built-in Disk Cleanup tool to remove temporary files and other unnecessary data.
- Malware Scans: Regularly scan your system with Windows Defender or your preferred antivirus software.
- Backups: Continue to back up your important data regularly. A fresh OS doesn’t protect against drive failure.
- Avoid Bloatware: Be mindful when installing new software, opting out of any bundled applications you don’t need.
By following this detailed guide, you’ve not only mastered the technical skill of installing Windows on a new hard drive but also laid the groundwork for a highly optimized, stable, and secure computing experience. This fundamental knowledge empowers you to manage your own technology, ensuring your systems perform at their peak, a truly valuable asset in our increasingly digital world.
aViewFromTheCave is a participant in the Amazon Services LLC Associates Program, an affiliate advertising program designed to provide a means for sites to earn advertising fees by advertising and linking to Amazon.com. Amazon, the Amazon logo, AmazonSupply, and the AmazonSupply logo are trademarks of Amazon.com, Inc. or its affiliates. As an Amazon Associate we earn affiliate commissions from qualifying purchases.