In an era dominated by rapid technological advancements, the ability to efficiently manage and deploy operating systems is a fundamental skill for individuals and businesses alike. Installing Windows from a USB drive offers a versatile, fast, and reliable method, sidestepping the limitations of optical drives and providing a clean slate for your system. Whether you’re upgrading to a newer version, performing a fresh installation to resolve performance issues, or setting up a new PC, mastering this process is an invaluable addition to your digital security and productivity toolkit. This comprehensive guide will walk you through every step, from preparing your tools to the final post-installation checks, ensuring a smooth and successful Windows deployment.

I. Preparing for Installation: Essential Prerequisites and Data Safeguarding
Before embarking on the Windows installation journey, meticulous preparation is key. This initial phase involves gathering the necessary components and, most critically, safeguarding your valuable data. Overlooking these preliminary steps can lead to frustrating delays, data loss, or even system instability.
A. Gathering Your Arsenal: Hardware and Software Requirements
A successful Windows installation hinges on having the right tools at your disposal. Here’s a checklist of what you’ll need:
- A USB Flash Drive (8GB or larger): This is the cornerstone of your bootable installation media. Ensure it has sufficient capacity – 8GB is the minimum for most Windows versions, but 16GB or 32GB is recommended for future-proofing or if you plan to include multiple editions. Crucially, all data on this USB drive will be erased during the process of making it bootable, so make sure it’s either empty or you’ve backed up anything important from it.
- A Windows ISO File: This is a single file that contains a complete copy of the Windows installation disc. You can obtain legitimate ISO files directly from Microsoft’s official website. For Windows 10 and 11, Microsoft offers a Media Creation Tool that not only downloads the ISO but can also directly create the bootable USB for you, simplifying the process significantly. Always download from official sources to avoid compromised files that could pose a digital security risk.
- A Computer with Internet Access: You’ll need this to download the Windows ISO file or Media Creation Tool. A stable internet connection is vital to prevent corrupt downloads.
- The Target Computer: This is the PC where you intend to install Windows. Ensure it’s powered on and accessible.
- Product Key (Optional, but Recommended): While you can often install Windows without immediately entering a product key, having it ready can streamline the activation process. Modern Windows versions often allow you to link the license to your Microsoft account, automatically activating upon signing in.
B. The Crucial Step: Backing Up Your Data
This cannot be stressed enough: Back up all critical data from the target computer before you begin the installation. Whether you’re performing a clean install or an upgrade, there’s always a risk, however small, of data loss. A fresh Windows installation typically involves formatting the primary drive, which irrevocably deletes all files.
Consider these backup strategies to maintain your productivity and digital security:
- External Hard Drive: A reliable and common method. Copy all your documents, photos, videos, and other essential files to an external drive.
- Cloud Storage: Services like OneDrive, Google Drive, Dropbox, or iCloud offer convenient cloud-based backup solutions. This is excellent for ensuring data accessibility from any device post-installation.
- Network-Attached Storage (NAS): For those with a home server or NAS device, this provides a robust local network backup solution.
- System Image (Advanced): If you wish to revert to your exact previous system state, you can create a full system image backup. However, for a clean install, this isn’t strictly necessary but serves as a complete disaster recovery option.
Taking the time to back up your data is not just a recommendation; it’s a foundational principle of responsible technology management and ensures that your valuable work and personal memories remain safe, regardless of any unforeseen installation hiccups.
II. Creating Your Bootable USB Drive: Your Gateway to Windows Installation
With your preparations complete and data secured, the next step is to transform your ordinary USB flash drive into a powerful Windows installation tool. There are primarily two widely used and recommended methods for achieving this: Microsoft’s official Media Creation Tool and the third-party utility, Rufus. Both are effective, but cater to slightly different user needs.
A. Method 1: Using Microsoft’s Media Creation Tool (Recommended for Most Users)
The Media Creation Tool is Microsoft’s official utility, designed to simplify the process of downloading the Windows ISO and creating bootable media. It’s user-friendly and ensures you get a genuine, unadulterated Windows image.
- Download the Tool: Navigate to Microsoft’s official Windows download page (e.g., for Windows 10 or Windows 11). Look for the section that says “Create Windows 10/11 Installation Media” and click to download the tool.
- Run the Tool: Once downloaded, double-click the
MediaCreationTool.exefile to run it. You might need administrator privileges. - Accept Terms: Read and accept the license terms.
- Choose “Create installation media (USB flash drive, DVD, or ISO file) for another PC”: Select this option when prompted.
- Select Language, Architecture, and Edition: The tool will usually pre-select the recommended options based on your current PC. If you’re installing on a different computer, uncheck “Use the recommended options for this PC” and choose your desired settings (e.g., English, 64-bit, Windows Home/Pro).
- Choose Media Type: Select “USB flash drive” as your media option.
- Select Your USB Drive: From the list of connected USB drives, carefully choose the correct one. Ensure it’s the drive you want to erase.
- Download and Create: The tool will then download the Windows files and write them to your USB drive. This process can take a significant amount of time depending on your internet speed and the speed of your USB drive. Do not remove the USB drive until the process is 100% complete and the tool confirms it’s finished.
B. Method 2: Using Rufus (For Advanced Users or Specific Scenarios)
Rufus is a popular, free, and open-source utility that offers more control over the bootable USB creation process. It’s often faster than the Media Creation Tool and provides options for different partition schemes (MBR vs. GPT) and boot types (BIOS vs. UEFI), which can be crucial for older or specialized hardware.
- Download Rufus: Go to the official Rufus website (rufus.ie) and download the latest portable version.
- Download Windows ISO (if not already done): If you haven’t already, you’ll need the standalone Windows ISO file. You can download this from Microsoft’s website using the Media Creation Tool (select “ISO file” in step 6 above) or other official channels.
- Run Rufus: Double-click the downloaded
rufus.exefile. It’s a portable app, so no installation is required. - Select Your USB Drive: Under “Device,” select your USB flash drive. Again, double-check that this is the correct drive.
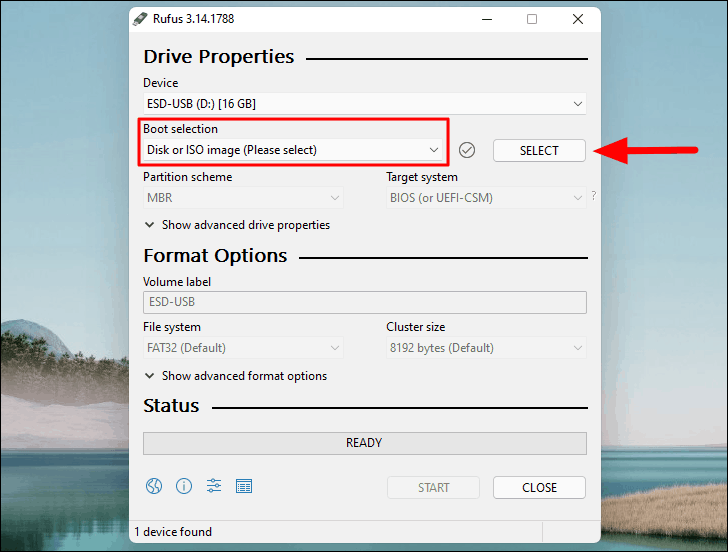
- Select the ISO: Click the “SELECT” button next to “Boot selection” and browse to your downloaded Windows ISO file.
- Choose Partition Scheme and Target System (Advanced):
- Partition scheme: For most modern PCs (post-2012), “GPT” is the correct choice, paired with “UEFI (non CSM)” for the target system. For older PCs (pre-2012) or specific legacy systems, “MBR” with “BIOS (or UEFI-CSM)” might be necessary. If unsure, “GPT” with “UEFI” is usually the safest bet for a clean install on modern hardware.
- File system: NTFS is the default and generally recommended.
- Start the Process: Click the “START” button. Rufus will warn you that all data on the USB drive will be destroyed. Confirm to proceed.
- Wait for Completion: Rufus will now create the bootable USB. This is usually faster than the Media Creation Tool but still requires patience. Once it says “READY,” you can close Rufus and safely remove your USB drive.
Whichever method you choose, your goal is to have a properly formatted USB drive containing the Windows installation files, ready to boot your target computer. This bootable USB is the essential “key” to unlocking a fresh Windows experience.
III. Initiating the Installation: Booting from USB and Windows Setup
With your bootable USB drive prepared, the next phase involves instructing your computer to boot from it and then navigating the initial stages of the Windows setup process. This step requires interacting with your computer’s firmware settings (BIOS or UEFI), which can seem daunting but is straightforward once you know where to look.
A. Adjusting BIOS/UEFI Settings for USB Boot
Your computer’s BIOS (Basic Input/Output System) or the more modern UEFI (Unified Extensible Firmware Interface) is the first software that runs when you power on your PC. It controls fundamental hardware operations, including the boot order.
- Insert the Bootable USB: Ensure your newly created bootable USB drive is securely plugged into an available USB port on the target computer.
- Access BIOS/UEFI Setup:
- Restart or power on your computer.
- Immediately and repeatedly press the designated key to enter the BIOS/UEFI setup utility. Common keys include
Del,F2,F10,F12, orEsc. The specific key varies by manufacturer (e.g., Dell, HP, Lenovo, Asus, Acer, MSI, Gigabyte). Look for a message on the screen during startup, like “Press F2 to enter Setup” or “Press DEL for BIOS.” - If you miss it, restart and try again.
- Locate Boot Options: Once in the BIOS/UEFI menu, navigate using your keyboard (mouse support is available in many modern UEFI interfaces). Look for sections like “Boot,” “Boot Order,” “Boot Priority,” or “Startup.”
- Prioritize USB Drive:
- Find your USB drive listed in the boot order (it might appear as “USB HDD,” “Removable Device,” or by its manufacturer name, e.g., “Kingston DataTraveler”).
- Use the on-screen instructions (often
+/-,F5/F6, or arrow keys) to move the USB drive to the top of the boot priority list. This tells your computer to try booting from the USB drive before attempting to boot from your internal hard drive. - UEFI Specifics: If your system uses UEFI, you might see separate options for “UEFI Boot” and “Legacy Boot.” Ensure “UEFI Boot” is enabled, and look for a specific UEFI entry for your USB drive. You might also need to temporarily disable “Secure Boot” if you encounter issues, though it’s often not necessary for official Windows media. Remember to re-enable it after installation for enhanced digital security.
- Save and Exit: Once you’ve adjusted the boot order, find the “Save and Exit,” “Exit Saving Changes,” or similar option (often mapped to
F10). Your computer will then restart and should boot directly from the USB drive.
B. Navigating the Windows Setup Wizard
Upon successful booting from the USB, you’ll be greeted by the familiar Windows Setup wizard. This guided process is relatively intuitive, but careful attention to certain steps is crucial.
- Language, Time, and Keyboard: The first screen will ask you to select your language, time and currency format, and keyboard or input method. Make your selections and click “Next.”
- Install Now: On the next screen, click the “Install now” button.
- Enter Product Key:
- You’ll be prompted to enter your Windows product key. If you have it, enter it now.
- If you don’t have it, or if Windows was previously activated on this PC (the license is tied to your hardware or Microsoft account), you can click “I don’t have a product key.” Windows will often activate automatically after installation once connected to the internet.
- Select Operating System: If your ISO contains multiple Windows editions (e.g., Home and Pro), select the edition you have a license for or intend to use.
- Accept License Terms: Read the license terms and check the box to accept them. Click “Next.”
- Choose Installation Type:
- Upgrade: Install Windows and keep files, settings, and applications: This option is only available if you’re running an older version of Windows and want to upgrade while retaining your data. It’s not a “clean install.”
- Custom: Install Windows only (advanced): This is the option you should choose for a clean installation, which is generally recommended for optimal performance and troubleshooting existing issues.
- Partitioning Your Drive (Critical Step for Clean Install):
- This is where you manage your hard drive space. You’ll see a list of drives and partitions.
- For a clean install on a drive that previously had Windows: Select each existing partition related to your old Windows installation (e.g., “C:”, “System Reserved,” “Recovery”) and click “Delete.” Be absolutely sure you’ve backed up all data before doing this. Deleting these partitions frees up the space.
- Once you have unallocated space (or if you’re installing on a brand new, unformatted drive), select the “Unallocated Space” and click “New” to create a new partition. Windows will typically create a primary partition and a few small system partitions automatically.
- Select the main partition where you want to install Windows (usually the largest one) and click “Next.”
- Windows Installation: The setup will now copy files and install Windows. Your computer will restart several times during this process. Do not remove the USB drive until the installation has truly completed and you see the initial setup screens for Windows itself (e.g., “Let’s start with a region”).
After the final restart, Windows will guide you through the initial Out-Of-Box Experience (OOBE), where you’ll set up your region, keyboard layout, Microsoft account, privacy settings, and other preferences. Follow the prompts to complete this setup.
IV. Post-Installation Essentials: Optimizing Your New Windows Environment
Congratulations! You’ve successfully installed Windows from a USB drive. However, the journey doesn’t end there. The post-installation phase is crucial for ensuring your system is secure, performs optimally, and is equipped with all the tools necessary for maximum productivity.
A. Installing Drivers and System Updates
A clean Windows installation often comes with generic drivers that provide basic functionality but may not unlock your hardware’s full potential. Furthermore, continuous security updates are paramount for digital security.
- Run Windows Update:
- The first thing you should do is connect to the internet (if not already connected during OOBE).
- Go to
Settings > Update & Security > Windows Update(for Windows 10) orSettings > Windows Update(for Windows 11) and click “Check for updates.” - Allow Windows to download and install all available updates. This process might take a while and involve multiple restarts, but it’s vital for patching vulnerabilities and installing essential system components and sometimes even critical drivers.
- Install Hardware Drivers:
- Even after Windows Update, it’s often best to install the latest drivers directly from your computer manufacturer’s website (for pre-built PCs like Dell, HP, Lenovo) or individual component manufacturers (for custom-built PCs, e.g., NVIDIA/AMD for graphics, Realtek for audio, Intel/AMD for chipset).
- Visit the support page for your specific PC model or motherboard. Download and install drivers for:
- Chipset
- Graphics Card (GPU)
- Network Adapter (Wi-Fi and Ethernet)
- Audio
- Any other specific peripherals or components.
- Installing manufacturer-specific drivers often provides better performance, stability, and access to unique features.
B. Essential Software Installation and Configuration
With your system up-to-date and drivers installed, it’s time to equip your PC with the software you need for work, creativity, and daily tasks.
- Antivirus/Security Software: While Windows Defender provides robust built-in protection, you might prefer a third-party antivirus solution. Install it immediately to establish a strong first line of defense against malware and other cyber threats, bolstering your digital security.
- Web Browser: Install your preferred web browser (Chrome, Firefox, Edge, Brave, etc.) if you don’t want to use the default Edge.
- Productivity Suite: Install your office suite, such as Microsoft 365 (Word, Excel, PowerPoint), LibreOffice, or Google Workspace desktop apps.
- Communication Tools: Install any necessary communication apps like Zoom, Microsoft Teams, Slack, or Discord.
- Creative and Utility Software: Install any specialized software for your work or hobbies, such as photo/video editors, CAD software, development environments, or utility tools.
- Cloud Storage Sync: Reinstall and configure your cloud storage clients (OneDrive, Google Drive, Dropbox) to sync your backed-up files back to your PC, ensuring seamless access and continued productivity.
- Data Backup Strategy: Re-establish your backup routine. This might involve configuring an automatic cloud backup, scheduling regular backups to an external drive, or setting up a robust NAS solution. A consistent backup strategy is the cornerstone of long-term digital security and uninterrupted productivity.

C. System Optimization and Personalization
Finally, take a moment to fine-tune your new Windows environment to your liking.
- Personalize Settings: Adjust your desktop background, theme, lock screen, and account picture.
- Privacy Settings: Review and adjust your Windows privacy settings (
Settings > Privacy & security) to ensure they align with your preferences for data collection and sharing. - Power Options: Configure power plans to optimize for performance or energy saving, based on your usage patterns.
- Uninstall Bloatware: Some pre-built PCs or even Windows installations might include unwanted software. Take a moment to uninstall any applications you don’t need to free up resources and improve performance.
- Organize Files: Create a logical folder structure for your documents, downloads, and media to enhance your future productivity.
By diligently following these post-installation steps, you not only ensure your Windows system is stable and secure but also tailor it into a highly efficient and personalized workspace. This proactive approach to technology management empowers you to maximize your digital experience, fostering both peace of mind and enhanced productivity.
aViewFromTheCave is a participant in the Amazon Services LLC Associates Program, an affiliate advertising program designed to provide a means for sites to earn advertising fees by advertising and linking to Amazon.com. Amazon, the Amazon logo, AmazonSupply, and the AmazonSupply logo are trademarks of Amazon.com, Inc. or its affiliates. As an Amazon Associate we earn affiliate commissions from qualifying purchases.