In today’s rapidly evolving technological landscape, staying current with your operating system is crucial for both personal productivity and professional success. Windows 10, despite the advent of Windows 11, remains a widely used and robust operating system, offering a stable and feature-rich environment for a vast array of tasks. Whether you’re setting up a new computer, upgrading an older machine, or performing a clean installation to resolve persistent issues, installing Windows 10 using a USB drive is a flexible, efficient, and accessible method. This guide will walk you through the entire process, from preparing your materials to the final boot-up, ensuring a smooth and successful installation.

Preparing for a Seamless Windows 10 Installation
Before you even begin the download process, it’s essential to ensure you have all the necessary components and information ready. This proactive approach will prevent potential roadblocks and make the installation smoother.
Gathering Your Essential Tools and Resources
To embark on your Windows 10 installation journey with a USB drive, you’ll need a few key items:
- A USB Flash Drive: This is your primary installation medium. It needs to have a minimum capacity of 8GB. While 8GB is the minimum requirement, having a 16GB or larger drive is always recommended, as it provides a bit more breathing room and can be useful for future updates or additional bootable tools. Ensure the USB drive is not one you need for other important data, as the process of creating a bootable drive will erase all existing content on it.
- A Working Computer with Internet Access: You’ll need another functional computer to download the Windows 10 Media Creation Tool and create the bootable USB drive. This computer will also be where you perform the initial setup of the USB installer.
- Your Windows 10 Product Key (Optional but Recommended): If you are upgrading from a previous genuine Windows version or have a retail copy of Windows 10, you likely have a product key. While Windows 10 can often be activated with a digital license linked to your Microsoft account, having your product key handy is a good backup. If you’re performing a clean install on a machine that previously had an activated Windows 10, it might automatically activate upon connecting to the internet, recognizing the hardware ID.
- A Target Computer for Installation: This is the machine where you intend to install Windows 10. Ensure it meets the minimum system requirements for Windows 10:
- Processor: 1 gigahertz (GHz) or faster processor or System on a Chip (SoC)
- RAM: 1 gigabyte (GB) for 32-bit or 2 GB for 64-bit
- Hard disk space: 16 GB for 32-bit OS or 20 GB for 64-bit OS
- Graphics card: DirectX 9 or later with WDDM 1.0 driver
- Display: 800×600 resolution
- Backup of Important Data: This is a critical step. If you are installing Windows 10 on a computer that already has data, you must back up all your important files, documents, photos, and any other personal data to an external hard drive, cloud storage, or another safe location. A clean installation will format the drive, deleting everything on it.
Understanding the Windows 10 Media Creation Tool
Microsoft provides a free and straightforward tool called the Media Creation Tool specifically designed to help users download Windows 10 and create bootable installation media, including USB drives. This tool automates much of the complex process, making it accessible to users of all technical skill levels.
Downloading the Media Creation Tool:
- Navigate to the Official Microsoft Download Page: Open your web browser and go to the official Microsoft website for downloading Windows 10. A quick search for “Download Windows 10” will lead you to the correct page.
- Download the Tool: On the download page, you will see a prominent button, typically labeled “Download tool now.” Click this button to download the Media Creation Tool executable file.
- Run the Tool: Once the download is complete, locate the downloaded file (usually in your Downloads folder) and double-click it to run it. You may be prompted by User Account Control (UAC) to allow the app to make changes to your device. Click “Yes” to proceed.
- Accept the License Terms: The tool will present you with Microsoft’s license terms. Read through them, and if you agree, click “Accept.”
- Choose “Create installation media (USB flash drive, DVD, or ISO file) for another PC”: On the “What do you want to do?” screen, select this option. This is crucial because you’re preparing the media on one computer to install on another (or the same one, but the process is designed for creating media).
- Select Language, Architecture, and Edition: The Media Creation Tool will then prompt you to choose the language, edition, and architecture (32-bit or 64-bit) for Windows 10. By default, it will suggest options recommended for your current PC. However, if you are creating media for a different computer, you might need to uncheck “Use the recommended options for this PC” and make your selections manually. For most modern computers, 64-bit architecture is recommended. If you’re unsure, check the system information of the target PC.
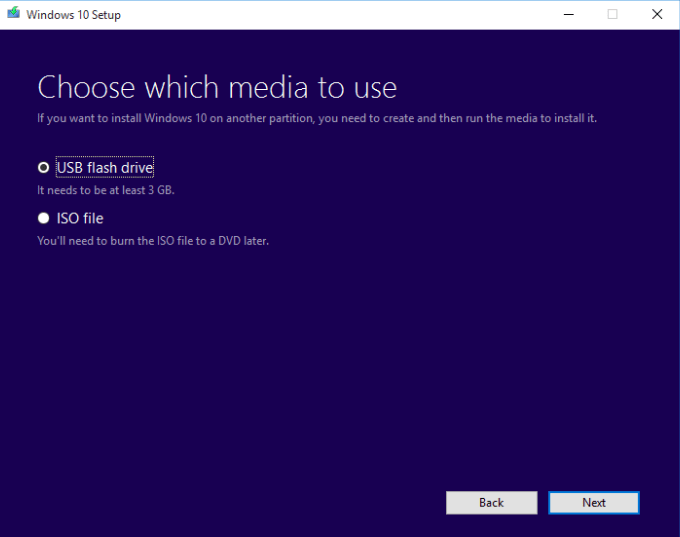
- Choose “USB flash drive”: On the “Choose which media to use” screen, select “USB flash drive.” Make sure your 8GB or larger USB drive is plugged into the computer.
- Select Your USB Drive: The tool will scan for connected USB drives and list them. Carefully select the correct USB drive you wish to use. Double-check that you’ve chosen the right one, as the next step will format it.
- Download and Create: Click “Next.” The Media Creation Tool will now download the necessary Windows 10 files and create the bootable USB drive. This process can take a significant amount of time depending on your internet speed and the performance of your computer. You’ll see a progress indicator. Do not unplug the USB drive or shut down the computer during this process.
- Completion: Once the process is finished, you’ll see a message indicating that your USB flash drive is ready. Click “Finish.”
Your bootable Windows 10 USB drive is now created and ready for the installation process.
Installing Windows 10 from the USB Drive
With your bootable USB drive prepared, you can now proceed to install Windows 10 on your target computer. This involves configuring the computer’s BIOS/UEFI settings to boot from the USB drive.
Booting from the USB Drive and Initiating the Installation
This step requires you to access your computer’s boot menu or BIOS/UEFI settings. The exact method varies depending on your computer’s manufacturer and model.
- Insert the Bootable USB Drive: Plug the Windows 10 bootable USB drive into a USB port on the target computer.
- Restart the Target Computer: If the computer is on, restart it. If it’s off, power it on.
- Access the Boot Menu or BIOS/UEFI: As the computer starts to boot up, you’ll need to press a specific key to enter the BIOS/UEFI setup or the Boot Menu. Common keys include:
- F2
- F10
- F12
- DEL (Delete)
- ESC (Escape)
Look for a message on the screen during the initial boot sequence that says something like “Press F2 to enter Setup,” “Press F12 for Boot Menu,” or “Press DEL to enter BIOS.” You might need to be quick to press the correct key as the prompt may only appear for a few seconds. If you miss it, restart the computer and try again.
- Navigate to Boot Settings:
- If you entered the Boot Menu: You will see a list of bootable devices. Use your arrow keys to select your USB drive (it might be listed by its brand name, or as “USB HDD,” “Removable Device,” etc.) and press Enter.
- If you entered BIOS/UEFI Setup: Navigate to the “Boot” or “Boot Order” section. This section allows you to define the sequence in which your computer attempts to boot from different devices. You’ll need to change the boot order so that the USB drive is listed before your hard drive or SSD. Use the keys indicated on the screen (usually arrow keys, Page Up/Page Down, or +/- keys) to move the USB drive to the top of the boot order.
- Save Changes and Exit: Once you’ve configured the boot order, find the option to “Save Changes and Exit” (often mapped to F10). Confirm your choice.
- The Windows Setup Begins: The computer will restart again. This time, if you’ve configured the boot order correctly, it should boot from the USB drive. You’ll see a message like “Press any key to boot from USB…” or a Windows logo. Press any key to proceed. The Windows Setup wizard will then launch.
Configuring Installation Settings and Partitioning
The Windows Setup wizard will guide you through the installation process. Pay close attention to each step.
-
Language, Time, and Keyboard Layout: On the first screen of the Windows Setup, select your preferred language, time and currency format, and keyboard or input method. Click “Next.”
-
Install Now: Click the prominent “Install now” button.
-
Enter Product Key (or Skip): If you have your Windows 10 product key, enter it now. If you don’t have it readily available or are performing a clean install on a system that was previously activated, you can click “I don’t have a product key.” Windows will likely activate automatically later if it’s a digital license.
-
Choose Operating System Edition: If you skipped the product key, you’ll be prompted to choose the edition of Windows 10 you want to install (e.g., Windows 10 Home, Windows 10 Pro). Make sure this matches your product key or intended license.
-
Accept License Terms: Read and accept the Microsoft license terms.
-
Choose Installation Type: This is a crucial step:
- Upgrade: This option installs Windows 10 and keeps your files, settings, and applications. It’s generally used when upgrading from an older version of Windows.
- Custom: Install Windows only (advanced): This option performs a clean installation. It’s the recommended method for a fresh start, troubleshooting issues, or installing on a new drive. This will erase all data on the selected partition.
Select “Custom: Install Windows only (advanced)” for a clean installation.
-
Drive Management (Partitioning): You’ll now see a list of drives and partitions on your computer. This is where you decide where to install Windows 10.
- For a clean install on an empty drive: You’ll likely see “Unallocated Space.” Select this and click “New” to create a partition, then click “Apply.” Windows will automatically create necessary system partitions. Then select the primary partition you just created and click “Next.”
- For a clean install on a drive with existing partitions: Be extremely careful. If you want to completely wipe the drive, select each existing partition one by one and click “Delete” until you have only “Unallocated Space.” Then proceed as above to create a new partition. If you want to install on a specific partition and format only that one, select the target partition, click “Format,” and then click “Next.” Again, ensure you have backed up all data before deleting or formatting any partitions.
-
Installing Windows: Once you’ve selected or created your desired partition, click “Next.” Windows will now begin copying files, installing features, and installing updates. This process will take some time, and your computer will restart multiple times. Do not remove the USB drive until you are prompted to do so or until you have completed the initial setup.
Completing the Windows 10 Setup and Personalization
After the core installation is complete and your computer has restarted, you’ll be guided through the final setup and personalization steps to get your Windows 10 environment ready for use.
Setting Up Your Windows 10 Account and Preferences
- Region and Keyboard Layout: You might be asked to confirm your region and keyboard layout again.
- Network Connection: Connect to your Wi-Fi network or a wired Ethernet connection. This is important for downloading updates and signing into your Microsoft account.
- Account Setup:
- Microsoft Account: You’ll be prompted to sign in with your Microsoft account (Outlook, Hotmail, Live.com email). This links your Windows 10 license, syncs settings across devices, and gives you access to the Microsoft Store and OneDrive.
- Local Account: If you prefer not to use a Microsoft account, look for an option to create a “Offline account” or “Local account.” You’ll then set up a username and password for your computer.
- Cortana and Privacy Settings: You’ll have the option to enable or disable Cortana (Microsoft’s virtual assistant) and configure various privacy settings, such as location services, diagnostic data, and advertising ID. It’s recommended to review these settings carefully to ensure they align with your comfort level.
- Choose Your Privacy Settings: Microsoft presents a summary of privacy settings. Review them and select “Accept” or customize them further.
- Pinning and Services: You may be asked about personalizing your experience by pinning apps to the Start menu or choosing services you want to use.
- Finalizing: Windows will perform some final setup tasks. This might involve a few more restarts.

Post-Installation Essentials: Drivers and Updates
Once you reach the Windows 10 desktop, your installation is largely complete, but there are a few crucial steps to ensure your system runs optimally and is secure.
- Install Drivers: While Windows 10 often installs generic drivers automatically, it’s essential to install the specific drivers for your computer’s hardware, especially for graphics cards, network adapters, and chipsets.
- Check Device Manager: Right-click the Start button and select “Device Manager.” Look for any devices with a yellow exclamation mark, indicating a missing or problematic driver.
- Manufacturer’s Website: The best way to get the latest drivers is to visit the support section of your computer manufacturer’s website (e.g., Dell, HP, Lenovo) or the website of individual hardware component manufacturers (e.g., NVIDIA, AMD, Intel). Download and install the latest drivers for your specific model.
- Run Windows Update:
- Go to Settings > Update & Security > Windows Update.
- Click “Check for updates.”
- Windows will download and install any available updates, including security patches and feature improvements. This is vital for keeping your system secure and stable. You may need to restart your computer several times to complete all updates.
- Activate Windows (if not already): If you skipped entering your product key during installation, go to Settings > Update & Security > Activation to check your activation status and enter your product key if needed.
- Install Your Essential Software: Now you can begin installing your favorite applications, web browsers, productivity tools, and any other software you need.
By following these steps, you’ve successfully installed Windows 10 using a USB drive, ensuring a clean, up-to-date, and personalized computing experience. This method provides flexibility and control, making it an indispensable skill for any tech-savvy individual.
aViewFromTheCave is a participant in the Amazon Services LLC Associates Program, an affiliate advertising program designed to provide a means for sites to earn advertising fees by advertising and linking to Amazon.com. Amazon, the Amazon logo, AmazonSupply, and the AmazonSupply logo are trademarks of Amazon.com, Inc. or its affiliates. As an Amazon Associate we earn affiliate commissions from qualifying purchases.