Chromebooks, with their lightweight ChromeOS and focus on cloud computing, have carved out a significant niche in the computing world. They’re lauded for their simplicity, security, and affordability, making them ideal for students, casual users, and those whose primary tasks revolve around web browsing and Google Workspace. However, for a segment of users, the limitations of ChromeOS can become apparent. The inability to run native Windows applications, specialized software, or certain games often leads to the question: can I install Windows 10 on my Chromebook?
The answer, while not always straightforward, is a resounding “yes” – at least for many models. Transforming your Chromebook into a Windows machine can unlock a new realm of productivity and possibilities, especially for those who appreciate the hardware design and portability of their Chromebook but need the versatility of Windows. This comprehensive guide will walk you through the various methods, prerequisites, and considerations involved in bringing Windows 10 to your Chromebook, turning a seemingly restricted device into a powerful, dual-purpose laptop. We’ll delve into the technicalities, offer practical advice, and ensure you have all the information needed to make an informed decision and execute the transition successfully.
The “Why” and What You Need to Know Before You Start
Before embarking on the journey of installing Windows 10 on your Chromebook, it’s crucial to understand the motivations, the potential benefits, and the significant prerequisites and warnings involved. This isn’t a trivial undertaking, and a clear understanding of what you’re getting into will save you time, frustration, and potentially data loss.
Why Migrate from ChromeOS to Windows 10?
The primary driver for wanting to install Windows 10 on a Chromebook is almost always software compatibility. ChromeOS excels at web-based tasks and Android apps, but it simply cannot run native Windows applications like Adobe Photoshop, Microsoft Office desktop versions (beyond the web apps), specialized engineering software, or many popular PC games. For professionals, students, or enthusiasts who rely on such software, a Chromebook, despite its many virtues, can feel limiting.
- Software Freedom: Windows 10 offers unparalleled access to a vast ecosystem of software, from productivity suites to development tools and entertainment applications.
- Gaming: While Chromebooks aren’t gaming machines, some low-to-mid-range Windows games can run surprisingly well on adequately specced Chromebook hardware, especially after installing Windows.
- Hardware Repurposing: Many Chromebooks boast excellent build quality, keyboards, and displays. Instead of buying a new Windows laptop, repurposing an existing Chromebook can be a cost-effective way to get a Windows machine, aligning with principles of financial prudence and sustainable tech use.
- Learning and Development: For tech enthusiasts, the process of flashing custom firmware and installing a new OS is an excellent learning experience, providing deeper insight into hardware and software interactions.
- Productivity Boost: For some users, Windows offers a more familiar and feature-rich desktop environment that can enhance specific workflows, especially those involving complex multi-tasking or specific peripheral support not native to ChromeOS.
Essential Prerequisites and Warnings
Installing Windows 10 on a Chromebook is not officially supported by Google or the device manufacturers. This means you’ll be venturing into unsupported territory, with associated risks.
- Hardware Compatibility: Not all Chromebooks are created equal, nor are they all capable of running Windows. The most critical factor is the processor. Generally, Chromebooks with Intel processors (especially Broadwell, Skylake, Kaby Lake, Gemini Lake, Amber Lake, Whiskey Lake, Comet Lake, Tiger Lake, or Jasper Lake) are good candidates. ARM-based Chromebooks are typically incompatible with Windows 10 (which primarily supports x86/x64 architecture). You’ll also need sufficient RAM (4GB minimum, 8GB recommended) and adequate internal storage (64GB SSD or more is ideal for Windows).
- Backup Everything: This cannot be stressed enough. The process of modifying your Chromebook’s firmware and wiping its storage will irrevocably erase all data on the device. Sync all your Google Drive files, export bookmarks, and save any local files to external storage or the cloud.
- Warranty Void: Modifying your Chromebook’s firmware (which is necessary for most direct Windows installations) will almost certainly void your manufacturer’s warranty. Proceed with caution and at your own risk.
- Developer Mode: You’ll need to enable Developer Mode on your Chromebook. This process also wipes your device and reduces its security posture by allowing unsigned code to run.
- Peripherals: You’ll likely need a USB drive (8GB or larger) for the Windows installation media and potentially a second one for drivers. A USB mouse and keyboard might also be necessary during the initial setup if your Chromebook’s trackpad and keyboard aren’t immediately recognized by Windows.
- Patience and Technical Aptitude: This is not a plug-and-play process. It involves command-line interfaces, firmware flashing, and driver hunting. If you’re uncomfortable with technical troubleshooting, you might want to reconsider or seek assistance.
- Driver Availability: After installing Windows, you’ll need drivers for components like Wi-Fi, Bluetooth, audio, graphics, and the trackpad. Specialized communities (most notably MrChromebox.tech) provide custom UEFI firmware and driver packages, but specific drivers for your exact model might be challenging to find or may not exist, leading to non-functional hardware.
- Performance Expectations: Even if Windows 10 installs successfully, the performance might not be on par with a laptop designed specifically for Windows. Chromebook hardware is optimized for ChromeOS, and some components might not perform optimally with Windows.
Method 1: The Full Transition – Replacing ChromeOS with Windows 10
This method is the most comprehensive and challenging but ultimately yields a true Windows 10 experience on your Chromebook hardware. It involves replacing the Chromebook’s stock firmware with a custom UEFI firmware, allowing the device to boot a standard Windows installer.
Unlocking Your Chromebook’s Potential with Custom Firmware
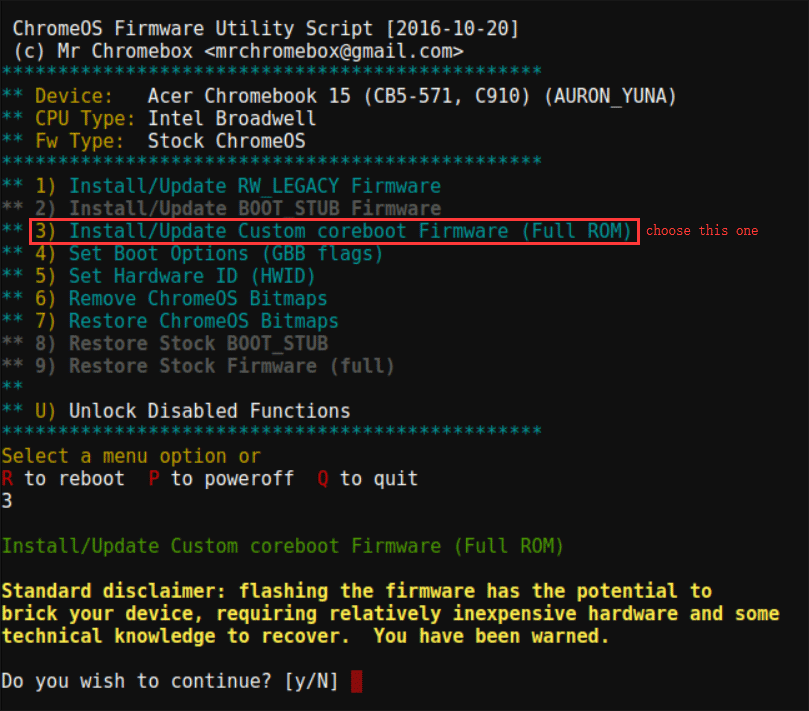
Chromebooks use a locked bootloader that prevents unauthorized operating systems from being installed. To bypass this, you need to replace the stock firmware with a custom UEFI firmware. The most respected and widely used tool for this is the script provided by MrChromebox.tech.
- Enable Developer Mode: Powerwash your Chromebook and enter Developer Mode. This typically involves holding
Esc+Refresh+Powerbuttons, then pressingCtrl + Dwhen prompted, and confirming the OS verification off. Your device will wipe itself and reboot into Developer Mode. - Remove Write Protection: For many Chromebook models, you’ll need to physically disable write protection before flashing custom firmware. This often involves removing a specific screw on the motherboard (known as the “write protect screw” or “WP screw”) or disconnecting a battery cable. Consult MrChromebox’s website for specific instructions for your exact Chromebook model, as this step varies greatly and is crucial.
- Run the Firmware Utility Script:
- Once in Developer Mode and with write protection disabled, open a ChromeOS terminal by pressing
Ctrl + Alt + T. - Type
shelland press Enter. - Execute the firmware utility script by typing the following command and pressing Enter:
cd; curl -LO https://mrchromebox.tech/firmware-util.sh && sudo bash firmware-util.sh - The script will present a menu of options. Select the option to “Install/Update Full ROM Firmware” (usually option
3). - Follow the on-screen prompts carefully. The script will download and flash the custom UEFI firmware. This process is critical; do not interrupt it.
- Once complete, the script will prompt you to reboot. Your Chromebook is now ready to boot Windows.
- Once in Developer Mode and with write protection disabled, open a ChromeOS terminal by pressing
Creating Your Windows 10 Installation Media
You’ll need a bootable USB drive containing the Windows 10 installation files.
- Download Windows 10 ISO: On a separate Windows computer (or even your Chromebook if you use a Linux VM to run
WoeUSBor similar tools, though a native Windows PC is easier), download the official Windows 10 ISO file from Microsoft’s website. - Create Bootable USB:
- Insert a USB flash drive (8GB or larger).
- Download and run the Rufus utility (or Microsoft’s Media Creation Tool, though Rufus offers more flexibility for specific UEFI settings).
- In Rufus, select your USB drive, then select the downloaded Windows 10 ISO.
- Crucially, ensure the “Partition scheme” is set to “GPT” and the “Target system” is “UEFI (non-CSM).” The “File system” should be “FAT32” for broad UEFI compatibility.
- Click “Start” to create the bootable USB.
The Installation Process: Step-by-Step
With the custom firmware flashed and the bootable Windows USB ready, you can now install Windows 10.
- Boot from USB:
- Insert the Windows 10 bootable USB into your Chromebook.
- Power on your Chromebook. It should automatically detect the USB and boot into the Windows installer. If it doesn’t, you might need to press a specific key (often
Esc,F2, orDel– watch for on-screen prompts, or consult MrChromebox’s site for your model’s boot key) immediately after powering on to access the boot menu and select your USB drive.
- Windows Setup:
- Follow the standard Windows installation prompts. Select your language, time, and keyboard preferences.
- Click “Install now.”
- When prompted for a product key, you can enter it if you have one, or click “I don’t have a product key” to proceed; you can activate Windows later.
- Choose the edition of Windows 10 you wish to install (e.g., Home or Pro).
- Accept the license terms.
- Select “Custom: Install Windows only (advanced).”
- Partitioning: This is a critical step. You will see several partitions from the previous ChromeOS installation. Delete all existing partitions on the Chromebook’s internal drive until you have one unallocated space. Then, select this unallocated space and click “New” to create new partitions, or simply click “Next” to let Windows create them automatically.
- Windows will now begin installing. This process will involve several reboots.
- Initial Setup:
- After the installation finishes and Windows reboots, you’ll be guided through the initial Windows setup: region, keyboard layout, network connection, account creation, and privacy settings.
- During this stage, your Chromebook’s trackpad and keyboard might not work. This is normal. Use a USB mouse and keyboard until the necessary drivers are installed.
Post-Installation: Drivers and Optimization
This is arguably the most challenging part of the entire process, as Windows often won’t have built-in drivers for Chromebook-specific hardware.
- Download Drivers: Before starting Windows installation, it’s highly recommended to download the necessary driver package for your specific Chromebook model from MrChromebox’s website onto a separate USB drive. These packages typically include drivers for Wi-Fi, Bluetooth, audio, trackpad, and sometimes even keyboard shortcuts.
- Install Drivers:
- Once Windows is up and running (even if basic functionalities like Wi-Fi or trackpad are missing), insert the USB drive containing the drivers.
- Run the installer or manually install drivers via Device Manager. Prioritize Wi-Fi and Bluetooth drivers first to enable internet access.
- If you can’t get Wi-Fi working immediately, consider using a USB-to-Ethernet adapter if your Chromebook supports it, or tethering to your phone via USB.
- Windows Updates: Once connected to the internet, run Windows Update repeatedly until all available updates are installed. This will often fetch generic drivers that might improve functionality or performance.
- Power Management & Performance:
- Chromebooks are designed for low power consumption with ChromeOS. Windows 10 might consume more power, leading to reduced battery life.
- Ensure all graphics drivers are installed for optimal display performance.
- Consider disabling unnecessary background apps and services to improve performance on lower-specced hardware.
- For trackpad gestures and advanced features, you might need to install specific drivers or utilities (e.g., from the relevant component manufacturer like ELAN or Synaptics).
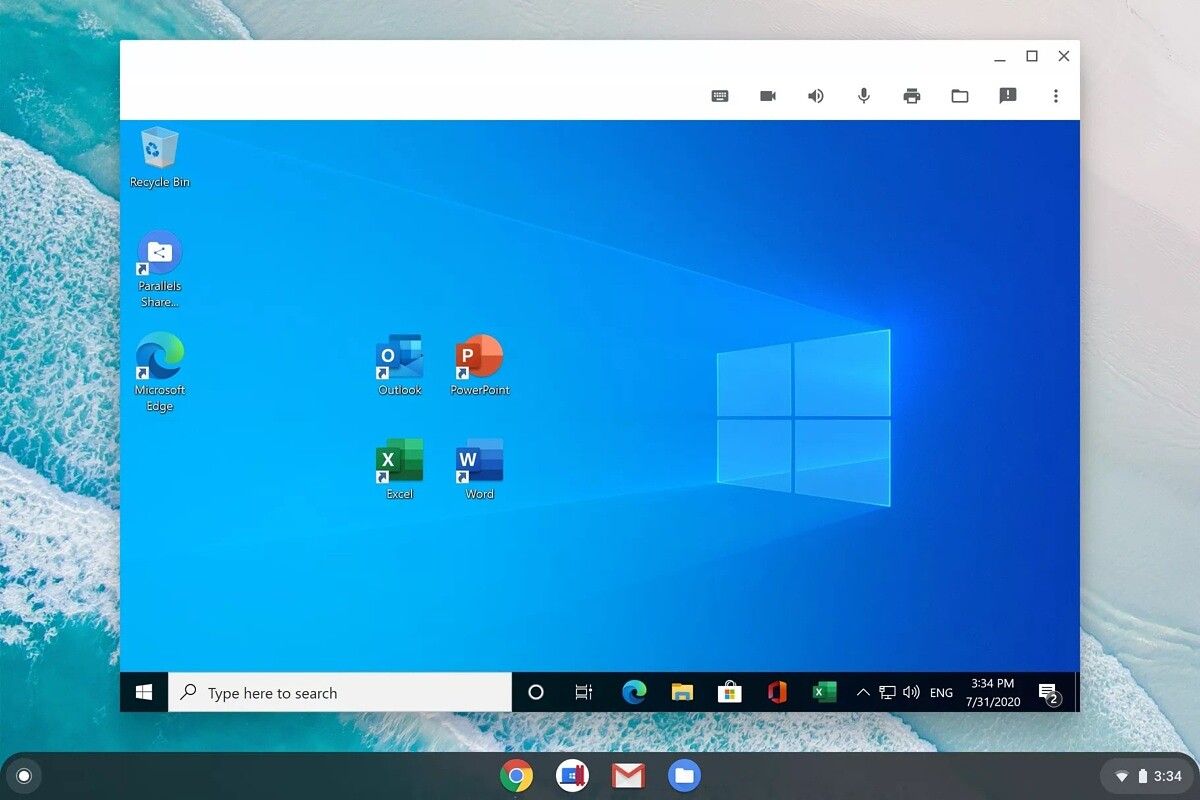
Method 2: The Virtual Solution – Running Windows 10 within ChromeOS
For those who prefer not to completely overhaul their Chromebook or risk damaging it, running Windows 10 in a virtual machine (VM) is an excellent alternative. This method allows you to retain ChromeOS while still gaining access to Windows applications, albeit with a performance overhead.
Enabling Linux (Crostini) on Your Chromebook
Modern Chromebooks (generally those released in the last few years with sufficient RAM and storage) support Crostini, which allows you to run a full Linux environment within ChromeOS. This Linux environment is key to hosting a virtual machine.
- Check Compatibility: Go to your Chromebook’s settings. Look for “Linux (Beta)” or “Developers.” If you see it, your Chromebook supports Crostini.
- Enable Linux Development Environment:
- Navigate to
Settings>Developers>Linux development environment. - Click “Turn on.”
- Follow the on-screen prompts to set up your Linux environment. You’ll be asked to choose a username and disk size. It’s recommended to allocate at least 20-30GB for Linux if you plan to install a VM.
- Once set up, a Linux terminal window will appear. You now have a Debian-based Linux distribution running on your Chromebook.
- Navigate to
Setting Up a Virtual Machine
With Linux enabled, you can now install virtualization software like VirtualBox or GNOME Boxes to host Windows 10.
- Install Virtualization Software (e.g., VirtualBox):
- Open your Linux terminal on the Chromebook.
- Update your package list:
sudo apt update - Install necessary dependencies:
sudo apt install build-essential linux-headers-$(uname -r) - Download VirtualBox: Go to the VirtualBox website on your Chromebook’s Chrome browser. Navigate to the Downloads page, and select the Debian 11 (Bullseye) package for your Chromebook’s architecture (likely
amd64). - Install VirtualBox: Once downloaded, open your Linux terminal, navigate to your Downloads folder (
cd ~/Downloads), and install the.debpackage usingsudo apt install ./virtualbox-*.deb. - Alternatively, you can often install it directly from the Debian repositories:
sudo apt install virtualbox.
- Download Windows 10 ISO: As with Method 1, download the official Windows 10 ISO file from Microsoft’s website. Save it to your Linux files within the Chromebook (e.g.,
/home/youruser/Downloads). - Create Your Windows 10 Virtual Machine:
- Launch VirtualBox from your ChromeOS app launcher (it will be under the “Linux apps” folder).
- Click “New” to create a new virtual machine.
- Give it a name (e.g., “Windows 10 VM”).
- Select “Microsoft Windows” as the type and “Windows 10 (64-bit)” as the version.
- Allocate RAM: Give the VM at least 4GB (4096MB) of RAM if your Chromebook has 8GB or more. If you only have 4GB total, allocate 2GB to the VM, but expect slower performance.
- Create Virtual Hard Disk: Choose “Create a virtual hard disk now” and click “Create.” Select VDI (VirtualBox Disk Image) and “Dynamically allocated.” Allocate at least 50-60GB for the virtual hard disk.
- Mount ISO: Once the VM is created, go to its settings (
Storage>Controller: IDE>EmptyCD icon) and select your downloaded Windows 10 ISO file as the virtual optical drive. - Start the VM: Click “Start” to power on the virtual machine. It will boot from the Windows 10 ISO.
- Install Windows 10 in the VM: Follow the standard Windows 10 installation steps as outlined in Method 1. The process is identical, but it occurs within the virtualized environment.
- Install VirtualBox Guest Additions: After Windows 10 is installed and running inside the VM, go to
Devices>Insert Guest Additions CD Imagein the VirtualBox menu. This will mount a virtual CD containing drivers and utilities that enhance VM performance, enable seamless mouse integration, shared clipboards, and better display resolution. Run the installer from within the Windows VM.
Performance Expectations and Limitations
Running Windows 10 in a VM on a Chromebook comes with inherent performance limitations:
- Resource Overhead: Both ChromeOS and the Linux container consume resources, on top of the VM itself. Performance will be noticeably slower than a native Windows installation or a dedicated Windows PC.
- Gaming & Graphics: Gaming or graphically intensive applications are generally not feasible due to the lack of direct hardware access for the VM and the overhead.
- Storage and RAM: Ensure your Chromebook has ample storage and RAM (8GB+ RAM, 128GB+ storage is recommended) for a usable VM experience.
- Battery Life: Running a VM will significantly increase power consumption and reduce battery life.
- Integration: While Guest Additions improve integration, there will always be a slight disconnect compared to a native OS.
This method is best for running light Windows applications, legacy software, or for development purposes where direct hardware access isn’t critical.
Considerations and Troubleshooting
Regardless of the method chosen, installing Windows 10 on a Chromebook is a complex endeavor that may present various challenges. Anticipating and preparing for these can save a lot of headaches.
Common Challenges and How to Address Them
- Driver Issues: This is the most prevalent problem. Wi-Fi, Bluetooth, audio, trackpad, and function keys often don’t work out of the box.
- Solution: Always pre-download driver packages from MrChromebox.tech or search forums for your specific Chromebook model (code name). Some components might share drivers with common PC hardware. Be prepared to search online using another device if you can’t get Wi-Fi working.
- No Boot from USB: If your Chromebook won’t boot from the Windows installation USB after flashing custom firmware.
- Solution: Ensure your USB drive is formatted correctly (GPT partition scheme, FAT32 filesystem, UEFI bootable) using Rufus. Check the boot order in the firmware settings (if accessible) or try different USB ports. Make sure your USB drive itself is functional.
- Performance Problems: Sluggishness, freezing, or slow boot times.
- Solution (Full Install): Ensure all relevant drivers are installed, especially graphics drivers. Update Windows fully. Adjust Windows power settings to “High Performance.” Disable unnecessary startup programs. Consider a lightweight Windows 10 version or optimizing privacy settings.
- Solution (VM): Increase RAM and CPU core allocation to the VM (if your physical hardware allows). Install VirtualBox Guest Additions. Ensure your Chromebook isn’t overloaded with other ChromeOS tasks.
- Storage Limitations: Running out of space quickly.
- Solution: Windows 10 requires a decent amount of space. If your Chromebook has limited storage (e.g., 32GB), it might not be feasible for a full install. For VMs, ensure you allocated enough space to the virtual hard disk. Consider regularly cleaning up temporary files and uninstalling unused apps.
- Battery Drain: Significantly reduced battery life.
- Solution: This is often an unavoidable consequence, as Windows isn’t as power-optimized for Chromebook hardware as ChromeOS. Ensure all chipset and power management drivers are installed. Adjust Windows power plans.
Reverting to ChromeOS (If Things Go Wrong)
If you’re unhappy with the Windows experience or encounter insurmountable issues, it’s usually possible to revert your Chromebook to its original ChromeOS state.
- Download Recovery Image: On a working computer, use the official Chrome Recovery Utility (a Chrome browser extension) to create a ChromeOS recovery image on a separate USB drive. Select your exact Chromebook model.
- Restore Stock Firmware: If you performed a full Windows installation (Method 1), you’ll first need to restore the stock ChromeOS firmware.
- Boot your Chromebook and press
Ctrl + Alt + F2(orCtrl + Alt + T, thenshell) to open a terminal. - Run the MrChromebox firmware utility script again (
cd; curl -LO https://mrchromebox.tech/firmware-util.sh && sudo bash firmware-util.sh). - Select the option to “Restore Stock Firmware” (usually option
1). Follow the prompts. This will re-enable the factory write protection (if you disabled it).
- Boot your Chromebook and press
- Perform ChromeOS Recovery:
- With the stock firmware restored (or if you were always in developer mode and want to return to a stable ChromeOS), ensure your Chromebook is powered off.
- Insert the ChromeOS recovery USB drive.
- Start your Chromebook in Recovery Mode (often by holding
Esc+Refresh+Powerand thenCtrl + D). - When prompted, press
Ctrl + Dto continue the recovery process. The Chromebook will detect the recovery USB and restore ChromeOS. This will wipe everything and return your Chromebook to its factory state, including re-enabling OS verification.
Conclusion
Installing Windows 10 on a Chromebook is a testament to the versatility of modern hardware and the ingenuity of the tech community. For those seeking the full power of Windows on their portable, often well-built Chromebook hardware, a full installation offers the most authentic experience. This route demands technical patience, a willingness to troubleshoot, and an acceptance of voiding your warranty. The reward, however, is a significantly more capable machine, transforming it from a web-centric device into a versatile productivity powerhouse that can run virtually any Windows application. This not only enhances the device’s utility but also represents a smart use of existing tech, preventing perfectly good hardware from becoming obsolete due to software limitations.
Alternatively, for users who appreciate ChromeOS but occasionally need Windows applications, the virtual machine approach provides a safer, less intrusive solution. While performance will be constrained, it offers the convenience of having both operating systems available without the need for complex firmware modifications. This method is ideal for light use of specific Windows programs or for development purposes, maximizing your Chromebook’s utility without committing to a full operating system swap.
Ultimately, the best method depends on your technical comfort level, hardware specifications, and specific needs. Whichever path you choose, understanding the prerequisites, following the steps meticulously, and being prepared for potential troubleshooting are key to successfully breathing new Windows life into your Chromebook. The journey might be challenging, but the destination—a fully functional Windows 10 machine in a Chromebook’s sleek shell—can be incredibly rewarding, offering a blend of portability, cost-effectiveness, and expansive software compatibility previously out of reach.
aViewFromTheCave is a participant in the Amazon Services LLC Associates Program, an affiliate advertising program designed to provide a means for sites to earn advertising fees by advertising and linking to Amazon.com. Amazon, the Amazon logo, AmazonSupply, and the AmazonSupply logo are trademarks of Amazon.com, Inc. or its affiliates. As an Amazon Associate we earn affiliate commissions from qualifying purchases.