Embarking on the journey of setting up a brand-new PC is an exciting prospect, brimming with the potential for enhanced productivity, streamlined workflows, and access to the latest technological advancements. While the allure of a fresh start is undeniable, the process of getting your new machine up and running with a fully functional operating system can sometimes feel daunting. Chief among these initial steps is the installation of Windows 10, the ubiquitous and highly capable operating system that powers millions of desktops and laptops worldwide. Whether you’re a seasoned tech enthusiast or a first-time PC builder, this comprehensive guide will walk you through every crucial stage of installing Windows 10 on your new PC, ensuring a smooth and successful setup.
Our journey into the world of Windows 10 installation will be guided by the core tenets of our website: Tech, Brand, and Money. We’ll explore the technical intricacies of the installation process, touch upon the branding implications of a well-configured system, and consider the financial aspects that underpin responsible PC ownership. By the end of this guide, you’ll not only have a fully operational Windows 10 PC but also a deeper understanding of how this fundamental step contributes to a positive and productive user experience.
Preparing Your Installation Media: The Foundation of a Smooth Setup
Before you can even think about booting up your new PC, the absolute first step is to prepare the necessary installation media. This is essentially a portable storage device that contains all the files required to install Windows 10. The most common and recommended method involves using a USB flash drive.
Creating a Bootable USB Drive with the Media Creation Tool
Microsoft provides a free and user-friendly tool called the Media Creation Tool that simplifies this process. This tool allows you to download the latest version of Windows 10 directly from Microsoft and create a bootable USB drive or an ISO file (which can then be burned to a DVD, though USB is far more common and faster).
Here’s a step-by-step breakdown:
- Download the Media Creation Tool: Navigate to the official Microsoft website and search for “Windows 10 download.” You’ll find a link to download the Media Creation Tool.
- Run the Tool and Accept Terms: Once downloaded, run the executable file. You’ll be prompted to accept the license terms.
- Choose “Create installation media (USB flash drive, DVD, or ISO file) for another PC”: This is the crucial option you want to select.
- Select Language, Edition, and Architecture: The tool will typically recommend the correct options based on your current PC, but for a new PC, it’s best to choose the language you prefer, the Windows 10 edition (Home or Pro are the most common), and the architecture (64-bit is standard for modern PCs). If you’re unsure, selecting “Use the recommended options for this PC” is generally safe, but double-check if you have specific needs.
- Choose “USB flash drive”: Again, this is the most convenient option. Ensure you have a USB drive with at least 8GB of storage space. Important Note: All data on the USB drive will be erased during this process, so make sure it doesn’t contain anything important.
- Select Your USB Drive: The tool will list the connected USB drives. Choose the correct one and click “Next.”
- Wait for the Download and Creation Process: The tool will now download the Windows 10 files and create the bootable USB drive. This can take some time depending on your internet connection speed.
- Finish: Once the process is complete, you’ll see a confirmation message. Your bootable Windows 10 USB drive is now ready.
This meticulously prepared USB drive serves as the key to unlocking your new PC’s potential. It’s the first tangible step in a process that bridges the gap between raw hardware and a fully functional digital environment.
Understanding the “Brand” of Your Installation Media
While seemingly a technical step, the act of creating your installation media also carries a subtle “Brand” implication. By using Microsoft’s official Media Creation Tool, you are aligning yourself with a reputable and trusted source. This signifies a commitment to authenticity and a desire for a secure and legitimate operating system. This choice, even at this early stage, reflects a deliberate decision to engage with the established technology landscape, ensuring that your PC’s foundation is built on a solid and recognized platform. This is akin to a business choosing a well-known and respected logo; it conveys a sense of reliability and professionalism from the outset.
The Boot Process: Telling Your PC Where to Start
With your bootable USB drive in hand, the next critical step is to instruct your new PC to boot from this external media rather than its internal storage. This is achieved through the BIOS (Basic Input/Output System) or UEFI (Unified Extensible Firmware Interface), the fundamental firmware that initializes your hardware during startup.
Accessing and Navigating the BIOS/UEFI Settings
Every motherboard has a unique way of accessing its BIOS/UEFI settings, but the general principle remains the same.
- Connect Your USB Drive: Plug your bootable Windows 10 USB drive into a USB port on your new PC.
- Power On Your PC: Turn on your computer.
- Enter BIOS/UEFI Setup: Immediately after powering on, you’ll need to press a specific key to enter the BIOS/UEFI setup. Common keys include Delete (Del), F2, F10, F12, or Esc. The exact key is usually displayed briefly on the screen during the initial boot-up sequence. If you miss it, you may need to restart and try again.
- Locate the Boot Order Settings: Once inside the BIOS/UEFI, you’ll need to find the section related to “Boot Order,” “Boot Priority,” or “Boot Sequence.” This is where you can dictate the order in which your PC attempts to boot from different devices.
- Prioritize the USB Drive: You will see a list of bootable devices. You need to move your USB drive (often listed by its brand name or as “USB HDD” or “Removable Device”) to the top of the list, making it the first device your PC tries to boot from.
- Save and Exit: After adjusting the boot order, navigate to the “Save and Exit” option. This is usually accessible via a specific key (often F10) or through a menu item. Confirm that you want to save the changes.
Your PC will then restart. If you’ve correctly configured the boot order, it should now attempt to boot from your USB drive, initiating the Windows 10 installation process.
The “Money” Aspect of Efficient Booting
The BIOS/UEFI configuration, while technical, also has a subtle link to the “Money” aspect of PC usage. A correctly configured boot order ensures that your PC starts up efficiently. This seemingly minor detail contributes to overall productivity. For individuals and businesses alike, time is money. A PC that boots quickly and reliably, without unnecessary delays caused by incorrect boot sequences, translates to more time spent on productive tasks and less time waiting. This is a fundamental element of optimizing your digital assets for maximum return on investment, whether that investment is time or actual monetary expenditure.
The Windows 10 Installation Wizard: Guiding You Through the Setup
Once your PC successfully boots from the USB drive, you’ll be greeted by the familiar Windows 10 installation wizard. This is a guided process designed to be as user-friendly as possible.
Step-by-Step Installation Process
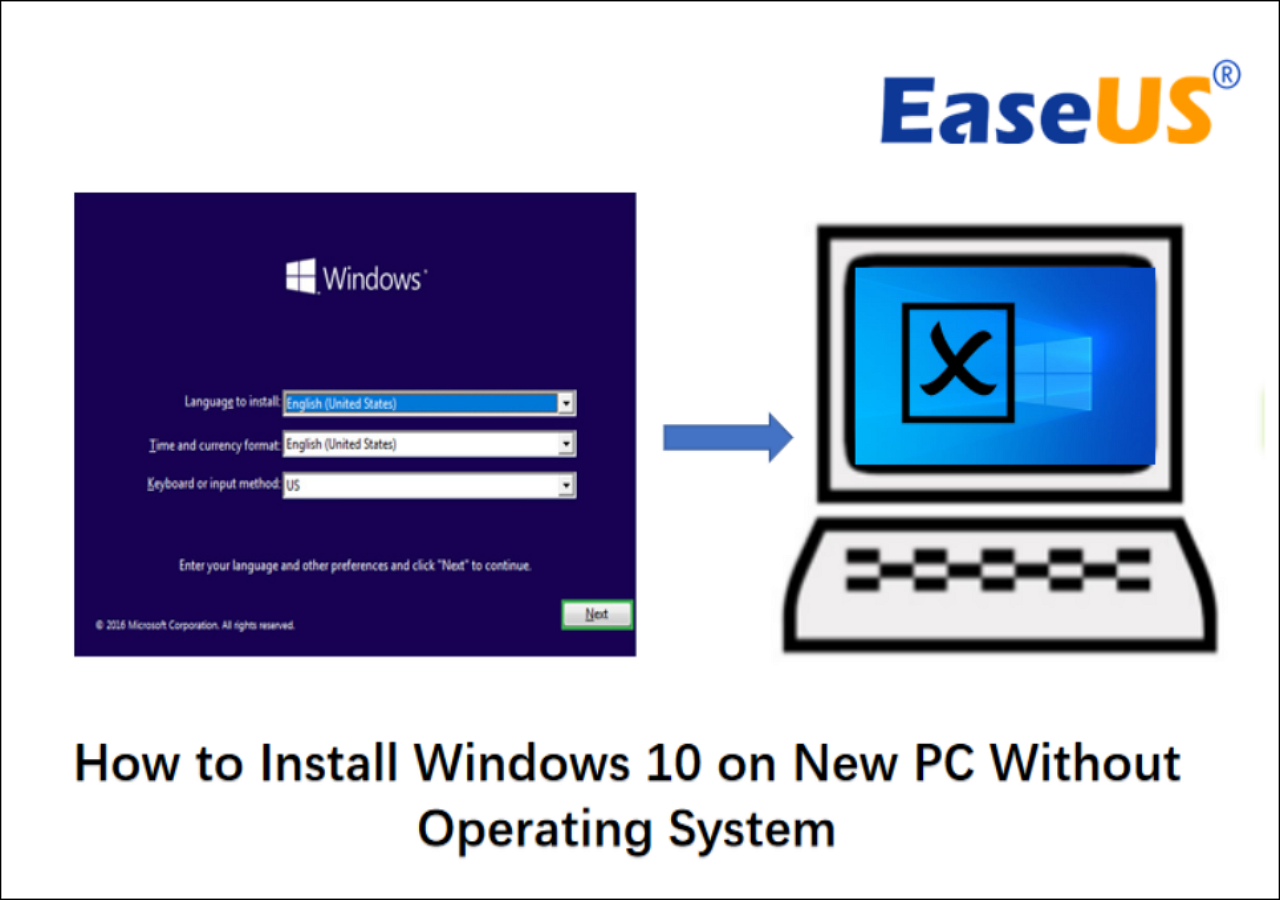
- Initial Setup Screen: The first screen will prompt you to select your language, time and currency format, and keyboard layout. Choose your preferred options and click “Next.”
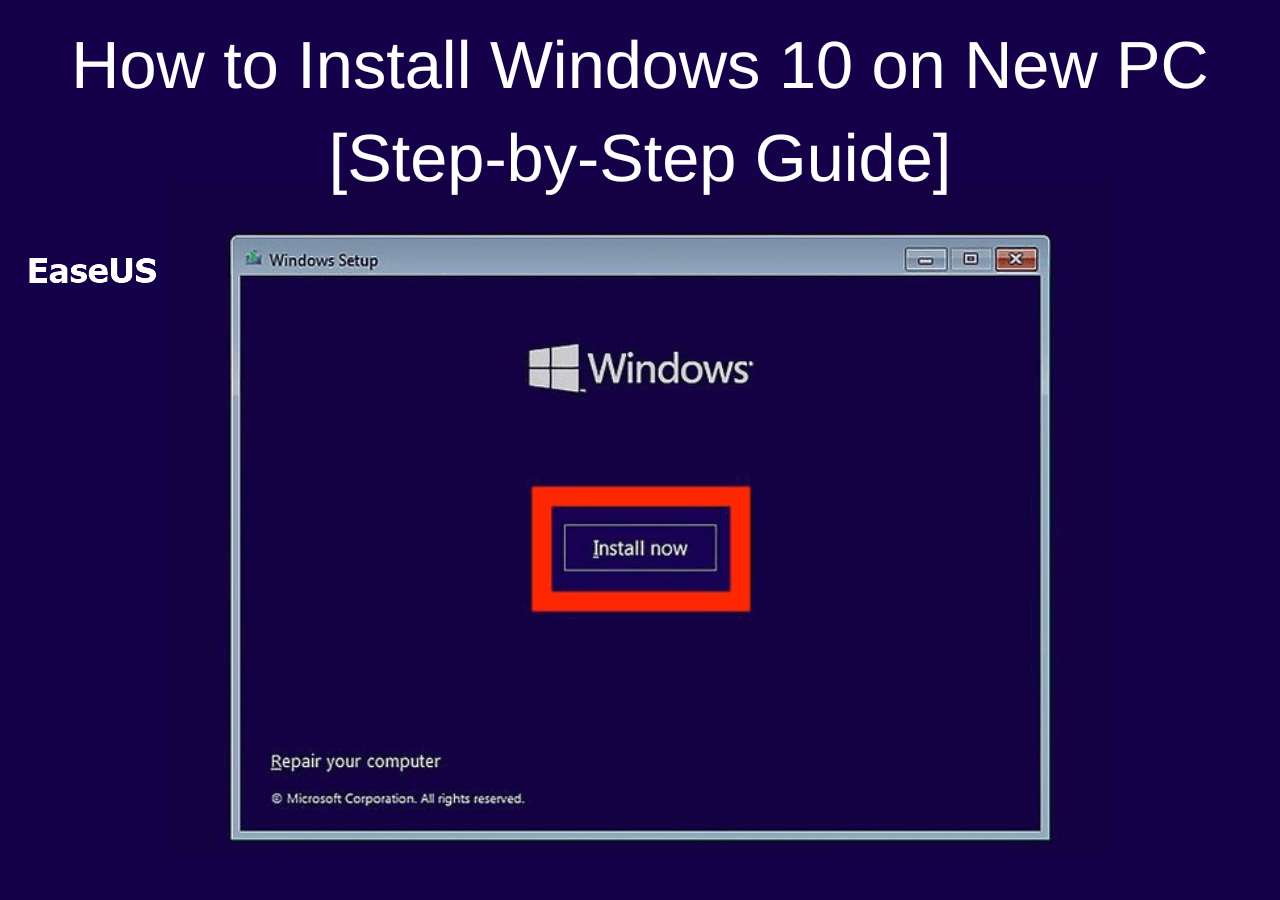
- “Install Now” Button: Click the prominent “Install Now” button.
- Product Key: You’ll be asked to enter your Windows 10 product key. If you have one, enter it now. If you plan to activate Windows later, you can click “I don’t have a product key.” You can activate Windows after the installation is complete.
- Select Operating System Version: If you chose not to enter a product key, you’ll be prompted to select the version of Windows 10 you want to install (e.g., Windows 10 Home, Windows 10 Pro). Make sure this matches your product key or your intended license.
- Accept License Terms: Read and accept the Microsoft software license terms.
- Choose Installation Type: “Custom: Install Windows only (advanced)”: This is the crucial choice for a new PC. Selecting “Upgrade” is for updating an existing Windows installation and is not suitable here.
- Disk Partitioning: This is where you’ll manage your storage drives. For a new PC with a blank drive, you’ll typically see one unallocated space.
- Single Drive Setup: If you have a single SSD or HDD, you can simply select the unallocated space and click “Next.” Windows will automatically create the necessary partitions.
- Multiple Drives or Custom Partitioning: If you want to create multiple partitions (e.g., a C: drive for Windows and an D: drive for data) or have multiple drives, you can use the “New” button to create partitions. Be cautious with this step, as incorrect partitioning can lead to data loss if not done carefully. For most users, letting Windows handle it on a single drive is the simplest approach.
- Windows Installation Progress: The installation process will begin. Files will be copied, features installed, and updates applied. Your PC will restart multiple times during this phase. Do not remove the USB drive until instructed to do so.
- Out-of-Box Experience (OOBE): After the main installation is complete, you’ll enter the Out-of-Box Experience (OOBE). This is where you’ll set up your user account, privacy settings, and connect to a network.
- Region and Keyboard Layout: Confirm your region and keyboard layout.
- Network Connection: Connect to your Wi-Fi network or Ethernet.
- Account Setup: You’ll be prompted to sign in with a Microsoft account or create a local account. Using a Microsoft account offers better integration with Microsoft services and cloud features.
- PIN Setup: Create a PIN for faster sign-in.
- Cortana: Decide whether to enable the Cortana voice assistant.
- Privacy Settings: Review and adjust your privacy settings. It’s recommended to disable telemetry and advertising ID for enhanced privacy.
- Desktop Ready: Once you’ve completed the OOBE, you’ll finally arrive at the Windows 10 desktop, ready to begin customizing and using your new PC.
The “Tech” Aspects of the Wizard
The installation wizard itself is a testament to modern “Tech.” Its intuitive interface, guided steps, and automated processes reflect years of software development and user experience refinement. Each click, each prompt, is designed to abstract away complex underlying operations. For instance, the disk partitioning step, while appearing simple, involves intricate file system management and allocation. The wizard handles this complexity, making it accessible to a broad audience. This showcases how sophisticated technology can be presented in an approachable manner, enabling users to leverage powerful capabilities without needing to be deeply technical.
Post-Installation Essentials: Bringing Your PC to Life
Congratulations! You’ve successfully installed Windows 10. However, the journey isn’t quite over. Several crucial post-installation steps will ensure your PC is secure, optimized, and ready for daily use.
Updating Windows and Drivers
- Windows Update: The first and most important step is to run Windows Update. Go to Settings > Update & Security > Windows Update and click “Check for updates.” Install all available updates, including feature updates and cumulative updates. This ensures you have the latest security patches and performance enhancements.
- Driver Updates: While Windows Update often installs generic drivers, it’s highly recommended to install the specific drivers for your hardware components, especially your graphics card, motherboard chipset, and network adapter.
- Graphics Card: Visit the NVIDIA, AMD, or Intel website (depending on your GPU) and download the latest drivers for your specific model.
- Motherboard Drivers: Go to your motherboard manufacturer’s website (e.g., ASUS, Gigabyte, MSI) and download the latest chipset, audio, and LAN drivers for your motherboard model.
- Other Peripherals: For any other specific hardware (e.g., printers, scanners), visit their respective manufacturer’s websites to download drivers.
Installing Essential Software and Security Measures
- Antivirus Software: Windows comes with Windows Security (Defender), which is quite capable. However, many users prefer to install a third-party antivirus solution. Choose a reputable one and ensure it’s kept updated.
- Web Browser: While Microsoft Edge is included, you might want to install your preferred browser (e.g., Chrome, Firefox).
- Productivity Software: Install essential applications like Microsoft Office, LibreOffice, or Google Workspace tools for document creation and management.
- Essential Utilities: Consider installing utilities like PDF readers, media players, and file compression tools.
- Digital Security Best Practices:
- Strong Passwords/PINs: Continue to use strong, unique passwords for your online accounts and a secure PIN for your Windows login.
- Two-Factor Authentication (2FA): Enable 2FA on all your important online accounts for an extra layer of security.
- Be Wary of Phishing: Educate yourself and your household on recognizing and avoiding phishing attempts.
The “Brand” and “Money” Synergy in Post-Installation
The post-installation phase is where the Brand and Money aspects truly converge.
- Brand Recognition and Trust: By installing official drivers and reputable software, you are reinforcing the “brand” of your PC as a reliable and secure machine. Using trusted software providers builds confidence and ensures a positive user experience. This mirrors how a business carefully selects its brand partners to maintain its reputation.
- Long-Term Value and Cost Savings: Keeping your system updated and secure through Windows Update and driver installations is a proactive measure that protects your investment. It prevents potential security breaches that could lead to data loss, identity theft, and significant financial repercussions. A well-maintained PC also performs better, extending its lifespan and delaying the need for costly replacements. This proactive approach to digital hygiene is a cornerstone of smart personal finance and efficient business operations. Furthermore, by choosing free or cost-effective software options where appropriate, you can manage your “Money” wisely while still achieving excellent functionality.
By following these comprehensive steps, you are not just installing an operating system; you are building the foundation for a productive, secure, and enjoyable computing experience. This initial setup is an investment, both in terms of time and the underlying technology, that will pay dividends in the efficiency and capabilities of your new PC.
aViewFromTheCave is a participant in the Amazon Services LLC Associates Program, an affiliate advertising program designed to provide a means for sites to earn advertising fees by advertising and linking to Amazon.com. Amazon, the Amazon logo, AmazonSupply, and the AmazonSupply logo are trademarks of Amazon.com, Inc. or its affiliates. As an Amazon Associate we earn affiliate commissions from qualifying purchases.