In an ever-evolving digital landscape, few operating systems have maintained their relevance and widespread adoption quite like Microsoft Windows. Despite the advent of newer versions, Windows 10 continues to be a cornerstone for millions of users worldwide, offering a robust, familiar, and highly compatible platform for both personal and professional computing. Whether you’re building a new PC, upgrading from an older version of Windows, or simply need to perform a clean installation to refresh a sluggish system, mastering the installation process is a fundamental skill.
This comprehensive guide will walk you through every step of installing Windows 10, from initial preparations to post-installation optimization. We’ll delve into the necessary tools, crucial settings, and best practices to ensure a smooth, secure, and successful setup. By the end, you’ll not only have a freshly installed Windows 10 system but also a deeper understanding of its foundational elements, setting you up for enhanced productivity and digital security.
Why Windows 10 Remains a Go-To OS (And What You Need Before You Start)
Even as Windows 11 gains traction, Windows 10 holds a significant market share and remains a preferred choice for many. Its stability, broad hardware compatibility, and consistent user interface are just a few reasons for its enduring appeal. Before you embark on the installation journey, however, careful preparation is paramount to avoid data loss and ensure a seamless experience.
The Enduring Appeal of Windows 10
Windows 10, initially released in 2015, revolutionized the user experience by bringing back the beloved Start Menu while integrating modern features like Cortana, Microsoft Edge, and a unified app ecosystem. Its consistent updates, though sometimes met with mixed reactions, have continually refined its performance, security protocols, and feature set. For many, its interface strikes an ideal balance between classic Windows familiarity and contemporary design principles. This makes it an excellent choice for a wide range of users, from students to professionals, who rely on a stable, widely supported, and feature-rich operating system.
From a productivity standpoint, Windows 10 offers a vast library of software, ensuring compatibility with virtually any application you might need for work, creativity, or entertainment. Its integration with Microsoft 365 services, robust multitasking features like Snap Assist and Virtual Desktops, and an ever-improving Windows Store make it a powerful hub for both individual and organizational efficiency. Furthermore, its extensive hardware support means you won’t struggle with driver compatibility issues, a common headache with less mature operating systems. For those wary of early adoption cycles or with specific hardware constraints, Windows 10 offers a proven, mature, and secure computing environment.
Essential Preparations: Your Pre-Installation Checklist
Before you even think about booting from an installation drive, it’s critical to perform several preparatory steps. These actions will safeguard your data, confirm your system’s readiness, and streamline the entire installation process. Skipping these can lead to frustration, data loss, or even a failed installation.
- Backup Your Data: This is arguably the most crucial step. A clean installation of Windows 10 will erase everything on the drive where you install it. If you have any personal files, documents, photos, videos, or crucial work data, back them up to an external hard drive, cloud storage (like OneDrive, Google Drive, or Dropbox), or a network-attached storage (NAS) device. Do not skip this step – there’s no going back once the installation begins.
- Check System Requirements: While Windows 10 is relatively lightweight, ensure your PC meets the minimum specifications:
- Processor: 1 GHz or faster compatible processor (or System on a Chip – SoC)
- RAM: 1 GB for 32-bit or 2 GB for 64-bit (more is always better, 4GB+ recommended)
- Hard disk space: 16 GB for 32-bit OS or 32 GB for 64-bit OS (64GB+ recommended)
- Graphics card: DirectX 9 or later with WDDM 1.0 driver
- Display: 800×600 resolution
Meeting these ensures smooth operation and access to all features, contributing to better digital productivity.
- Obtain a Windows 10 Product Key: If you’re performing a clean installation on a new build or a PC that hasn’t had Windows 10 activated before, you’ll need a legitimate product key. This can be purchased directly from Microsoft, a reputable retailer, or might be printed on a sticker on your computer if it came pre-installed. If you are reinstalling Windows 10 on a PC that was previously activated with a digital license, you might not need to enter a product key during installation; it will activate automatically once connected to the internet.
- Gather Necessary Peripherals: Ensure you have a working keyboard, mouse, and display connected. For laptops, make sure the battery is fully charged or, even better, connected to a power outlet to prevent interruption during the installation. A stable internet connection is also highly recommended for downloading updates and drivers post-installation.
- Decide on Installation Media: You’ll need a USB flash drive (at least 8GB, blank) or a blank DVD to create your bootable Windows 10 installation media. A USB drive is generally faster and more convenient.
Crafting Your Windows 10 Installation Media
Once your preparations are complete, the next critical step is to create a bootable installation medium. Microsoft provides a free, user-friendly tool for this purpose, simplifying what used to be a somewhat complex process.
Downloading the Windows 10 Media Creation Tool
Microsoft offers an official tool designed to download the Windows 10 ISO file and create bootable installation media directly. This ensures you get a legitimate, up-to-date version of the operating system.
- Visit the Official Microsoft Website: Open your web browser and navigate to the official Windows 10 download page on Microsoft’s website. Search for “Download Windows 10 disk image (ISO file)” or “Windows 10 Media Creation Tool.”
- Download the Tool: On the page, you’ll find an option like “Download tool now.” Click this to download the
MediaCreationTool.exefile. Save it to your Downloads folder or Desktop. - Run the Tool: Locate the downloaded executable file and double-click it to run. You’ll likely be prompted by User Account Control (UAC); click “Yes” to allow it to make changes to your device.
- Accept Terms: Read through the license terms and click “Accept” to proceed.
Creating a Bootable USB Drive or DVD
The Media Creation Tool will present you with two main options. For most users, creating a bootable USB drive is the recommended approach due to its speed and the decreasing prevalence of optical drives in modern PCs.
- Select Action: On the “What do you want to do?” screen, choose “Create installation media (USB flash drive, DVD, or ISO file) for another PC” and click “Next.”
- Choose Language, Architecture, and Edition: The tool will usually pre-select the recommended options based on your current PC. However, you can uncheck “Use recommended options for this PC” if you need to choose a different language, a 32-bit or 64-bit architecture (always choose 64-bit for modern PCs with 4GB+ RAM), or a specific Windows 10 edition. Click “Next.”
- Select Media Type: Here, you’ll choose between “USB flash drive” or “ISO file.”
- For USB Flash Drive: Select “USB flash drive” and click “Next.” Ensure your blank USB drive (8GB or larger) is plugged into your computer. The tool will display a list of available USB drives. Select the correct one (double-check, as all data on it will be erased!) and click “Next.” The tool will then download the Windows 10 files and write them to your USB drive, making it bootable. This process can take some time, depending on your internet speed.
- For ISO File (for DVD or virtual machines): Select “ISO file” and click “Next.” You’ll be prompted to choose a location to save the
.isofile. Once downloaded, you can then use a DVD burning software (like the built-in Windows Disc Image Burner) to burn the ISO to a blank DVD. This option is also useful if you plan to install Windows 10 in a virtual machine.
- Completion: Once the tool finishes, it will inform you that the USB flash drive is ready or the ISO file has been saved. Click “Finish.” Safely eject your USB drive before removing it from the port.
Navigating the Installation Process: From Boot to Desktop
With your bootable installation media ready, you’re now poised to begin the actual installation. This phase involves configuring your computer to boot from the installation media and then following the on-screen prompts of the Windows Setup Wizard.
Configuring BIOS/UEFI for a Smooth Boot
Before you can install Windows 10, your computer needs to know to start from your USB drive or DVD instead of its internal hard drive. This is done by accessing your system’s BIOS (Basic Input/Output System) or UEFI (Unified Extensible Firmware Interface) settings.

- Insert Installation Media: Plug your bootable USB drive into an available USB port or insert your DVD into the optical drive.
- Restart Your PC: Reboot your computer. As it starts, you’ll need to rapidly press a specific key to enter the BIOS/UEFI setup utility. Common keys include
Del,F2,F10,F12, orEsc. The exact key often flashes briefly on the screen during startup, or you can check your motherboard/PC manufacturer’s manual. - Navigate to Boot Options: Once in the BIOS/UEFI menu, look for a section labeled “Boot,” “Boot Order,” “Boot Priority,” or similar. The interface varies greatly between manufacturers (e.g., ASUS, Dell, HP, Lenovo).
- Set Boot Priority: Change the boot order to prioritize your USB drive (it might be listed as “USB-HDD,” “Removable Device,” or by its brand name) or DVD drive as the first boot device.
- Save and Exit: Save your changes (often
F10) and exit the BIOS/UEFI setup. Your computer will then restart and should boot from your installation media.
- UEFI vs. Legacy BIOS: Modern systems use UEFI, which offers features like faster boot times, support for larger hard drives (GPT partition scheme), and secure boot. If you encounter issues, you might need to disable “Secure Boot” or enable “CSM (Compatibility Support Module)” (which mimics legacy BIOS) in your UEFI settings if you’re trying to install on older hardware or encountering compatibility issues. For a new, clean install, sticking with UEFI mode is generally recommended.
The Windows Setup Wizard: Step-by-Step Installation
Once your PC successfully boots from the installation media, the Windows Setup Wizard will begin. This is where you’ll make key decisions about your Windows installation.
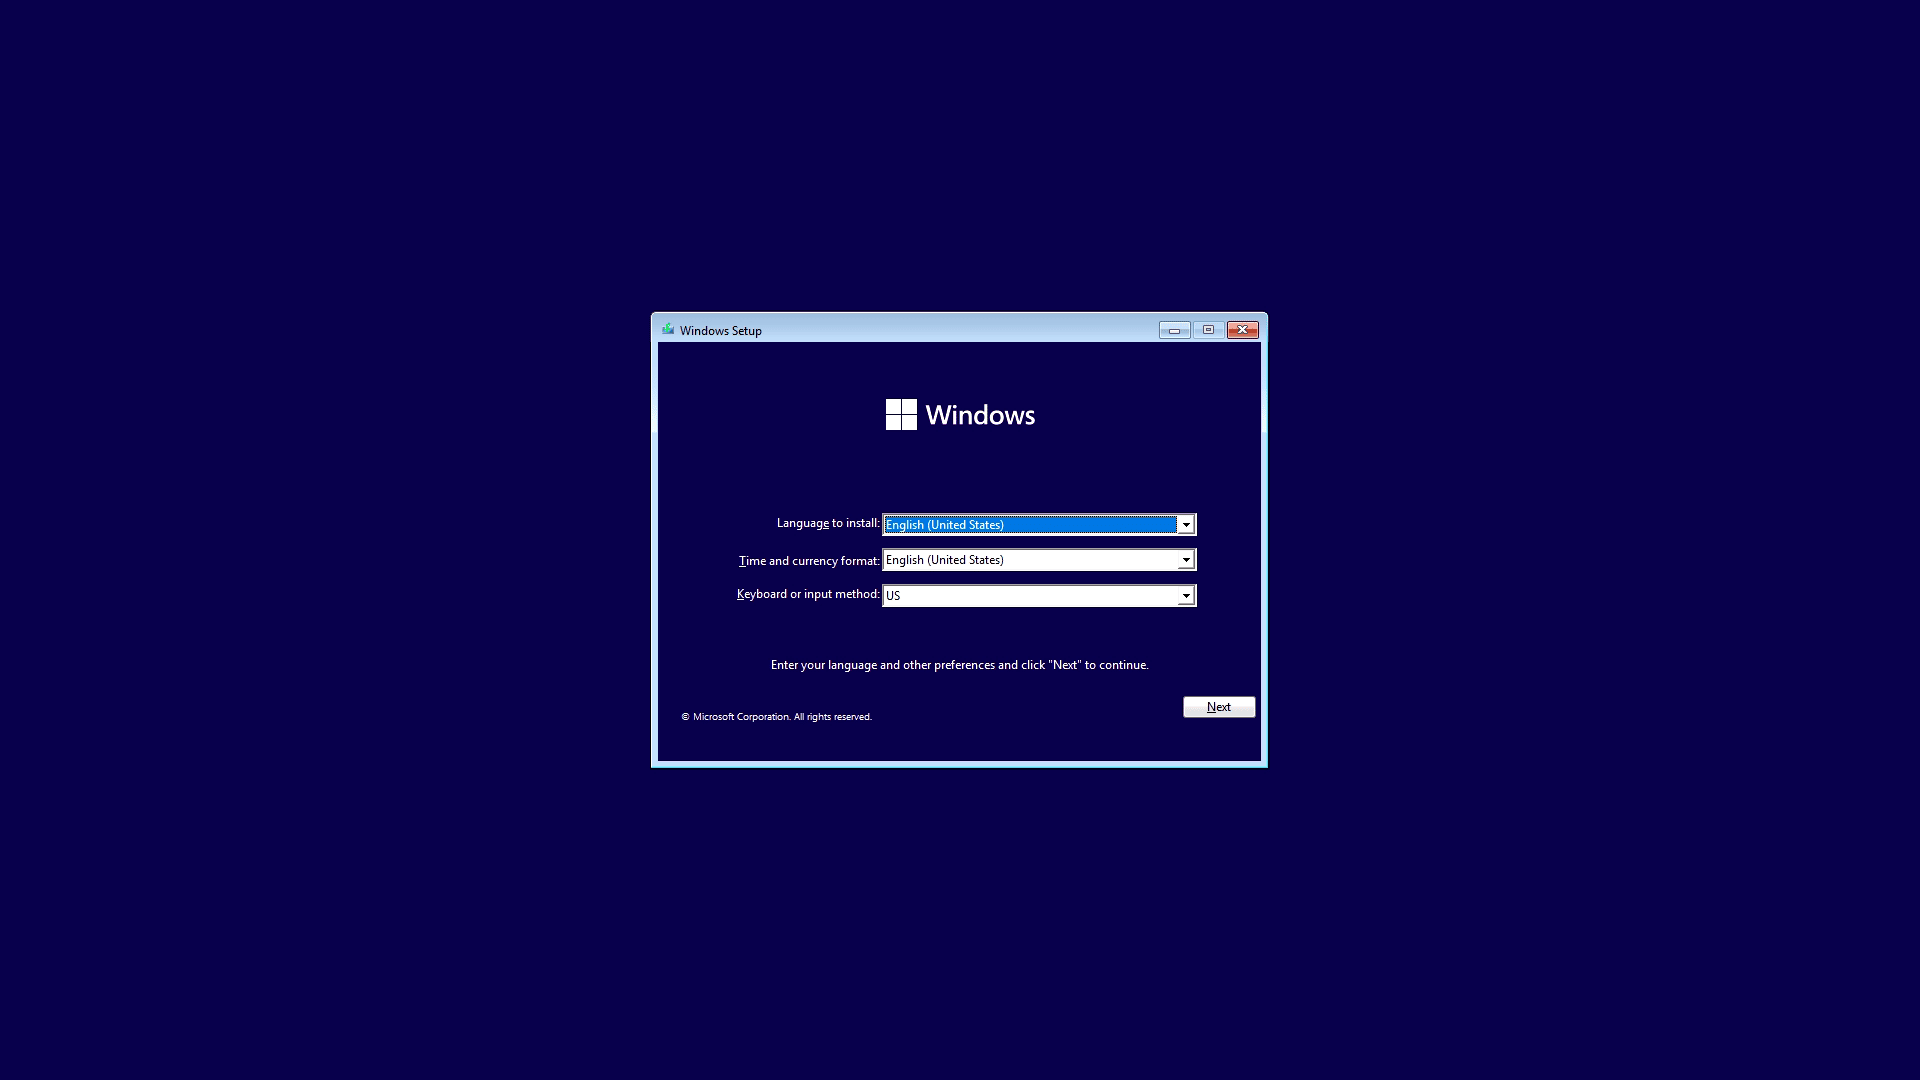
- Language, Time, and Keyboard: The first screen asks you to select your language, time and currency format, and keyboard or input method. Make your selections and click “Next.”
- Install Now: Click the “Install now” button to proceed.
- Enter Product Key: If you have a product key, enter it here. If you are reinstalling Windows 10 on a PC that was previously activated with a digital license, or if you plan to purchase a key later, you can click “I don’t have a product key” to skip this step. Windows will activate automatically once connected to the internet after installation.
- Select Operating System: If your product key activates multiple editions (e.g., Home or Pro), you’ll be asked to choose which version of Windows 10 you want to install. Select your preferred edition and click “Next.”
- License Terms: Read the Microsoft Software License Terms and check “I accept the license terms,” then click “Next.”
- Choose Installation Type: This is a crucial step:
- Upgrade: Install Windows and keep files, settings, and applications: This option is only available if you’re running an older version of Windows (like Windows 7 or 8.1) and want to upgrade while preserving your existing data. Do NOT choose this for a clean install from bootable media.
- Custom: Install Windows only (advanced): This is the option you want for a clean installation. Select this.
- Drive Partitioning and Selection: This screen allows you to choose where to install Windows 10.
- You’ll see a list of drives and partitions. Carefully identify the drive where you want to install Windows. If you are performing a clean install on a new drive, it might show as “Drive 0 Unallocated Space.”
- If you have an existing Windows installation or other partitions on the target drive, you can select each one and click “Delete” to remove them. Remember, this will erase all data on those partitions.
- Once you have unallocated space on your desired drive, select it and click “Next.” Windows will automatically create the necessary partitions (e.g., system reserved, primary).
- Alternatively, you can click “New” to manually create and size partitions, then select one for installation. For most users, simply selecting the unallocated space and clicking “Next” is sufficient.
- Installation Process: Windows will now begin copying files and installing features. Your PC will restart multiple times during this process. Do not remove the installation media until prompted, or until you see the initial setup screens for Windows 10. This phase can take anywhere from 15 minutes to an hour or more, depending on your system’s speed.
Post-Installation Essentials: Optimizing Your New Windows 10 System
Congratulations! Windows 10 is now installed. However, your journey isn’t quite complete. Several critical post-installation steps are necessary to ensure your system is secure, performs optimally, and is ready for daily use. This includes setting up your user environment, installing drivers, applying updates, and securing your digital life.
Initial Setup and Personalization
After the installation files are copied, Windows 10 will guide you through the initial setup process.
- Region and Keyboard Layout: Select your region and keyboard layout.
- Network Connection: Connect to a Wi-Fi network or plug in an Ethernet cable. This is crucial for activation, updates, and accessing online services.
- Account Setup: You’ll be prompted to sign in with a Microsoft account. Using a Microsoft account provides benefits like OneDrive integration, app synchronization, and access to the Microsoft Store. If you prefer, you can often find an option to create an offline account (local account) – though Microsoft sometimes makes this less obvious. If you choose an offline account, you’ll enter a username and password.
- Privacy Settings: Windows will present you with a series of privacy settings (e.g., location, diagnostic data, tailored experiences). Review these carefully and make choices that align with your privacy preferences. You can always adjust these later in the Settings app.
- Cortana Setup: You might be asked to set up Cortana. You can choose to enable or disable it.
- Welcome to Desktop: Finally, you’ll be greeted by the Windows 10 desktop!
Critical Driver Updates and Windows Updates
An unoptimized system can significantly hinder productivity. Ensuring all drivers are up-to-date and applying the latest Windows updates are crucial for system stability, security, and performance.
- Check for Windows Updates: Immediately after reaching the desktop, connect to the internet and run Windows Update.
- Go to
Start Menu > Settings > Update & Security > Windows Update. - Click “Check for updates.” Let Windows download and install all available updates. This process might take some time and require multiple restarts. These updates include important security patches and performance enhancements.
- Go to
- Install Device Drivers: While Windows Update often installs generic drivers, it’s best to install the latest, manufacturer-specific drivers for your hardware, especially for your graphics card, chipset, network adapter, and any specialized peripherals.
- Graphics Card: Visit the website of your graphics card manufacturer (NVIDIA, AMD, Intel) and download the latest drivers for your specific model.
- Motherboard/Chipset: Go to your motherboard manufacturer’s website (e.g., ASUS, Gigabyte, MSI) and download drivers for your chipset, audio, and network interface card (NIC).
- Other Devices: If you have any other devices not functioning correctly, check their respective manufacturer websites for drivers.
- You can verify installed drivers in
Device Manager(Right-click Start button > Device Manager). Look for any devices with yellow exclamation marks, which indicate missing or problematic drivers.
Bolstering Security and Productivity Tools
A fresh Windows installation is a blank canvas. The next step is to equip it with the tools necessary for digital security and enhanced productivity.
- Antivirus and Cybersecurity: Windows 10 includes Windows Security (Defender) which provides robust real-time protection. Ensure it’s active and up-to-date. If you prefer a third-party antivirus solution, install it now. This is a crucial aspect of digital security, protecting your brand (personal or corporate) from data breaches and malware.
- Essential Software:
- Web Browser: While Microsoft Edge is included, you might prefer Chrome, Firefox, or Brave. Download and install your preferred browser.
- Productivity Suites: Install Microsoft Office (Word, Excel, PowerPoint), LibreOffice, or Google Workspace desktop apps.
- Communication Tools: Zoom, Microsoft Teams, Slack, Discord, etc.
- Media Players: VLC Media Player or other preferred options.
- Cloud Storage Clients: If you use Google Drive, Dropbox, or other cloud services, install their desktop clients for seamless file synchronization.
- Implement a Backup Strategy: Beyond the initial backup you made, establish an ongoing backup routine. Utilize Windows’ built-in
File HistoryorBackup and Restore (Windows 7)features, or invest in third-party backup software. Cloud backups (OneDrive, Google Drive) offer an additional layer of protection, particularly against hardware failure or ransomware. Regularly backing up your data is a non-negotiable aspect of digital security and disaster recovery, safeguarding your precious information and ensuring business continuity. - Consider Financial Tools (Optional but Recommended): While not directly tied to OS installation, consider installing personal finance managers, budgeting apps, or tools for online income tracking if they align with your “Money” goals, which the website focuses on. This can help you leverage your new system for better financial management right from the start.
Troubleshooting Common Installation Hiccups
Even with careful planning, unexpected issues can arise. Knowing how to diagnose and address common installation problems can save you time and frustration.
Addressing Installation Errors and Boot Issues
- “Windows cannot be installed to this disk. The selected disk has an MBR partition table.” This error often occurs when trying to install Windows in UEFI mode on a drive partitioned with the older MBR (Master Boot Record) scheme. To fix this, convert the disk to GPT (GUID Partition Table) by deleting all partitions during setup, or by using
diskpartfrom the Command Prompt during setup (Shift+F10). - “We couldn’t create a new partition or locate an existing one.” This usually means Windows can’t properly identify or write to your chosen drive. Try deleting all existing partitions on the target drive and then clicking “Next” to let Windows create new ones automatically.
- Boot Loop or Blue Screen of Death (BSOD) during/after installation: This can be due to faulty hardware (RAM, hard drive), incompatible drivers, or a corrupt installation media.
- Try creating the installation media again.
- Test your RAM using a tool like MemTest86.
- Ensure all hardware is properly seated.
- If it happens after installation, try booting into Safe Mode to troubleshoot drivers.
- “Missing operating system” or “No boot device found”: This typically means the BIOS/UEFI boot order isn’t set correctly, or the installation media wasn’t successfully created. Double-check your BIOS settings and recreate the USB drive if necessary.
- Slow Installation: This can be caused by a slow USB drive, an older hard drive (HDD), or insufficient RAM. Be patient, or consider using a faster USB 3.0 drive and an SSD for the target drive if possible.
If you encounter persistent issues, document the exact error message or code, and search online forums or Microsoft support resources. Often, a quick search can yield a solution from someone who has faced the same problem.

Conclusion: Embracing Your Newly Installed Windows 10 System
Installing Windows 10, while seemingly a daunting task, is a straightforward process when approached systematically. By following the detailed steps outlined in this guide, from crucial pre-installation backups to post-setup optimization, you can ensure a smooth and successful transition to a fresh, secure, and highly functional operating system.
A clean installation breathes new life into your hardware, offering enhanced performance, improved digital security, and a stable platform for all your productivity needs. With your new Windows 10 system up and running, updated, and equipped with essential software and a robust backup strategy, you’re now fully prepared to leverage its power for work, creativity, and leisure, confident in its reliability and ready for the digital demands of today and tomorrow. Embrace your revamped digital environment and unlock its full potential.
aViewFromTheCave is a participant in the Amazon Services LLC Associates Program, an affiliate advertising program designed to provide a means for sites to earn advertising fees by advertising and linking to Amazon.com. Amazon, the Amazon logo, AmazonSupply, and the AmazonSupply logo are trademarks of Amazon.com, Inc. or its affiliates. As an Amazon Associate we earn affiliate commissions from qualifying purchases.