In today’s hyper-connected world, Wi-Fi is no longer a luxury but an absolute necessity. From streaming 4K movies and attending virtual meetings to controlling smart home devices and working remotely, a reliable wireless network underpins almost every aspect of modern digital life. While the concept of “installing Wi-Fi” might sound daunting to some, it’s a remarkably straightforward process that anyone can accomplish with a little guidance. This comprehensive guide will walk you through every step, from understanding the core components to optimizing your network for peak performance and troubleshooting common issues, ensuring you establish a robust and secure connection to the digital world.

Understanding Your Wi-Fi Ecosystem
Before you dive into connecting cables and configuring settings, it’s crucial to grasp the fundamental elements that constitute your home network. A clear understanding of these components will empower you to make informed decisions and set up your system with confidence.
What is Wi-Fi and Why Do You Need It?
Wi-Fi, short for “Wireless Fidelity,” is a technology that allows electronic devices to connect to a computer network, primarily the internet, using radio waves instead of physical cables. It liberates your devices from the confines of Ethernet ports, offering unparalleled flexibility and mobility within your home or office. The proliferation of smartphones, tablets, smart TVs, laptops, and a myriad of IoT (Internet of Things) devices has made Wi-Fi indispensable. Without it, the seamless connectivity we’ve come to expect would be severely hampered, restricting most of your devices to tethered connections or mobile data. A properly installed Wi-Fi network ensures every compatible device in your space can access the internet simultaneously, sharing a single internet connection provided by your Internet Service Provider (ISP).
Essential Components: Modem, Router, and Beyond
To establish a functioning Wi-Fi network, you typically need at least two primary pieces of equipment, often supplied by your ISP or purchased separately:
- Modem (Modulator-Demodulator): This is the bridge between your home network and your ISP’s network. It translates the digital signals from your computer into analog signals that can travel over your ISP’s infrastructure (like cable, fiber, or DSL lines) and vice-versa. Essentially, it’s what gets the internet into your house. Modems are specific to the type of internet service you have.
- Router (Wireless Router): Once the internet enters your home via the modem, the router takes over. Its primary function is to direct network traffic between your devices and the internet. More importantly, a wireless router creates your Wi-Fi network, broadcasting a signal that your devices can connect to. It acts as a central hub, allowing multiple devices to share a single internet connection and communicate with each other.
- Modem-Router Combo Unit: Many ISPs provide a single device that combines the functions of both a modem and a wireless router. While convenient, these units might offer less flexibility or advanced features compared to separate components.
- Mesh Wi-Fi Systems: For larger homes or spaces with dead zones, traditional routers might struggle to provide consistent coverage. Mesh Wi-Fi systems consist of a main router and several satellite “nodes” placed strategically around your home. These nodes communicate with each other to create a single, unified Wi-Fi network that blankets your entire space with strong, seamless signal, automatically switching your devices to the strongest connection point as you move.
- Wi-Fi Extenders/Repeaters: These devices are designed to boost the range of an existing Wi-Fi signal. They capture your router’s signal and re-broadcast it, extending coverage to areas where the signal might be weak. While effective, they often come with a trade-off in speed compared to mesh systems.
Choosing the Right Wi-Fi Router for Your Needs
Selecting the appropriate router is a critical step that significantly impacts your Wi-Fi experience. Consider these factors when making your choice:
- Speed (Wi-Fi Standards): Look for routers supporting the latest Wi-Fi standards, such as Wi-Fi 6 (802.11ax) or even Wi-Fi 7 (802.11be) if future-proofing is a priority. These standards offer higher theoretical speeds, better efficiency, and improved performance in congested environments compared to older standards like Wi-Fi 5 (802.11ac). Ensure the router’s maximum speed aligns with or exceeds your ISP’s internet plan.
- Range and Coverage: Consider the size and layout of your home. For larger spaces or multi-story houses, a powerful router with multiple antennas or a mesh system will be more effective than a basic model. Walls, floors, and other obstructions can significantly degrade Wi-Fi signals.
- Security Features: Prioritize routers with robust security protocols like WPA3 (or WPA2 at minimum), built-in firewalls, parental controls, and guest network capabilities. Some advanced routers also offer VPN support and intrusion detection.
- Number of Devices: If you have many connected devices (smartphones, tablets, laptops, smart home gadgets), look for routers with technologies like MU-MIMO (Multi-User, Multiple-Input, Multiple-Output) which allow the router to communicate with multiple devices simultaneously, improving efficiency.
- Ethernet Ports: Check the number of Gigabit Ethernet ports available if you plan to hardwire devices like gaming consoles, smart TVs, or desktop PCs for maximum speed and stability.
- USB Ports: Some routers include USB ports, useful for connecting external hard drives to create a network-attached storage (NAS) or sharing printers wirelessly.
- Budget: Routers vary widely in price. Determine your budget, but remember that investing in a good quality router often translates to a more stable and faster internet experience over several years.
Pre-Installation Checklist: Paving the Way for Seamless Connectivity
A little preparation goes a long way in ensuring a smooth and successful Wi-Fi installation. Addressing these points beforehand can prevent frustration and optimize your network’s performance from the outset.
Verify Your Internet Service Provider (ISP) Connection
Before you even touch your new router, confirm that your internet service from your ISP is active and working.
- Check Existing Setup: If you’re replacing an old router, ensure the existing internet connection is functional. Plug a computer directly into your modem with an Ethernet cable to confirm you have internet access.
- New Service Activation: If you’re setting up internet for the first time, your ISP will typically provide a modem or a modem-router combo. Follow their instructions for initial modem activation, which might involve calling them or using an online portal. Ensure the modem’s indicator lights confirm a successful connection (e.g., “Online” or “Internet” light is solid).
Optimal Placement: Finding the Sweet Spot for Your Router
Where you place your router significantly impacts its performance and coverage. Strategic placement can dramatically reduce dead zones and improve signal strength throughout your home.
- Central Location: Position the router as close to the center of your home as possible. This allows the signal to propagate evenly in all directions.
- Elevated Position: Place the router on a shelf or desk, not on the floor. Wi-Fi signals travel better downwards and outwards.
- Avoid Obstructions and Interference:
- Physical Barriers: Walls (especially concrete or brick), floors, and large metal objects (appliances, filing cabinets) can absorb or block Wi-Fi signals. Try to minimize the number of obstacles between your router and your most-used devices.
- Electronic Interference: Keep your router away from other electronics that emit radio waves, such as cordless phones (especially 2.4 GHz models), microwave ovens, baby monitors, and even certain fluorescent lights. These devices can operate on similar frequencies and cause signal degradation.
- Water: Large aquariums or water heaters can also absorb Wi-Fi signals, so avoid placing the router too close to them.
- Antenna Orientation: If your router has external antennas, try orienting one vertically and another horizontally for optimal signal propagation, as devices may connect on different planes.
Gathering Your Tools and Information
Having everything you need ready will streamline the installation process.
- Your New Wi-Fi Router: Unboxed and ready.
- Ethernet Cables: Typically, one short Ethernet cable comes with the router to connect it to the modem. You might also want an additional long cable to connect a computer directly to the router for initial setup.
- Power Adapters: For both your modem and your new router.
- Your Modem: Already connected to your ISP’s line.
- Pen and Paper: To jot down network names (SSID) and passwords.
- Router’s Default Information: The router’s default Wi-Fi network name (SSID), password (or Wi-Fi key), and the router’s administrative access information (IP address, username, password) are usually found on a sticker on the bottom or back of the router, or in its quick start guide.
Step-by-Step Wi-Fi Installation: Connecting to the Digital World
With your preparations complete, it’s time to bring your wireless network to life. Follow these steps carefully for a successful setup.
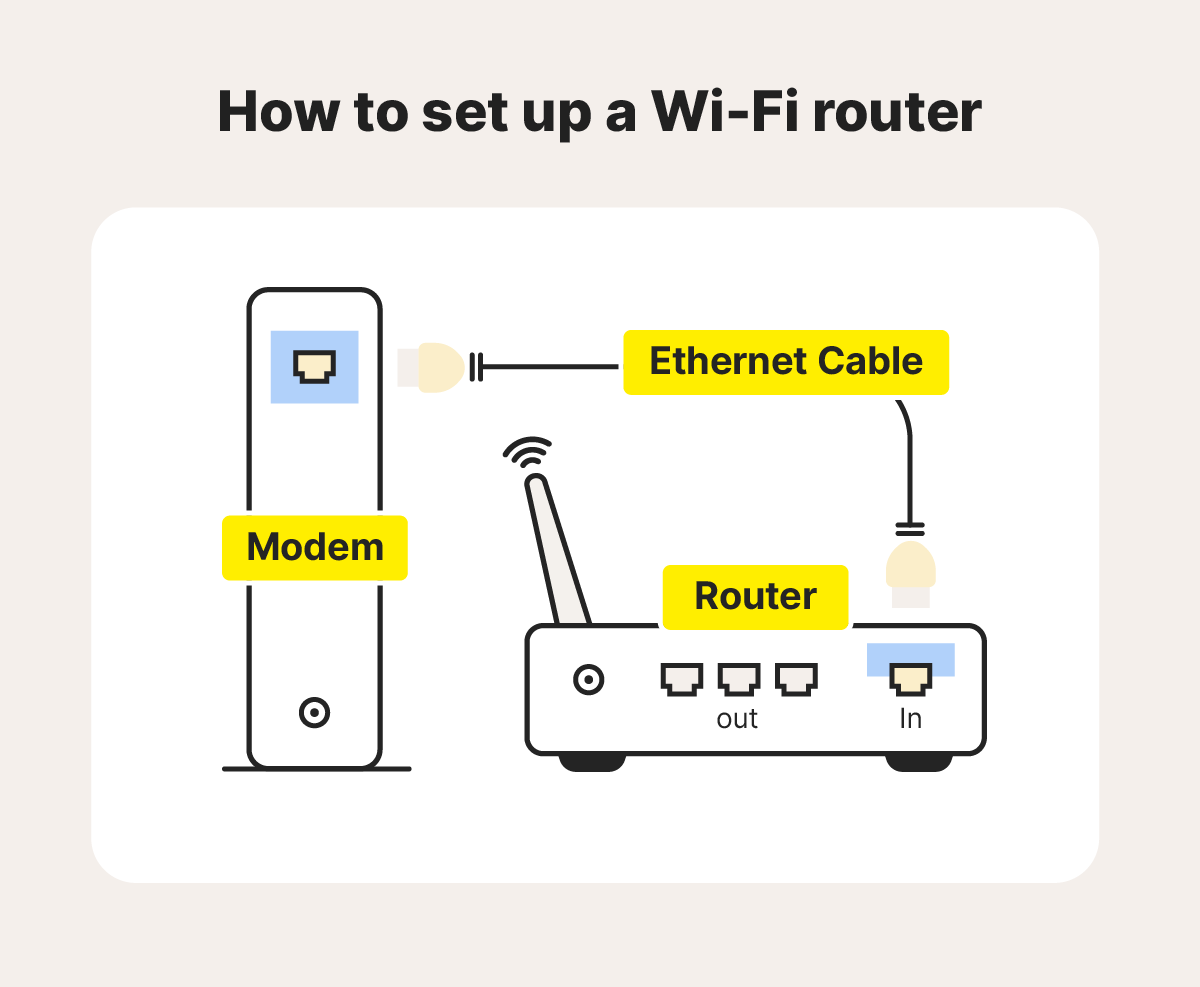
Connecting Your Modem to Your Router
This is the physical heart of your network connection.
- Power Off Everything: Disconnect the power cords from both your modem and any existing router (if applicable). This is crucial for preventing conflicts and ensuring proper device recognition.
- Connect the Modem to the Router: Locate the “WAN” or “Internet” port on your new Wi-Fi router. This port is usually a different color (often blue) from the other Ethernet ports and might be labeled with a globe icon.
- Take one end of the Ethernet cable (usually supplied with the router) and plug it into the Ethernet port on your modem.
- Plug the other end of that same Ethernet cable into the “WAN” or “Internet” port on your new Wi-Fi router.
- Power On Your Modem: Plug in your modem’s power adapter and wait for it to fully boot up and establish an internet connection. This typically takes a few minutes, and you’ll usually see stable indicator lights (e.g., “Power,” “Downstream,” “Upstream,” and “Online” or “Internet” lights should be solid green or blue).
- Power On Your Router: Once the modem is stable, plug in your new Wi-Fi router’s power adapter. Allow it a few minutes to boot up. The indicator lights on the router will typically light up, signifying power, network activity, and Wi-Fi signal broadcast.
Initial Router Setup: Accessing the Admin Interface
Now that the hardware is connected, you need to configure your router’s software settings.
- Connect a Computer to the Router:
- Wired Connection (Recommended for initial setup): Plug an Ethernet cable from one of the router’s LAN ports (usually yellow or black, distinct from the WAN port) into the Ethernet port of a computer. This provides the most stable connection during configuration.
- Wireless Connection: Alternatively, you can connect wirelessly. Look for the router’s default Wi-Fi network name (SSID) on the sticker of the router (e.g., “NETGEARxx,” “TP-Link_XXXX”). Connect to this network using the default Wi-Fi password (also on the sticker).
- Open a Web Browser: Launch any web browser (Chrome, Firefox, Edge, Safari) on the connected computer.
- Access the Router’s Admin Interface: In the browser’s address bar, type the router’s default IP address or web address. Common IP addresses are
192.168.1.1,192.168.0.1, or192.168.1.254. Some manufacturers use addresses likerouterlogin.netortplinkwifi.net. This information is usually found on the router’s sticker or in the quick start guide. - Log In: You will be prompted for a username and password. The default credentials are also on the router’s sticker (e.g.,
admin/admin,admin/password). It is critically important to change these default credentials immediately for security reasons.
Configuring Your Wireless Network (SSID and Password)
Once logged in, you’ll typically be guided through a setup wizard, or you can navigate the settings manually.
- Change Router Admin Password: This is your first security step. Locate the “Administration,” “System,” or “Security” section and change the default username and password for accessing the router’s settings. Choose a strong, unique password.
- Set Your Wi-Fi Network Name (SSID): This is the name your Wi-Fi network will appear as when devices search for available networks.
- Navigate to the “Wireless,” “Wi-Fi,” or “Network Settings” section.
- Find the field for “SSID” or “Network Name” and change it from the default to something memorable but not easily identifiable with your personal information (e.g., “HomeNetwork-5G,” “MyWirelessHub”). You can choose to broadcast separate SSIDs for 2.4 GHz and 5 GHz bands, or use a single SSID for both (band steering).
- Create a Strong Wi-Fi Password (Passphrase): This is the key to securing your network from unauthorized access.
- Select “WPA2-PSK” or “WPA3” as the security type. WPA3 is the latest and most secure, but WPA2-PSK (AES) is still highly robust and widely compatible. Avoid WEP or WPA as they are outdated and easily compromised.
- Enter a strong password (also known as a passphrase or network key). It should be at least 12-16 characters long, a mix of uppercase and lowercase letters, numbers, and symbols. Avoid personal information or easily guessable phrases.
- Save Your Settings: Click “Apply,” “Save,” or “OK” to save your changes. The router may reboot to apply the new settings.
- Reconnect: If you connected wirelessly for setup, your connection will drop as the SSID and password have changed. You will need to reconnect your computer and other devices to the new network name using the new password you just created.
Securing Your Network: Beyond the Basics
Basic setup is done, but enhancing your network’s security is paramount in today’s digital landscape.
- Firmware Updates: Regularly check for and install firmware updates from your router manufacturer’s website. Firmware updates often include critical security patches and performance improvements.
- Guest Network: Enable a guest network if your router supports it. This allows visitors to access the internet without having access to your main network, protecting your devices and data.
- Firewall: Ensure your router’s built-in firewall is enabled. This provides a first line of defense against external threats.
- Disable WPS (Wi-Fi Protected Setup): While convenient for quickly connecting devices, WPS can be a security vulnerability. It’s generally safer to disable it and manually enter your Wi-Fi password.
- MAC Address Filtering (Optional): For very high security needs, you can configure your router to only allow devices with specific MAC addresses to connect. This is cumbersome for many devices but adds an extra layer of protection.
Connecting Your Devices to the New Wi-Fi Network
With your Wi-Fi network active and secured, it’s time to connect all your devices.
- On Your Computer: Go to your Wi-Fi settings, find your new network name (SSID) from the list of available networks, click “Connect,” and enter your Wi-Fi password.
- On Your Smartphone/Tablet: Go to “Settings” > “Wi-Fi,” select your SSID, and enter the password.
- Smart TVs, Gaming Consoles, Smart Home Devices: Navigate to their network settings menus and follow similar steps to connect to your new Wi-Fi network.
Optimizing and Troubleshooting Your Wi-Fi Network
Installation is just the beginning. To truly enjoy a seamless experience, you’ll want to optimize your network and know how to address common issues.
Enhancing Performance: Tips for a Faster and More Stable Connection
- Channel Selection: Wi-Fi networks operate on specific channels. If your neighbors are using the same channel, it can cause interference and slow speeds. Use a Wi-Fi analyzer app (available for smartphones or computers) to identify less congested channels (especially for the 2.4 GHz band, which is more prone to interference) and manually select one in your router’s settings.
- Quality of Service (QoS): Many routers offer QoS settings that allow you to prioritize certain types of traffic (e.g., video streaming, online gaming) over others, ensuring critical applications receive the bandwidth they need.
- Regular Reboots: Just like computers, routers can benefit from a periodic reboot (unplugging and replugging the power). This clears the router’s memory, refreshes its connections, and can resolve minor performance glitches. Do this once a month or whenever you notice slowdowns.
- Firmware Updates (Again): We mentioned it for security, but firmware updates also often include performance enhancements and bug fixes.
- Consider Range Extenders or Mesh Systems: If you still experience dead zones or weak signals after optimizing placement, investing in a Wi-Fi range extender or, for superior performance, a mesh Wi-Fi system can significantly improve coverage.
- Use Ethernet for Stationary Devices: For devices like desktop PCs, gaming consoles, or smart TVs that don’t move, a wired Ethernet connection will always provide superior speed, stability, and lower latency compared to Wi-Fi.
Common Wi-Fi Issues and How to Solve Them
- No Internet Connection:
- Check modem lights: Ensure the “Online” or “Internet” light on your modem is solid. If not, contact your ISP.
- Check router lights: Ensure the “WAN” or “Internet” light on your router is solid.
- Reboot sequence: Power off both modem and router. Power on modem first, wait 2 minutes. Then power on router, wait 2 minutes.
- Check cables: Ensure all Ethernet cables are securely plugged in.
- Slow Speeds:
- Run speed tests: Compare wired speeds (from modem) to Wi-Fi speeds.
- Interference: Check for interfering devices or try changing Wi-Fi channels.
- Router placement: Is it optimally located?
- Too many devices: Are too many devices hogging bandwidth? Consider QoS settings.
- Outdated hardware: Your router might be old and not supporting your ISP’s speeds.
- Dropped Connections:
- Router firmware: Update it.
- Signal strength: Move closer to the router or consider extenders/mesh.
- Overheating: Ensure the router has proper ventilation.
- Channel interference: Try a different Wi-Fi channel.
- Limited Range/Dead Zones:
- Router placement: Re-evaluate.
- Obstructions: Minimize physical barriers.
- Antennas: Adjust external antennas.
- Solution: Consider a range extender, powerline adapters, or a mesh Wi-Fi system.
Advanced Wi-Fi Features for Power Users
Modern routers come packed with features that can further customize and enhance your network.
- Parental Controls: Manage and restrict internet access for specific devices or users, set time limits, and block inappropriate content.
- VPN Server/Client: Some routers can act as a VPN server, allowing you to securely access your home network from outside, or as a VPN client, encrypting all traffic from devices connected to it.
- Port Forwarding: Necessary for certain online games, remote access to devices, or hosting services, allowing specific external traffic to reach a particular device on your internal network.
- NAT (Network Address Translation): This is a fundamental router function that translates private IP addresses on your local network to a single public IP address for internet communication.
- DHCP (Dynamic Host Configuration Protocol): This server automatically assigns IP addresses to devices connecting to your network, simplifying network management. Most users will keep this enabled.
Installing Wi-Fi is a fundamental step toward a connected lifestyle. By following these steps and understanding the underlying principles, you can confidently set up a reliable, fast, and secure wireless network that serves all your digital needs. Remember that technology evolves, so staying informed about router features, security best practices, and network optimization techniques will ensure your Wi-Fi remains a robust cornerstone of your digital existence.
aViewFromTheCave is a participant in the Amazon Services LLC Associates Program, an affiliate advertising program designed to provide a means for sites to earn advertising fees by advertising and linking to Amazon.com. Amazon, the Amazon logo, AmazonSupply, and the AmazonSupply logo are trademarks of Amazon.com, Inc. or its affiliates. As an Amazon Associate we earn affiliate commissions from qualifying purchases.