WhatsApp has become an indispensable tool for communication, connecting billions of people worldwide. Whether you’re looking to stay in touch with family and friends, collaborate with colleagues, or even build a business presence, understanding how to install and set up this popular messaging app is crucial. This guide will walk you through the entire process, from downloading the app to navigating its essential features, ensuring you can start chatting in no time. We’ll cover installation on various devices, account setup, and basic usage, all within the context of how technology impacts our daily lives, brand perception, and even our financial interactions.
Getting Started: Downloading and Installing WhatsApp
The first step to using WhatsApp is to get the app onto your device. The installation process is generally straightforward and differs slightly depending on whether you’re using a smartphone (Android or iOS) or a desktop computer.
Installing WhatsApp on Your Smartphone (Android and iOS)
For the vast majority of users, WhatsApp is primarily a mobile application. The installation process is identical on both major mobile operating systems, Android and iOS.
For Android Users:
- Open the Google Play Store: Locate the Google Play Store app on your device. It’s usually represented by a colorful play button icon.
- Search for WhatsApp: In the search bar at the top of the Play Store, type “WhatsApp” and tap the search icon.
- Select WhatsApp Messenger: From the search results, choose the official “WhatsApp Messenger” app developed by WhatsApp LLC. It’s important to select the official app to avoid counterfeit versions.
- Tap “Install”: On the app’s page, you’ll see an “Install” button. Tap this button to begin the download and installation.
- Grant Permissions: During installation, WhatsApp may request certain permissions, such as access to your contacts, camera, microphone, and storage. These permissions are necessary for the app to function correctly. Review them and tap “Accept” or “Allow.”
- Wait for Installation: The app will download and install automatically. This process usually takes a few minutes, depending on your internet connection speed.
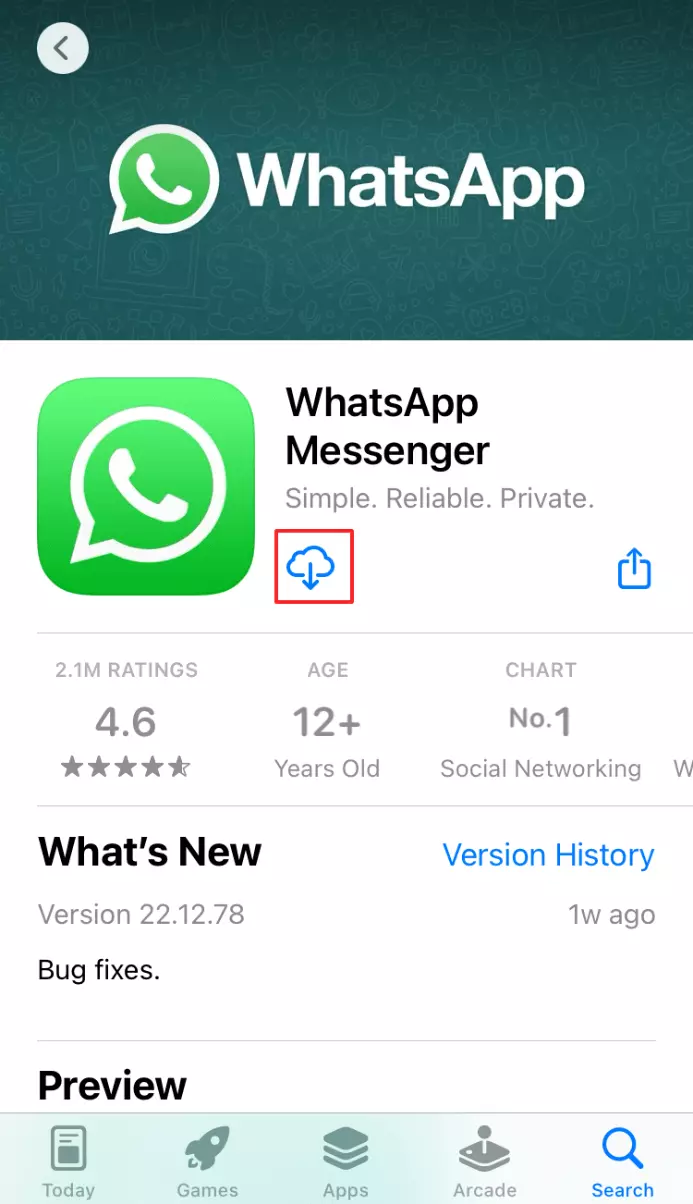
For iOS Users (iPhone and iPad):
- Open the App Store: Find the App Store app on your iPhone or iPad. It’s characterized by a blue icon with a white ‘A’.
- Search for WhatsApp: Tap the “Search” tab at the bottom right of the screen and type “WhatsApp” into the search bar.
- Select WhatsApp Messenger: Look for the official “WhatsApp Messenger” app from WhatsApp LLC in the search results and tap on it.
- Tap “Get” or the Cloud Icon: If you haven’t downloaded it before, you’ll see a “Get” button. If you have downloaded it previously, you’ll see a cloud icon with a downward arrow. Tap either to initiate the download.
- Authenticate: You might be prompted to authenticate the download using your Apple ID password, Face ID, or Touch ID.
- Wait for Installation: The app will download and install automatically.
Installing WhatsApp on Your Desktop or Web Browser
While primarily a mobile app, WhatsApp also offers ways to use it on your computer, enhancing productivity and convenience.
WhatsApp Web
WhatsApp Web allows you to use WhatsApp directly from your web browser without installing any software. It’s a quick and easy way to switch between your phone and computer.
- Open a Web Browser: On your computer, open your preferred web browser (e.g., Chrome, Firefox, Safari, Edge).
- Go to web.whatsapp.com: Type
web.whatsapp.cominto the address bar and press Enter. - Open WhatsApp on Your Phone: On your smartphone, open the WhatsApp app.
- Link a Device:
- On Android: Tap the three vertical dots in the top-right corner, then select “Linked devices.”
- On iPhone: Go to “Settings” (usually a gear icon in the bottom-right), then tap “Linked Devices.”
- Scan the QR Code: A QR code will be displayed on your computer screen. On your phone, tap “Link a device” and scan the QR code using your phone’s camera.
- Access WhatsApp: Once scanned, your WhatsApp chats will appear in your web browser, and you can start messaging from your computer.
WhatsApp Desktop App
For a more integrated desktop experience, you can download the dedicated WhatsApp Desktop application.
- Visit the Official WhatsApp Website: Go to
whatsapp.com/downloadin your web browser. - Download the Application: You’ll see options to download for Windows or macOS. Click the appropriate download button.
- Install the Application: Once the download is complete, open the downloaded file and follow the on-screen instructions to install WhatsApp Desktop on your computer.
- Link Your Account: Similar to WhatsApp Web, you’ll be presented with a QR code. Open WhatsApp on your phone, navigate to “Linked devices” (as described in the WhatsApp Web section), and scan the QR code.
Setting Up Your WhatsApp Account
Once you’ve installed WhatsApp on your smartphone, the next crucial step is to set up your account and personalize your profile. This involves verifying your phone number and configuring your basic information.
Verifying Your Phone Number
WhatsApp uses your phone number as your unique identifier. This is how your contacts will find you, and how WhatsApp ensures you’re a legitimate user.
- Open WhatsApp: Launch the WhatsApp app on your smartphone.
- Agree to Terms of Service: You’ll be presented with WhatsApp’s Terms of Service and Privacy Policy. Read them and tap “Agree and Continue” to proceed.
- Enter Your Phone Number: Select your country code and enter your full phone number, including the area code. Ensure you enter it accurately, as this is how verification will occur.
- Tap “Next” or “Done”: Once your number is entered, tap the confirmation button.
- Confirm Your Number: A confirmation screen will appear. Double-check your phone number. If it’s correct, tap “OK” or “Yes.” If there’s an error, tap “Edit” to correct it.
- Receive and Enter Verification Code: WhatsApp will send you an SMS message containing a six-digit verification code to the phone number you provided. Enter this code into the verification screen within WhatsApp.
- Automatic Verification: In most cases, if you have the SIM card in the phone where you’re installing WhatsApp, the app will automatically detect the SMS and verify your number without you needing to manually enter the code.
- Manual Verification: If automatic verification doesn’t work, you’ll need to manually type the six-digit code into the provided field.
- Resend Code: If you don’t receive the SMS, you can tap “Resend SMS” after a short waiting period. You can also opt for a phone call to receive the code via an automated voice message by tapping “Call Me.”
- Grant Permissions (Again): WhatsApp might ask for permissions again during this setup phase, such as access to your contacts to find people you know who are also on WhatsApp. Granting access to contacts is highly recommended for a seamless experience.
Setting Up Your Profile
After successful phone number verification, you’ll be prompted to set up your profile. This is your digital identity on WhatsApp.
- Enter Your Name: Type your first and last name (or whatever name you wish to be displayed to your contacts). This name will be visible to anyone you chat with.
- Add a Profile Photo: Tap the camera icon to add a profile picture. You can choose to take a new photo or select one from your phone’s gallery. A profile picture helps people recognize you more easily.
- Tap “Next” or “Done”: Once you’ve set your name and profile picture, tap “Next” or “Done” to finalize your profile setup.
Your WhatsApp account is now active, and you’re ready to start connecting with others.
Essential WhatsApp Features and Usage Tips
With your account set up, let’s explore some of the core features that make WhatsApp so popular and offer some tips to enhance your experience. Understanding these features can also indirectly impact your personal branding and even how you conduct business.
Starting a Chat and Understanding the Interface
The primary function of WhatsApp is messaging. The interface is designed to be intuitive.
- Chats Tab: This is where all your conversations are listed, from one-on-one chats to group chats. New messages will appear at the top.
- New Chat Icon: Look for a speech bubble or a plus icon (depending on your operating system) to start a new conversation. Tapping this will show you your contacts who are also on WhatsApp.
- Sending a Message:
- Tap on a contact’s name from your contacts list or the “Chats” tab to open a conversation.
- Type your message in the text field at the bottom of the screen.
- Tap the send button (usually a paper airplane icon) to send your message.
- Media and Attachments: To send photos, videos, documents, your location, or contacts, tap the attachment icon (often a paperclip) within the chat window.
- Voice and Video Calls: WhatsApp allows free voice and video calls over the internet. To initiate a call, open a chat, and tap the phone icon (for voice call) or the video camera icon (for video call) at the top of the screen.
Groups and Broadcasting
WhatsApp’s group features are powerful for communicating with multiple people simultaneously.
- Creating Groups:
- Tap the “New Chat” icon.
- Select “New Group.”
- Choose the contacts you want to add to the group.
- Tap the arrow or “Next” button.
- Give your group a name and an optional group icon.
- Tap “Create.”
- Group Administration: Group admins have control over who can send messages, edit group info, and add/remove members.
- Broadcast Lists: This feature allows you to send a message to multiple individual contacts simultaneously without them knowing who else received it. This is useful for announcements or updates to a wider audience without creating a chat group.
- Go to the “Chats” tab.
- Tap the “New Chat” icon.
- Select “New broadcast.”
- Choose your recipients.
- Tap “Create.”
Status Updates
The Status feature is similar to stories on other social media platforms, allowing you to share text, photos, videos, and GIFs that disappear after 24 hours.
- Adding a Status:
- Go to the “Status” tab.
- Tap the “My Status” option or the camera icon.
- Create your update by taking a photo/video or selecting from your gallery.
- Add text, stickers, or drawings.
- Tap the send button.

Privacy and Security Settings
WhatsApp prioritizes user privacy and offers several settings to control who can see your information and how your messages are protected.
- Last Seen and Online Status: You can control who sees when you were last active on WhatsApp and when you are currently online.
- Profile Photo and About: You can choose who can view your profile picture and the “About” section.
- Read Receipts: This feature shows whether recipients have read your messages. You can disable it for all contacts if you prefer.
- End-to-End Encryption: WhatsApp uses end-to-end encryption by default for all messages, calls, photos, videos, documents, and status updates. This means only you and the person you’re communicating with can read or listen to what is sent, not even WhatsApp. This is a critical aspect of digital security and fosters trust.
- Two-Step Verification: For enhanced security, enable two-step verification to add a PIN that is required when registering your phone number with WhatsApp again. This protects your account from being hijacked.
By mastering these installation steps and understanding the core functionalities, you’ll be well-equipped to leverage WhatsApp for effective and secure communication, contributing positively to your personal brand and even streamlining certain aspects of your financial or business communications.
aViewFromTheCave is a participant in the Amazon Services LLC Associates Program, an affiliate advertising program designed to provide a means for sites to earn advertising fees by advertising and linking to Amazon.com. Amazon, the Amazon logo, AmazonSupply, and the AmazonSupply logo are trademarks of Amazon.com, Inc. or its affiliates. As an Amazon Associate we earn affiliate commissions from qualifying purchases.