Digital music production has undergone a massive transformation over the last two decades, evolving from expensive hardware-heavy studios to streamlined, software-based environments. At the heart of this evolution is the Virtual Studio Technology (VST) plugin. For users of Image-Line’s FL Studio—one of the world’s most popular Digital Audio Workstations (DAWs)—mastering the installation and management of VSTs is a fundamental skill. Whether you are adding a cutting-edge synthesizer like Serum or a vintage compressor emulation, knowing the technical intricacies of plugin integration ensures a stable and creative workflow.
This guide provides an in-depth technical walkthrough on how to install VST plugins in FL Studio, covering directory management, the scanning process, and optimization techniques for modern production environments.
Understanding VST Architecture and File Formats
Before moving into the installation process, it is critical to understand the technical specifications of the software you are adding to your system. VSTs come in various formats, and mismatching them can lead to software crashes or “plugin not found” errors.
VST2 vs. VST3: What is the Difference?
VST2 is the older standard, typically found as a .dll file. While still widely used, it is being phased out by many developers. VST3, the modern standard (ending in .vst3), is more efficient. It only consumes CPU cycles when it is actively processing audio, and it allows for more flexible input/output routing. Whenever possible, tech-savvy producers should opt for the VST3 version to optimize system resources.
32-bit vs. 64-bit Compatibility
Modern versions of FL Studio are 64-bit. While FL Studio includes a “bridge” that allows 32-bit plugins to run within a 64-bit environment, doing so increases CPU overhead and can lead to instability. For a streamlined tech setup, always install the 64-bit version of a plugin if your operating system and DAW support it. This ensures that the plugin can access your system’s full RAM capacity, which is vital for heavy sample libraries.
Instruments (VSTi) vs. Effects (VST)
It is important to distinguish between the two. VST Instruments (VSTi) generate sound (synths, samplers, drum machines), while VST effects process sound (reverbs, EQs, delays). FL Studio handles both through the same manager, but they are categorized differently within the software’s internal database.
Preparing Your System for Plugin Integration
The most common reason for VST installation failure is poor file management. Unlike standard apps that install to a single “Program Files” folder, VSTs often spread files across multiple directories.
Establishing Standard Installation Paths
To keep your technical environment clean, you should use the industry-standard folders. On a Windows machine, these are typically:
- VST3:
C:Program FilesCommon FilesVST3 - VST2 (64-bit):
C:Program FilesVSTPlugins - VST2 (32-bit):
C:Program Files (x86)VSTPlugins
When running a plugin installer, it will often ask you where to place the files. Redirecting them all to these centralized locations makes it much easier for FL Studio to locate them during a scan.
Managing Sample Libraries and Data
Many high-end VSTs, such as Kontakt or Omnisphere, come with massive “sample libraries” that can reach hundreds of gigabytes. From a technical optimization standpoint, you should never install these libraries on your primary OS drive if it is small. Instead, install the plugin software (the VST file) on your C: drive (SSD) and move the heavy sound libraries to a dedicated high-speed external SSD. This prevents your boot drive from slowing down and ensures faster loading times within FL Studio.
Dealing with Compressed Files
Many free or indie VSTs do not come with an installer. Instead, they are delivered as a .zip or .rar file containing a .dll or .vst3 file. In these cases, you must manually extract these files into your designated VST folders. Failing to extract them properly is a frequent technical hurdle for beginners.
The Step-by-Step Installation Process in FL Studio

Once the plugin files are correctly placed on your hard drive, you must introduce them to the FL Studio environment. This is handled through the software’s “Plugin Manager.”
Accessing the Plugin Manager
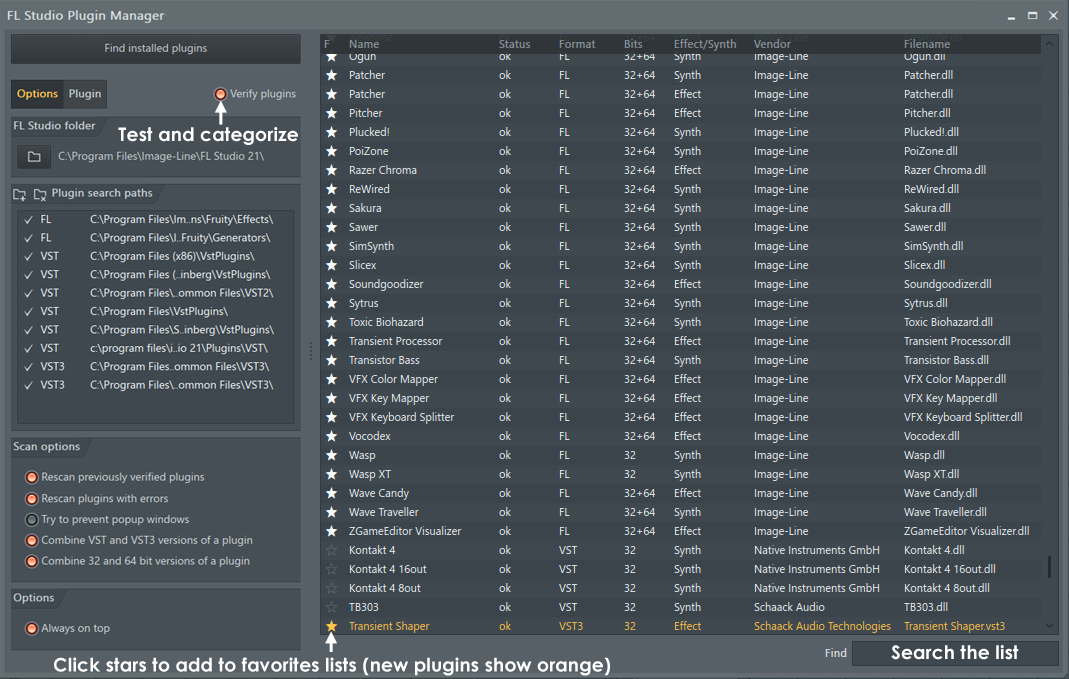
To begin, open FL Studio and navigate to the top menu. Go to Options > Manage Plugins. This will open a dedicated window that acts as the control center for your software library. On the left side of this window, you will see a list of “Plugin search paths.” If you installed your VST to a custom folder, you must click the “plus folder” icon here to add that specific path to the list.
Executing the Scan
There are two primary ways to scan for new software:
- Find installed plugins: This is a basic scan that looks for new files in your designated folders.
- Verify plugins: This is the recommended technical approach. When you select “Verify plugins,” FL Studio opens each plugin in the background to categorize it as either a “Synth” or an “Effect” and checks if it is 32-bit or 64-bit. While this takes longer, it significantly reduces errors when you actually try to load the plugin into a project.
Activating and Favoriting Plugins
Once the scan is complete, your new VSTs will appear in the list highlighted in white (or orange in some versions). To make them available in your project, click the “star” icon next to the plugin name. This “favorites” the plugin, adding it to the quick-access menus in the Browser and the Mixer. This step is essential for maintaining an efficient workflow, as it prevents your menus from being cluttered with hundreds of unused stock plugins.
Managing and Troubleshooting Your Plugin Library
Even with a perfect installation, software conflicts can occur. Technical troubleshooting is a part of maintaining a high-performance Digital Audio Workstation.
Resolving “Plugin Not Found” Errors
If you open an old project and receive a “Plugin not found” error, it usually means the VST file has been moved or renamed. To fix this, check your Plugin Manager paths to ensure they point to the current location of the .dll or .vst3 file. If the plugin was updated, ensure that the new version has the exact same filename as the old one, as DAWs use the filename to link the plugin to the project data.
Handling Plugin Crashes and GUI Issues
Sometimes a plugin will load, but the interface (GUI) will appear as a black box or look distorted. This is often a DPI scaling issue. In the FL Studio Wrapper settings (the gear icon on the plugin window), go to the “Processing” tab and toggle “Make bridged” or “External window.” For high-resolution monitors, you may also need to check “DPI aware when bridged” to ensure the plugin scales correctly with your Windows display settings.
Organizing the Plugin Database
FL Studio allows you to organize your VSTs into folders (e.g., “Drums,” “Reverbs,” “Synths”). To do this technically, go to the Browser > Plugin Database. Here, you can right-click and create subfolders. When you have a plugin open that you want to categorize, go to the plugin’s wrapper menu and select “Flag as favorite.” It will then be saved into the currently selected folder in your Browser, complete with a thumbnail preview.
Optimizing VST Performance for Modern Music Production
Installing a VST is only half the battle; ensuring it runs efficiently without taxing your CPU is the hallmark of a professional tech setup.
Utilizing “Smart Disable”
One of FL Studio’s most powerful technical features is “Smart Disable.” When active, this feature turns off a VST’s CPU processing when it is not currently producing sound. You can enable this globally by going to Tools > Macros > Switch smart disable for all plugins. This can significantly lower your CPU usage, allowing you to run more complex projects on modest hardware.
Managing Latency and Buffer Size
Every VST adds a small amount of “latency” (delay) to your audio signal. If you install a particularly “heavy” VST, you may hear crackling or popping. This is a technical sign that your CPU buffer is too small. Navigate to Options > Audio Settings and increase the “Buffer length.” While this increases delay when playing a MIDI keyboard, it provides the CPU with more time to process the complex algorithms of your new VSTs.

Keeping Your Library Updated
Finally, technology moves fast. VST developers frequently release updates to fix bugs related to Windows updates or new FL Studio versions. Periodically check the manufacturer’s website or use a plugin manager like “Waves Central” or “Native Access” to ensure your tools are up to date. This proactive maintenance prevents technical debt and ensures your creative sessions remain uninterrupted by software failures.
By following these professional standards for VST installation and management, you transform FL Studio from a simple program into a robust, scalable production powerhouse. Managing your software with technical precision ensures that when inspiration strikes, your tools are ready, stable, and optimized for performance.
aViewFromTheCave is a participant in the Amazon Services LLC Associates Program, an affiliate advertising program designed to provide a means for sites to earn advertising fees by advertising and linking to Amazon.com. Amazon, the Amazon logo, AmazonSupply, and the AmazonSupply logo are trademarks of Amazon.com, Inc. or its affiliates. As an Amazon Associate we earn affiliate commissions from qualifying purchases.