In an increasingly interconnected world, where digital threats loom large and privacy concerns grow daily, securing your online presence is no longer optional—it’s imperative. While Virtual Private Networks (VPNs) have become a cornerstone of personal digital security, installing a VPN directly on your router takes this protection to an entirely new level. This advanced setup offers unparalleled benefits, extending robust encryption and privacy safeguards to every device connected to your home network, often streamlining your digital security strategy and enhancing overall productivity.
This comprehensive guide will walk you through the intricacies of installing a VPN on your router, covering everything from understanding the benefits to navigating the technical steps and troubleshooting common issues. Whether you’re a tech enthusiast seeking ultimate control or simply aiming for a more secure and private smart home environment, mastering VPN router installation is a valuable skill in today’s digital landscape.
Why You Should Install a VPN on Your Router
Many users are familiar with installing VPN software on individual devices like laptops, smartphones, or tablets. However, integrating a VPN directly into your router provides a suite of advantages that individual device installations simply cannot match. It’s an investment in your digital safety, offering efficiency and peace of mind.
Universal Protection for All Connected Devices
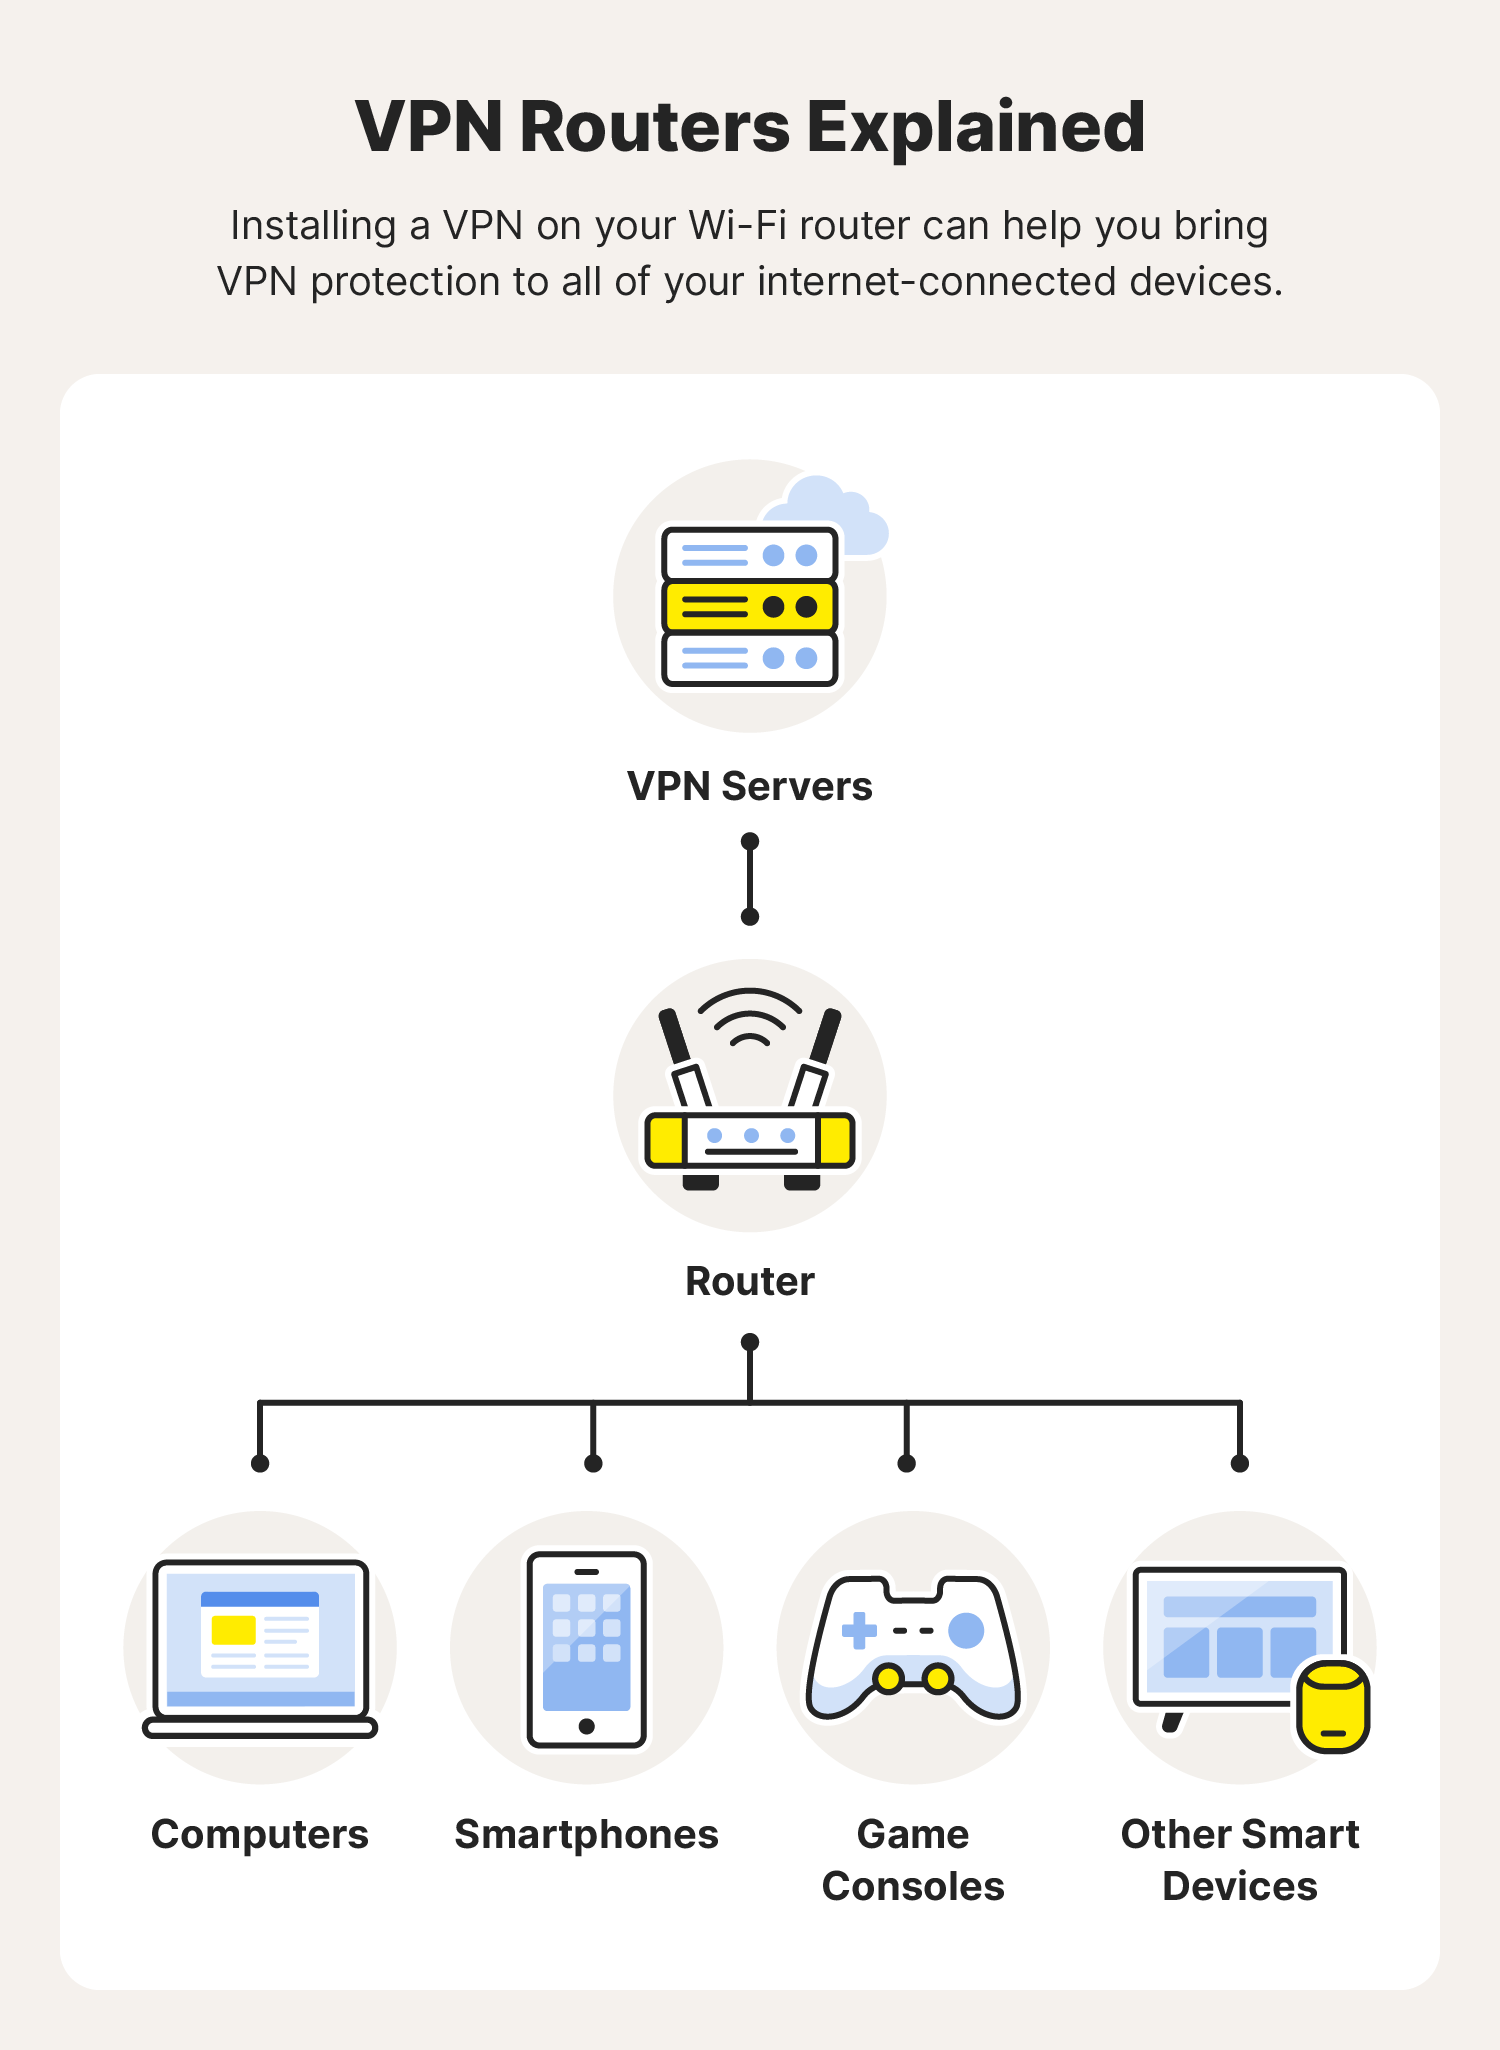
The most compelling reason to install a VPN on your router is the blanket protection it provides. Once configured, every device that connects to your Wi-Fi network – from your computer and phone to smart TVs, gaming consoles, smart home devices, and even guest devices – will automatically route its internet traffic through the VPN. This eliminates the need to install and configure VPN software on each device individually, a task that can become tedious and sometimes impossible for certain gadgets like smart thermostats or older smart TVs. This universal coverage ensures that your entire digital ecosystem is shielded, bolstering your overall digital security posture and preventing any unsecured devices from becoming potential vulnerabilities.
Bypassing Device Limitations and Enhancing Coverage
Many devices, particularly smart home gadgets, streaming boxes, and gaming consoles, do not support native VPN clients. This means that without a VPN-enabled router, these devices operate without the benefits of encryption, IP masking, or geo-unblocking. By having the VPN at the router level, you effectively extend VPN functionality to these otherwise incompatible devices. This opens up a world of possibilities, allowing you to stream geo-restricted content on your smart TV, access international gaming servers, or simply ensure that all IoT devices in your home are not broadcasting unencrypted data. It enhances the functionality and reach of your digital security beyond conventional limits.
Simplifying Your Digital Security Strategy
Managing multiple VPN installations, subscriptions, and configurations across numerous devices can be cumbersome and inefficient. A router-level VPN centralizes your security management. You only need to configure the VPN once on the router, and it applies to everything. This simplification not only saves time but also reduces the chances of human error, ensuring a consistent level of protection across your network. Furthermore, for users who frequently travel or have guests, a router VPN means they don’t have to worry about securing individual devices; anyone connecting to your Wi-Fi benefits from your established security protocols. This streamlined approach contributes directly to digital productivity by reducing administrative overhead and freeing up time.
Prerequisites for Router VPN Installation
Before you embark on the journey of installing a VPN on your router, it’s crucial to ensure you have the necessary components and information. Proper preparation is key to a smooth and successful installation process, minimizing potential roadblocks and maximizing efficiency.
Choosing a Compatible Router
Not all routers are created equal when it comes to VPN compatibility. Many standard, off-the-shelf routers lack the processing power, memory, or the necessary firmware to run a VPN client effectively.
Generally, routers fall into three categories for VPN support:
- Routers with Native VPN Client Support: Some modern routers, particularly higher-end models from brands like Asus (running AsusWRT), Linksys (with specific firmware versions), or Netgear (Nighthawk series), come with built-in VPN client functionality. These are the easiest to configure.
- Routers Compatible with Custom Firmware (DD-WRT, OpenWRT, Tomato): These open-source firmware replacements can transform a basic router into a powerful, feature-rich device capable of running a VPN client. This option offers immense flexibility but requires a more technical installation process. You’ll need to check if your specific router model is listed as compatible on the DD-WRT, OpenWRT, or Tomato websites.
- Pre-Flashed VPN Routers: For those who prefer a plug-and-play solution, some vendors offer routers that come pre-configured with VPN firmware and even pre-installed with a VPN service of your choice. This is often the most expensive but least technically demanding option.
Verify your router’s make, model, and current firmware version. You can usually find this information on a sticker at the bottom of your router or by logging into its web interface.
Selecting the Right VPN Service
Your choice of VPN service is paramount. Not all VPN providers are optimized for router installation, and some may not even provide the necessary configuration files. When selecting a VPN service for your router, consider the following:
- Router Compatibility: Does the VPN provider offer clear instructions and configuration files (e.g.,
.ovpnfor OpenVPN, WireGuard configuration) specifically for routers, custom firmware like DD-WRT/OpenWRT, or native router VPN clients? - Protocols Supported: Look for services that support OpenVPN and/or WireGuard, as these are the most common and secure protocols for router VPNs.
- Server Network and Speed: A large network of servers ensures you can find a fast connection near your desired location. Speed is crucial, as router VPNs can sometimes introduce a slight overhead.
- No-Logs Policy: Ensure the VPN provider has a strict no-logs policy to guarantee your privacy.
- Customer Support: Accessible and knowledgeable customer support is invaluable, especially if you encounter issues during installation.
Reputable VPN providers like ExpressVPN, NordVPN, Surfshark, and ProtonVPN are generally good choices, offering extensive router support and guides.
Essential Tools and Software
Before you begin, gather these items:
- Ethernet Cable: Essential for a stable connection during the flashing process (if using custom firmware) and for initial router configuration.
- Computer: A desktop or laptop to access the router’s web interface and download necessary files.
- VPN Subscription Details: Your VPN username, password, and any server configuration files (e.g.,
.ovpn, private keys, certificates) provided by your VPN service. - Router Login Credentials: The username and password for your router’s administrative interface.
- Latest Router Firmware (if flashing custom firmware): Download the correct custom firmware file (e.g., DD-WRT, OpenWRT) specifically for your router model from the official project websites. Double-check the exact version.
Step-by-Step Methods for VPN Router Setup
The installation process varies significantly depending on your router’s capabilities. We’ll explore the three primary methods for installing a VPN on your router, from the most technical to the most straightforward.
Method 1: Flashing Your Router with Custom Firmware (DD-WRT/OpenWRT)

This method offers the most flexibility and power but is also the most technically demanding. It involves replacing your router’s factory firmware with a third-party, open-source alternative. Proceed with caution; incorrect flashing can “brick” your router, rendering it unusable.
- Check Router Compatibility: Reconfirm that your specific router model and hardware version are officially supported by DD-WRT, OpenWRT, or Tomato. Visit their respective websites (e.g.,
dd-wrt.com/site/support/router-database) and search for your model. - Download the Correct Firmware: Download the appropriate custom firmware file(s) for your router model. Pay close attention to the specific build and installation instructions provided on the firmware project’s wiki for your router. Often, you’ll need an initial “factory-to-DD-WRT” firmware followed by a “web-flash” build.
- Backup Your Router’s Configuration: While not always possible to restore, it’s good practice to save your current router settings (if your router allows). More importantly, make a note of your Wi-Fi names, passwords, and any port forwarding rules.
- Connect Your Router and PC: Connect your computer directly to one of your router’s LAN ports using an Ethernet cable. Disconnect your router from the internet (unplug the WAN cable).
- Perform a 30/30/30 Hard Reset (for DD-WRT/Tomato): This step resets the router to factory defaults and clears residual settings, reducing the chance of conflicts.
- With the router plugged in, hold the reset button for 30 seconds.
- While holding the reset button, unplug the router’s power for 30 seconds.
- While still holding the reset button, plug the router’s power back in and continue holding for another 30 seconds. Release.
- Flash the Firmware:
- Access your router’s factory web interface (usually
192.168.1.1or192.168.0.1). - Navigate to the “Firmware Upgrade,” “Administration,” or “Router Upgrade” section.
- Upload the downloaded custom firmware file. DO NOT interrupt the process. Wait for the router to restart. This can take several minutes.
- After flashing, you might need to perform another 30/30/30 reset.
- Access your router’s factory web interface (usually
- Configure DD-WRT/OpenWRT:
- After restarting, access the new firmware interface (often
192.168.1.1). You’ll likely be prompted to set a new username and password for the router. - Configure the VPN Client: Navigate to “Services” > “VPN” > “OpenVPN Client” (or equivalent for WireGuard).
- Enter VPN Details: Your VPN provider will supply the necessary information:
- Start OpenVPN Client: Enable.
- Server IP/Name: Your VPN server address.
- Port: (e.g., 1194 for OpenVPN UDP).
- Protocol: UDP or TCP.
- Tunnel Device: TUN.
- Encryption Cipher: (e.g., AES-256-CBC/GCM).
- Hash Algorithm: (e.g., SHA256).
- User Pass Authentication: Enable, enter your VPN username and password.
- Advanced Options: Enable.
- TLS Cipher: (if provided).
- TLS Auth Key: Paste the key from your
.ovpnfile (often between<tls-auth>tags). - Public Client Cert, Private Client Key, CA Cert: Paste the respective certificate and key data from your
.ovpnfile. - Additional Config: Paste any additional configuration lines provided by your VPN service (e.g.,
nobind,persist-key,persist-tun,comp-lzo no).
- Save and Apply Settings.
- Check Status: Go to “Status” > “OpenVPN” to see if the client is connected.
- After restarting, access the new firmware interface (often
Method 2: Utilizing Routers with Native VPN Client Support
If your router supports a native VPN client (e.g., many Asus routers with AsusWRT, some higher-end Linksys or Netgear models), the process is much simpler, as you don’t need to flash custom firmware.
- Access Router Settings: Log into your router’s web interface using your browser (e.g.,
192.168.1.1). - Navigate to VPN Client Section: Look for a “VPN” or “VPN Client” section, often under “Advanced Settings” or “WAN.”
- Add a New VPN Profile:
- Choose the VPN protocol (usually OpenVPN or WireGuard).
- Your VPN provider will have a dedicated guide for your router type, but generally, you’ll need to upload the
.ovpnconfiguration file or manually enter:- Description: A name for your VPN connection.
- VPN Server IP/Domain: The address of the VPN server.
- Username and Password: Your VPN credentials.
- Port and Protocol: (e.g., 1194 UDP).
- Import .ovpn file: If available, this option will auto-populate most settings. Otherwise, you’ll manually input the certificates and keys as text.
- Connect and Apply: Save the settings and click “Connect.” Your router should establish a connection to the VPN server.
Method 3: Opting for a Pre-Flashed VPN Router
This is the easiest route, perfect for users who want to avoid the technical complexities of flashing and configuration.
- Purchase a Pre-Flashed Router: Buy a router from a reputable vendor that comes pre-installed with VPN-compatible firmware (like DD-WRT, OpenWRT, or Tomato) and often pre-configured with a specific VPN service. Companies like FlashRouter specialize in this.
- Unbox and Connect: Follow the vendor’s instructions, which typically involve connecting the router to your modem and powering it on.
- Enter VPN Credentials: Access the router’s web interface (usually through a custom URL provided by the vendor). You’ll typically find a simplified interface where you just need to enter your VPN service username and password, select a server location, and click “Connect.”
- Verify Connection: Check the router’s status page or use an external IP checker to confirm the VPN is active.
Post-Installation: Verifying Your VPN Connection and Advanced Tips
Once you’ve gone through the installation steps, it’s crucial to confirm that your VPN is working as intended and to optimize its performance and reliability.
Confirming VPN Functionality
- Check IP Address: Connect a device (e.g., your computer) to your router’s Wi-Fi network. Open a web browser and visit an “IP address checker” website (e.g.,
whatismyipaddress.comoripleak.net). The displayed IP address should be that of your VPN server, not your actual public IP address. - DNS Leak Test: While on the same IP checker website, look for a “DNS leak test” feature. This will confirm that your DNS requests are also being routed through the VPN and not leaking to your ISP.
- Geo-Restriction Test: If you installed the VPN to access geo-restricted content, try accessing a service that was previously blocked.
Split Tunneling and Kill Switch Considerations
Depending on your router’s firmware and VPN provider, you might have access to advanced features:
- Split Tunneling: Allows you to choose which devices or applications on your network use the VPN and which bypass it. This is useful for accessing local network resources while simultaneously protecting internet traffic. For example, you might want your streaming device to use the VPN, but your local printer to remain on your regular network.
- VPN Kill Switch: Essential for security, a kill switch (often built into the custom firmware) automatically blocks all internet traffic if the VPN connection drops. This prevents accidental exposure of your real IP address or unencrypted data. Ensure this feature is enabled if available.
Maintaining Your VPN Router
To ensure continuous security and optimal performance:
- Regular Firmware Updates: Keep your router’s firmware (whether factory or custom) updated. Updates often include security patches and performance enhancements.
- VPN Service Updates: Ensure your VPN configuration files are up-to-date. VPN providers sometimes change server addresses, certificates, or encryption protocols.
- Monitor Performance: Periodically check your internet speed and VPN connection status. If speeds drop significantly or connections become unstable, consult your VPN provider or router firmware documentation.
Troubleshooting Common VPN Router Issues
Even with careful planning, you might encounter issues. Here are some common problems and their solutions:
Connection Drops and Speed Reductions
- Server Overload: Try connecting to a different VPN server provided by your service.
- Router Overload: Router VPNs consume CPU resources. If your router is old or low-spec, it might struggle. Consider upgrading your router or reducing the number of simultaneously connected VPN devices if split tunneling is available.
- Interference: Ensure your router isn’t placed near other electronics that could cause wireless interference.
- ISP Throttling: While less common with VPNs, some ISPs may throttle general internet traffic.
- OpenVPN/WireGuard vs. PPTP/L2TP: OpenVPN and WireGuard are more secure but can be more resource-intensive. If your router has very limited hardware, older (less secure) protocols like PPTP or L2TP might offer better speed, but should be avoided for critical privacy.
Firmware Flashing Problems
- Bricked Router: If your router becomes unresponsive after flashing, you might need to attempt a recovery procedure (e.g., TFTP recovery). This is highly model-specific and often requires advanced technical skills. Prevention is key: always double-check compatibility and follow instructions precisely.
- Incorrect Firmware Version: Ensure you downloaded the exact firmware for your router’s make, model, and hardware version. Flashing the wrong firmware is a common cause of bricking.
- Interrupted Flashing: Never unplug your router or close your browser during a firmware upgrade.

VPN Configuration Errors
- Incorrect Credentials: Double-check your VPN username, password, server address, and port. Even a single typo can prevent a connection.
- Missing Certificates/Keys: Ensure all necessary certificates, client keys, and TLS authentication keys from your
.ovpnfile are correctly copied and pasted into the router’s VPN client configuration. Spaces or extra characters can cause issues. - Firewall Conflicts: Sometimes, your router’s firewall or your ISP’s firewall might block VPN ports. Ensure the necessary ports (e.g., 1194 for OpenVPN UDP, 51820 for WireGuard UDP) are open.
- DNS Issues: If websites aren’t loading, check your router’s DNS settings. Some VPN providers recommend specific DNS servers. Ensure your router isn’t leaking DNS requests to your ISP.
- “Additional Config” Lines: Incorrectly formatted or unsupported “additional config” lines can cause the VPN to fail to connect. Try removing them one by one to isolate the issue.
By systematically going through these troubleshooting steps, you can often diagnose and resolve common issues, restoring your secure, whole-network VPN protection.
Installing a VPN on your router is a powerful step towards a more secure, private, and unrestricted digital life. While it may seem daunting at first, the benefits of universal protection, simplified management, and extended device compatibility far outweigh the initial effort. By carefully selecting your router and VPN service, following the installation guidelines, and understanding how to maintain and troubleshoot your setup, you’ll create a robust defense for your entire home network, ensuring that all your devices operate under a blanket of robust digital security. This investment not only protects your personal data but also contributes to a more efficient and worry-free online experience for everyone in your household.
aViewFromTheCave is a participant in the Amazon Services LLC Associates Program, an affiliate advertising program designed to provide a means for sites to earn advertising fees by advertising and linking to Amazon.com. Amazon, the Amazon logo, AmazonSupply, and the AmazonSupply logo are trademarks of Amazon.com, Inc. or its affiliates. As an Amazon Associate we earn affiliate commissions from qualifying purchases.