In today’s increasingly interconnected world, digital security and online privacy are no longer niche concerns; they are fundamental aspects of our daily lives. From managing personal finances and navigating the complexities of brand building to staying abreast of the latest technological advancements, our digital footprint is expanding. A critical, yet often overlooked, component of this digital defense is the security of our home network. While individual device VPN installations offer robust protection, extending this security to your router creates a powerful, blanket of privacy for every device connected to your network. This comprehensive guide will walk you through the process of installing a VPN on your router, transforming your home network into a bastion of digital security.
Why Install a VPN on Your Router? The Ultimate Network Protection
The allure of a VPN (Virtual Private Network) typically lies in its ability to encrypt your internet traffic and mask your IP address, offering anonymity and security on a per-device basis. However, the true power of VPN technology is amplified when implemented at the router level. This strategic approach offers several compelling advantages that transcend individual device protection.
Protecting Every Connected Device, Simultaneously
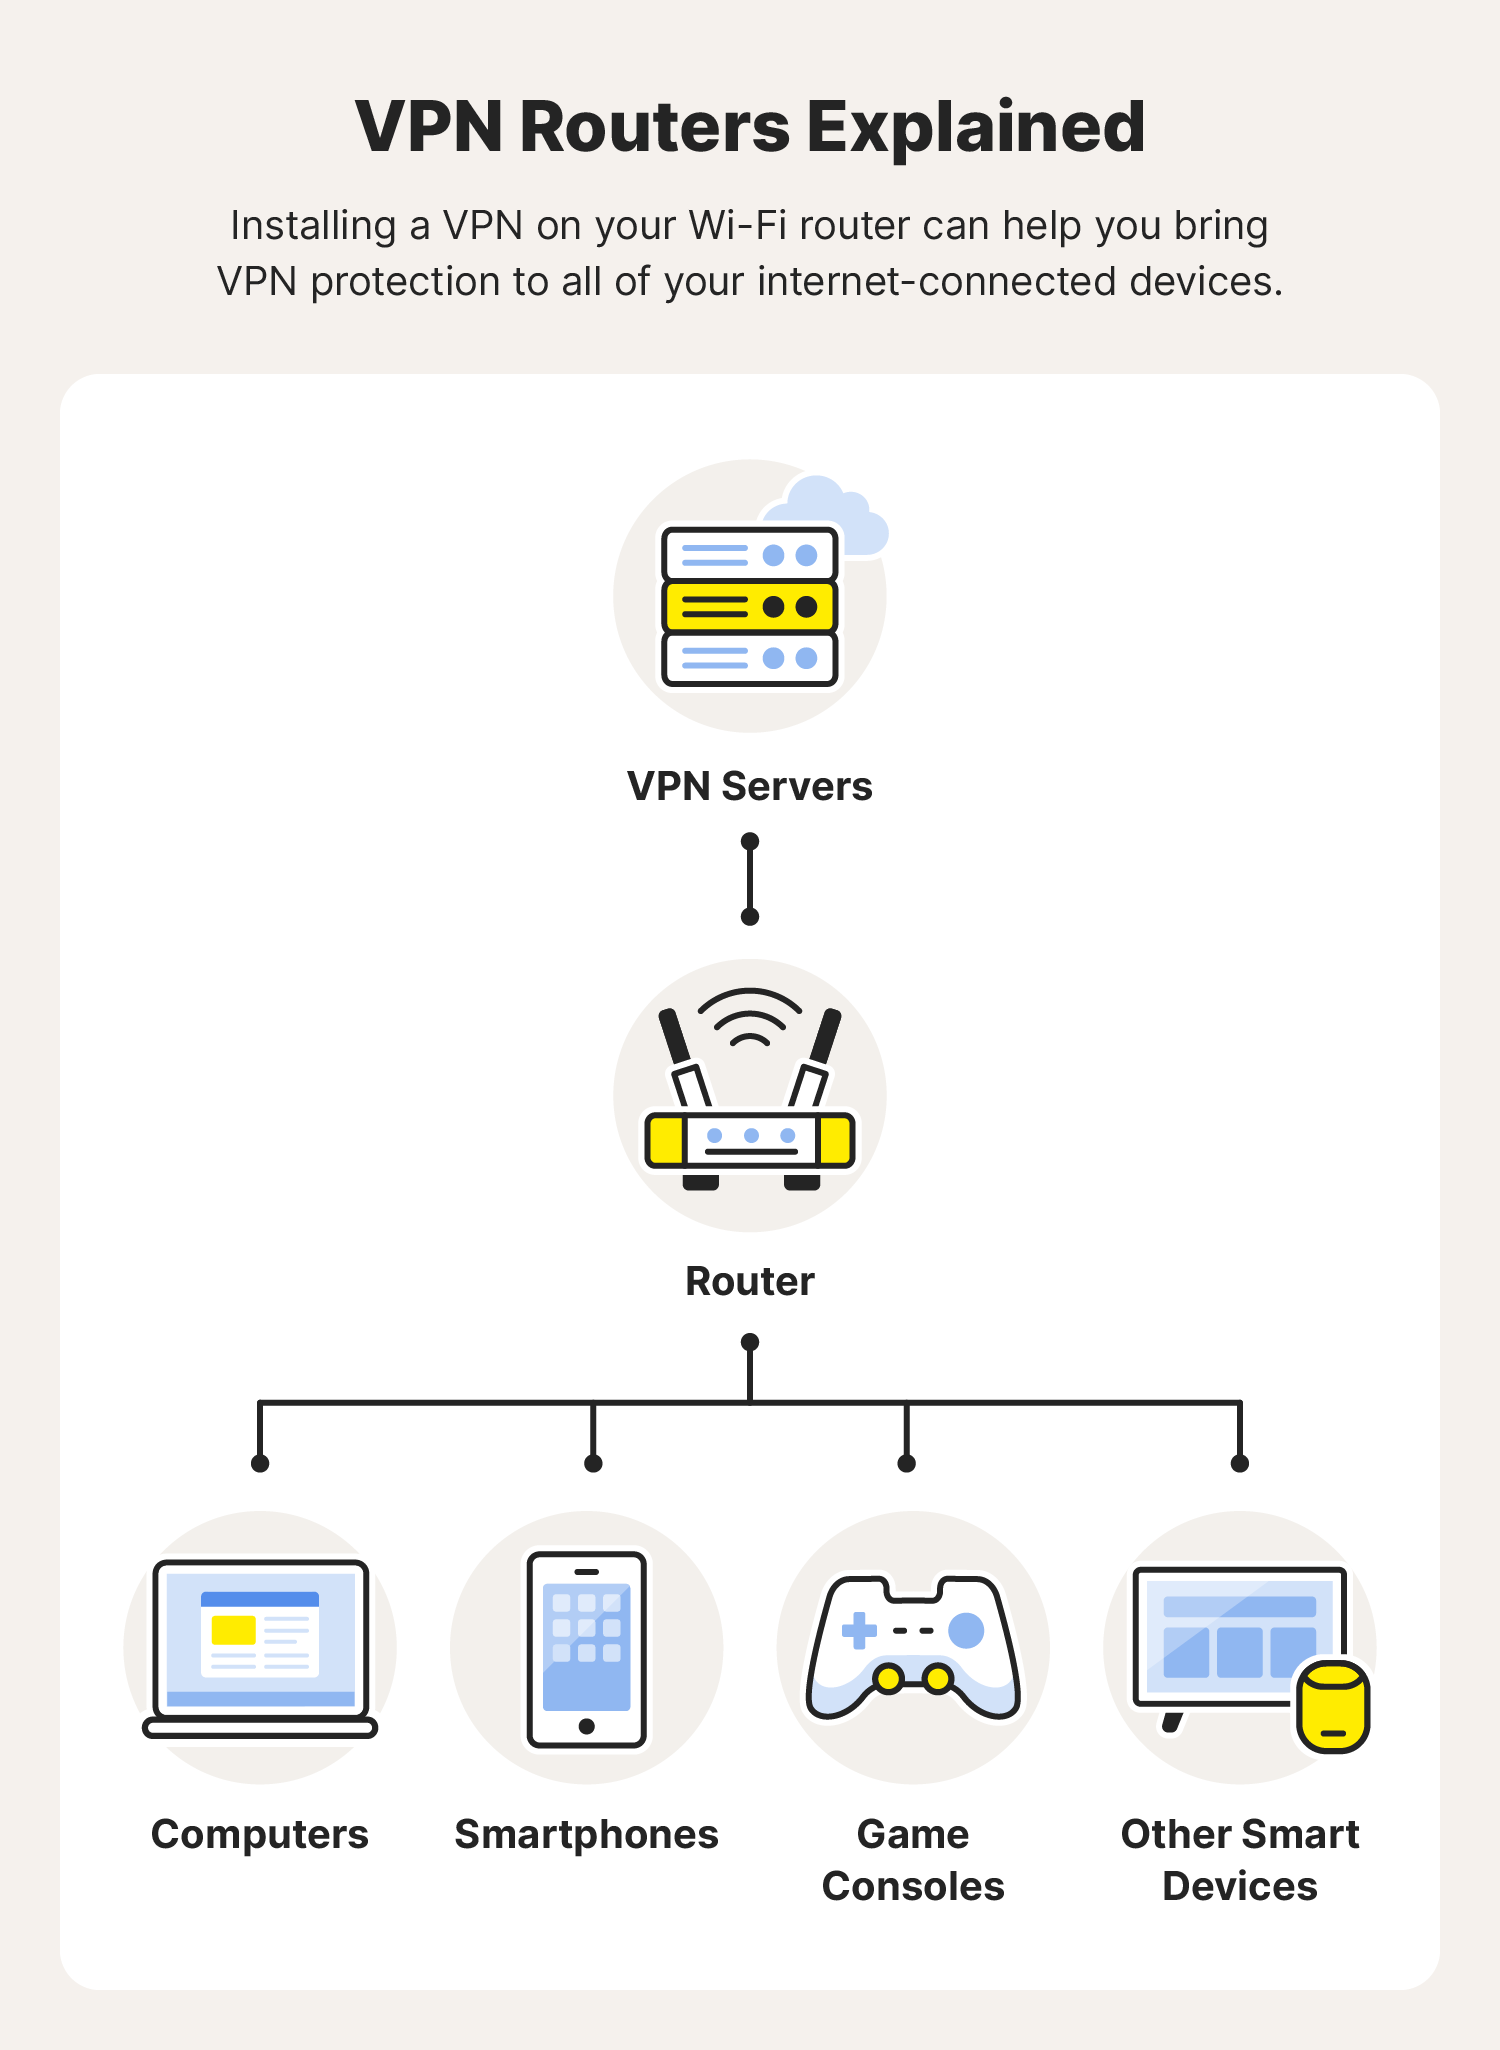
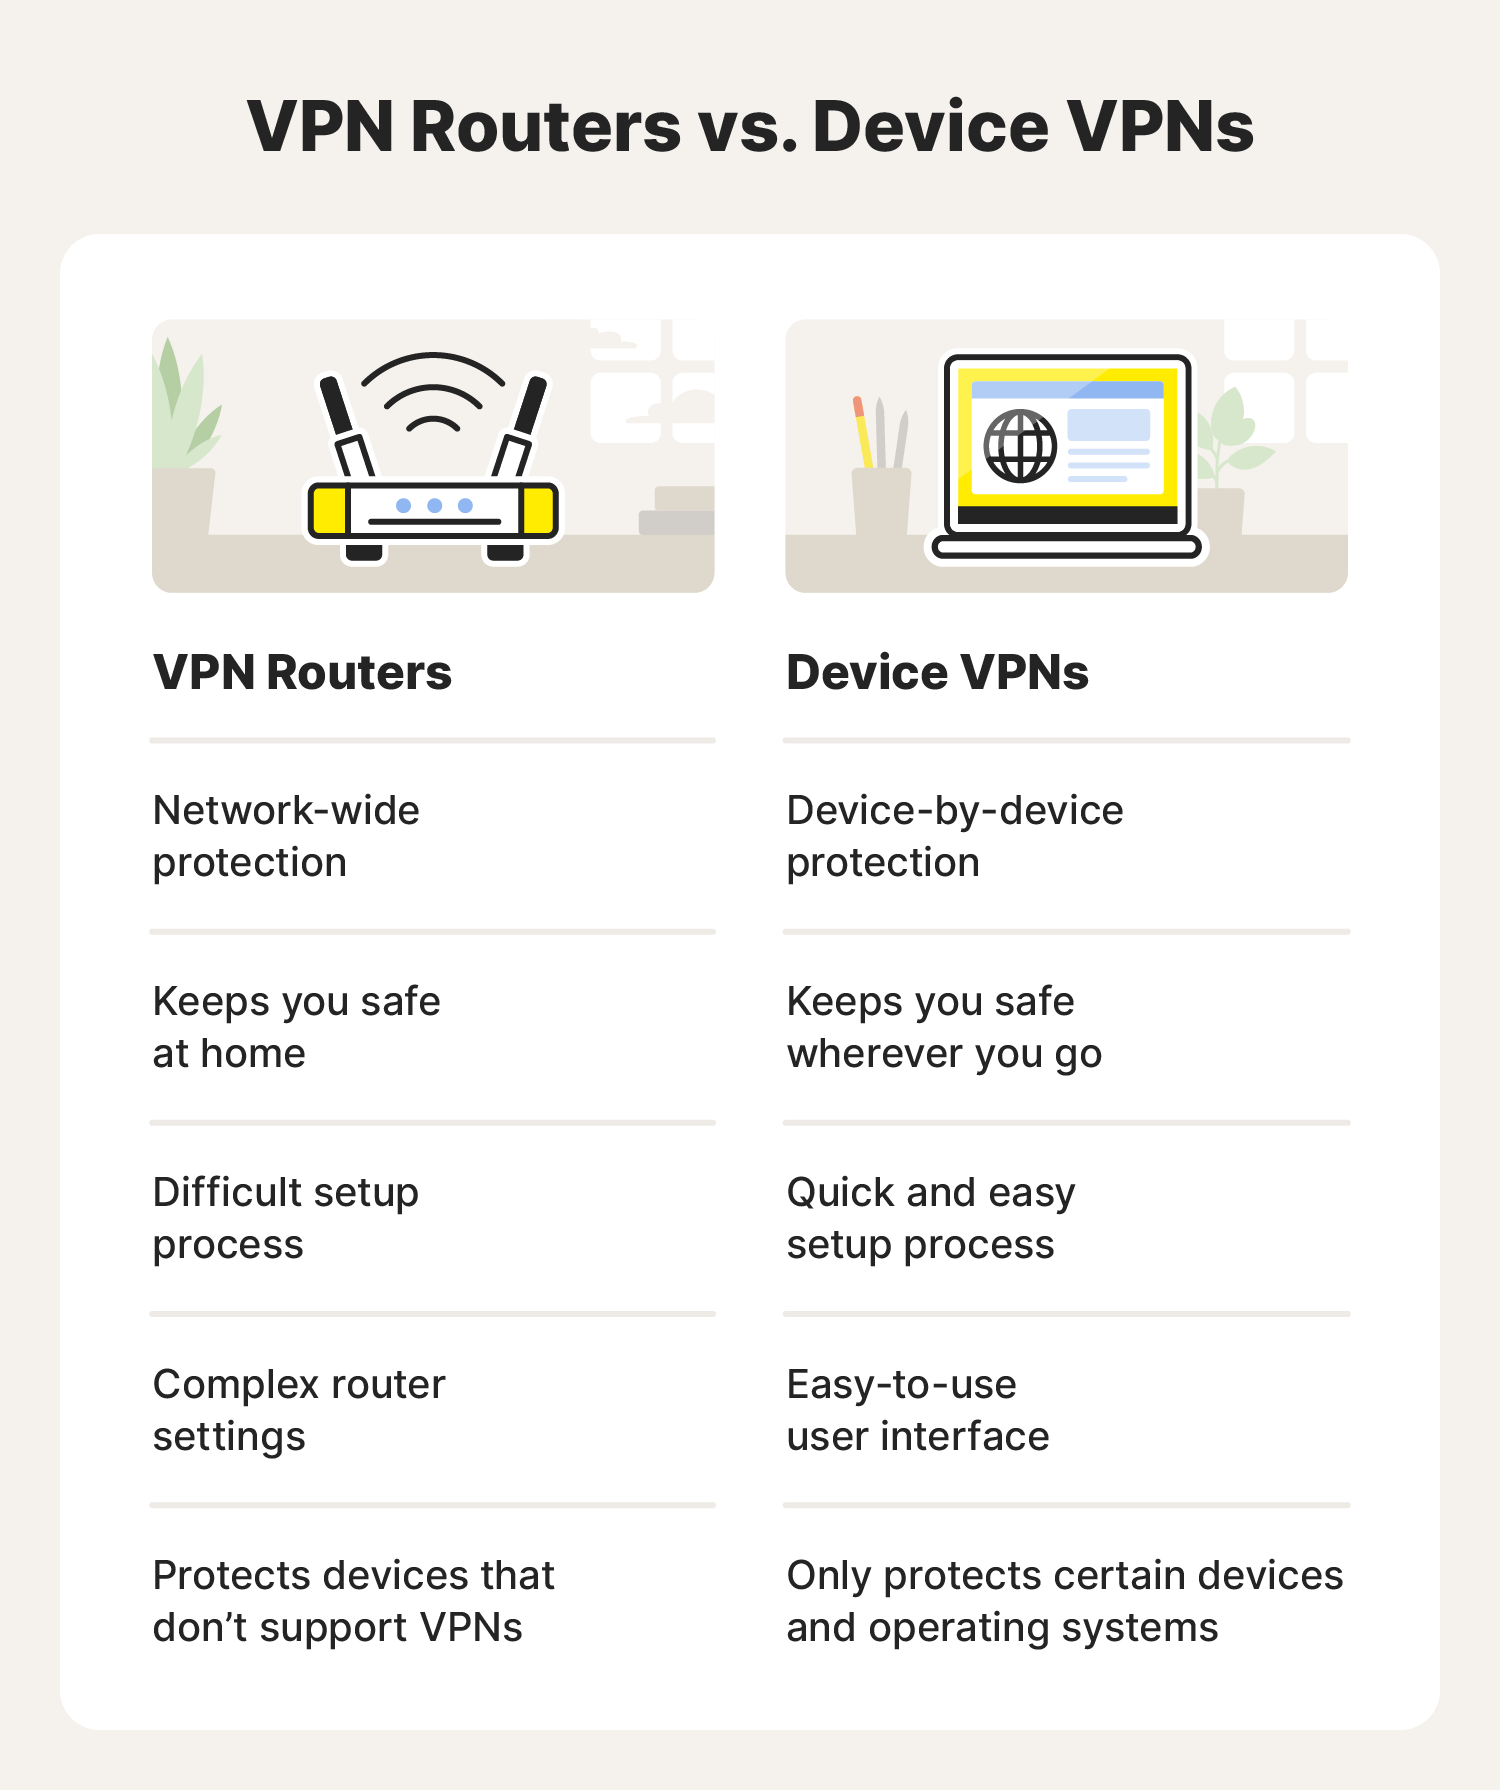
One of the most significant benefits of installing a VPN on your router is that it provides protection to all devices connected to your home Wi-Fi network. This includes not only your computers and smartphones but also smart TVs, gaming consoles, smart home devices (like Alexa or Google Home), and any other gadget that utilizes your Wi-Fi. This is particularly crucial for devices that either don’t natively support VPN client software or are notoriously difficult to secure individually. Think of your smart refrigerator or your child’s gaming console – these devices often represent vulnerabilities in your network’s overall security. By configuring your router with a VPN, you create an impenetrable shield for all of them, ensuring that every byte of data leaving and entering your home is encrypted and routed through a secure VPN server.
Simplified Management and Seamless Connectivity
Managing VPN connections on multiple devices can become tedious. Imagine having to install and configure a VPN app on every new device you bring home, or remembering to connect each one every time you want to go online securely. This administrative burden can lead to oversights and, consequently, security gaps. A router-level VPN installation eliminates this hassle. Once configured, your entire network is protected automatically. You don’t need to worry about individual device settings; the VPN is always on for everyone. This seamless connectivity ensures that your online activities remain private and secure without any ongoing effort from your end.
Circumventing Geographic Restrictions Effortlessly
Many online services, streaming platforms, and websites impose geographic restrictions, limiting access based on your physical location. While you can use device-level VPNs to bypass these restrictions on individual devices, a router-level VPN allows you to circumvent these limitations across your entire network. This means your entire household can enjoy access to a broader range of content, from international streaming libraries to region-locked websites, without the need for individual device configurations. For families or households with diverse online interests, this feature alone can be a game-changer.
Enhancing Online Privacy for All Household Members
In an era where data privacy is a paramount concern, a router-level VPN offers a comprehensive solution for protecting the online activities of everyone in your home. This is especially important for children who may be more susceptible to online threats or for individuals who are conscious of their digital footprint. By encrypting all traffic, a router VPN prevents your Internet Service Provider (ISP) from monitoring your browsing habits, selling your data, or throttling your connection based on your online activities. This granular control over your network’s privacy empowers you to safeguard your family’s digital lives.
Choosing the Right VPN and Router for the Job
Before you embark on the installation process, it’s essential to select the right tools. Not all VPNs are created equal, and not all routers are compatible with VPN configurations. Making informed choices here will significantly impact the effectiveness and ease of your VPN setup.
Selecting a VPN Provider That Supports Router Configurations
The first step is choosing a VPN service provider that explicitly supports router installations. This typically means the provider offers firmware that can be flashed onto compatible routers or provides instructions for configuring their VPN service on routers that support specific VPN protocols (like OpenVPN or WireGuard). Key features to look for in a VPN provider for router use include:
- Router Compatibility: Does the VPN provider offer custom firmware for popular router models, or do they provide detailed guides for manual configuration on routers that support OpenVPN or WireGuard?
- Server Network: A robust network of servers across various locations is crucial for both speed and bypassing geographic restrictions.
- Speed and Performance: Router VPNs can sometimes introduce a slight overhead, so choosing a VPN known for its speed is important to minimize any impact on your internet performance.
- Security Protocols: Ensure the VPN supports strong encryption protocols like OpenVPN or WireGuard, which are commonly used for router configurations.
- Customer Support: Good customer support is invaluable, especially when dealing with router configurations, which can be more technical than app installations.
Identifying Router Compatibility: DD-WRT, Tomato, and AsusWRT-Merlin
Not all routers are created equal when it comes to VPN capabilities. Most stock router firmwares do not natively support VPN client configurations. To install a VPN on your router, you’ll likely need a router that supports third-party firmware or has advanced built-in VPN client capabilities. The most common and recommended solutions include:
- DD-WRT: This is a highly popular open-source firmware that replaces your router’s stock firmware. It offers extensive customization options, including robust VPN client support. DD-WRT is compatible with a wide range of router models from various manufacturers.
- Tomato: Another powerful open-source firmware, Tomato, is known for its user-friendly interface and excellent performance, particularly for VPN configurations. Like DD-WRT, it supports a broad spectrum of routers.
- AsusWRT-Merlin: For users who prefer to stick with Asus routers, AsusWRT-Merlin is a custom firmware based on Asus’s stock firmware but with added features and improvements, including enhanced VPN client capabilities. It’s a great option for those who want a balance of user-friendliness and advanced features.
Before purchasing a router or attempting to flash new firmware, always check the compatibility lists for DD-WRT, Tomato, or AsusWRT-Merlin to ensure your router model is supported. Flashing custom firmware can be a technical process, and choosing a compatible router is the first step to a successful installation.
The Installation Process: A Step-by-Step Guide
Installing a VPN on your router generally involves two main approaches: flashing custom firmware onto your router or configuring the VPN directly through your router’s existing advanced settings (if supported).
Method 1: Flashing Custom Firmware (DD-WRT, Tomato)
This method provides the most comprehensive VPN integration but is also more technical.
1. Prepare Your Router and Download Firmware

- Backup Router Settings: Before you begin, it’s crucial to back up your current router settings. This will allow you to revert to your previous configuration if anything goes wrong. Access your router’s web interface (usually by typing its IP address, like 192.168.1.1, into your browser) and look for a “Backup” or “Administration” section.
- Check Router Compatibility: Re-verify that your router model is on the DD-WRT or Tomato compatibility list.
- Download Firmware: Visit the official DD-WRT or Tomato websites and download the specific firmware file for your router model. Ensure you download the correct version (often there are different builds for different hardware revisions).
- Download VPN Configuration Files: Log in to your VPN provider’s website and navigate to their router setup section. Download the OpenVPN configuration files (
.ovpnfiles) for the server locations you wish to use. You might also need to download your VPN credentials or a certificate file.
2. Flash the Custom Firmware
- Access Router Interface: Connect your computer directly to your router via an Ethernet cable. Navigate to your router’s web interface.
- Navigate to Firmware Upgrade: Find the “Firmware Upgrade,” “Administration,” or “System” section.
- Upload Firmware: Select the firmware file you downloaded. Crucially, do NOT interrupt the flashing process. This can brick your router.
- Reboot Router: Once the firmware is flashed, the router will reboot.
3. Configure the VPN on the New Firmware
- Access New Interface: After the router reboots, you’ll access a new interface (DD-WRT or Tomato). You may need to perform a “30/30/30 reset” if the router doesn’t get an IP address, but consult the firmware’s documentation for your specific model.
- Navigate to VPN Settings: Look for sections labeled “VPN,” “OpenVPN Client,” or similar.
- Enter VPN Details:
- Server Address: Enter the IP address or hostname of the VPN server from your downloaded
.ovpnfile. - Port and Protocol: Configure the port and protocol (usually UDP, sometimes TCP) as specified by your VPN provider.
- Encryption and Authentication: Select the encryption cipher (e.g., AES-256-CBC) and authentication method (e.g., SHA256) recommended by your VPN provider.
- Certificates and Keys: Paste the contents of your downloaded CA certificate, client certificate, and client key into the appropriate fields. You may also need to provide your VPN username and password.
- Server Address: Enter the IP address or hostname of the VPN server from your downloaded
- Enable and Save: Enable the VPN client and save your settings. The router will then attempt to connect to the VPN server.
Method 2: Configuring VPN on Routers with Built-in Support (e.g., AsusWRT-Merlin)
Many modern routers, particularly higher-end Asus models, come with built-in VPN client functionality. This method is generally more user-friendly.
1. Access Router Settings and Download VPN Files
- Log in to Router Interface: Access your router’s web interface as usual.
- Download VPN Configuration: Log in to your VPN provider’s website and download the OpenVPN configuration files (
.ovpn) for your desired server locations. You’ll also need your VPN username and password.
2. Configure the VPN Client in Router Settings
- Navigate to VPN Section: Look for a “VPN” or “VPN Client” section in your router’s advanced settings.
- Add VPN Profile: Select the option to add a new VPN client profile.
- Import Configuration File: Most modern firmwares allow you to import the
.ovpnfile directly. This will automatically populate many of the settings. - Enter Credentials: You will likely need to manually enter your VPN username and password.
- Select Server and Protocol: Choose the desired VPN server location and protocol (UDP/TCP).
- Apply and Connect: Apply the settings and click “Connect.”
Verifying Your VPN Connection
Once you’ve configured the VPN on your router, it’s crucial to verify that it’s working correctly.
- Check Your IP Address: On any device connected to your router, go to a website like “whatismyipaddress.com.” The IP address displayed should correspond to the VPN server’s location, not your actual ISP-assigned IP address.
- Test for Leaks: Visit websites like “dnsleaktest.com” or “ipleak.net” to ensure your DNS requests are also being routed through the VPN and not revealing your real location.
- Speed Test: Run a speed test to gauge the impact of the VPN on your internet connection. Some performance degradation is expected, but it shouldn’t be excessive.
Maintaining Your Network Security: Ongoing Best Practices
Installing a VPN on your router is a significant step towards enhanced digital security, but it’s not a set-and-forget solution. Regular maintenance and adherence to best practices will ensure your network remains robustly protected.
Regularly Update Router Firmware and VPN Credentials
- Firmware Updates: Both stock and custom router firmwares receive regular updates that patch security vulnerabilities and improve performance. Check for updates periodically and install them promptly. This is especially important for custom firmwares like DD-WRT and Tomato.
- VPN Credentials: If your VPN provider requires periodic re-authentication or password changes, ensure you update these on your router configuration to maintain your connection.
Monitor Your VPN Connection and Performance
- Connection Status: Most router interfaces will indicate whether the VPN connection is active. Check this periodically to ensure it hasn’t dropped.
- Performance Monitoring: If you notice a significant and persistent slowdown in your internet speeds, revisit your VPN configuration. You might consider trying a different VPN server location or protocol.
Consider Split Tunneling (If Supported)
Some advanced router firmwares and VPN providers support “split tunneling.” This feature allows you to specify which devices or applications use the VPN and which connect directly to the internet. This can be useful for devices that don’t require VPN protection or for improving speeds for certain activities. For example, you might route all smart home device traffic through the regular internet while directing all streaming and browsing to the VPN.
Secure Your Router Administration Interface
Even with a VPN active, the security of your router’s administration interface itself is paramount.
- Strong Admin Password: Change the default administrator username and password for your router to a strong, unique password.
- Disable Remote Management: Unless absolutely necessary, disable remote management features that allow access to your router’s settings from outside your home network.
By following these steps, you’ll not only install a VPN on your router but also establish a comprehensive and resilient network security system that safeguards your digital life and the privacy of everyone in your home. In an era where our digital and financial lives are increasingly intertwined with our online presence, this proactive approach to network security is an investment in peace of mind.
aViewFromTheCave is a participant in the Amazon Services LLC Associates Program, an affiliate advertising program designed to provide a means for sites to earn advertising fees by advertising and linking to Amazon.com. Amazon, the Amazon logo, AmazonSupply, and the AmazonSupply logo are trademarks of Amazon.com, Inc. or its affiliates. As an Amazon Associate we earn affiliate commissions from qualifying purchases.