In today’s fast-paced digital landscape, virtual machines (VMs) have become indispensable tools for developers, IT professionals, educators, and even casual users. They offer a sandboxed environment to experiment with different operating systems, test software, or run legacy applications without impacting the host machine. Among the leading virtualization platforms, VMware stands out for its robust features and widespread adoption. However, to truly unlock the full potential of an Ubuntu guest operating system running within a VMware environment, installing VMware Tools is not just recommended—it’s essential.
This comprehensive guide will walk you through the process of installing VMware Tools on your Ubuntu virtual machine, explaining its benefits, outlining different installation methods, and ensuring you get the most out of your virtualized experience. By optimizing your VM performance, you not only enhance your productivity (a key aspect of the “Tech” theme) but also contribute to a smoother workflow, which can indirectly impact efficiency and cost-effectiveness (“Money”) in a professional setting, and even elevate your personal “Brand” as a tech-savvy individual.
Understanding VMware Tools and Their Importance
Before diving into the installation process, it’s crucial to understand what VMware Tools are and why they are so vital for an optimal virtual machine experience.
What are VMware Tools?
VMware Tools is a suite of utilities that enhances the performance of a virtual machine’s guest operating system and improves user interaction with the host system. Essentially, they act as a bridge between your virtualized Ubuntu instance and the underlying VMware hypervisor, allowing them to communicate more effectively. Without these tools, your Ubuntu VM operates with basic, generic drivers, leading to a suboptimal experience.
The suite includes several key components:
- Drivers: Optimized display, network, and storage drivers that replace generic operating system drivers.
- VMware User Process: Manages various features like copy-paste, drag-and-drop, and shared folders.
- VMware Device Drivers: Enhances mouse responsiveness, allows for seamless mouse movement between the guest and host, and improves display resolution and color depth.
- VMware Services: Facilitate time synchronization, graceful shutdowns, and script execution during power operations.
Why You Need Them for Optimal Performance
Installing VMware Tools delivers a multitude of benefits that dramatically improve your virtual machine’s performance and usability. Ignoring them is akin to driving a high-performance car with flat tires – it will move, but not efficiently.
Here’s why they are non-negotiable:
- Enhanced Graphics Performance: Without VMware Tools, your Ubuntu VM will likely be stuck at a low resolution, making everything appear large and pixelated. The display driver provided by VMware Tools allows you to run your VM at higher resolutions, including full screen, and provides better color depth and smoother video playback. This is crucial for graphic designers, developers working with complex UIs, or anyone desiring a visually comfortable workspace.
- Seamless Mouse Integration: One of the most noticeable improvements is the fluid mouse movement. Without VMware Tools, you often have to press a key (like Ctrl+Alt) to release the mouse cursor from the VM back to your host. With the tools installed, your mouse seamlessly moves in and out of the VM window, just like another application on your host desktop.
- Improved Network Performance: The optimized network drivers ensure your VM can achieve near-native network speeds, which is vital for web browsing, downloads, and network-intensive applications.
- Faster Disk I/O: Storage drivers within VMware Tools enhance the read/write performance of your virtual disks, leading to faster application loading times and overall system responsiveness.
- Copy-Paste and Drag-and-Drop Functionality: These seemingly simple features are incredibly powerful for productivity. VMware Tools enable you to effortlessly copy text and files between your host and guest operating systems, eliminating the need for cumbersome workarounds like shared folders for small transfers.
- Shared Folders: For larger file transfers or continuous access to files from both the host and guest, shared folders provide a convenient solution, allowing you to mount a host directory directly into your Ubuntu VM.
- Time Synchronization: VMware Tools ensure that your guest operating system’s clock remains synchronized with your host system’s clock, preventing potential issues with timestamps in logs, applications, or file modifications.
- Graceful Shutdowns: When you shut down or restart your VM from the VMware interface, the tools allow the guest OS to perform a proper shutdown, similar to a physical machine, reducing the risk of data corruption.
From a “Tech” perspective, these enhancements mean a more stable, responsive, and enjoyable virtualized environment. From a “Money” standpoint, the increased efficiency saves time, which translates into saved resources, especially for professionals whose work heavily relies on virtual machines. And for your “Brand,” demonstrating proficiency with optimized tech setups reinforces a professional image.
Preparing Your Ubuntu Virtual Machine
Before initiating the installation of VMware Tools, it’s crucial to prepare your Ubuntu virtual machine. This preparation ensures a smooth installation process and helps prevent common issues.
System Requirements and Prerequisites
While VMware Tools are designed to be lightweight, your Ubuntu VM needs certain packages and an up-to-date system to ensure a successful installation.
Here’s what you’ll need:
- An existing Ubuntu Virtual Machine: This guide assumes you have Ubuntu (any recent LTS version like 20.04 or 22.04 is ideal) already installed and running in your VMware Workstation, Fusion, or ESXi environment.
- Internet Connection: Required for downloading necessary packages and updates.
- Root or Sudo Privileges: You’ll need administrative rights to install software and update your system.
- Sufficient Disk Space: While the tools themselves are small, updates and dependencies might require a few hundred MBs.
Updating Your System
The first and most critical step is to ensure your Ubuntu system is fully updated. This ensures that you have the latest kernel headers and other necessary packages, which are often prerequisites for building and installing drivers.
Open a terminal in your Ubuntu VM (you can usually find it in the applications menu or by pressing Ctrl+Alt+T) and run the following commands:
sudo apt update
sudo apt upgrade -y
sudo apt autoremove -y
sudo reboot
sudo apt update: This command refreshes the list of available packages and their versions from the Ubuntu repositories.sudo apt upgrade -y: This command upgrades all installed packages to their newest versions. The-yflag automatically confirms the prompts.sudo apt autoremove -y: This command removes any old, no longer needed packages that were installed as dependencies for other packages.sudo reboot: It’s highly recommended to reboot your VM after a kernel or system-wide upgrade to ensure all changes take effect.
Once your VM has rebooted, log back in, and you are ready to proceed with the VMware Tools installation.
Installation Methods for VMware Tools
There are two primary ways to install VMware Tools on an Ubuntu guest: the recommended open-vm-tools package from the Ubuntu repositories, and the manual installation method using the official VMware Tools ISO image. We will cover both.
Method 1: Installing via Open-VM-Tools (Recommended)
For most Linux distributions, including Ubuntu, the open-vm-tools package is the preferred and easiest way to install VMware Tools. This is an open-source implementation of VMware Tools, maintained by the Linux distribution’s community, ensuring better integration with the OS and automatic updates through the standard package manager. This approach aligns perfectly with modern “Tech” practices, promoting efficiency and maintainability.
-
Install
open-vm-toolsandopen-vm-tools-desktop:
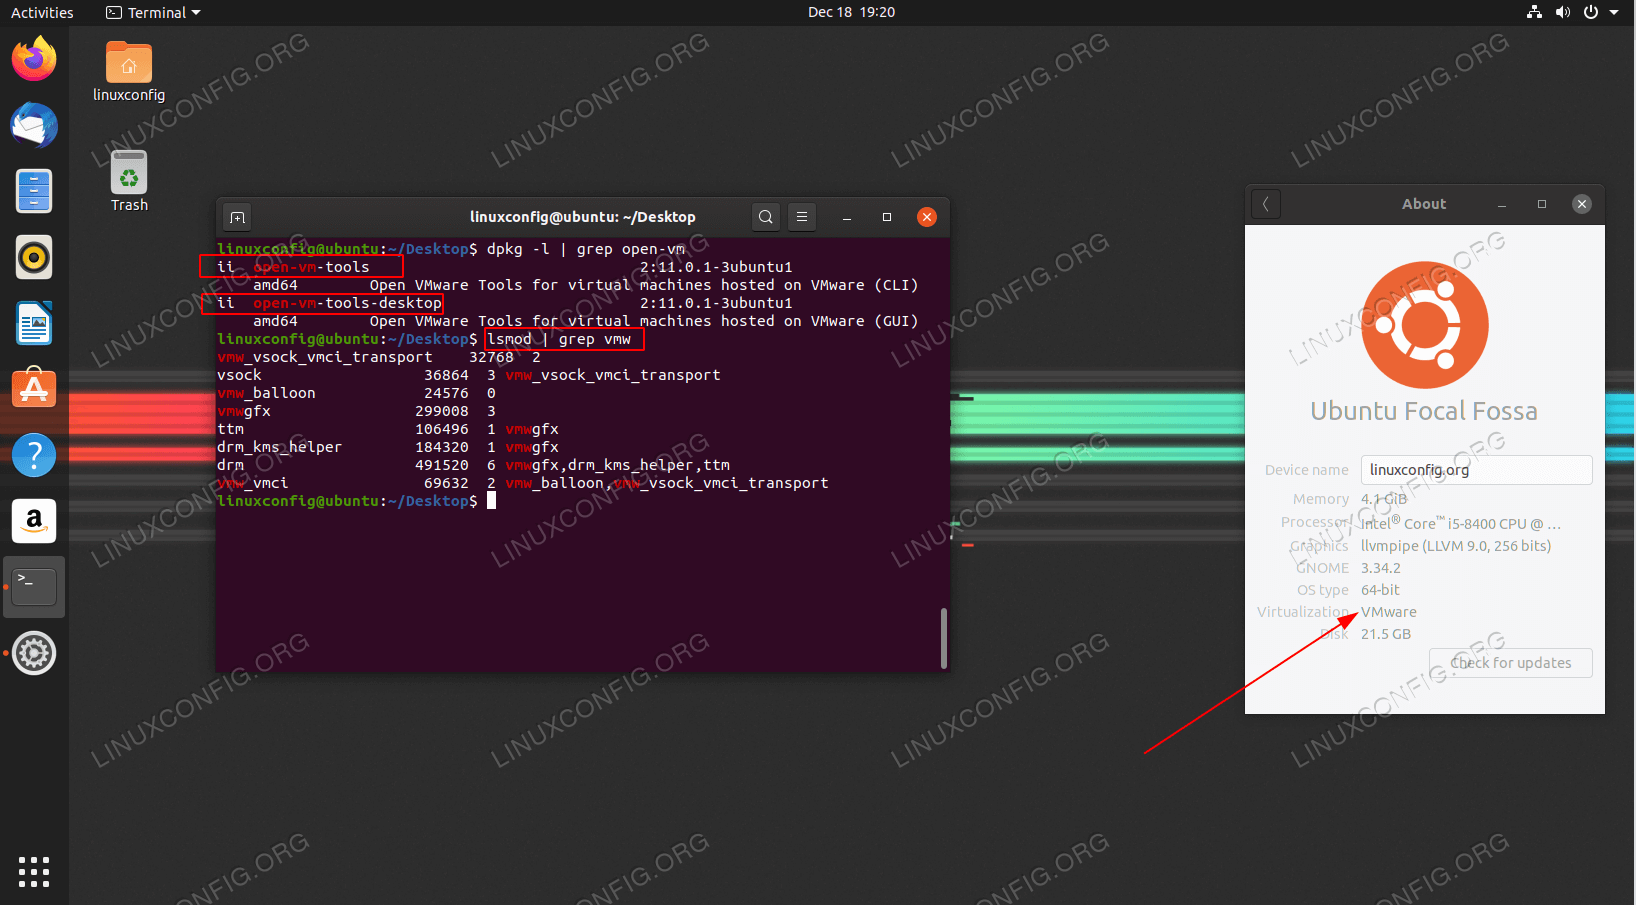
Open a terminal in your Ubuntu VM and execute the following command:sudo apt install open-vm-tools open-vm-tools-desktop -yopen-vm-tools: This package provides the core VMware Tools functionality for server environments.open-vm-tools-desktop: This package adds desktop-specific enhancements such as drag-and-drop, copy-paste, and display resolution auto-fitting, which are crucial for a graphical desktop environment like Ubuntu’s GNOME or KDE.
-
Reboot Your VM:
After the installation completes, it’s essential to reboot your virtual machine for all changes to take effect:sudo rebootUpon reboot, you should immediately notice the improvements: the display resolution will likely auto-adjust to your window size, and your mouse will move seamlessly between the host and guest.
This method is generally recommended because:
- Ease of Installation: It’s a simple
apt installcommand. - Automatic Updates:
open-vm-toolsare updated alongside your regular system updates, ensuring you always have the latest, compatible version. - Stability: It’s well-integrated with Ubuntu and maintained by the community.
Method 2: Installing from VMware’s Official ISO (Manual Approach)
This method involves mounting a virtual CD-ROM drive containing the VMware Tools installer directly from your VMware hypervisor. While open-vm-tools is preferred, there might be specific scenarios where you need to use the official VMware package (e.g., if you’re on an older Ubuntu version where open-vm-tools might not be as feature-rich, or if instructed by specific software requirements).

-
Mount the VMware Tools ISO:
From your VMware application (Workstation, Fusion, or vSphere Client), go to the VM menu and select “Install VMware Tools” or “Reinstall VMware Tools.” This action will virtually mount the VMware Tools ISO image to your Ubuntu guest operating system. -
Open the Virtual CD-ROM:
In your Ubuntu VM, open the file manager. You should see a new CD-ROM icon appear, typically named “VMware Tools.” Double-click it to open its contents. -
Extract the Installer:
Inside the CD-ROM, you’ll find a compressed archive file, usually namedVMwareTools-x.x.x-xxxx.tar.gz(wherex.x.x-xxxxrepresents the version number).- Right-click on this
.tar.gzfile and select “Extract Here” or “Extract to…” to extract its contents to a directory (e.g., your Desktop or~/Downloads). - Alternatively, you can extract it via the terminal:
bash

mkdir ~/vmware-tools-distrib

sudo mount /dev/cdrom /mnt

sudo cp /mnt/VMwareTools-*.tar.gz ~/vmware-tools-distrib/

sudo umount /mnt

cd ~/vmware-tools-distrib/

tar -xvf VMwareTools-*.tar.gz
(Note: Themount /dev/cdrom /mntcommand might vary depending on your system’s setup. Modern Ubuntu versions often auto-mount the CD-ROM to/media/username/VMware Tools/.)
- Right-click on this
-
Install Required Build Dependencies:
Before running the installer, you need to ensure that the necessary build tools and kernel headers are installed. These are crucial for the installer to compile the specific drivers for your kernel version.sudo apt update sudo apt install build-essential linux-headers-$(uname -r) -ybuild-essential: Provides the necessary compilers and build tools.linux-headers-$(uname -r): Installs the kernel headers matching your currently running kernel version (uname -routputs the current kernel version).
-
Run the Installer Script:
Navigate to the extractedvmware-tools-distribdirectory in the terminal:cd ~/vmware-tools-distrib/vmware-tools-distrib/ sudo ./vmware-install.plThe
vmware-install.plscript will start a series of prompts. For most questions, pressingEnterto accept the default option is sufficient. The script will detect your system configuration and install the tools accordingly. This process might take several minutes as it compiles modules. -
Reboot Your VM:
Once the installation script completes, reboot your VM to activate the newly installed drivers and services.sudo rebootAfter rebooting, you should experience all the benefits of VMware Tools.
Important Note for Manual Installation: If you upgrade your Ubuntu kernel in the future, you may need to reinstall VMware Tools using this manual method to ensure compatibility with the new kernel. This is another reason why open-vm-tools is generally preferred, as it handles updates automatically.
Verifying the Installation and Next Steps
After completing the installation, it’s crucial to verify that VMware Tools are properly installed and functioning as expected. This step confirms the optimization of your virtual environment and ensures you’re leveraging all the “Tech” benefits.
Confirming VMware Tools Functionality
There are several ways to check if VMware Tools are running correctly:
-
Check Service Status (for
open-vm-tools):
If you used Method 1 (open-vm-tools), you can check the status of theopen-vm-toolsservice:systemctl status open-vm-toolsYou should see output indicating that the service is “active (running).”
-
Check VMware Tools Process:
You can also look for the running VMware processes:ps -ef | grep vmtoolsYou should see entries for
vmtoolsd, confirming the core daemon is active. -
Visual and Interactive Checks:
- Display Resolution: Try resizing your VM window. The Ubuntu display should automatically adjust to fit the new window dimensions. If it does, the display driver is working.
- Mouse Integration: Move your mouse cursor seamlessly in and out of the VM window without pressing any keys (like Ctrl+Alt).
- Copy-Paste: Try copying text from your host machine and pasting it into your Ubuntu VM, and vice-versa.
- Drag-and-Drop: Attempt to drag a file from your host desktop into the Ubuntu VM window (or vice-versa, if enabled).
- Shared Folders: If you’ve configured shared folders in your VMware settings, check if they are accessible within your Ubuntu VM (typically under
/mnt/hgfs).
If all these checks pass, congratulations! Your VMware Tools installation was successful, and your Ubuntu VM is now fully optimized.
Post-Installation Considerations
With VMware Tools successfully installed, here are a few additional tips to further enhance your experience and maintain optimal performance:
- Monitor Performance: Keep an eye on your VM’s resource usage (CPU, RAM, disk I/O) using Ubuntu’s System Monitor or
htopin the terminal. While VMware Tools optimize performance, ensuring your VM has adequate resources allocated from the host is still crucial. - Configure Shared Folders: If you frequently exchange files between your host and guest, configure shared folders through your VMware application settings. This is a highly efficient way to manage data without needing network shares or cloud services for local transfers.
- Snapshots and Backups: Regularly take snapshots of your VM, especially before major software installations or system changes. This provides a quick revert point if anything goes wrong. Back up your entire VM periodically, particularly if it contains critical data. This is good “Tech” practice for data security and reliability.
- Stay Updated: If you used
open-vm-tools, regularsudo apt update && sudo apt upgradecommands will keep your VMware Tools updated. If you used the manual ISO method, remember to reinstall or update them if you perform a major kernel upgrade on your Ubuntu VM. - Explore VMware Features: With VMware Tools installed, you can now explore other advanced features offered by your VMware product, such as advanced power management, virtual machine statistics, and scripting capabilities, further streamlining your virtualized workflows.
Troubleshooting Common Issues
Even with careful preparation, you might encounter issues during or after the VMware Tools installation. Being able to troubleshoot effectively is a valuable “Tech” skill that saves time and frustration.
Addressing Installation Errors
-
Missing Dependencies:
- Symptom: The installer script (
vmware-install.pl) fails with messages about missinggcc,make, or kernel headers. - Solution: Ensure
build-essentialandlinux-headers-$(uname -r)are installed.
bash
sudo apt update
sudo apt install build-essential linux-headers-$(uname -r) -y
Then, retry the installation.
- Symptom: The installer script (
-
“Could not open directory /etc/init.d” or similar errors:
- Symptom: Typically occurs during manual installation if the system cannot find standard directories.
- Solution: This might indicate a problem with the extraction or execution path. Double-check that you are running the
vmware-install.plscript from within the extractedvmware-tools-distribdirectory.
-
Installation Fails with Generic Errors:
- Symptom: The installer completes but reports errors, or the tools don’t function.
- Solution:
- Check logs: The installer often outputs logs to
/tmp/vmware-root/or similar paths. Review these for specific error messages. - Reboot: Sometimes a simple reboot can resolve transient issues.
- Try
open-vm-tools: If you are using the manual method and facing persistent issues, consider switching to theopen-vm-toolsmethod, as it’s generally more robust for Ubuntu. - Clean previous installations: If you’re attempting a reinstall, it might be beneficial to try cleaning up any remnants of a previous failed installation. This usually involves removing the
vmware-tools-distribdirectory and checking for anyvmwarerelated packages or files.
- Check logs: The installer often outputs logs to
Performance Glitches
-
Display Not Adjusting / Low Resolution:
- Symptom: After installation and reboot, the display resolution doesn’t auto-adjust, or you can’t select higher resolutions.
- Solution:
- Verify
open-vm-tools-desktop: Ensureopen-vm-tools-desktopis installed foropen-vm-toolsusers. - Check
vmtoolsdservice: Make suresystemctl status open-vm-toolsshows active. - Guest Isolation: In VMware settings, ensure “Guest Isolation” features like copy/paste and drag/drop are enabled.
- Reboot again: Sometimes a second reboot can resolve display issues.
- Check Xorg logs: For advanced troubleshooting, check
/var/log/Xorg.0.logfor errors related to display drivers.
- Verify
-
Slow Performance (even after installing tools):
- Symptom: VM still feels sluggish despite VMware Tools being installed.
- Solution:
- Allocate more resources: Check your VM settings in VMware and allocate more CPU cores, RAM, or video memory to the VM if your host machine can spare it.
- Check host resources: Ensure your host machine isn’t running out of resources itself. Close unnecessary applications on the host.
- Update VMware hypervisor: Make sure your VMware Workstation, Fusion, or ESXi version is up to date.
- Disk optimization: Ensure your virtual disk isn’t fragmented, especially if it’s on a magnetic hard drive. For SSDs, ensure TRIM is enabled in your Ubuntu guest.
By following these troubleshooting steps, you can resolve most common issues, maintaining the high level of “Tech” efficiency you aim for with virtual machines.

Conclusion
Installing VMware Tools on your Ubuntu virtual machine is a foundational step towards achieving a seamless, high-performance, and truly productive virtualized environment. Whether you opt for the simplicity and automatic updates of open-vm-tools or the traditional manual installation from the VMware ISO, the benefits are undeniable: superior graphics, fluid mouse control, robust networking, and convenient file sharing capabilities.
These optimizations not only enhance the raw “Tech” performance of your VM but also contribute to a more efficient workflow, directly impacting your “Money” through saved time and reduced frustration. Furthermore, maintaining a finely tuned virtual workspace projects a professional image, subtly bolstering your personal or corporate “Brand.”
By diligently following the steps outlined in this guide – from initial system preparation to choosing your preferred installation method and verifying the outcome – you’ll transform your Ubuntu VM from a merely functional system into a powerful, responsive, and indispensable tool in your digital arsenal. Embrace the full power of virtualization, and unlock new levels of productivity and innovation within your VMware setup.
aViewFromTheCave is a participant in the Amazon Services LLC Associates Program, an affiliate advertising program designed to provide a means for sites to earn advertising fees by advertising and linking to Amazon.com. Amazon, the Amazon logo, AmazonSupply, and the AmazonSupply logo are trademarks of Amazon.com, Inc. or its affiliates. As an Amazon Associate we earn affiliate commissions from qualifying purchases.