Chromebooks are renowned for their simplicity, speed, and seamless integration with the Google ecosystem. They excel at web-based tasks, cloud computing, and running Android apps. However, for users who crave more power, flexibility, and access to a vast ecosystem of desktop applications, installing a full-fledged Linux distribution like Ubuntu can be a game-changer. This guide will walk you through the process of installing Ubuntu on your Chromebook, unlocking its potential for development, creative projects, and advanced computing.
Why Install Ubuntu on a Chromebook?
While Chrome OS is excellent for its intended purpose, it has limitations. For individuals interested in Tech trends, particularly in areas like software development, AI tools, and digital security, a Linux environment offers unparalleled advantages.
Expanding Your Technological Horizons
- Development Powerhouse: Ubuntu, as a popular Linux distribution, is the de facto standard for many developers. Installing it on your Chromebook gives you access to a rich repository of programming languages (Python, Java, C++, Go, etc.), development tools (Git, Docker, VS Code), and frameworks. This transforms your Chromebook from a casual browsing device into a capable coding machine.
- Access to Advanced Software: Many powerful desktop applications are either not available on Chrome OS or are limited in functionality through web versions or Android ports. Ubuntu provides access to a vast array of open-source and proprietary software, including sophisticated photo and video editors, 3D modeling software, statistical analysis tools, and more.
- Enhanced Digital Security and Control: For those focused on Digital Security, a Linux environment offers greater control over your system. You can fine-tune security settings, install specialized security tools, and understand your system at a deeper level. This is crucial for IT professionals, security researchers, or anyone who wants to take a more proactive approach to their digital safety.
- Exploring New Tech Trends: Staying ahead of the curve in Technology Trends often involves experimenting with new software and platforms. Ubuntu’s open-source nature makes it ideal for exploring emerging AI tools, experimenting with server technologies, or contributing to open-source projects.
Beyond the Browser: A More Versatile Computing Experience
While Chrome OS is built around the browser, Ubuntu provides a traditional desktop experience. This means you can run applications locally, manage files with more granularity, and customize your operating system to an extent not possible with Chrome OS alone. This shift in functionality can significantly boost Productivity for tasks that require more than just web access.
Preparing Your Chromebook for Ubuntu Installation
Before you dive into the installation process, a bit of preparation is crucial. This ensures a smooth transition and minimizes potential issues.
Checking Chromebook Compatibility
Not all Chromebooks are created equal, and some may present more challenges for Linux installations than others.
- Intel-Based Chromebooks: Generally, Intel-based Chromebooks offer the most straightforward path to installing Linux. Most modern Intel processors are well-supported.
- ARM-Based Chromebooks: While possible, installing Linux on ARM-based Chromebooks can be more complex and might have limited hardware support. You’ll need to research specific ARM models to ensure compatibility and find appropriate installation methods.
- UEFI vs. BIOS: Most modern Chromebooks use UEFI firmware, which is generally compatible with Linux. Older models might use proprietary firmware, requiring more advanced steps.
- Storage Space: Ubuntu, along with your applications, will require a significant amount of storage. Ensure your Chromebook has enough free space, ideally 32GB or more, to accommodate the operating system and your needs.
Backing Up Your Data
This is a non-negotiable step. Installing a new operating system will likely wipe your internal storage.
- Google Drive and Cloud Services: Ensure all your important documents, photos, and files are synced to Google Drive, Dropbox, or another cloud storage service.
- External Storage: For larger files or critical backups, consider transferring data to an external hard drive or USB stick.
- Android App Data: Some Android app data might not automatically sync. If you have critical data within specific Android apps, explore their backup options.
Enabling Developer Mode
Developer Mode is a prerequisite for installing alternative operating systems on most Chromebooks. Enabling it allows you to bypass some of Chrome OS’s security restrictions.
Warning: Enabling Developer Mode will wipe your local data. Ensure you have backed everything up before proceeding.
The process varies slightly by Chromebook model, but generally involves:
- Entering Recovery Mode:
- Turn off your Chromebook.
- Press and hold the
Esc+Refreshkeys, then press thePowerbutton. - Release the
Powerbutton when the screen lights up. You’ll see a “Chrome OS is missing or damaged” screen.
- Enabling Developer Mode:
- Press
Ctrl+D. - You’ll be prompted to confirm enabling Developer Mode. Press
Enterto proceed. - Your Chromebook will restart and begin the process of enabling Developer Mode. This can take several minutes and will erase all local data.
- Press
- Waiting for the Transition:
- After the wipe, your Chromebook will boot into a screen with a yellow warning indicating it’s in Developer Mode.
- Crucially, DO NOT press Spacebar to disable Developer Mode. Instead, wait for the screen to automatically boot into Chrome OS. This might take a few minutes.
Once your Chromebook boots into Chrome OS with Developer Mode enabled, you can proceed to the installation methods.
Methods for Installing Ubuntu on Your Chromebook
There are several approaches to installing Ubuntu on a Chromebook, each with its own advantages and complexities. The most common and recommended methods involve using Crouton or replacing Chrome OS entirely with a Linux distribution.
Option 1: Using Crouton (Chroot Environment)
Crouton (Chromium OS Universal Chroot Environment) allows you to run Ubuntu alongside Chrome OS in a chroot environment. This is a popular method because it’s less disruptive and allows you to switch between Chrome OS and Ubuntu seamlessly.
Advantages:
- Non-destructive: Doesn’t erase Chrome OS.
- Dual Booting: Easily switch between Chrome OS and Ubuntu.
- Access to Linux Tools: Run Linux applications and development environments directly.
- Faster Performance: Often performs better than running Linux in a virtual machine.
Disadvantages:
- Requires Developer Mode: As mentioned earlier.
- Not a full OS replacement: You’re essentially running Ubuntu within Chrome OS.
- Hardware Support: Some hardware might not be fully accessible from within the chroot.

Installation Steps (Simplified):
- Download Crouton: Visit the official Crouton GitHub repository (https://github.com/dnschneid/crouton) and download the latest release. Save it to your Downloads folder.
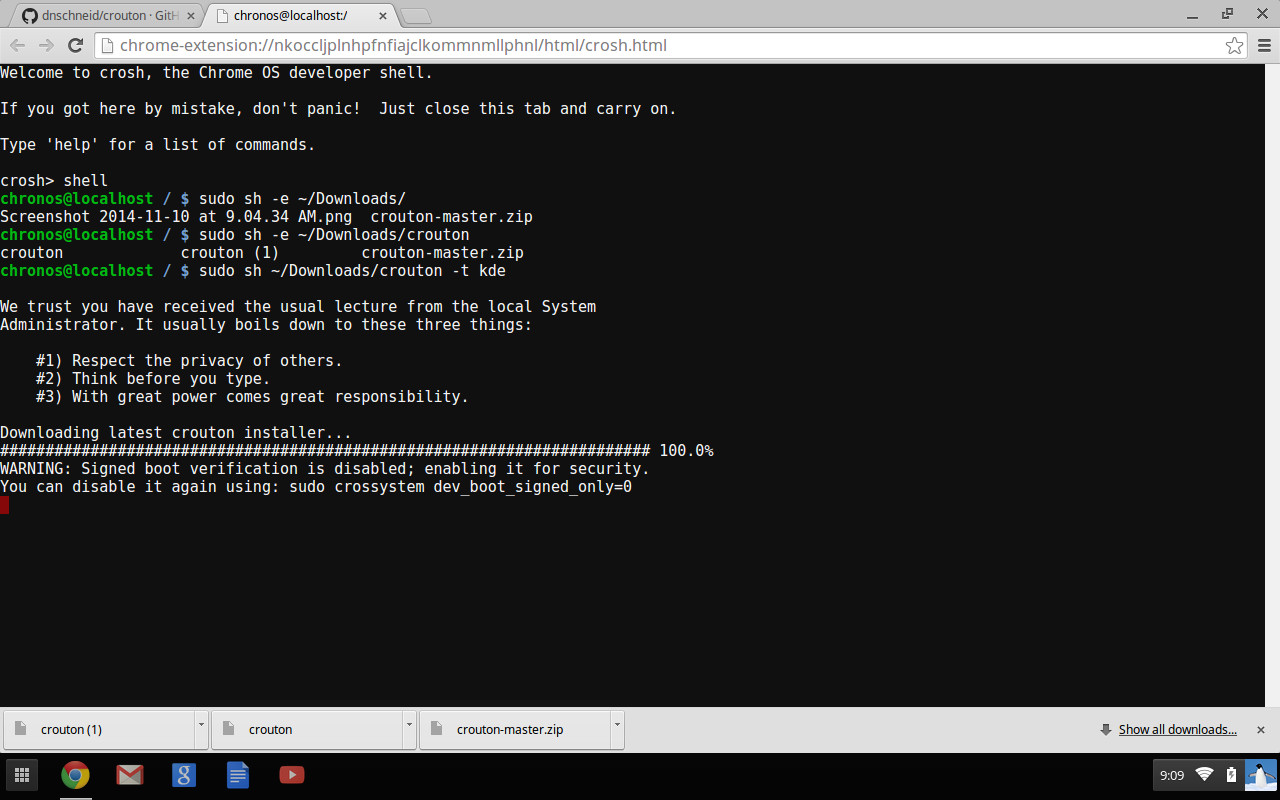
- Open Crosh: Press
Ctrl+Alt+Tto open the Chrome OS shell (Crosh). - Enter Shell Mode: Type
shelland pressEnter. - Run Crouton: Execute the Crouton script with your desired Ubuntu release and desktop environment. For example, to install Ubuntu 22.04 LTS (Jammy Jellyfish) with the XFCE desktop environment, you would use a command like:
bash

sudo sh ~/Downloads/crouton -r jammy -t xfce
-r jammy: Specifies the Ubuntu release (e.g.,focalfor 20.04,jammyfor 22.04).-t xfce: Specifies the desktop environment (e.g.,xfce,gnome,kde,lxqt).- You can explore other targets for additional features.
- Set Up Ubuntu: The script will download and install Ubuntu. You’ll be prompted to create a username and password for your Ubuntu environment.
- Start Ubuntu: Once installed, you can start your Ubuntu session by typing in Crosh:
bash

sudo startxfce4
(Replacestartxfce4with the command for your chosen desktop environment). This will launch your Ubuntu desktop.
Option 2: Replacing Chrome OS with Ubuntu (Dual Boot or Full Install)
This method involves removing Chrome OS entirely and installing Ubuntu as the primary operating system, or setting up a dual-boot configuration. This offers the most “native” Linux experience but is more involved.
Advantages:
- Full Linux Experience: Your Chromebook becomes a dedicated Linux machine.
- Maximum Control: Complete control over your system and its configuration.
- Full Hardware Access: Generally better hardware support.
Disadvantages:
- Complex Installation: Requires more technical steps and understanding.
- Potential Data Loss: Involves partitioning or wiping the drive.
- Loss of Chrome OS: You lose the simplicity and integration of Chrome OS.
- Challenging Reversion: Reverting back to Chrome OS can be difficult.
Key Considerations for Full Installation:
- BIOS/UEFI Modification: Many Chromebooks have locked-down firmware. You might need to flash custom firmware (like MrChromebox’s UEFI firmware) to allow booting from USB drives and installing standard Linux distributions. This is a critical and potentially risky step that requires careful research for your specific Chromebook model.
- Partitioning: You’ll need to partition your Chromebook’s internal storage to accommodate Ubuntu.
- Bootloader: Setting up a bootloader (like GRUB) for Ubuntu is necessary.
- Driver Support: While Ubuntu has excellent hardware support, there might be specific components (like certain trackpads or audio devices) that require manual configuration.
General Workflow (Highly Dependent on Chromebook Model and Firmware):
- Install Custom Firmware (if necessary): Research and flash compatible custom firmware (e.g., MrChromebox.tech). This is often the most critical step for full replacements.
- Create a Bootable Ubuntu USB Drive: Download the Ubuntu ISO image and use a tool like Rufus (on Windows) or Etcher (cross-platform) to create a bootable USB drive.
- Boot from USB: Configure your Chromebook’s BIOS/UEFI to boot from the USB drive.
- Install Ubuntu: Follow the standard Ubuntu installation wizard. This will involve partitioning your drive, setting up user accounts, and installing the operating system.
- Post-Installation Configuration: After installation, you’ll likely need to install drivers, configure specific hardware, and optimize your system.
Due to the complexity and model-specific nature of full OS replacements, it’s highly recommended to consult detailed guides tailored to your specific Chromebook model and the custom firmware you choose to use. Websites like MrChromebox.tech offer invaluable resources for this.
Post-Installation: Optimizing Your Ubuntu Chromebook
Once Ubuntu is installed, whether via Crouton or a full replacement, you’ll want to optimize your system for the best experience.
Updating and Upgrading
This is the first and most important step to ensure you have the latest security patches and software updates.
Open your terminal and run:
sudo apt update
sudo apt upgrade -y
This will fetch the latest package lists and upgrade all installed packages.
Installing Essential Software
Now that you have a Linux environment, you can install the applications that were previously out of reach.
- Development Tools:
bash

sudo apt install build-essential git docker.io code
(For VS Code, you might need to add its repository or download the .deb file). - Productivity Apps:
bash

sudo apt install libreoffice vlc gimp inkscape
- AI and Machine Learning Libraries:
bash

sudo apt install python3-pip python3-venv

pip3 install tensorflow pytorch numpy pandas
Customizing Your Desktop Environment
Ubuntu offers a highly customizable experience.
- Themes and Icons: Explore GNOME Tweaks (for GNOME) or your desktop environment’s appearance settings to change themes, icons, and fonts.
- Keyboard Shortcuts: Learn and customize keyboard shortcuts for faster navigation and task execution.
- Power Management: Configure power settings to optimize battery life.
Connecting Peripherals and Hardware
Ensure all your hardware is recognized and functions correctly.
- Printers and Scanners: Use the “Printers” or “Scanners” settings to add your devices.
- External Displays: Connect external monitors and configure display settings.
- Webcams and Microphones: These are usually detected automatically, but you can verify their functionality in applications like Cheese or Audacity.

Conclusion: Unleashing Your Chromebook’s Full Potential
Installing Ubuntu on your Chromebook transforms it into a far more versatile and powerful computing device. Whether you’re a student, a developer, a creative professional, or simply someone who wants more control over their operating system, Ubuntu offers a rich and flexible environment. By carefully following the preparation steps and choosing the installation method that best suits your technical comfort level and needs, you can unlock a world of possibilities, turning your humble Chromebook into a formidable tool for productivity, learning, and innovation. Remember to always back up your data and research the specifics for your Chromebook model to ensure a smooth and successful installation. The journey into the Linux world on your Chromebook is an exciting one, paving the way for deeper exploration of Tech trends, enhanced Productivity, and even potential new avenues for Online Income through developing and utilizing powerful software.
aViewFromTheCave is a participant in the Amazon Services LLC Associates Program, an affiliate advertising program designed to provide a means for sites to earn advertising fees by advertising and linking to Amazon.com. Amazon, the Amazon logo, AmazonSupply, and the AmazonSupply logo are trademarks of Amazon.com, Inc. or its affiliates. As an Amazon Associate we earn affiliate commissions from qualifying purchases.