In an era defined by rapid technological advancements, the operating system you choose can significantly influence your productivity, digital security, and even your personal brand within the tech landscape. While proprietary systems like Windows and macOS dominate the market, a powerful, free, and open-source alternative known as Ubuntu has steadily grown its user base, offering a compelling blend of stability, security, and customization. This comprehensive guide will walk you through the process of installing Ubuntu from a USB drive, transforming your computer into a versatile machine capable of handling everything from routine tasks to complex development projects. Whether you’re a seasoned tech enthusiast looking to explore new horizons or a beginner seeking a more private and cost-effective computing solution, understanding the nuances of an Ubuntu installation is a valuable skill that opens doors to a vast ecosystem of innovation.
Embracing Ubuntu: Why This Free OS is a Smart Choice for Tech Enthusiasts
The decision to install a new operating system is more than just a technical step; it’s a strategic move that can impact your digital life profoundly. Ubuntu, based on the robust Linux kernel, stands out as a leading choice for millions worldwide, including developers, educators, and everyday users. Its rise in popularity isn’t accidental; it’s a testament to its compelling features and the vibrant community that supports its continuous evolution.
The Ubuntu Advantage: Security, Stability, and Customization
At its core, Ubuntu offers a suite of advantages that align perfectly with modern technology trends and user demands. Security is paramount in today’s digital world, and Ubuntu, with its Linux heritage, boasts a formidable track record. Its open-source nature means that countless developers scrutinize its code for vulnerabilities, leading to rapid patching and a generally more secure environment compared to closed-source systems. This inherent security reduces the reliance on costly third-party antivirus software, directly appealing to the “Money” aspect of smart computing.
Stability is another cornerstone of the Ubuntu experience. Linux-based systems are renowned for their reliability, often running for weeks or months without needing a restart. This makes Ubuntu an excellent choice for servers, workstations, and even daily drivers where uptime and consistent performance are critical. For professionals, this stability translates directly into uninterrupted workflow and enhanced productivity, reinforcing the “Tech” focus of the website.
Beyond security and stability, Ubuntu champions customization. Unlike more rigid proprietary systems, Ubuntu allows users unprecedented control over their desktop environment, system settings, and software choices. From various desktop environments (GNOME, KDE Plasma, XFCE, etc.) to a vast repository of free and open-source applications, users can tailor their Ubuntu experience to perfectly match their preferences and specific needs. This level of personalization not only enhances the user experience but also allows individuals to craft a unique digital workspace that reflects their “Personal Branding” in the tech realm.
A Strategic Investment: How Open-Source Enhances Your Digital Brand and Budget
Choosing Ubuntu is not merely about installing an operating system; it’s about making a strategic “investment” in your digital future. From a “Money” perspective, Ubuntu is completely free to download, install, and use, eliminating the licensing costs associated with Windows or macOS. This substantial saving can be redirected towards hardware upgrades, educational resources, or even contributing to open-source projects. Furthermore, the vast ecosystem of free software available for Ubuntu means you rarely need to purchase expensive commercial applications for tasks like office productivity, photo editing, or web development, further maximizing your budget.
From a “Brand” standpoint, embracing open-source software like Ubuntu can significantly enhance your “Personal Branding” as a tech-savvy and forward-thinking individual. Familiarity with Linux systems is a highly sought-after skill in many tech industries, including software development, cybersecurity, and cloud computing. By running Ubuntu, you’re not just using an OS; you’re actively engaging with a philosophy of transparency, collaboration, and innovation that resonates deeply within the tech community. For students and aspiring professionals, having Ubuntu as part of your tech arsenal signals a commitment to learning and adapting to diverse technological environments, positioning you as a valuable asset in an increasingly competitive job market. It also aligns with the broader “Tech” trends that see open-source solutions powering everything from smartphones (Android) to supercomputers and web servers.
The Prerequisites: Preparing for a Seamless Ubuntu Installation
Before diving into the installation process, proper preparation is crucial. Rushing through these initial steps can lead to unnecessary complications or even data loss. Taking the time to gather the right tools and understand key requirements will ensure a smooth and successful transition to Ubuntu.
Assembling Your Toolkit: USB Drive, Ubuntu ISO, and Bootable Media Creator
The cornerstone of installing Ubuntu from a USB drive is, predictably, the USB drive itself. You’ll need a USB flash drive with at least 8GB of storage (16GB is recommended for broader compatibility and future-proofing). Ensure this drive is empty or contains data you’re willing to lose, as the process of creating a bootable drive will erase all existing content. Investing in a reliable, fast USB 3.0 or 3.1 drive will significantly speed up the creation and installation process.
The second critical component is the Ubuntu ISO file. This disk image contains the entire Ubuntu operating system. You’ll need to download it from the official Ubuntu website (ubuntu.com/download). Ubuntu offers several versions, including the latest stable release and Long Term Support (LTS) versions. For most users, an LTS version is recommended as it receives five years of security and maintenance updates, offering maximum stability and reducing the need for frequent upgrades. Choose the desktop version suitable for your system architecture (typically 64-bit). The download size is usually around 3-5 GB, so a stable internet connection is advisable.
Finally, you’ll need a bootable media creation tool. This software takes the downloaded ISO file and writes it onto your USB drive in a way that your computer can recognize and boot from. Popular and reliable choices include:
- Rufus (for Windows): A fast and easy-to-use utility known for its efficiency.
- BalenaEtcher (for Windows, macOS, Linux): A user-friendly, cross-platform tool praised for its simplicity and safety features.
- dd (for Linux/macOS command line): A powerful command-line utility for advanced users.
For this guide, we’ll focus on Rufus and BalenaEtcher due to their widespread accessibility and ease of use. Having one of these tools downloaded and ready before you begin will streamline the process.
Safeguarding Your Data: Backup Strategies and System Requirements
Before making any significant changes to your computer’s operating system or disk partitions, backing up your data is non-negotiable. This cannot be stressed enough. While the Ubuntu installation process is generally safe, unexpected power outages, incorrect steps, or hardware failures can lead to irreversible data loss. Copy all your important documents, photos, videos, and other files to an external hard drive, cloud storage (like Google Drive, Dropbox, OneDrive), or another safe location. Consider using backup software if you have a large volume of data. This proactive step aligns with fundamental “Digital Security” principles and is a smart “Money” decision, as data recovery services can be expensive.
Next, ensure your computer meets the minimum system requirements for Ubuntu. While Ubuntu is relatively lightweight, especially compared to some proprietary OS, understanding these requirements ensures a smooth experience. For the latest LTS desktop version of Ubuntu, generally, you’ll need:
- 2 GHz dual-core processor (or better)
- 4 GB RAM (8 GB recommended for comfortable multitasking)
- 25 GB of free hard drive space (or more, especially if you plan to install many applications or store large files)
- VGA capable of 1024×768 screen resolution
- Internet access (recommended for updates during installation)
Also, determine if your computer uses UEFI (Unified Extensible Firmware Interface) or BIOS (Basic Input/Output System) for booting. Most modern computers use UEFI, which offers better security and faster boot times. The Ubuntu installer is designed to work with both, but knowing your system’s firmware type can help you navigate the boot menu correctly. You can typically find this information in your computer’s system information or BIOS/UEFI settings.
Step-by-Step Installation: From Bootable USB to a Fully Functional Ubuntu System
With your preparations complete, it’s time for the core process: creating the bootable USB and installing Ubuntu. This section provides detailed instructions to guide you through each critical stage.
Crafting the Bootable USB: A Guide to Rufus and BalenaEtcher
This is where your chosen bootable media creation tool comes into play.
Using Rufus (for Windows users):
- Insert your USB drive into a USB port.
- Open Rufus. If prompted, allow it to make changes to your device.
- Device: Select your USB drive from the dropdown menu. Double-check this step to ensure you don’t accidentally select another drive!
- Boot selection: Click “SELECT” and browse to the downloaded Ubuntu ISO file.
- Partition scheme and Target system: Rufus will usually auto-detect optimal settings based on your ISO. For modern systems, it’s typically “GPT” for UEFI or “MBR” for BIOS. If unsure, leaving it as default or selecting “MBR” for broader compatibility usually works.
- Volume label: You can leave this as default or give it a custom name (e.g., “Ubuntu Live”).
- File system and Cluster size: Leave these at their default settings.
- Click “START.” You might be prompted to download some files (e.g., Syslinux). Allow it.
- Warning: Rufus will warn you that all data on the USB drive will be destroyed. Confirm by clicking “OK.”
- The process will take several minutes. Once it says “READY,” you can close Rufus and safely remove your USB drive.
Using BalenaEtcher (for Windows, macOS, Linux users):
- Insert your USB drive.
- Open BalenaEtcher.
- “Flash from file”: Click this button and select your downloaded Ubuntu ISO file.
- “Select target”: Click this and choose your USB drive from the list. Again, be extremely careful to select the correct drive!
- Click “Flash!”
- You may be prompted for administrator privileges or your system password. Provide it.
- Etcher will now write the ISO to the USB drive and then validate it. This process can take 5-15 minutes depending on your USB drive speed.
- Once completed, Etcher will indicate “Flash Complete!” You can then close the application and safely remove your USB drive.
Initiating the Install: Booting from USB and Navigating the Installer
With your bootable USB ready, the next step is to tell your computer to start from it instead of its internal hard drive.
- Insert the bootable USB drive into your computer.
- Restart your computer.
- As the computer starts, you’ll need to press a specific key repeatedly to enter either the BIOS/UEFI setup utility or the Boot Menu. Common keys include F2, F10, F12, Del, or Esc. The exact key varies by manufacturer (e.g., Dell, HP, Lenovo, Asus, Acer). Look for an on-screen prompt during startup, such as “Press F12 for Boot Menu” or “Press Del to enter Setup.”
- Boot Menu: If you can access the Boot Menu, select your USB drive from the list (it might appear as “UEFI: [USB Drive Name]” or “USB-HDD”).
- BIOS/UEFI Setup: If you enter the setup utility, navigate to the “Boot” section. Change the boot order to prioritize the USB drive over your internal hard drive. Save and Exit (usually F10).
- Once you successfully boot from the USB, you’ll see the Ubuntu GRUB menu. Select “Try or Install Ubuntu.”
- Ubuntu will load into a live environment. This allows you to try Ubuntu without installing it, test hardware compatibility, and ensure everything works before committing to the installation.
- On the desktop, you’ll find an icon that says “Install Ubuntu.” Double-click it to start the installer.
Disk Partitioning Explained: Making Informed Choices
This is arguably the most critical step, especially if you plan to dual-boot Ubuntu alongside another operating system like Windows. Careful partitioning prevents data loss and ensures optimal performance.
-
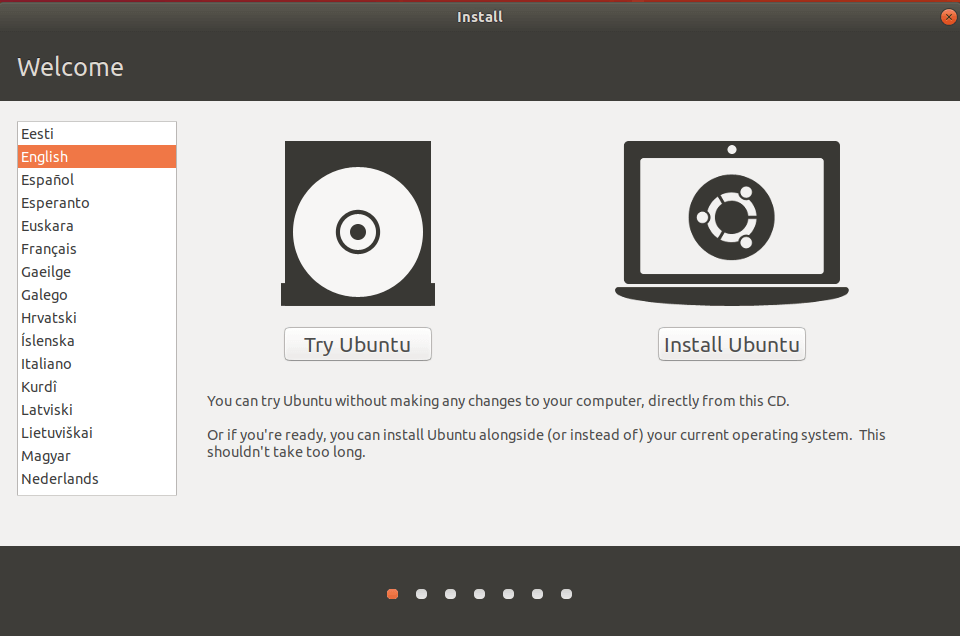
Welcome: Choose your preferred language and click “Continue.”
-
Keyboard Layout: Select your keyboard layout and click “Continue.”
-
Updates and other software:
- “Normal installation” includes a web browser, office suite, media players, and games.
- “Minimal installation” only includes a web browser and basic utilities. For beginners, “Normal installation” is recommended.
- Check “Download updates while installing Ubuntu” (requires an internet connection) and “Install third-party software for graphics and Wi-Fi hardware and additional media formats.” This saves time post-installation and ensures better hardware compatibility. Click “Continue.”
-
Installation type: This is where partitioning decisions are made.
- “Install Ubuntu alongside Windows Boot Manager” (or other OS): This option creates new partitions for Ubuntu while preserving your existing OS. The installer usually provides a slider to adjust partition sizes. This is the easiest option for dual-booting.
- “Erase disk and install Ubuntu”: WARNING: This will delete everything on your selected hard drive. Choose this only if you want Ubuntu to be the only operating system on that drive and have backed up all your data.
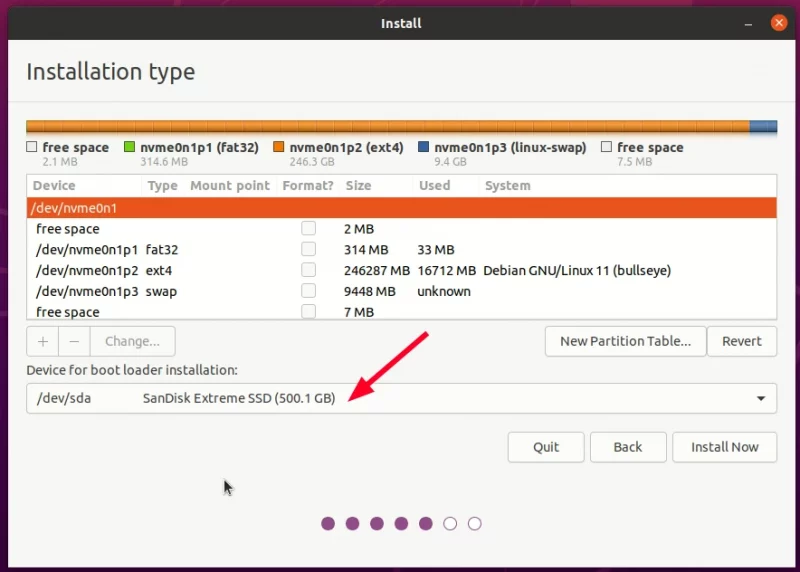
- “Something else”: This option provides full manual control over partitioning. This is for advanced users who want custom partition layouts (e.g., separate partitions for
/,/home,/boot,/swap). If you’re new to Linux, stick to the automated options. If you must use “Something else”, ensure you know which partition is free space or where you intend to install Ubuntu, create a root partition (/) with an ext4 filesystem, and optionally a swap area.
Self-Correction: Given the 1300-word target, I should elaborate more on partitioning for dual-boot and “Something else” briefly.
For dual-booting with “Something else”: You’d typically shrink an existing Windows partition (using Windows Disk Management before starting the Ubuntu installer) to create free space. Then, in “Something else”:
- Select the “free space.”
- Click the
+button to create a new partition. - Root Partition (
/): Allocate at least 20-30GB for the root file system. Choose “Ext4 journaling file system” and set the mount point to/. - Swap Area (Optional but Recommended): Create a logical partition as “swap area.” Its size should typically be equal to your RAM (or 2x RAM if you have less than 4GB, or 4-8GB if you have ample RAM).
- Home Partition (
/home) (Optional): Allocate the remaining space (or a significant portion) for your user data. Choose “Ext4 journaling file system” and set the mount point to/home. This separates your user data from the system files, making future re-installations easier without affecting your personal files. - Crucially, ensure the “Device for boot loader installation” is set to the main hard drive (e.g.,
/dev/sdaor/dev/nvme0n1), not a specific partition, to ensure GRUB (Ubuntu’s bootloader) can manage booting both Ubuntu and Windows.
Click “Install Now” once your partitioning choices are confirmed. The installer will present a summary of changes; review it carefully and click “Continue” to proceed.
Personalizing Your Setup: User Accounts and Initial Configuration
The final steps involve setting up your user account and time zone.
- Where are you?: Click on your location on the map or type it in to set your time zone. Click “Continue.”
- Who are you?:
- Enter your name.
- Choose a computer name (hostname) – this will be how your computer is identified on a network.
- Pick a username.
- Create a strong password and confirm it.
- Choose between “Log in automatically” (less secure) or “Require my password to log in” (recommended for security).
- You can also select “Encrypt my home folder” for enhanced privacy and security, though this might slightly impact performance. Click “Continue.”
The installation process will now begin, copying files and configuring your system. This can take anywhere from 15 to 45 minutes, depending on your system’s speed and the chosen installation options. You’ll see a slideshow highlighting Ubuntu’s features during this time.
Once the installation is complete, a prompt will appear asking you to “Restart Now.” Click it. When prompted, remove your USB drive and press Enter. Your computer will then reboot, and you should be greeted by the GRUB boot menu (if dual-booting) or the Ubuntu login screen directly. Congratulations, you’ve successfully installed Ubuntu!
Post-Installation Essentials: Optimizing Your Ubuntu Experience and Leveraging Its Potential
Installing Ubuntu is just the beginning. To truly harness its power and ensure a smooth, secure, and productive experience, a few post-installation steps are highly recommended. These steps will not only keep your system up-to-date but also allow you to personalize it further and tap into the vast open-source ecosystem, aligning perfectly with the “Tech” and “Productivity” aspects of our website’s focus.
System Updates and Driver Management: Keeping Your System Current
Upon first boot into your new Ubuntu system, the very first thing you should do is update your software repositories and install any pending updates. This ensures you have the latest security patches, bug fixes, and application versions.
- Open the “Software Updater” application (search for it in the Applications menu).
- It will check for updates. If available, click “Install Now” or “Download and Install.”
- Alternatively, for a more hands-on approach and to familiarize yourself with the command line (a powerful tool in Linux), open a Terminal (Ctrl+Alt+T) and run:
bash

sudo apt update

sudo apt upgrade -y

sudo apt dist-upgrade -y # for kernel or major package updates

sudo apt autoremove -y # to remove unused packages
sudogrants administrative privileges,apt updaterefreshes the list of available packages,apt upgradeinstalls new versions of packages, andapt dist-upgradehandles more complex updates.
Driver Management is also crucial, especially for graphics cards (NVIDIA/AMD) and Wi-Fi adapters that might require proprietary drivers for optimal performance or full functionality. Ubuntu’s “Software & Updates” utility (under the “Additional Drivers” tab) can help you find and install these non-free drivers. Simply open “Software & Updates,” navigate to “Additional Drivers,” and let it search. Select any recommended proprietary drivers and apply changes. A reboot might be required. This ensures your hardware is fully utilized, which is essential for performance, especially in graphics-intensive tasks or for reliable wireless connectivity.
Essential Software and Customization: Tailoring Your Open-Source Hub
One of Ubuntu’s greatest strengths is its access to a colossal library of free and open-source software, accessible through the Ubuntu Software Center or the command line.
- Productivity Suites: While Ubuntu comes with LibreOffice, you might want alternatives or specialized tools. For instance, many web developers will install Visual Studio Code, Git, Docker, and various programming language interpreters. Graphic designers might opt for GIMP (a free Photoshop alternative) or Inkscape (vector graphics).
- Web Browsers: Firefox is pre-installed, but you can easily install Chrome, Brave, or Opera from their respective websites or the Software Center.
- Media Players: VLC is a popular choice for playing almost any media format and can be installed from the Software Center.
- Communication: Zoom, Discord, Slack, and other popular communication tools are often available as
snappackages or.debfiles for easy installation.
Customization goes beyond just software. Ubuntu’s default desktop environment, GNOME, is highly customizable. Explore the “Settings” application to tweak your desktop background, themes, fonts, dock behavior, and more. You can also install GNOME Extensions (available from extensions.gnome.org) to add new functionalities and visual flair, further aligning your system with your personal brand and workflow. This level of control allows you to craft an environment that enhances your productivity and makes your computing experience uniquely yours.
Troubleshooting Tips and Further Resources: Mastering Your New OS
Even with a smooth installation, you might encounter minor issues or have questions as you learn Ubuntu. Here are some common troubleshooting tips and resources:
- Internet Connectivity: If you have no internet after installation, check your Wi-Fi/Ethernet drivers (via “Additional Drivers” as mentioned above) or ensure your network settings are correct in “Settings” -> “Network.”
- Boot Issues: If your system doesn’t boot correctly, especially in a dual-boot setup, you might need to repair the GRUB bootloader. This can often be done by booting from your Ubuntu live USB again and using tools like Boot-Repair.
- Software Not Found: If you can’t find specific software in the Software Center, try searching online for a Linux version or instructions to install it from a PPA (Personal Package Archive) or as a Flatpak/Snap package.
- Performance Issues: If Ubuntu feels slow, ensure your system has enough RAM, consider a lighter desktop environment (like XFCE or MATE), or close unnecessary background applications.
Further Resources:
- Ubuntu Community Forums: A vast repository of knowledge and a place to ask questions.
- Ask Ubuntu: A Stack Exchange site dedicated to Ubuntu, with thousands of answered questions.
- Official Ubuntu Documentation: Comprehensive guides and manuals for all aspects of Ubuntu.
- YouTube Tutorials: Many content creators offer visual walkthroughs of various Ubuntu tasks.
Engaging with these resources not only helps you solve immediate problems but also builds your “Tech” knowledge and problem-solving skills, which are invaluable assets in any digital career.
By successfully installing Ubuntu and taking these post-installation steps, you’re not just running a new operating system; you’re actively participating in the open-source movement, leveraging a powerful, free tool to enhance your productivity, secure your digital footprint, and potentially save significant money on software. This journey into Ubuntu is a strategic choice that positions you at the forefront of modern computing, embodying the spirit of innovation and control that defines today’s tech-savvy individual.
aViewFromTheCave is a participant in the Amazon Services LLC Associates Program, an affiliate advertising program designed to provide a means for sites to earn advertising fees by advertising and linking to Amazon.com. Amazon, the Amazon logo, AmazonSupply, and the AmazonSupply logo are trademarks of Amazon.com, Inc. or its affiliates. As an Amazon Associate we earn affiliate commissions from qualifying purchases.