In the ever-evolving landscape of technology, having the right tools at your disposal can significantly impact your productivity and browsing experience. For many, Google Chrome stands out as a preferred web browser due to its speed, extensive extension library, and seamless integration with Google services. While Ubuntu is a robust and versatile operating system, a common question among its users, especially those new to Linux, is how to install this popular browser. This guide will walk you through the process of installing Google Chrome on Ubuntu, ensuring you can leverage its full potential on your Linux desktop.
The beauty of Ubuntu lies in its user-friendly approach and the flexibility it offers. While the default browser on Ubuntu, Firefox, is excellent, some users find themselves drawn to Chrome for various reasons. Perhaps you’re accustomed to its interface from other operating systems, or you rely heavily on specific Chrome extensions that aren’t readily available or as optimized on Firefox. Regardless of your motivation, installing Chrome is a straightforward process that enhances your Ubuntu experience.
This tutorial aims to provide a clear, step-by-step explanation, catering to both beginners and those with a bit more experience in the Linux command line. We’ll cover different methods, discuss potential issues, and offer tips to ensure a smooth installation. By the end of this article, you’ll be well-equipped to have Google Chrome up and running on your Ubuntu system, ready to explore the digital world with confidence.
Understanding Your Ubuntu Environment and Chrome’s Compatibility
Before diving into the installation process, it’s beneficial to understand a few key aspects. Ubuntu, like other Linux distributions, uses a package management system to handle software installations, updates, and removals. This system is crucial for maintaining system stability and security. Google Chrome, while not open-source in the same vein as many Ubuntu applications, is readily available for Linux, including Ubuntu.
Google provides an official .deb package for Ubuntu and other Debian-based distributions. This is the most recommended and straightforward method for installation. Using the .deb package ensures that Chrome integrates properly with your system’s package manager, allowing for easy updates and uninstallation.
Choosing the Right Chrome Package
Google offers Chrome in different formats for Linux. For Ubuntu, the .deb package is the native format. There are also alternatives like Snap packages, which are self-contained applications that bundle all their dependencies. While Snap is also a viable option, especially if you prefer sandboxed applications, installing the .deb package directly from Google’s repository offers a more traditional and often simpler integration with your system’s software sources.
It’s important to note that Google Chrome is a proprietary browser. While it’s free to use, its source code is not open. If you are strictly committed to open-source software, you might consider Chromium, the open-source project that Chrome is based on. However, for this guide, we will focus on installing the official Google Chrome.
Method 1: Installing Google Chrome via the Official Debian Package
This is the most common and recommended method for installing Google Chrome on Ubuntu. It involves downloading the .deb package from Google’s website and then installing it using the Ubuntu Software Center or the command line.
Step 1: Download the Google Chrome .deb Package
-
Visit the Official Google Chrome Download Page: Open your current web browser on Ubuntu (likely Firefox) and navigate to the official Google Chrome download page. You can usually find this by searching “download Google Chrome” on your preferred search engine, or by directly visiting:
https://www.google.com/chrome/ -
Select the Correct Version: On the download page, you will see options to download Chrome for various operating systems. Look for the Linux download option. You will typically be presented with two package formats:
.deb(for Debian/Ubuntu) and.rpm(for Fedora/openSUSE). Ensure you select the.deboption. -
Choose Your Architecture (if prompted): While modern Ubuntu systems are predominantly 64-bit, some older systems might be 32-bit. The download page usually defaults to the correct architecture for your system. If you’re unsure, you can check your system’s architecture by opening a terminal and typing:
dpkg --print-architecture
For most current systems, it will beamd64. -
Download the File: Click the download button for the
.debpackage. The file will be saved to your default download location (usually theDownloadsfolder). The file name will typically be something likegoogle-chrome-stable_current_amd64.deb.
Step 2: Install the .deb Package
You have two primary ways to install the downloaded .deb file:
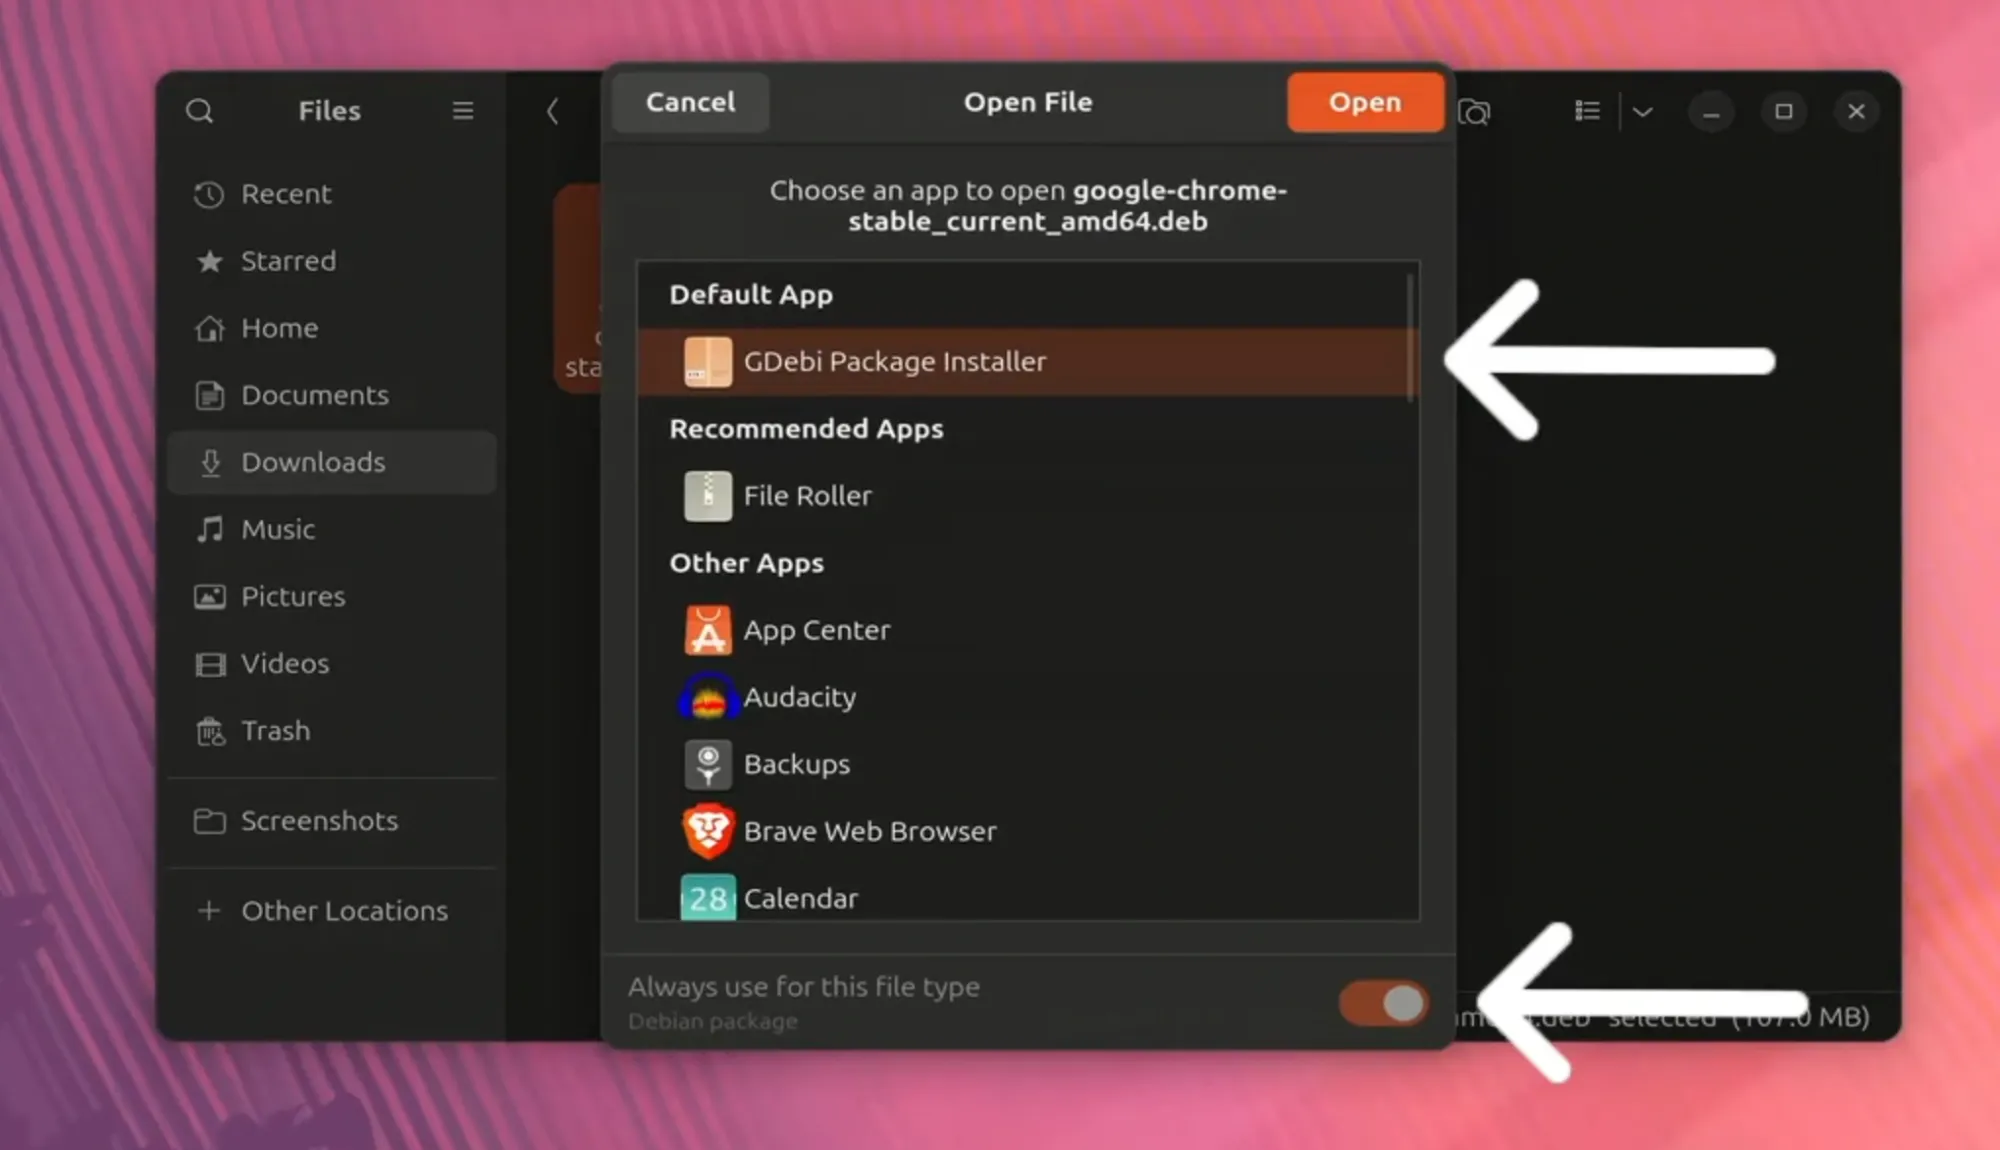
Option A: Using the Ubuntu Software Center (Graphical Method)
This is the most user-friendly method, especially for those new to Ubuntu.
- Open your File Manager: Navigate to the folder where you downloaded the
.debfile (usually yourDownloadsfolder). - Locate the
.debfile: Find thegoogle-chrome-stable_current_amd64.debfile you just downloaded. - Double-Click to Open: Double-click the
.debfile. This action should automatically open the file with the Ubuntu Software Center (or a similar package installer). - Install: In the Ubuntu Software Center window, you will see information about Google Chrome. Click the “Install” button.
- Authenticate: You will be prompted to enter your user password to authorize the installation. This is a standard security measure for installing software on Ubuntu.
- Wait for Installation: The Software Center will now proceed with installing Chrome. This may take a minute or two. Once complete, the “Install” button will change to indicate that Chrome is installed, or it might disappear.
Option B: Using the Terminal (Command Line Method)
This method is faster and provides more feedback, which can be helpful for troubleshooting.
-
Open the Terminal: You can do this by pressing
Ctrl + Alt + Ton your keyboard, or by searching for “Terminal” in the Ubuntu applications menu. -
Navigate to the Download Directory: Use the
cdcommand to change your current directory to where you downloaded the.debfile. If it’s in your Downloads folder, type:cd ~/Downloads -
Install the Package: Use the
dpkgcommand to install the package. Replacegoogle-chrome-stable_current_amd64.debwith the actual filename if it’s different.sudo dpkg -i google-chrome-stable_current_amd64.debsudois used to execute the command with administrative privileges (root access).dpkgis the Debian package manager.-istands for “install”.
-
Handle Potential Dependency Issues: Sometimes, the
dpkgcommand might report that certain dependencies are missing. If this happens, you can usually fix it by running the following command:sudo apt --fix-broken installThis command tells
apt(Ubuntu’s advanced packaging tool) to find and install any missing dependencies for packages that are currently in a broken state. After running this, you might need to re-run thesudo dpkg -i google-chrome-stable_current_amd64.debcommand, oraptmight automatically complete the installation. -
Alternatively, use
aptdirectly: A more robust way to install a local.debfile is by usingapt, which handles dependencies automatically. In your terminal, from the directory containing the.debfile, you can run:
bash

sudo apt install ./google-chrome-stable_current_amd64.deb
The./tellsaptto look for the file in the current directory. This command is generally preferred as it resolves dependency issues on the fly.
Step 3: Launching Google Chrome
Once the installation is complete, you can launch Google Chrome:
- From the Applications Menu: Click on the Ubuntu applications grid (usually at the bottom left of the screen) and search for “Chrome” or “Google Chrome.” Click on the icon to launch it.
- From the Terminal: You can also launch Chrome directly from the terminal by typing:
bash

google-chrome-stable

Upon the first launch, Chrome might ask you if you want to set it as your default browser and if you want to import bookmarks and settings from another browser. Choose the options that best suit your preferences.
Method 2: Installing Google Chrome via Snap Package
Ubuntu, by default, comes with Snap support enabled. Snap packages are a universal package format that allows developers to bundle applications with all their dependencies, making them easier to install and run across different Linux distributions. Installing Chrome via Snap is another quick and easy method.
Step 1: Open the Terminal
Press Ctrl + Alt + T or search for “Terminal” in your applications menu.
Step 2: Install Chrome using Snap
The command to install Google Chrome as a Snap package is straightforward:
sudo snap install google-chrome
sudois used for administrative privileges.snap installis the command to install a Snap package.google-chromeis the name of the Chrome Snap package.
The system will download the Chrome Snap package and install it. This process might take a bit longer than installing the .deb package as it includes all necessary dependencies within the Snap.
Step 3: Launching Google Chrome (Snap)
Similar to the .deb installation, you can find Google Chrome in your applications menu after installation. You can also launch it from the terminal using:
google-chrome
(Note: The command might be google-chrome for the Snap version, whereas for the .deb installation it’s typically google-chrome-stable).
Keeping Google Chrome Updated
One of the significant advantages of installing Chrome using the official .deb package and adding its repository is that Chrome will be updated automatically whenever you update your Ubuntu system.
When you install Chrome using the .deb package, the installation process typically adds Google’s software repository to your system’s list of software sources. This means that when you run a system update using:
sudo apt update
sudo apt upgrade
or when you use the “Software Updater” application, Chrome will be included in the list of packages to be updated, ensuring you always have the latest stable version with the newest security patches and features.
If you installed Chrome using the Snap package, it will also update automatically in the background without you needing to do anything. Snap packages are designed for automatic updates.
Troubleshooting Common Issues
While installing Chrome on Ubuntu is generally smooth, you might encounter a few hiccups.
Issue: “Dependency problems” when using dpkg
As mentioned in Method 1, if you encounter dependency errors after using sudo dpkg -i ..., the solution is to run:
sudo apt --fix-broken install
This command will attempt to resolve and install any missing dependencies, allowing the installation to complete successfully.
Issue: Chrome not launching or crashing
If Chrome fails to launch or crashes unexpectedly, it could be due to a few reasons:
-
Corrupted Installation: Try uninstalling and then reinstalling Chrome.
- For
.debinstallation:
bash

sudo apt remove google-chrome-stable

sudo apt autoremove
Then, re-download and reinstall the.debpackage. - For Snap installation:
bash

sudo snap remove google-chrome
Then, reinstall it usingsudo snap install google-chrome.
- For
-
Profile Issues: Sometimes, your Chrome user profile can become corrupted. You can try resetting it by renaming or deleting the Chrome configuration directory. Caution: This will reset all your Chrome settings, extensions, and bookmarks unless you’ve backed them up or are using sync.
- Open your terminal and navigate to the Chrome configuration directory:
bash

cd ~/.config/google-chrome
- Rename the
Defaultfolder:
bash

mv Default Default.backup
- Then, try launching Chrome. It will create a new
Defaultprofile. If this resolves the issue, you can then consider selectively copying data fromDefault.backupif needed, or just start fresh.
- Open your terminal and navigate to the Chrome configuration directory:
-
Graphics Driver Issues: Although less common, outdated or incompatible graphics drivers can sometimes cause application instability. Ensure your system’s graphics drivers are up-to-date.
Issue: Missing Google Chrome Icon in Applications Menu
If you install via the terminal and the icon doesn’t appear, it’s often a caching issue. You can try logging out and logging back into your Ubuntu session, or restarting your computer. In some rare cases, you might need to manually create a .desktop file, but this is usually not necessary with the official packages.

Conclusion
Installing Google Chrome on Ubuntu is a simple process that can significantly enhance your browsing experience. Whether you prefer the direct installation of the .deb package, which integrates seamlessly with Ubuntu’s system, or the convenience of the self-contained Snap package, both methods are effective and accessible. By following the steps outlined in this guide, you can confidently add Google Chrome to your Ubuntu system and enjoy its robust features, vast extension library, and speed. Remember to keep your system updated to ensure Chrome remains secure and performs optimally. With Chrome installed, you’re ready to tackle your daily tasks, explore the web, and leverage the full power of your Ubuntu desktop.