Trailer lights are not just an accessory; they are a fundamental safety and legal requirement for anyone towing a trailer. Whether you’re hauling a boat, a utility trailer, or camping gear, properly functioning trailer lights ensure your intentions are clear to other drivers, significantly reducing the risk of accidents. Beyond the immediate safety implications, understanding and executing a DIY trailer light installation can be a rewarding experience, saving you money, equipping you with valuable practical skills, and enhancing your personal brand as a capable and resourceful individual.
In a world increasingly dominated by digital tech and financial strategizing, the seemingly analog task of installing trailer lights might appear out of place. However, it perfectly embodies the ethos of informed living promoted by GlobalizeThis: it’s a practical application of “Tech” in understanding electrical systems and components, a “Money”-saving venture by avoiding professional labor costs, and an aspect of “Brand” building through self-reliance and mastering essential skills.
This guide will walk you through every step of installing trailer lights, from understanding the various components and gathering the necessary tools to making the final connections and testing your work. We’ll explore the technical nuances, provide practical tips, and ensure you have the confidence to tackle this project safely and effectively.
Understanding Trailer Lighting Systems and Their Importance
Before you even pick up a tool, it’s crucial to grasp why trailer lights are so vital and what components make up a typical system. This foundational knowledge will not only guide your installation but also deepen your appreciation for the role these simple devices play in road safety.
The Critical Role of Trailer Lights for Safety and Legality
The primary function of trailer lights is communication. They communicate your presence, your speed changes, and your directional intentions to drivers behind and alongside you. Without them, your trailer would be a silent, invisible hazard, especially in low light conditions or adverse weather.
- Enhanced Road Safety: Brake lights warn following drivers when you slow down or stop, turn signals indicate your lane changes or turns, and running lights ensure your trailer is visible from dusk till dawn. Side marker lights further define the length of your trailer, which is especially crucial for longer setups, helping other motorists judge safe passing distances.
- Legal Compliance: In virtually every jurisdiction worldwide, operating a vehicle with a trailer that lacks proper lighting is illegal. Regulations, such as those mandated by the Department of Transportation (DOT) in the U.S., specify the types of lights required, their placement, and their functionality. Non-compliance can lead to hefty fines, points on your license, insurance complications, and even criminal liability in the event of an accident. Furthermore, an unlit trailer significantly increases your risk of being involved in a collision, which can lead to injuries, property damage, and extensive legal battles. Investing your time in a proper DIY installation upfront is a small price to pay for peace of mind and legal protection.
Types of Trailer Lighting Systems
The technology behind trailer lights has evolved, offering various options to suit different needs and budgets. Understanding these types will help you choose the right kit for your trailer.
- Incandescent vs. LED Lights:
- Incandescent Lights: These are the traditional choice, using a filament bulb to produce light. They are generally less expensive upfront but consume more power, generate heat, and have a shorter lifespan due to the delicate filament being susceptible to vibrations and impacts. Replacement bulbs are readily available and inexpensive.
- LED Lights (Light Emitting Diode): Representing a more modern “Tech” solution, LEDs are rapidly becoming the standard. They are significantly more energy-efficient, drawing less current from your vehicle’s electrical system, which can be crucial for preventing strain on older vehicles. LEDs are also far more durable, resistant to vibration, and boast an impressively long lifespan, often outlasting the trailer itself. While they have a higher initial cost, their longevity and reduced maintenance needs often result in long-term “Money” savings. Their brighter, instant-on illumination also offers a safety advantage.
- Basic vs. Advanced Kits:
- Basic Kits: Typically include two taillight assemblies (with brake, turn, and running light functions integrated), a wiring harness with a standard 4-flat connector, and often some reflectors. These are suitable for smaller utility trailers.
- Advanced Kits: For larger or commercial trailers, kits might include additional side marker lights, clearance lights, license plate lights, reverse lights, and more complex wiring harnesses (e.g., 5-flat, 6-round, or 7-way connectors) to accommodate these extra functions and potentially electric brakes. When considering these options, think about the “Tech” implications – the more functions, the more complex the wiring and potential troubleshooting.
- Wired vs. Wireless (Emerging Tech): While most trailer lighting systems are wired, advancements in “Tech” are seeing the emergence of wireless trailer light options. These systems use a transmitter connected to the tow vehicle’s wiring and receivers on the trailer lights, communicating wirelessly. While offering ease of installation by eliminating the need to run extensive wiring along the trailer frame, they typically come at a higher cost and rely on battery power for the trailer lights, which requires periodic charging. For most DIYers, a wired system remains the most reliable and cost-effective choice, aligning well with the practical “Money” and “Tech” focus of this guide.
Essential Tools and Materials for the Job
A successful installation hinges on having the right equipment. Gathering all your tools and materials before you start will prevent frustrating interruptions and ensure a smooth process.
Gathering Your Trailer Light Kit and Components
Your chosen trailer light kit is the heart of this project, but several other components are crucial for a complete and durable installation.
- The Trailer Light Kit: Ensure it’s rated for your trailer’s size and intended use. Consider factors like submersible lights for boat trailers or heavy-duty options for commercial applications. Verify that all components (lights, harness, connectors) are present and undamaged.
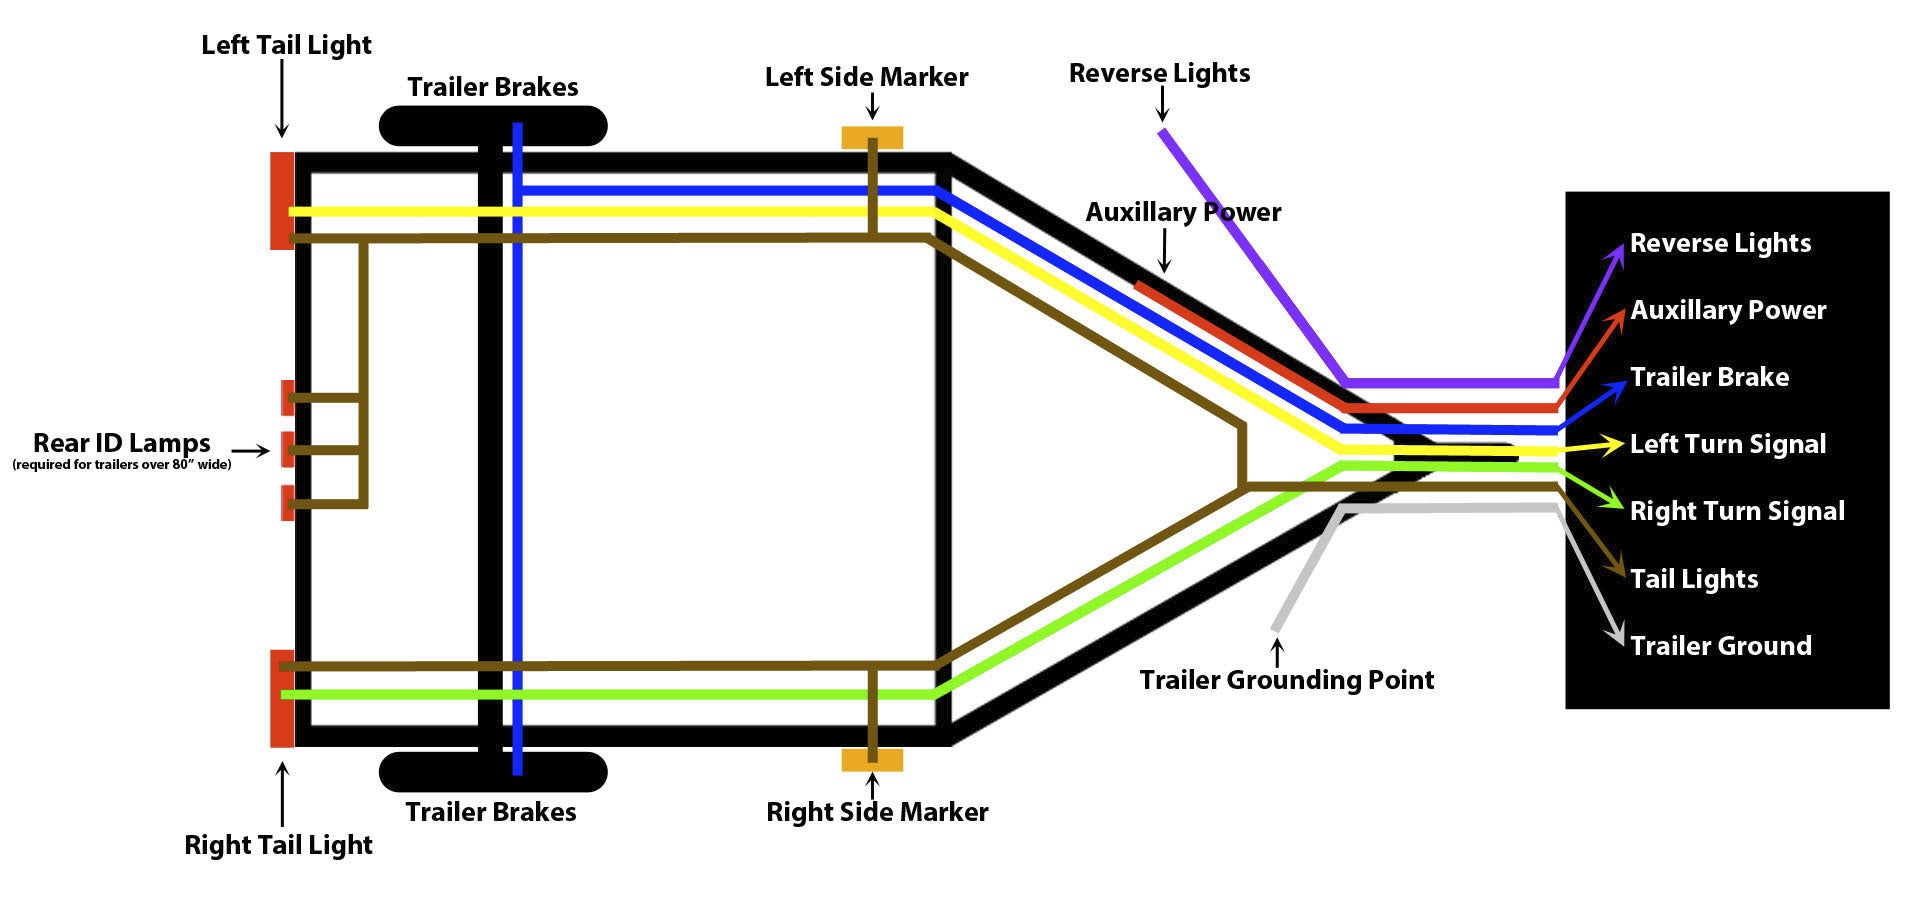
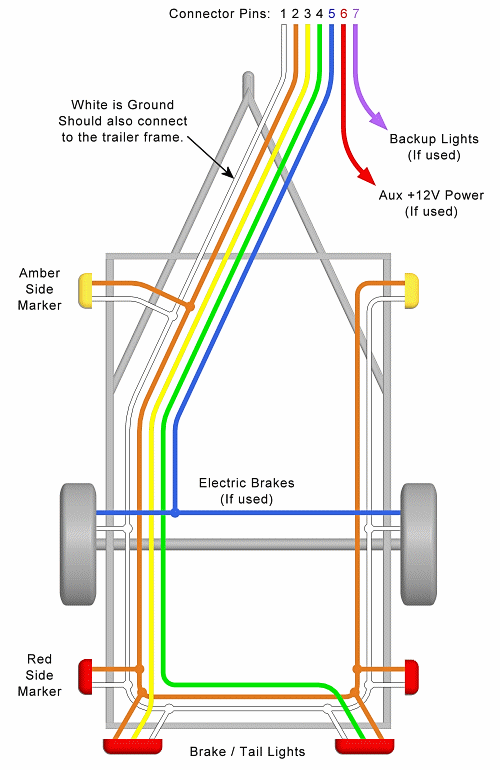
- Wiring Harness: Most kits come with a standard 4-flat wire harness, which supports basic functions: running lights, left turn/brake, right turn/brake, and ground. For more functions, you might need a 5-flat (adds reverse/auxiliary), 6-round, or 7-way connector (for electric brakes, auxiliary power, etc.). Ensure the harness length is sufficient for your trailer’s dimensions.
- Additional Lights and Reflectors: Depending on your trailer’s length, width, and local regulations, you might need extra side marker lights (amber for front half, red for rear half), clearance lights, and mandated reflectors (red at the rear, amber on sides).
- Electrical Connectors:
- Butt Connectors: Used to join two wires end-to-end.
- T-Connectors/Splice Connectors: Allow you to tap into an existing wire without cutting it, useful for connecting the trailer harness to the vehicle’s wiring.
- Heat Shrink Tubing: Essential for weatherproofing and protecting electrical connections from moisture and corrosion, significantly extending the life of your wiring. This is a crucial “Tech” detail for longevity.
- Ring Terminals/Spade Connectors: For attaching wires to screws or posts, especially for grounding.
- Grounding Wire: Often included in the harness, but sometimes extra wire is needed to ensure a solid, rust-free ground connection, which is paramount for all trailer lights to function correctly.
Tools You’ll Need for a Seamless Installation
Having the right tools at hand makes all the difference between a frustrating ordeal and a satisfying DIY project.
- Wire Strippers/Crimpers: A multi-function tool that allows you to remove insulation from wires and securely crimp connectors. This is your primary “Tech” tool for electrical work.
- Screwdrivers and Wrenches: For mounting lights and other components. A socket set might be useful.
- Utility Knife or Box Cutter: For cutting zip ties, opening packaging, and carefully stripping thicker wires if needed.
- Drill and Drill Bits: Necessary if you need to create new mounting holes for lights or to run wires through the trailer frame. Ensure you have bits suitable for metal (if applicable).
- Multimeter/Circuit Tester: An invaluable “Tech” tool for troubleshooting. It helps you verify power, ground, and continuity at various points in the electrical system, ensuring wires are correctly connected and functional before you button everything up.
- Measuring Tape: For accurate placement of lights and ensuring sufficient wire length.
- Zip Ties and Electrical Tape: For securing wires neatly along the trailer frame, preventing snags and wear. Electrical tape can also provide additional insulation and protection for connections.
- Dielectric Grease: A non-conductive, silicone-based grease used to protect electrical connections from moisture and corrosion, especially important in marine environments or areas with high humidity. Applying this to your connections is a smart “Tech” practice for long-term reliability.
- Safety Gear: Always wear safety glasses to protect your eyes from debris, and gloves to protect your hands.
Step-by-Step Installation Process: From Prep to Testing
With your materials gathered and tools at the ready, it’s time to embark on the installation process. Following these steps systematically will ensure a reliable and safe setup.
Pre-Installation Preparations and Safety First
A well-prepared installation is a successful one. Don’t rush this initial phase.
- Read the Instructions: Every trailer light kit comes with specific instructions. While this guide provides general principles, always refer to your kit’s manual for precise wiring diagrams, component identification, and unique installation tips. This is a critical “Tech” first step.
- Disconnect Vehicle Battery: As a paramount safety measure, disconnect the negative terminal of your tow vehicle’s battery. This prevents accidental short circuits while you’re working with the vehicle’s electrical system.
- Clean Mounting Surfaces: Ensure the areas where your lights will be mounted are clean, dry, and free of rust or old adhesive. This promotes a secure fit and good electrical contact for ground wires.
- Plan Wire Routing: Before securing anything, lay out your wiring harness along the trailer frame. Identify the best path, considering points where wires might be pinched, chafed, or exposed to excessive heat or moving parts. Aim for a neat, protected route that keeps wires out of sight and harm’s way.
Mounting the Lights and Running the Wiring
This is where your trailer starts to take shape with its new lighting system.
- Position and Mount Tail Lights: The taillights are the most crucial components. Mount them securely at the rear of the trailer, ensuring they are visible and meet legal height and spacing requirements. Many trailers have pre-drilled holes, but you may need to drill new ones. Use appropriate hardware and consider rubber gaskets for a watertight seal.
- Mount Side Markers and Reflectors: If your kit includes them or if they are legally required, mount side marker lights along the sides of the trailer. Amber lights typically go on the front half, and red lights on the rear half. Reflectors are often required even if you have lights, providing passive visibility.
- Run the Main Wiring Harness: Route the main harness along the underside or inside the frame of the trailer. Use zip ties every 12-18 inches to secure the wires firmly. Avoid letting wires dangle or rub against sharp edges. Ensure there’s enough slack at connection points, especially where the harness connects to the tow vehicle, to allow for turns and articulation without stretching the wires.
- Connect Individual Lights: Once the main harness is routed, connect the individual wires from the taillights, side markers, and any other lights to the corresponding wires in the main harness. Strip about half an inch of insulation from each wire end, twist the bare strands together, and use appropriate connectors (butt connectors, for instance). After crimping, slide heat shrink tubing over the connection and heat it gently with a heat gun or lighter until it shrinks tightly, sealing the connection. This “Tech” step is vital for weatherproofing.
Making the Electrical Connections
Understanding the standard wiring color codes is fundamental here. While there can be variations, the following is widely accepted in North America for 4-flat systems:
- White Wire: Ground. This is the most critical connection. It must be securely attached to a clean, unpainted metal surface on the trailer frame, or directly to the tow vehicle’s frame. A poor ground connection is the most common cause of trailer light malfunctions. Use a ring terminal for a secure screw connection, ensuring the metal is scraped clean of paint or rust.
- Brown Wire: Running Lights (Taillights, Side Markers, Clearance Lights). This wire powers all lights that come on with your vehicle’s headlights.
- Yellow Wire: Left Turn Signal and Brake Lights.
- Green Wire: Right Turn Signal and Brake Lights.
For 5-flat, 6-round, or 7-way connectors, additional wires will include:
- Blue Wire: Electric Brake Control (for trailers with electric brakes).
- Black Wire: 12V Auxiliary Power (for charging trailer batteries or running accessories).
- Purple/Red Wire: Reverse Lights.
Connecting to the Vehicle:
You’ll need to connect the trailer harness to your tow vehicle’s electrical system. This can be done in a few ways:
- Factory Plug-and-Play: Many modern vehicles come with a pre-wired trailer light connector. If your vehicle has one, simply plug your trailer harness into it. This is the easiest and most reliable “Tech” solution.
- T-Connectors/Tee Harness: These plug in-line with your vehicle’s existing taillight wiring harness, providing a simple way to tap into the necessary signals without cutting wires.
- Splicing: If no factory connector or T-connector is available, you will need to manually splice into your vehicle’s taillight wires. Identify the correct wires using your vehicle’s manual or a circuit tester. Use high-quality splice connectors and seal them with heat shrink tubing or electrical tape. This method requires more technical skill and precision.
Crucial Grounding: Reiterate the importance of a solid ground. A corroded or loose ground connection will cause various issues, from dim lights to total failure. Ensure all ground wires are connected to a clean, bare metal surface.
Final Checks and Testing
Once all connections are made, it’s time to verify your work.
- Reconnect Vehicle Battery: With all wiring secure, reconnect the negative terminal of your tow vehicle’s battery.
- Test All Functions:
- Running Lights: Turn on your vehicle’s headlights. All trailer running lights, taillights, side markers, and clearance lights should illuminate.
- Brake Lights: Have a helper press the brake pedal. Both left and right trailer taillights should brighten.
- Turn Signals: Test the left turn signal, then the right. The corresponding taillight on the trailer should flash.
- Hazards: Turn on your vehicle’s hazard lights. Both trailer taillights should flash simultaneously.
- Reverse Lights (if applicable): Put the vehicle in reverse (with brakes applied) to test.
- Troubleshooting Common Issues:
- No Lights: Check the ground connection first. Then verify the main connection to the tow vehicle, and check fuses in both the vehicle and the trailer harness (if applicable). Use your multimeter to test for power at various points.
- Dim Lights/Intermittent Flashing: Often a sign of a poor ground connection or corrosion in a connector.
- Incorrect Function (e.g., brake lights cause turn signals to flash): Indicates a crossed wire or an improper ground. Recheck your wiring against the color code.
Maximizing Your Investment: Maintenance and Long-Term Value
Installing trailer lights is an investment—of your time, effort, and money. Protecting this investment through regular maintenance ensures longevity, reliability, and continued safety.
Regular Maintenance for Longevity and Performance
A little preventative care goes a long way in avoiding future headaches and costly repairs.
- Inspect Connections Regularly: Before each tow, quickly check all visible electrical connections for corrosion, loose wires, or damaged insulation. Pay particular attention to the trailer-to-vehicle connector and the ground connection. This aligns with a “Tech” approach to preventative care.
- Check Bulbs (Incandescent): If you have incandescent lights, periodically check bulbs for burnout and replace them as needed. Keep spare bulbs in your trailer kit.
- Clean Lenses: Keep light lenses clean and free of dirt, mud, or road salt. A simple wipe-down ensures maximum light output and visibility.
- Apply Dielectric Grease: Reapply dielectric grease to your electrical connectors annually, especially the vehicle-to-trailer plug, to prevent moisture ingress and corrosion. This small “Tech” detail drastically extends the life of your connections.
- Inspect Wiring for Wear and Tear: Routinely check the entire wiring harness for signs of chafing, cuts, or degradation, especially where it passes through or along the trailer frame. Repair any damaged sections immediately with electrical tape or new heat shrink tubing.
The Financial and Practical Benefits of DIY Installation
Beyond the immediate satisfaction, choosing the DIY route for your trailer lights offers substantial benefits that align perfectly with the “Money” and “Brand” aspects of GlobalizeThis.
- Significant Cost Savings (Money): Professional installation of trailer lights can be expensive, often costing hundreds of dollars in labor alone. By doing it yourself, you eliminate these labor costs entirely, making it a smart financial decision. This allows you to allocate those savings to other trailer upgrades, maintenance, or even investing in higher-quality LED lights.
- Enhanced Personal Skills and Confidence (Brand, Tech): Successfully completing a project like this builds confidence and expands your practical “Tech” skillset. You gain a deeper understanding of basic electrical systems, problem-solving, and tool usage. This contributes to your “Personal Brand” as a capable, self-reliant individual, and these skills are transferable to many other DIY projects around the home or garage.
- Ensuring Quality of Work: When you install your own lights, you control the quality of the components, the connections, and the routing of the wires. You can take the extra time to properly weather-seal connections, secure wires meticulously, and ensure a robust ground, often surpassing the speed-focused approach of some professional installers.
- Increased Trailer Resale Value (Money): A trailer with a properly installed, well-maintained, and fully functional lighting system is safer, more reliable, and ultimately more attractive to potential buyers. It demonstrates that the trailer has been cared for, potentially increasing its resale value and helping you recoup your initial “Money” investment.
- Avoiding Fines and Accidents (Money, Peace of Mind): Properly installed lights mean you’re compliant with the law, avoiding costly fines and the legal headaches associated with non-compliance. More importantly, they significantly reduce the risk of accidents, protecting your investment, your health, and the safety of others on the road. The peace of mind that comes from knowing your trailer is safely and legally equipped is invaluable.
- Potential for Side Hustles (Money): Mastering practical skills like this can even open doors to “Side Hustles.” If you become proficient, you might find opportunities to assist friends, family, or local community members with their trailer lighting needs, earning a bit of extra income and further solidifying your “Brand” as a local expert.

Conclusion
Installing trailer lights is a fundamental skill for anyone who tows. It’s an undertaking that goes beyond simply attaching wires and bulbs; it’s an investment in safety, legality, and the longevity of your equipment. By following this comprehensive guide, you’ve not only learned the technical “Tech” steps involved but also understood the profound “Money” savings and personal “Brand” enhancement that come with mastering such a practical DIY project.
Embrace the empowerment that comes from understanding your tools, your vehicle, and your trailer. With proper installation and diligent maintenance, your new trailer lights will serve you reliably for years to come, illuminating your path and ensuring safer journeys for everyone on the road. So, next time you’re faced with a practical challenge, remember the spirit of GlobalizeThis: equip yourself with knowledge, leverage technology wisely, and make smart financial decisions to build a more capable and fulfilling life.
aViewFromTheCave is a participant in the Amazon Services LLC Associates Program, an affiliate advertising program designed to provide a means for sites to earn advertising fees by advertising and linking to Amazon.com. Amazon, the Amazon logo, AmazonSupply, and the AmazonSupply logo are trademarks of Amazon.com, Inc. or its affiliates. As an Amazon Associate we earn affiliate commissions from qualifying purchases.