The Central Processing Unit (CPU) is often referred to as the “brain” of the computer. It is the component responsible for executing instructions, processing data, and ensuring that every other part of your system works in harmony. For many PC enthusiasts and first-time builders, the prospect of installing a CPU is the most intimidating part of the assembly process. The components are delicate, expensive, and require a level of precision that can feel overwhelming.
However, once you understand the underlying mechanics and the safety protocols involved, installing a CPU is a straightforward and immensely satisfying task. This guide provides a deep dive into the technical nuances of CPU installation, ensuring that whether you are building a high-end gaming rig or a professional workstation, your processor is seated perfectly for optimal performance.
Preparing for the Installation: Safety and Equipment
Before you even touch your processor, the environment in which you work is critical. Modern electronics are highly sensitive to Electrostatic Discharge (ESD). A tiny spark that you might not even feel can permanently damage the microscopic circuits inside a CPU or motherboard.
Static Electricity and Component Safety
To mitigate the risk of ESD, it is highly recommended to work on a non-conductive surface. Avoid carpets or plastic tablecloths. Ideally, use a dedicated anti-static mat. If you do not have one, you can “ground” yourself by frequently touching a metal part of your computer case while it is plugged into a grounded outlet (but with the power switch turned off). Professional builders often use an anti-static wrist strap, which clips to the case and ensures a constant discharge of static.
Furthermore, handle the CPU only by its edges. Never touch the gold contacts on the bottom of an Intel chip or the delicate pins on an older AMD chip. The oils from your skin can cause corrosion or interfere with electrical connectivity over time.
Necessary Tools and Workspace Setup
Unlike other complex machinery, a CPU installation requires very few tools. Generally, you will need:
- A Phillips-head screwdriver (usually #2) for the CPU cooler mounting brackets.
- High-purity Isopropyl alcohol (90% or higher) and lint-free wipes (if you are re-installing a used CPU).
- High-quality thermal interface material (TIM), commonly known as thermal paste, unless your cooler comes with it pre-applied.
- A bright, well-lit workspace to clearly see the alignment markers.
Unboxing and Inspection
When you remove the CPU from its protective plastic “clamshell,” take a moment to inspect it. For Intel CPUs or AMD’s AM5 series, look at the bottom pads to ensure there are no scratches. For AMD’s older PGA (Pin Grid Array) chips, look across the rows of pins to ensure none are bent. Similarly, inspect the motherboard socket. Motherboard pins are notoriously fragile; even a slight nudge can bend them, leading to a “dead on arrival” (DOA) motherboard.
Understanding CPU Socket Architectures
Before proceeding with the physical installation, it is vital to understand which type of socket you are working with. The tech world is primarily divided between two major players: Intel and AMD. Their mounting mechanisms differ significantly.
Intel’s Land Grid Array (LGA)
Most modern Intel desktop processors (and AMD’s latest AM5 chips) use the LGA architecture. In this design, the pins are located on the motherboard socket itself, while the CPU has flat gold contact pads. The advantage of LGA is that the most fragile parts (the pins) are on the motherboard, which is often cheaper to replace than a high-end CPU. LGA sockets use a “load plate” and a lever to clamp the CPU down, ensuring firm contact between the pads and the pins.
AMD’s Pin Grid Array (PGA)
For many years, AMD’s consumer chips (like the Ryzen 1000 through 5000 series on the AM4 socket) used PGA. Here, the pins are on the CPU itself. The motherboard socket consists of small holes that the pins slide into. This design uses a “Zero Insertion Force” (ZIF) socket. When the lever is raised, the holes align, and the CPU should drop in by gravity alone. If you have to push, something is wrong.
Keying and Alignment Markers
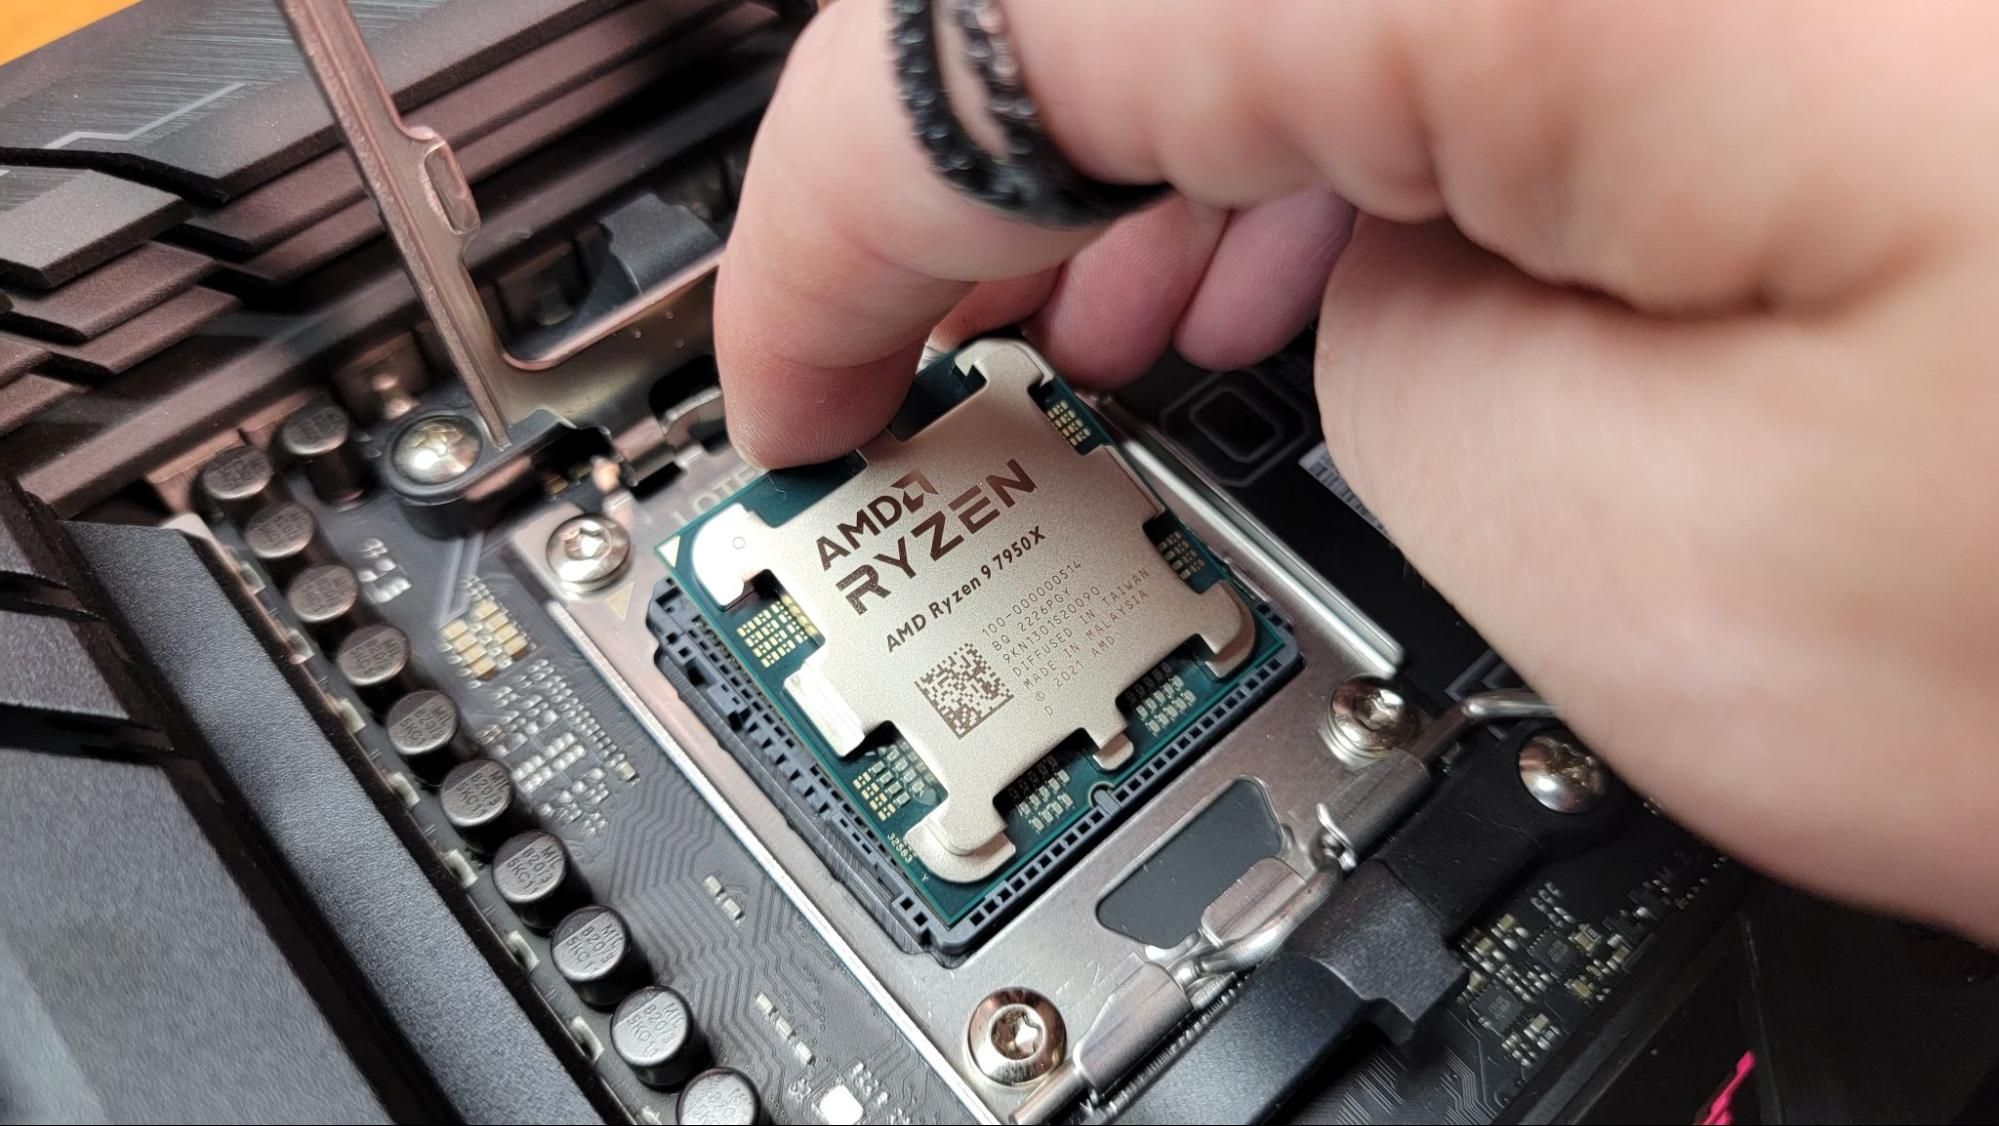
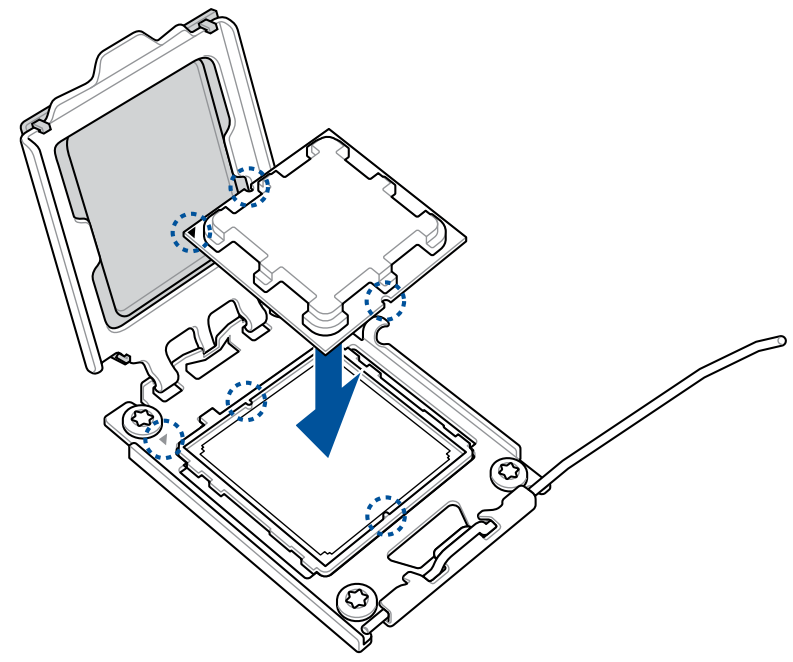
Regardless of the brand, all CPUs feature “keying.” These are physical notches or marks that ensure the chip can only be inserted in the correct orientation. The most common marker is a small golden triangle in one corner of the CPU. This triangle must align with a corresponding triangle etched into or molded onto the motherboard socket.
The Installation Process: Step-by-Step
Once you are grounded and have identified your socket type, it is time for the physical installation. This process requires a steady hand and a “measure twice, cut once” mentality.
Opening the Load Plate
For an LGA socket (Intel or AMD AM5), you will see a metal frame (the load plate) and a small tension lever. Push the lever down and slightly outward to release it from its hook, then lift it back. This will raise the load plate. You may see a plastic protective cover over the socket pins. Do not remove this cover manually. Most modern motherboards are designed so that the plastic cover pops off automatically once the CPU is installed and the lever is locked back down. This prevents you from accidentally touching the pins during the process.
Seating the Processor
Gently pick up the CPU by the sides. Align the golden triangle on the CPU with the triangle on the socket. Double-check the notches on the sides of the CPU; they should match the plastic protrusions in the socket.
Slowly lower the CPU straight down into the socket. It should sit perfectly flat. Do not wiggle it or apply pressure. If it feels uneven, lift it out and check the alignment again. In the world of hardware, “Zero Insertion Force” is a rule, not a suggestion.
Securing the CPU
Once the CPU is seated, lower the metal load plate over it. Bring the tension lever back down. You will feel a significant amount of resistance—this is normal. The lever is designed to apply enough pressure to ensure every pin makes a solid electrical connection. As you lock the lever back into its notch, the plastic protective cap should pop off. Keep this cap in your motherboard box; you will need it if you ever have to ship the motherboard for repair.
Thermal Interface Material and Cooling Solutions
A CPU generates an immense amount of heat in a very small area. Without a cooler, a modern CPU would reach its thermal limit and shut down within seconds of booting. The bridge between the CPU and the cooler is the Thermal Interface Material (TIM).
Applying Thermal Paste
Even though the surface of a CPU and the base of a cooler look flat, they have microscopic imperfections. Thermal paste fills these gaps to ensure maximum heat transfer.
- The “Pea” Method: The most common and reliable method is placing a small, pea-sized drop of paste directly in the center of the CPU.
- The “X” Method: For larger chips (like Intel’s LGA 1700 or AMD’s Threadripper), an “X” shape ensures better coverage across the larger surface area.
The goal is a thin, even layer. Too much paste can create a messy overflow, while too little can lead to air bubbles and overheating.
Mounting the Heatsink or Water Block
Place your cooler (whether an air-cooled tower or an AIO liquid cooler block) directly onto the CPU. Try to avoid sliding it around once it makes contact with the paste. Align the screws with the mounting brackets or the backplate.
When tightening the screws, always use a “cross” or “star” pattern. Tighten one corner slightly, then the opposite diagonal corner. This ensures that the pressure is distributed evenly across the CPU die, preventing cracking or poor contact.
Connecting the Power
Your CPU cooler will have at least one cable. This must be plugged into the header on the motherboard labeled CPU_FAN. If you are using a liquid cooler, you may also have a PUMP_FAN or AIO_PUMP header. Modern motherboards use these headers to monitor the fan’s RPM; if the motherboard doesn’t detect a fan spinning, it may refuse to boot as a safety precaution to prevent the CPU from burning out.
Final Configuration and Troubleshooting
The physical installation is complete, but the job isn’t finished until the system is stable and monitored.
Initial Boot and BIOS Monitoring
Upon the first boot, tap the Delete or F2 key to enter the BIOS/UEFI. Navigate to the “Hardware Monitor” or “PC Health” section. Here, you can watch the CPU temperature in real-time. At idle, a CPU should typically sit between 30°C and 45°C. If you see the temperature climbing rapidly toward 90°C while just sitting in the BIOS, turn the system off immediately. This usually indicates that the cooler is not mounted correctly or the plastic film was left on the bottom of the heatsink.
Post-Installation Stress Testing
Once you have installed your operating system, it is wise to run a stress test using software like Cinebench or Prime95. Monitor your temperatures using a tool like HWMonitor or HWiNFO64. This ensures that under full load, your installation can handle the thermal output. For most modern processors, “load” temperatures between 70°C and 85°C are perfectly acceptable.

Common Errors to Avoid
If your system fails to “POST” (Power-On Self-Test), check the following:
- The 8-pin CPU Power Cable: Ensure the dedicated power cable from the PSU is plugged into the top left of the motherboard.
- RAM Seating: Sometimes, the pressure of installing a CPU cooler can slightly unseat a RAM stick.
- Bent Pins: If all else fails, you may need to remove the cooler and CPU to inspect the socket for bent pins that might have occurred during installation.
By following these technical steps with patience and precision, you ensure that your CPU—the most vital component of your digital life—is installed for longevity and peak performance. The transition from a box of parts to a functional, high-performance machine begins with this critical first step.
aViewFromTheCave is a participant in the Amazon Services LLC Associates Program, an affiliate advertising program designed to provide a means for sites to earn advertising fees by advertising and linking to Amazon.com. Amazon, the Amazon logo, AmazonSupply, and the AmazonSupply logo are trademarks of Amazon.com, Inc. or its affiliates. As an Amazon Associate we earn affiliate commissions from qualifying purchases.