In today’s fast-paced digital landscape, cloud computing isn’t just a buzzword; it’s the backbone of modern businesses, powering everything from innovative startups to established enterprises. Amazon Web Services (AWS) stands as a titan in this arena, offering an unparalleled suite of services that can transform how organizations operate. While the intuitive AWS Management Console provides a user-friendly graphical interface, seasoned cloud professionals, developers, and system administrators often seek a more powerful, efficient, and programmable way to interact with their cloud resources. This is where the AWS Command Line Interface (CLI) becomes indispensable.
The AWS CLI is a unified tool that enables you to manage your AWS services directly from your terminal. Imagine the ability to automate complex tasks, script deployments, and manage hundreds of resources with just a few lines of code. This is the power the AWS CLI puts at your fingertips. For anyone serious about leveraging the full potential of AWS, mastering the CLI is not just an option—it’s a necessity. It significantly boosts productivity, streamlines operations, and offers a level of control that the console alone cannot match. This guide will walk you through the comprehensive process of installing the AWS CLI, ensuring you’re equipped to embark on a journey of enhanced cloud management and automation.
Understanding the AWS CLI: Your Gateway to Cloud Automation
Before we dive into the nitty-gritty of installation, it’s crucial to grasp what the AWS CLI is, why it’s a vital tool in your tech arsenal, and which version is best suited for your needs. Its role extends beyond mere convenience; it’s a cornerstone for DevOps practices, infrastructure-as-code principles, and robust cloud security.
What is the AWS CLI and Why Do You Need It?
At its core, the AWS CLI is a powerful open-source tool developed by Amazon. It allows you to interact with AWS services using commands in your command-line shell. Instead of clicking through web pages in the AWS Management Console, you execute simple text commands to perform operations like launching EC2 instances, managing S3 buckets, configuring Lambda functions, or updating DynamoDB tables.
The benefits of integrating the AWS CLI into your workflow are manifold, significantly touching upon various aspects of technology and productivity:
- Automation: This is arguably the biggest advantage. The CLI enables you to script entire cloud deployments, perform routine maintenance tasks, and automate responses to events, saving countless hours and reducing human error. This directly translates to improved “Tech” efficiency and “Productivity.”
- Scripting Capabilities: You can integrate AWS CLI commands into shell scripts, Python scripts, or other programming languages, allowing for complex, multi-step operations that can be version-controlled and reused.
- Speed and Efficiency: For experienced users, typing a command is often much faster than navigating through a graphical interface, especially for repetitive tasks or when managing a large number of resources.
- Multi-Account Management: Easily switch between different AWS accounts or IAM roles using profiles, simplifying management for organizations with complex cloud environments.
- Integration with CI/CD Pipelines: The AWS CLI is a fundamental component of Continuous Integration and Continuous Deployment (CI/CD) pipelines, enabling automated deployments and infrastructure provisioning.
- Remote Access: Manage your AWS resources from virtually anywhere, as long as you have terminal access and an internet connection.
For professionals immersed in cloud architecture, software development, or system administration, the AWS CLI is not just another tool; it’s a fundamental skill that underpins effective cloud operations and accelerates career growth in the “Tech” sector.
AWS CLI Version 1 vs. Version 2: Choosing Your Tool
When discussing the AWS CLI, you might encounter references to two major versions: AWS CLI Version 1 (v1) and AWS CLI Version 2 (v2). It’s important to understand the distinction as this guide will focus primarily on installing the most current and recommended version.
- AWS CLI Version 1 (v1): This was the original version, primarily distributed via Python’s
pippackage manager. It required a separate Python installation and managing Python environments could sometimes introduce complexities. - AWS CLI Version 2 (v2): This is the current and recommended version of the AWS CLI. AWS developed v2 to provide an improved installation experience, enhanced functionality, and better performance. Key differences and advantages of v2 include:
- Bundled Installer: V2 comes as a self-contained executable, meaning it bundles all its dependencies (including Python) into a single package. This simplifies installation significantly, as you don’t need a pre-existing Python environment.
- Improved Installation: Dedicated installers (MSI for Windows, PKG for macOS, install script for Linux) make the process much smoother and less prone to environment-related issues.
- Enhanced Features: V2 introduced new features like improved configurability, a built-in auto-completion tool, and better handling of command-line pagination.
For all new installations and for users looking for the most stable and feature-rich experience, AWS CLI Version 2 is the unequivocal choice. This guide will exclusively cover the installation steps for AWS CLI v2 across various operating systems.
Prerequisites for a Seamless AWS CLI Installation
To ensure a smooth and successful installation process, a few fundamental requirements must be met. Preparing these prerequisites will save you time and prevent common frustrations, allowing you to quickly move towards leveraging the power of the AWS CLI.
Essential Requirements Before You Begin
- An Active AWS Account: This might seem obvious, but you’ll need an active Amazon Web Services account to interact with any AWS services. If you don’t have one, you can sign up for a free tier account on the AWS website.
- Basic Understanding of Command-Line Interfaces/Terminals: While this guide will walk you through the commands, a foundational familiarity with navigating a terminal, executing commands, and understanding basic concepts like file paths will be beneficial. This is a core “Tech” skill that the AWS CLI builds upon.
- Administrator Privileges on Your Local Machine: To install software and potentially modify system PATH variables, you’ll need administrative rights on your Windows, macOS, or Linux machine.
- Stable Internet Connection: The installation process involves downloading significant files from AWS servers. A reliable internet connection will ensure downloads complete without interruption.
- AWS Access Key ID and Secret Access Key: After installation, you will need to configure the CLI to authenticate with your AWS account. This requires an AWS Access Key ID and a corresponding Secret Access Key. It is highly recommended to create a dedicated IAM (Identity and Access Management) user with appropriate permissions (least privilege principle) for CLI access, rather than using your root account credentials.
- Security Note: Access keys are powerful. Treat your Secret Access Key like a password. Never share it, commit it to public repositories, or store it insecurely. For advanced security, consider using IAM roles and temporary credentials when possible. This ties directly into “Digital Security” best practices under the “Tech” theme.
Having these items ready will pave the way for a trouble-free installation and configuration experience, allowing you to quickly get started with managing your AWS cloud resources.
Step-by-Step Installation Across Major Operating Systems
The installation process for the AWS CLI v2 varies slightly depending on your operating system. Below, we’ll provide detailed, platform-specific instructions to ensure a successful setup on Windows, macOS, and Linux.
Installing AWS CLI on Windows
For Windows users, the AWS CLI v2 offers a straightforward graphical installer (MSI package), which simplifies the process significantly by handling all dependencies and path configurations automatically.
- Download the MSI Installer:
Open your web browser and navigate to the official AWS CLI documentation or directly to the download link for Windows:https://awscli.amazonaws.com/AWSCLIV2.msi
Always download directly from official AWS sources to ensure security and authenticity. - Run the Installer:
Once the download is complete, locate the.msifile (usually in yourDownloadsfolder) and double-click it to start the installation wizard. - Follow the Installation Wizard:
- Click Next on the Welcome screen.
- Review and accept the License Agreement, then click Next.
- Choose the installation destination folder (the default is usually fine:
C:Program FilesAmazonAWSCLIV2). Click Next. - Click Install to begin the installation process.
- If prompted by User Account Control (UAC), click Yes to allow the installer to make changes to your system.
- The installation will proceed. Once complete, click Finish to exit the wizard.
- Verify the Installation:
Open a new Command Prompt or PowerShell window (existing windows might not have the updated PATH variable). Type the following command and press Enter:
bash

aws --version
You should see output similar to this, indicating the version number, Python version, and operating system:
aws-cli/2.15.52 Python/3.11.8 Windows/10 exe/AMD64 prompt/off
If you receive a “command not found” error, ensure you opened a new terminal window after installation. If the problem persists, you may need to manually add the AWS CLI installation directory to your system’s PATH environment variable (though the MSI installer typically handles this automatically).
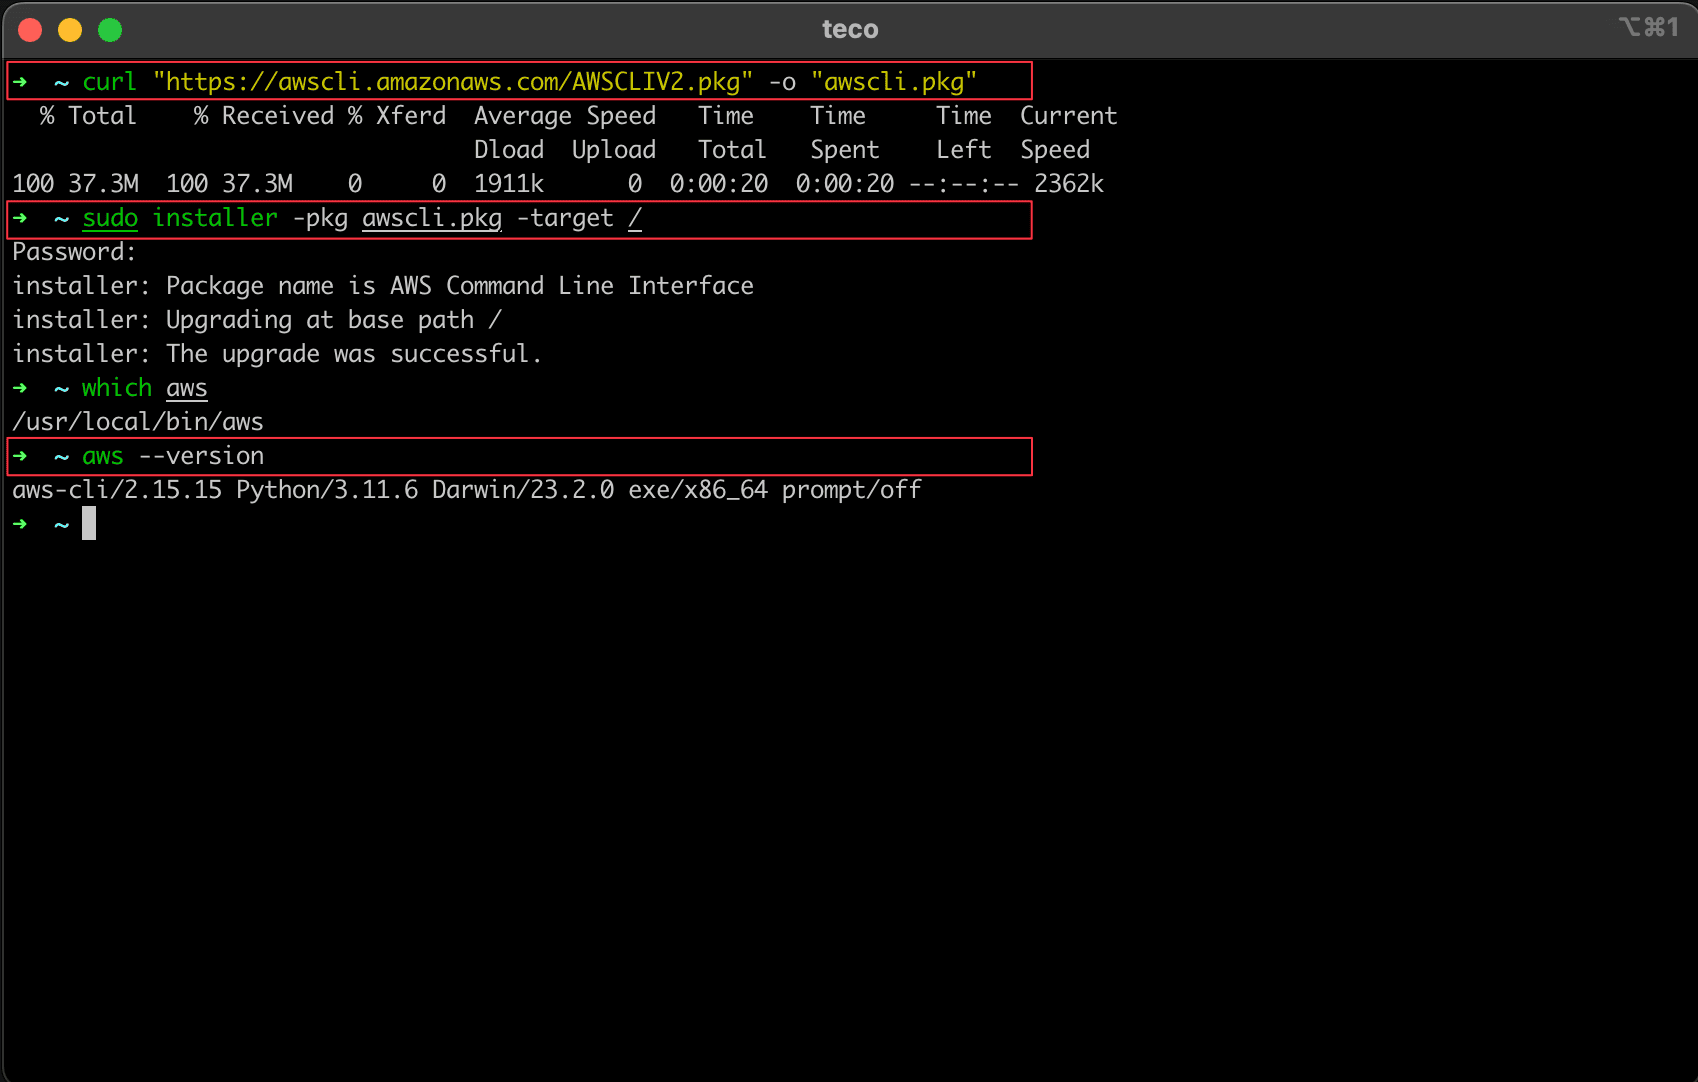
Installing AWS CLI on macOS
macOS users also benefit from a dedicated installer package, providing a simple and robust installation experience. While Homebrew can also install AWS CLI, the official installer is recommended for v2 due to its bundled nature.
- Download the PKG Installer:
Open your web browser and navigate to the official AWS CLI documentation or directly to the download link for macOS:https://awscli.amazonaws.com/AWSCLIV2.pkg - Run the Installer:
Once the download finishes, locate the.pkgfile in yourDownloadsfolder and double-click it. - Follow the Installation Wizard:
- Click Continue on the Welcome screen.
- Read the Important Information and click Continue.
- Review the License Agreement and click Continue, then Agree to accept the terms.
- Choose the Installation Type. The default “Install for all users of this computer” is recommended. Click Install.
- You will be prompted to enter your macOS user password. Enter it and click Install Software.
- The installation will proceed. Once complete, you will see a summary. Click Close. You might be asked if you want to move the installer to the Trash; this is optional.
- Verify the Installation:
Open a new Terminal window (Finder > Applications > Utilities > Terminal). Type the following command and press Enter:
bash

aws --version
You should see output similar to this:
aws-cli/2.15.52 Python/3.11.8 Darwin/23.3.0 exe/x86_64 prompt/off
If you encounter issues, ensure your PATH environment variable includes/usr/local/bin(where the installer typically places theawsexecutable). The installer usually manages this, but manual checks might be necessary.
Installing AWS CLI on Linux
For Linux users, the AWS CLI v2 is distributed as a bundled installer script, which makes the installation process straightforward without needing Python pre-installed. This method is recommended over pip for v2.
- Download the Installation Package:
Open your terminal and usecurlto download the installer bundle. You might need to installunzipif it’s not already on your system (sudo apt install unzipfor Debian/Ubuntu,sudo yum install unzipfor RHEL/CentOS).
bash

curl "https://awscli.amazonaws.com/awscli-exe-linux-x86_64.zip" -o "awscliv2.zip"
- Unzip the Package:
After the download is complete, unzip the package:
bash

unzip awscliv2.zip
This will create a new directory namedawsin your current working directory. - Run the Install Script:
Execute the install script. The--install-dirflag specifies where the AWS CLI files will be placed, and--bin-dirspecifies where the symbolic link to theawsexecutable will be created, which should be in your system’s PATH./usr/local/binis a common choice.
bash

sudo ./aws/install --install-dir /usr/local/aws-cli --bin-dir /usr/local/bin
- Explanation:
sudo: Required to install files into system directories../aws/install: Executes the installation script located in theawsdirectory.--install-dir /usr/local/aws-cli: Specifies the directory where the AWS CLI files will be installed.--bin-dir /usr/local/bin: Creates a symbolic link to theawsexecutable in/usr/local/bin. This directory is typically already in your system’s PATH, making theawscommand globally accessible.
- Explanation:
- Verify the Installation:
Close and reopen your terminal, or source your shell’s profile file (e.g.,source ~/.bashrcorsource ~/.zshrc) to ensure the PATH is updated. Then, type the following command:
bash

aws --version
You should see output similar to this:
aws-cli/2.15.52 Python/3.11.8 Linux/5.15.0-101-generic exe/x86_64 prompt/off
If you get a “command not found” error, double-check that/usr/local/bin(or your chosen--bin-dir) is in your system’s PATH. You can check your PATH withecho $PATH. If it’s not, you might need to manually add it to your shell’s configuration file (e.g.,~/.bashrc,~/.zshrc) like so:export PATH="/usr/local/bin:$PATH", thensourcethe file.
Verifying Your Installation and Initial Configuration
Successfully installing the AWS CLI is the first major step. The next crucial phase is to verify that it’s correctly recognized by your system and then to configure it to securely connect with your AWS account. This configuration is essential for the CLI to authenticate your requests and manage your cloud resources.
Confirming Successful Installation
After running the installation steps for your specific operating system, the most critical verification step is to confirm that the aws command is recognized and functional.
-
Run the Version Check Command:
Open a new terminal or command prompt window and execute:
bash

aws --version
-
Interpret the Output:
A successful installation will display output similar to these examples (the exact version numbers and system details will vary):- Windows:
aws-cli/2.15.52 Python/3.11.8 Windows/10 exe/AMD64 prompt/off - macOS:
aws-cli/2.15.52 Python/3.11.8 Darwin/23.3.0 exe/x86_64 prompt/off - Linux:
aws-cli/2.15.52 Python/3.11.8 Linux/5.15.0-101-generic exe/x86_64 prompt/off
This output confirms that the AWS CLI executable is found, it’s running the correct version, and it identifies your Python version and operating system.
- Windows:
-
Troubleshooting “Command Not Found” Errors:
If you receive an error like “command not found,” “aws is not recognized as an internal or external command,” or similar, it typically indicates an issue with your system’s PATH environment variable.- Solution 1: Open a New Terminal: Ensure you’ve opened a brand new terminal or command prompt after completing the installation. Sometimes, existing windows don’t automatically refresh their environment variables.
- Solution 2: Check PATH: Verify that the directory containing the
awsexecutable (e.g.,/usr/local/binon Linux/macOS orC:Program FilesAmazonAWSCLIV2on Windows) is included in your system’s PATH. You may need to manually add it if the installer failed to do so. Refer to your OS documentation for how to manage environment variables. - Solution 3: Reinstallation: If all else fails, consider reinstalling, paying close attention to any prompts during the installation process.
Configuring the AWS CLI for Your Account
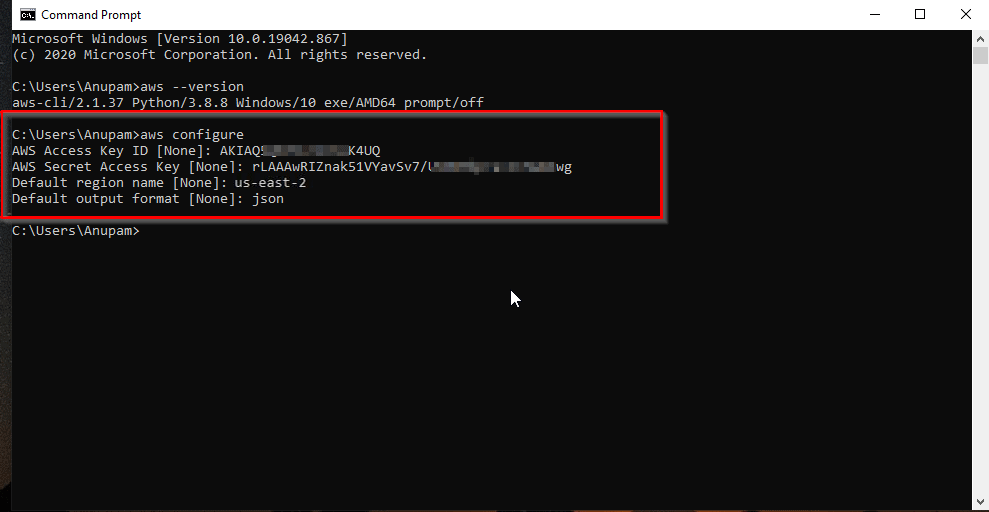
With the CLI installed, the next step is to configure it with your AWS credentials. This allows the CLI to authenticate with your AWS account and execute commands on your behalf. The aws configure command is the standard way to do this.
-
Run the Configuration Command:
In your terminal, type:
bash

aws configure
-
Provide Required Information (Press Enter after each entry):
The CLI will prompt you for four pieces of information:AWS Access Key ID [None]:
This is a unique identifier for your IAM user. You’ll obtain this from the AWS Management Console (IAM service > Users > Your User > Security credentials tab > Create access key). It typically starts withAKIA....- Security Best Practice: As mentioned earlier, use an IAM user with minimal necessary permissions rather than your root account credentials.
AWS Secret Access Key [None]:
This is the confidential portion of your credentials, acting like a password. It’s revealed only once when you create an access key. It’s a long string of alphanumeric characters.- CRITICAL SECURITY WARNING: Never expose this key publicly. Treat it with the utmost confidentiality.
Default region name [None]:
This specifies the AWS region you want the CLI to interact with by default (e.g.,us-east-1,eu-west-2,ap-southeast-1). Commands will target this region unless explicitly overridden with the--regionflag. Choose a region geographically close to you or your primary resources for lower latency.Default output format [None]:
This determines how the results of your CLI commands are displayed. Common options are:json(recommended for scripting and programmatic parsing)text(simple, space-delimited text, good for quick reads)table(human-readable tables, excellent for visual inspection)
You can always override this default for specific commands using the--outputflag.
Your credentials and configuration settings are stored in plain text files in a hidden directory:
~/.aws/credentials(for access keys)~/.aws/config(for region and output format)
(On Windows, these are typicallyC:UsersYOUR_USERNAME.awscredentialsandC:UsersYOUR_USERNAME.awsconfig).
After successfully configuring your AWS CLI, you’re ready to start issuing commands and interacting with your AWS environment directly from your terminal, marking a significant leap in your cloud management capabilities.
Unlocking Potential: Beyond Installation
The true power of the AWS CLI emerges once it’s installed and configured. It transforms from a simple tool into a dynamic command center for your cloud operations. Understanding how to use basic commands and adhering to best practices will not only enhance your productivity but also bolster the security of your cloud infrastructure.
Basic Commands and Practical Applications
Let’s explore a few fundamental commands to illustrate the versatility and efficiency of the AWS CLI. These examples barely scratch the surface, but they demonstrate how quickly you can retrieve information and manage resources.
- Listing S3 Buckets:
To see all the S3 buckets in your default region:
bash

aws s3 ls
This command is far quicker than navigating to the S3 service in the console, especially if you have many buckets. - Describing EC2 Instances:
To get detailed information about your running EC2 instances:
bash

aws ec2 describe-instances
This will output a large JSON object. To filter specific information (e.g., instance IDs and states):
bash

aws ec2 describe-instances --query "Reservations[*].Instances[*].{ID:InstanceId,State:State.Name}" --output table
This demonstrates the power of--query(using JMESPath) and--output tablefor efficient data extraction and readability. This kind of filtering directly contributes to “Productivity” by giving you precisely the information you need, fast. - Creating a New S3 Bucket:
To create a new bucket (remember bucket names must be globally unique):
bash

aws s3 mb s3://my-unique-new-bucket-name-12345
- Retrieving IAM User List:
To list all IAM users in your account:
bash

aws iam list-users
These simple examples highlight how the CLI enables rapid information retrieval and resource manipulation. For developers and system administrators, stringing these commands together in scripts is how they build automated deployment pipelines, perform bulk operations, and enforce configuration standards – core “Tech” tasks that drive efficiency.
Best Practices for Secure and Efficient AWS CLI Usage
While the AWS CLI provides immense power, it also comes with significant responsibilities, particularly regarding security. Adhering to best practices ensures both the integrity of your cloud environment and the efficiency of your operations.
Security Best Practices:
- Principle of Least Privilege: Always grant your IAM users or roles only the minimum permissions necessary to perform their required tasks. Never use root account credentials for CLI access. This fundamental “Digital Security” principle minimizes the blast radius in case of compromised credentials.
- Use IAM Roles Over Permanent Credentials: When working with EC2 instances, Lambda functions, or other AWS compute services, use IAM roles. Roles provide temporary credentials that are automatically rotated, eliminating the need to store static
Access Key IDandSecret Access Keyon your instances, significantly enhancing security. - Temporary Credentials with MFA: For human users, consider enabling Multi-Factor Authentication (MFA) on your IAM user. You can then use the
aws sts get-session-tokencommand to generate temporary credentials that require an MFA token, adding an extra layer of security. - Regular Key Rotation: Even for non-role-based IAM users, rotate your access keys regularly (e.g., every 90 days). This reduces the risk associated with long-lived credentials.
- Secure Storage of Credentials: If you must store static credentials, ensure they are in the default
.aws/credentialsfile and that this file has restrictive permissions (e.g.,chmod 600on Linux/macOS). Never hardcode credentials into scripts or commit them to version control, even private repositories. Use environment variables or configuration files.
Efficiency Best Practices:
- Utilize Profiles for Multiple Accounts/Roles: If you manage multiple AWS accounts or frequently switch between different IAM roles, configure named profiles in your
~/.aws/configfile. This allows you to easily switch contexts without re-entering credentials for each operation (e.g.,aws s3 ls --profile dev-account). This streamlines “Productivity” when managing complex cloud environments. - Keep Your CLI Updated: AWS regularly releases updates to the CLI with new features, bug fixes, and support for new services. Keep your CLI updated to leverage the latest capabilities:
- Windows: Re-run the MSI installer.
- macOS: Re-run the PKG installer.
- Linux: Re-run the install script (
sudo ./aws/install --update).
- Leverage
--queryand--output: As shown in the EC2 example, these flags are incredibly powerful for filtering and formatting output, making it easier to parse results manually or programmatically. - Use Auto-Completion: The AWS CLI v2 comes with built-in auto-completion. Setting this up for your shell (e.g.,
aws_completerfor Bash/Zsh) can dramatically speed up typing commands and reduce errors. - Explore
aws helpand Documentation: The--helpflag (e.g.,aws s3 helporaws help) provides extensive inline documentation for commands and subcommands. The official AWS CLI documentation is also an invaluable resource.
By integrating these best practices into your AWS CLI workflow, you’ll not only operate more efficiently but also build a more resilient and secure cloud infrastructure, aligning perfectly with the principles of robust “Tech” management and “Digital Security.”

Conclusion
The AWS Command Line Interface is far more than just another utility; it’s a transformative tool that empowers you to interact with your AWS cloud resources with unprecedented speed, precision, and automation. From simplifying routine tasks to orchestrating complex deployments, the AWS CLI is an indispensable asset for anyone serious about mastering cloud technology.
By following this comprehensive guide, you’ve successfully installed and configured the AWS CLI, laying the groundwork for a more efficient and controlled cloud management experience. You’ve learned how to set it up across various operating systems, verified its functionality, and secured it with proper credentials. Now, the real journey begins. Dive deeper into the vast array of commands, explore scripting possibilities, and witness firsthand how the AWS CLI can elevate your “Tech” prowess and enhance your overall “Productivity.” Your cloud is now truly at your fingertips – command by command.
aViewFromTheCave is a participant in the Amazon Services LLC Associates Program, an affiliate advertising program designed to provide a means for sites to earn advertising fees by advertising and linking to Amazon.com. Amazon, the Amazon logo, AmazonSupply, and the AmazonSupply logo are trademarks of Amazon.com, Inc. or its affiliates. As an Amazon Associate we earn affiliate commissions from qualifying purchases.