Starlink, SpaceX’s revolutionary satellite internet service, has transformed access to high-speed, low-latency broadband for millions, especially in remote and rural areas where traditional internet options are scarce or unreliable. While the setup process is designed to be user-friendly, optimizing performance often means finding the clearest view of the sky, and for many, that ideal spot is on the roof.
Installing Starlink on your roof can seem like a daunting task, but with the right preparation, tools, and a clear understanding of the steps involved, it’s a perfectly achievable DIY project. This guide will walk you through everything you need to know, from initial considerations and safety precautions to the step-by-step installation process and post-setup optimization. By tackling this installation yourself, you not only gain the satisfaction of a job well done but also save on professional installation costs, bringing reliable internet directly to your home or business sooner.
The Promise of Starlink: Unlocking High-Speed Internet Anywhere
Before diving into the nuts and bolts of installation, it’s worth understanding why Starlink has become such a game-changer. For years, residents in underserved areas have grappled with slow, expensive, or non-existent internet access, hindering everything from remote work and online education to entertainment and vital communication. Starlink addresses this critical gap by leveraging a vast constellation of low Earth orbit (LEO) satellites to deliver broadband speeds that often rival, or even exceed, those found in urban centers.
The “Dishy” (as the Starlink dish is affectionately known) automatically self-aligns to communicate with the satellites overhead. However, its performance is heavily dependent on an unobstructed view of the sky, particularly the northern sky in the Northern Hemisphere (and vice-versa in the Southern Hemisphere). This is precisely why roof installation is frequently the preferred, and often necessary, method for achieving optimal speeds and minimizing service interruptions caused by trees, buildings, or other ground-level obstructions. A roof-mounted dish ensures Dishy has the widest possible field of view, maximizing its ability to connect with multiple satellites as they traverse the sky, thereby guaranteeing a more consistent and robust connection.
Preparation is Key: Your Pre-Installation Checklist
A successful Starlink roof installation begins long before you even touch a tool. Thorough preparation is paramount, ensuring you have everything you need, understand the risks, and can execute the project safely and efficiently. Skipping this crucial phase can lead to frustrating delays, unexpected costs, or, more importantly, safety hazards.
Essential Tools and Materials
Having all your tools and materials organized beforehand will make the installation process much smoother. Here’s a comprehensive list:
- Your Starlink Kit: This includes the Starlink dish (Dishy), the router, the proprietary Starlink cable (long and robust), and the power supply.
- Starlink Mounting Kit: While Dishy comes with a basic ground mount, for roof installation, you’ll need a dedicated roof mount. Starlink offers various official options (e.g., Pipe Adapter Mount, Flashing Mount, Ridgeline Mount) designed for different roof types. Alternatively, third-party universal pipe adapter mounts are available. Ensure it’s compatible with your roof and Dishy.
- Safety Gear:
- Sturdy Ladder: Ensure it’s tall enough to safely access your roof and stable on uneven ground.
- Safety Harness and Rope: Highly recommended for pitched roofs to prevent falls.
- Non-Slip Footwear: Essential for traction on roof surfaces.
- Work Gloves: Protect your hands from splinters, sharp edges, and provide better grip.
- Safety Glasses: To protect your eyes from debris, especially when drilling.
- Drilling and Fastening Tools:
- Cordless Drill: With various drill bits suitable for wood, metal, or masonry, depending on your roof’s construction.
- Stud Finder: Crucial for locating rafters or joists to ensure secure mounting.
- Measuring Tape and Pencil/Marker: For accurate positioning and marking.
- Socket Wrench Set or Adjustable Wrench: For tightening mount bolts.
- Screwdrivers: Philips and flathead.
- Weatherproofing and Cable Management:
- Outdoor-Grade Sealant: High-quality silicone caulk or roofing tar/sealant to waterproof any holes drilled into your roof. This is absolutely critical to prevent leaks.
- Cable Clips/Ties: UV-resistant clips or ties to secure the Starlink cable along the roof, eaves, and exterior walls, preventing sagging and potential damage.
- Cable Entry Plate/Grommet (Optional but Recommended): For a neat and weatherproof entry point where the cable enters your home.
- Fish Tape (Optional): If you plan to run the cable through existing conduits or wall cavities.
- Miscellaneous:
- Level: To ensure your mount is perfectly plumb.
- Utility Knife: For cutting sealant tubes or trimming cable ties.
- Bucket/Tool Bag: To carry tools safely up and down the ladder.
Safety First: Prioritizing Your Well-being
Working on a roof inherently involves risks. Prioritizing safety is non-negotiable.
- Working at Heights:
- Ladder Safety: Always place your ladder on firm, level ground. Extend it at least three feet above the edge of the roof. Maintain three points of contact when ascending or descending. Have a spotter hold the ladder if possible.
- Fall Protection: For pitched roofs, a safety harness anchored to a secure point is strongly recommended. This significantly reduces the risk of a serious fall.
- Never Work Alone: Always have someone nearby who can assist or call for help if an accident occurs.
- Electrical Safety: While Dishy operates on low voltage, always exercise caution when working around existing electrical lines on your roof (e.g., power masts, solar panels). Never drill into or near live electrical wires.
- Weather Considerations:
- Dry Conditions: Only work on a dry roof. Wet or icy conditions make surfaces extremely slippery and dangerous.
- Wind: High winds can make working at heights precarious and even dislodge tools or the dish itself.
- Extreme Temperatures: Avoid working in scorching heat or freezing cold, which can lead to heatstroke or frostbite, affecting your concentration and dexterity.
- Roof Integrity: Be mindful of your steps on the roof to avoid damaging shingles or other roofing materials. Distribute your weight evenly.
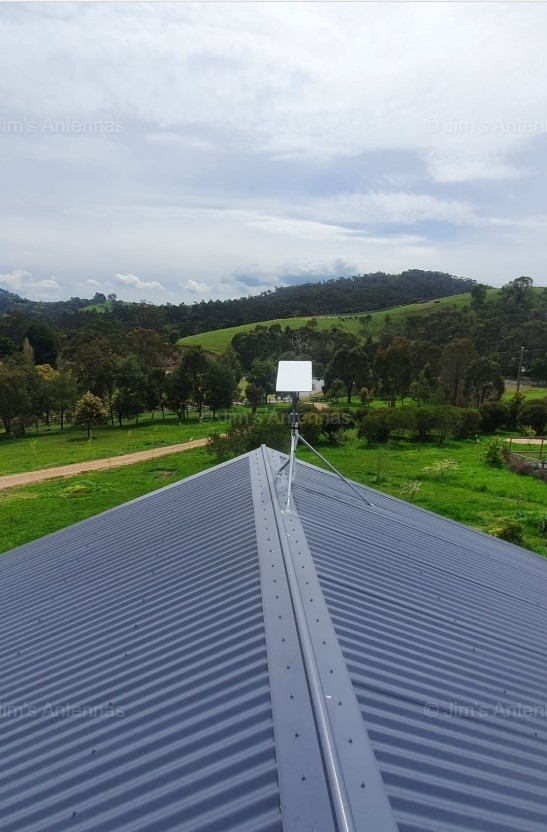
Strategic Placement: Finding the Optimal Spot for Dishy
The success of your Starlink installation hinges significantly on choosing the perfect location for Dishy. This isn’t just about convenience; it directly impacts your internet speed, reliability, and overall experience.
Line of Sight: The Golden Rule
The most critical factor for Starlink performance is an unobstructed view of the sky.
- Using the Starlink App’s Obstruction Checker: The Starlink app (available for iOS and Android) is your best friend here. It features an augmented reality (AR) tool that allows you to scan the sky from various potential mounting locations. It will show you a visual representation of Dishy’s required field of view and highlight any potential obstructions (trees, chimneys, other buildings). This tool is incredibly accurate and should be your first step.
- Identifying Potential Blockers: Even small obstructions can degrade performance. Pay close attention to:
- Tall Trees: Especially deciduous trees that might lose leaves in winter, revealing more obstructions.
- Chimneys and Vents: These are common roof features that can block Dishy’s view.
- Adjacent Buildings: Neighboring houses, barns, or garages.
- Roof Overhangs or Dormers: These can create blind spots.
- The Northern Sky (for most users): In the Northern Hemisphere, Starlink satellites generally pass from west to east, with a strong focus on the northern sky. Your dish will typically point somewhat north. The app’s obstruction checker will guide you precisely, but keep this general orientation in mind.
Roof Type and Accessibility
Beyond clear line of sight, consider the practicalities of mounting.
- Pitched vs. Flat Roofs:
- Pitched Roofs: Often offer the best line of sight. Ridgeline mounts (which attach to the peak) or flashing mounts (which slide under shingles) are common. Installation requires more caution due to the slope.
- Flat Roofs: Easier to walk on, but obstructions on the roof itself (HVAC units, parapet walls) might be an issue. Non-penetrating flat roof mounts (often using ballast like concrete blocks) are an option, or mast mounts.
- Easy Access for Installation and Future Maintenance: Choose a spot that you can safely reach with your ladder. You may need to access Dishy in the future for cleaning, troubleshooting, or mount inspection. Avoid overly steep or precarious locations.
- Proximity to Power and Router Location Inside: The Starlink cable is quite long (typically 75-150 feet/23-46 meters), but planning the cable run efficiently can simplify installation and reduce the need for excessive drilling or unsightly external cable routes. Ideally, the mounting location should allow for a direct or easily managed cable path to where your Starlink router will be placed inside your home, near an electrical outlet.
Structural Integrity and Aesthetics
A secure mount is essential for long-term reliability.
- Ensuring the Roof Can Support the Mount and Dish: Always aim to mount directly into structural elements like rafters or joists. A stud finder is invaluable here. Avoid mounting solely into plywood sheathing or thin roof decking, as this will not provide sufficient long-term stability against wind and weather.
- Minimizing Visual Impact: While functionality is key, consider how the dish will look. Can it be placed in a less conspicuous spot without compromising performance? Starlink dishes are relatively small and aesthetically pleasing, but thoughtful placement can integrate it more harmoniously with your home’s exterior.
Step-by-Step: The Roof Installation Process
With your preparations complete and the ideal spot identified, it’s time to get hands-on. Follow these steps carefully to ensure a secure and functional installation.
Unboxing and Initial Setup
Before you ascend to the roof, take a moment to familiarize yourself with your Starlink kit.
- Familiarizing Yourself with Components: Unpack everything and lay it out. Identify Dishy, the pole, the base, the cable, the router, and the power supply.
- Assembling Dishy on the Ground (If Needed): Some Starlink mounts require assembling the dish to a specific adapter or pole on the ground before taking it up. Follow the instructions for your specific mount.
- Performing a Ground Test (Optional but Recommended): Before permanent installation, you can connect Dishy and the router on the ground in a clear area to ensure everything powers up and establishes an initial connection. This verifies that your equipment is functional before you commit to roof work. Simply plug it in, wait for it to self-align, and check the app.
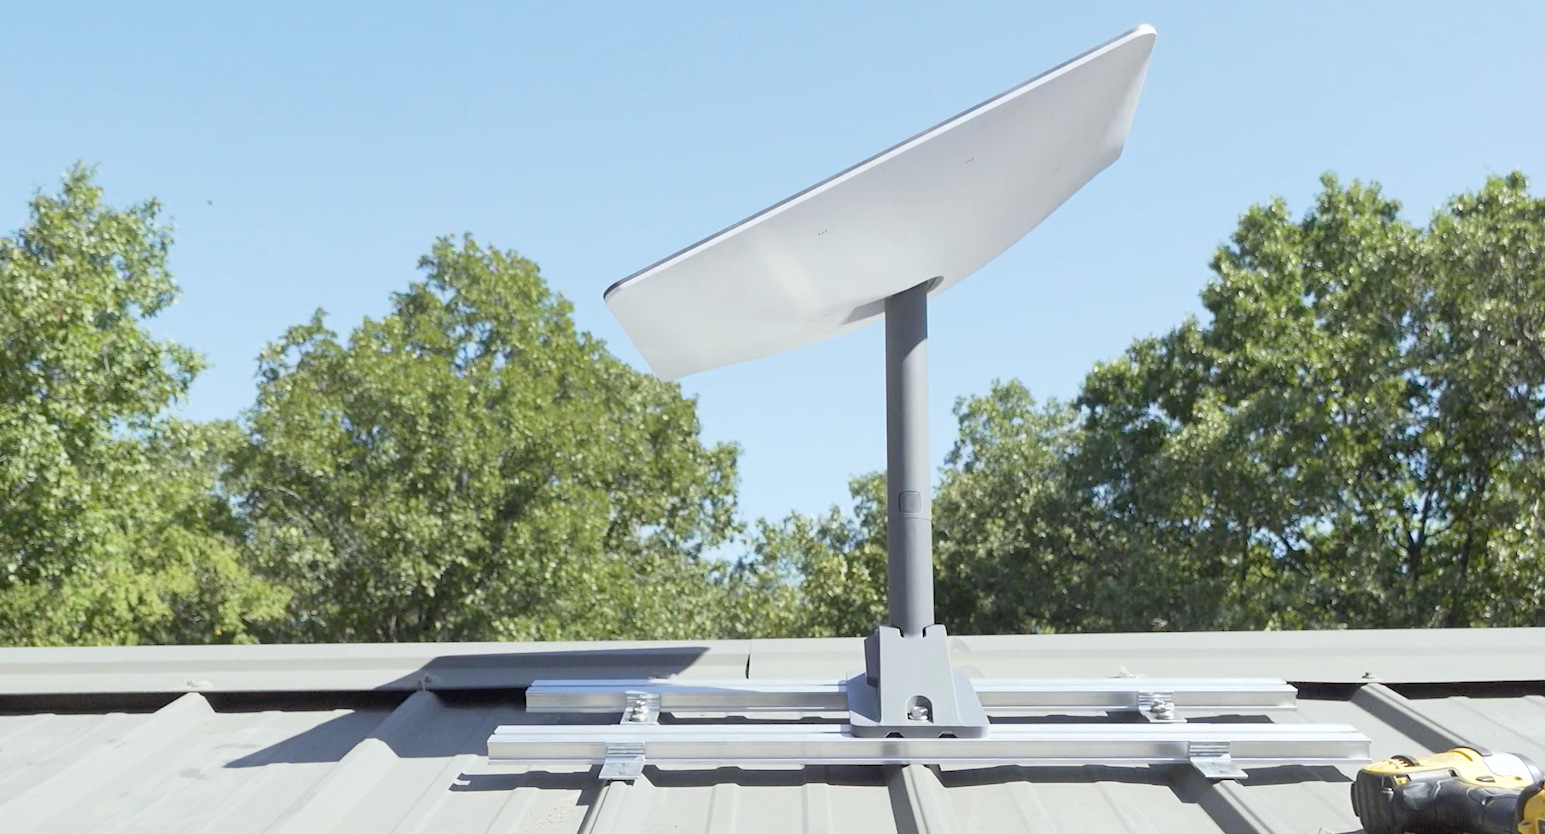
Securing the Mount
This is the most critical structural part of the installation.
- Positioning the Mount Based on Your Chosen Spot: Carefully place the mount in the precise location you identified using the Starlink app. Use your level to ensure it’s plumb and true.
- Marking Drill Points: Once positioned, use a pencil or marker to precisely mark the locations where you’ll drill holes for the mount’s fasteners. Double-check these marks.
- Drilling Pilot Holes Carefully: Using your drill and the appropriate bit, create pilot holes. Ensure these holes are correctly sized for your fasteners – large enough to allow the screw or bolt to pass through easily but small enough for the threads to bite firmly. Drill straight down to avoid damaging structural elements unnecessarily.
- Applying Sealant Generously Around Holes: Before attaching the mount, apply a generous bead of high-quality, outdoor-grade silicone caulk or roofing sealant around each pilot hole. This is your primary defense against water intrusion and is absolutely crucial. Also, apply sealant to the underside of the mount where it will contact the roof.
- Fastening the Mount Securely to Rafters or Joists: Using your socket wrench or drill (with a driver bit), securely fasten the mount. Ensure the fasteners penetrate into the rafters or joists beneath the roof decking. Tighten them firmly, but avoid over-tightening, which can strip wood or crack plastic. The mount should feel rock-solid with no wobble. Once fastened, apply more sealant over the heads of the fasteners and around the edges of the mount base for extra weatherproofing.
Attaching Dishy and Running the Cable
With the mount secure, the dish can now be placed, and the cable routed.
- Carefully Attaching the Starlink Dish to the Mount: Following your mount’s specific instructions, carefully insert Dishy’s pole into the mount. Ensure it clicks or locks into place securely. Dishy should be upright and stable.
- Routing the Cable Down the Roof Edge, Avoiding Pinch Points: Begin routing the long Starlink cable from Dishy. Guide it along a natural path, ideally following roof lines or the underside of eaves. Avoid running the cable across open roof areas where it could be a tripping hazard or exposed to excessive UV degradation. Most importantly, ensure the cable is never pinched by shingles, trim, or any moving parts.
- Using Cable Clips for Neat and Secure Management: Every few feet, use UV-resistant cable clips to secure the cable to the roof edge, fascia board, or exterior wall. This prevents the cable from sagging, flapping in the wind, and becoming a hazard or getting damaged. Maintain a slight drip loop before any entry point to prevent water from running directly into the penetration.
- Drilling an Entry Point into the House (If Necessary, with Proper Sealing):
- Identify an Entry Point: The best entry points are often through the soffit, a utility closet, or an attic space. Avoid drilling directly through living space walls if possible.
- Drill Safely: From inside, use a long, small drill bit to create a pilot hole to verify the interior and exterior locations align safely. Then, from the outside, use a larger bit (just big enough for the Starlink connector to pass through, typically 3/4″ to 1″) to drill the main entry hole.
- Weatherproof: Apply generous amounts of sealant around the cable as it passes through the hole, both inside and outside. A cable entry plate or grommet can provide a professional, watertight finish.
- Considering Existing Conduits or Soffit Entry: If you have existing electrical conduits or accessible soffit vents, these can be excellent, less invasive ways to route the cable into your home.
Indoor Connections and Power-Up
The final steps involve connecting the system inside and getting online.
- Connecting the Starlink Cable to the Router: Locate the proprietary port on the Starlink router (often labeled with a small dish icon) and firmly insert the cable.
- Plugging in the Router and Power Supply: Connect the power supply to the router and then plug it into a standard electrical outlet. The router will begin its startup sequence.
- Downloading the Starlink App and Following Prompts for Network Setup: Download the Starlink app if you haven’t already. Connect your smartphone or tablet to the temporary Wi-Fi network broadcast by the Starlink router (details typically on the router itself). The app will guide you through naming your network, setting a password, and checking the system’s status. Dishy will begin its final self-alignment once powered, which can take several minutes.
Post-Installation: Activation, Optimization, and Maintenance
Your Starlink dish is mounted, powered, and connected. Now it’s time to ensure everything is running smoothly and to keep it that way.
Activating Your Service and Testing Performance
- Using the Starlink App for Final Setup and Status Checks: The app is your command center. It will show you Dishy’s status (online, searching, obstructed), connection quality, and even allow you to reboot the system. Ensure it shows an “Online” status.
- Running Speed Tests to Verify Performance: Once online, use the app’s built-in speed test or a third-party service like Speedtest.net to confirm you’re getting the expected speeds. Remember that initial speeds can vary as the system optimizes.
- Checking for Firmware Updates: The Starlink system automatically downloads and installs firmware updates. Ensure your system is up-to-date, as updates often include performance enhancements and bug fixes.
Tips for Optimal Performance
Even with a perfect installation, a few tweaks can maximize your Starlink experience.
- Router Placement Indoors: Place the Starlink router in a central location within your home, away from obstructions like thick walls or large appliances. Higher locations often provide better Wi-Fi signal distribution.
- Mesh Networks for Larger Homes: For larger homes or those with multiple floors, consider extending your Wi-Fi coverage with a mesh Wi-Fi system. Starlink offers its own Mesh Wi-Fi Routers, or you can use compatible third-party systems.
- Monitoring Obstruction Levels Periodically: The environment around your home can change. Trees grow, new structures might appear. Periodically check the “Obstructions” section in your Starlink app to ensure your line of sight remains clear.

Ongoing Maintenance and Troubleshooting
Starlink is largely maintenance-free, but occasional checks can prolong its life and ensure consistent performance.
- Periodically Checking Mount for Security: After high winds or severe weather, visually inspect your roof mount from the ground (or safely from the roof if necessary) to ensure it remains secure and has not shifted.
- Inspecting Cable for Wear or Damage: Look for any signs of fraying, cracking, or damage to the Starlink cable, especially where it’s exposed to the elements or where it enters your home. Repair or replace as needed.
- Common Issues and Basic Fixes:
- “Offline” or “Searching”: Most often due to a power issue, a disconnected cable, or a severe obstruction. Check all connections, ensure power is on, and re-run the obstruction checker in the app.
- “Obstructed”: The app will pinpoint where the obstruction is. This might require relocating the dish, trimming a tree, or even raising the dish higher with an extension pole (if safe and compatible with your mount).
- Slow Speeds: Could be network congestion (rare but possible), an obstruction not yet flagged by the app, or Wi-Fi interference inside your home. Try rebooting the router and dish (via the app) and re-testing speeds.
Congratulations! You’ve successfully installed Starlink on your roof, granting yourself or your household access to cutting-edge satellite internet. By taking the DIY route, you’ve not only saved significant costs associated with professional installers but also gained an intimate understanding of your system, empowering you to troubleshoot and maintain it effectively. Enjoy the newfound freedom and connectivity that Starlink brings to your remote work, digital learning, entertainment, and communication needs.
aViewFromTheCave is a participant in the Amazon Services LLC Associates Program, an affiliate advertising program designed to provide a means for sites to earn advertising fees by advertising and linking to Amazon.com. Amazon, the Amazon logo, AmazonSupply, and the AmazonSupply logo are trademarks of Amazon.com, Inc. or its affiliates. As an Amazon Associate we earn affiliate commissions from qualifying purchases.