In an increasingly connected world, the safety and security of our homes have become paramount. While traditional security systems often come with complex installations, lengthy contracts, and hefty professional fees, the landscape of home protection has been revolutionized by innovative DIY solutions. Among these, SimpliSafe stands out as a leading contender, empowering homeowners to take charge of their digital and physical security with user-friendly technology. This comprehensive guide will walk you through the process of installing your SimpliSafe system, transforming your residence into a fortress of smart security and peace of mind.
SimpliSafe embodies a significant trend in digital security: accessible, self-managed protection that integrates seamlessly into the modern smart home ecosystem. From its intuitive design to its robust monitoring capabilities, SimpliSafe offers a compelling blend of technology, affordability, and user empowerment, aligning perfectly with the evolving demands of tech-savvy consumers seeking reliable gadgets and effective digital security solutions.
Why Choose SimpliSafe for Your Home Security?
Before diving into the installation specifics, it’s worth understanding what makes SimpliSafe a preferred choice for many homeowners. Its rise to prominence is not accidental; it’s a testament to a brand strategy focused on demystifying home security and making it accessible to a wider audience.
The SimpliSafe Advantage: Flexibility and Affordability
One of the primary drivers behind SimpliSafe’s popularity is its no-contract, DIY model. In an era where “Money” topics like personal finance and online income are critical, the cost-effectiveness of SimpliSafe is a major draw. Traditional security companies often lock customers into multi-year agreements, complete with installation fees and escalating monthly monitoring costs. SimpliSafe disrupts this by allowing users to purchase their equipment upfront and choose monitoring plans that fit their budget, or even opt for self-monitoring without any recurring fees. This financial flexibility makes premium home security achievable for a broader demographic, positioning it as a smart investment for those looking to manage their personal finance effectively without compromising on safety. The ability to install the system yourself eliminates professional installation costs, further enhancing its appeal as a wise financial decision. This model empowers users, allowing them to scale their security needs as their financial situation or home requirements evolve, aligning perfectly with principles of prudent financial management.
Smart Security Features and Ecosystem Integration
SimpliSafe is far more than just a collection of sensors; it’s a sophisticated “Tech” gadget ecosystem designed for modern living. Its core components leverage advanced technology to provide comprehensive protection. Motion sensors utilize passive infrared (PIR) technology to detect human heat signatures while minimizing false alarms from pets. Entry sensors use magnetic contact to alert you to open doors or windows. Beyond these basics, SimpliSafe integrates a range of advanced features including glass break sensors, smoke detectors, carbon monoxide detectors, and even water leak sensors, offering an all-encompassing safety net.
The system is controlled via a sleek keypad and managed through a powerful mobile app – a prime example of “Apps” in action. This app provides real-time alerts, remote arming/disarming, and access to live camera feeds, putting control literally at your fingertips. SimpliSafe also embraces smart home integration, allowing it to communicate with other popular platforms like Amazon Alexa and Google Assistant. This means you can use voice commands to arm your system or integrate it into broader smart home routines, enhancing productivity and convenience. For tech enthusiasts and those seeking robust “Digital Security,” SimpliSafe’s blend of hardware innovation, software intelligence, and ecosystem compatibility makes it a compelling choice. The ongoing development of new gadgets and “AI Tools” within its framework ensures it remains at the forefront of home protection technology.
Understanding the SimpliSafe Brand Promise
The “Brand” of SimpliSafe is built on simplicity, reliability, and empowerment. Their marketing and corporate identity consistently communicate a message of accessible security for everyone. They focus on ease of use, making complex technology approachable for the average consumer. This commitment to user experience is evident in every aspect, from the packaging to the intuitive app interface. By emphasizing DIY installation, SimpliSafe builds trust and demonstrates a belief in the customer’s ability to manage their own security effectively. This strong brand reputation, nurtured through transparent communication and a focus on customer success, contributes significantly to its market leadership in the DIY security space. Their “Brand Strategy” has successfully positioned them as a trustworthy partner in home protection, rather than just a product vendor.
Pre-Installation Checklist: Getting Ready for a Smooth Setup
A successful SimpliSafe installation begins long before you peel the first adhesive strip. Proper preparation is key to ensuring a seamless setup and optimal system performance. This stage is about strategically planning your defense.
Unboxing and Inventory: What’s in Your Kit?
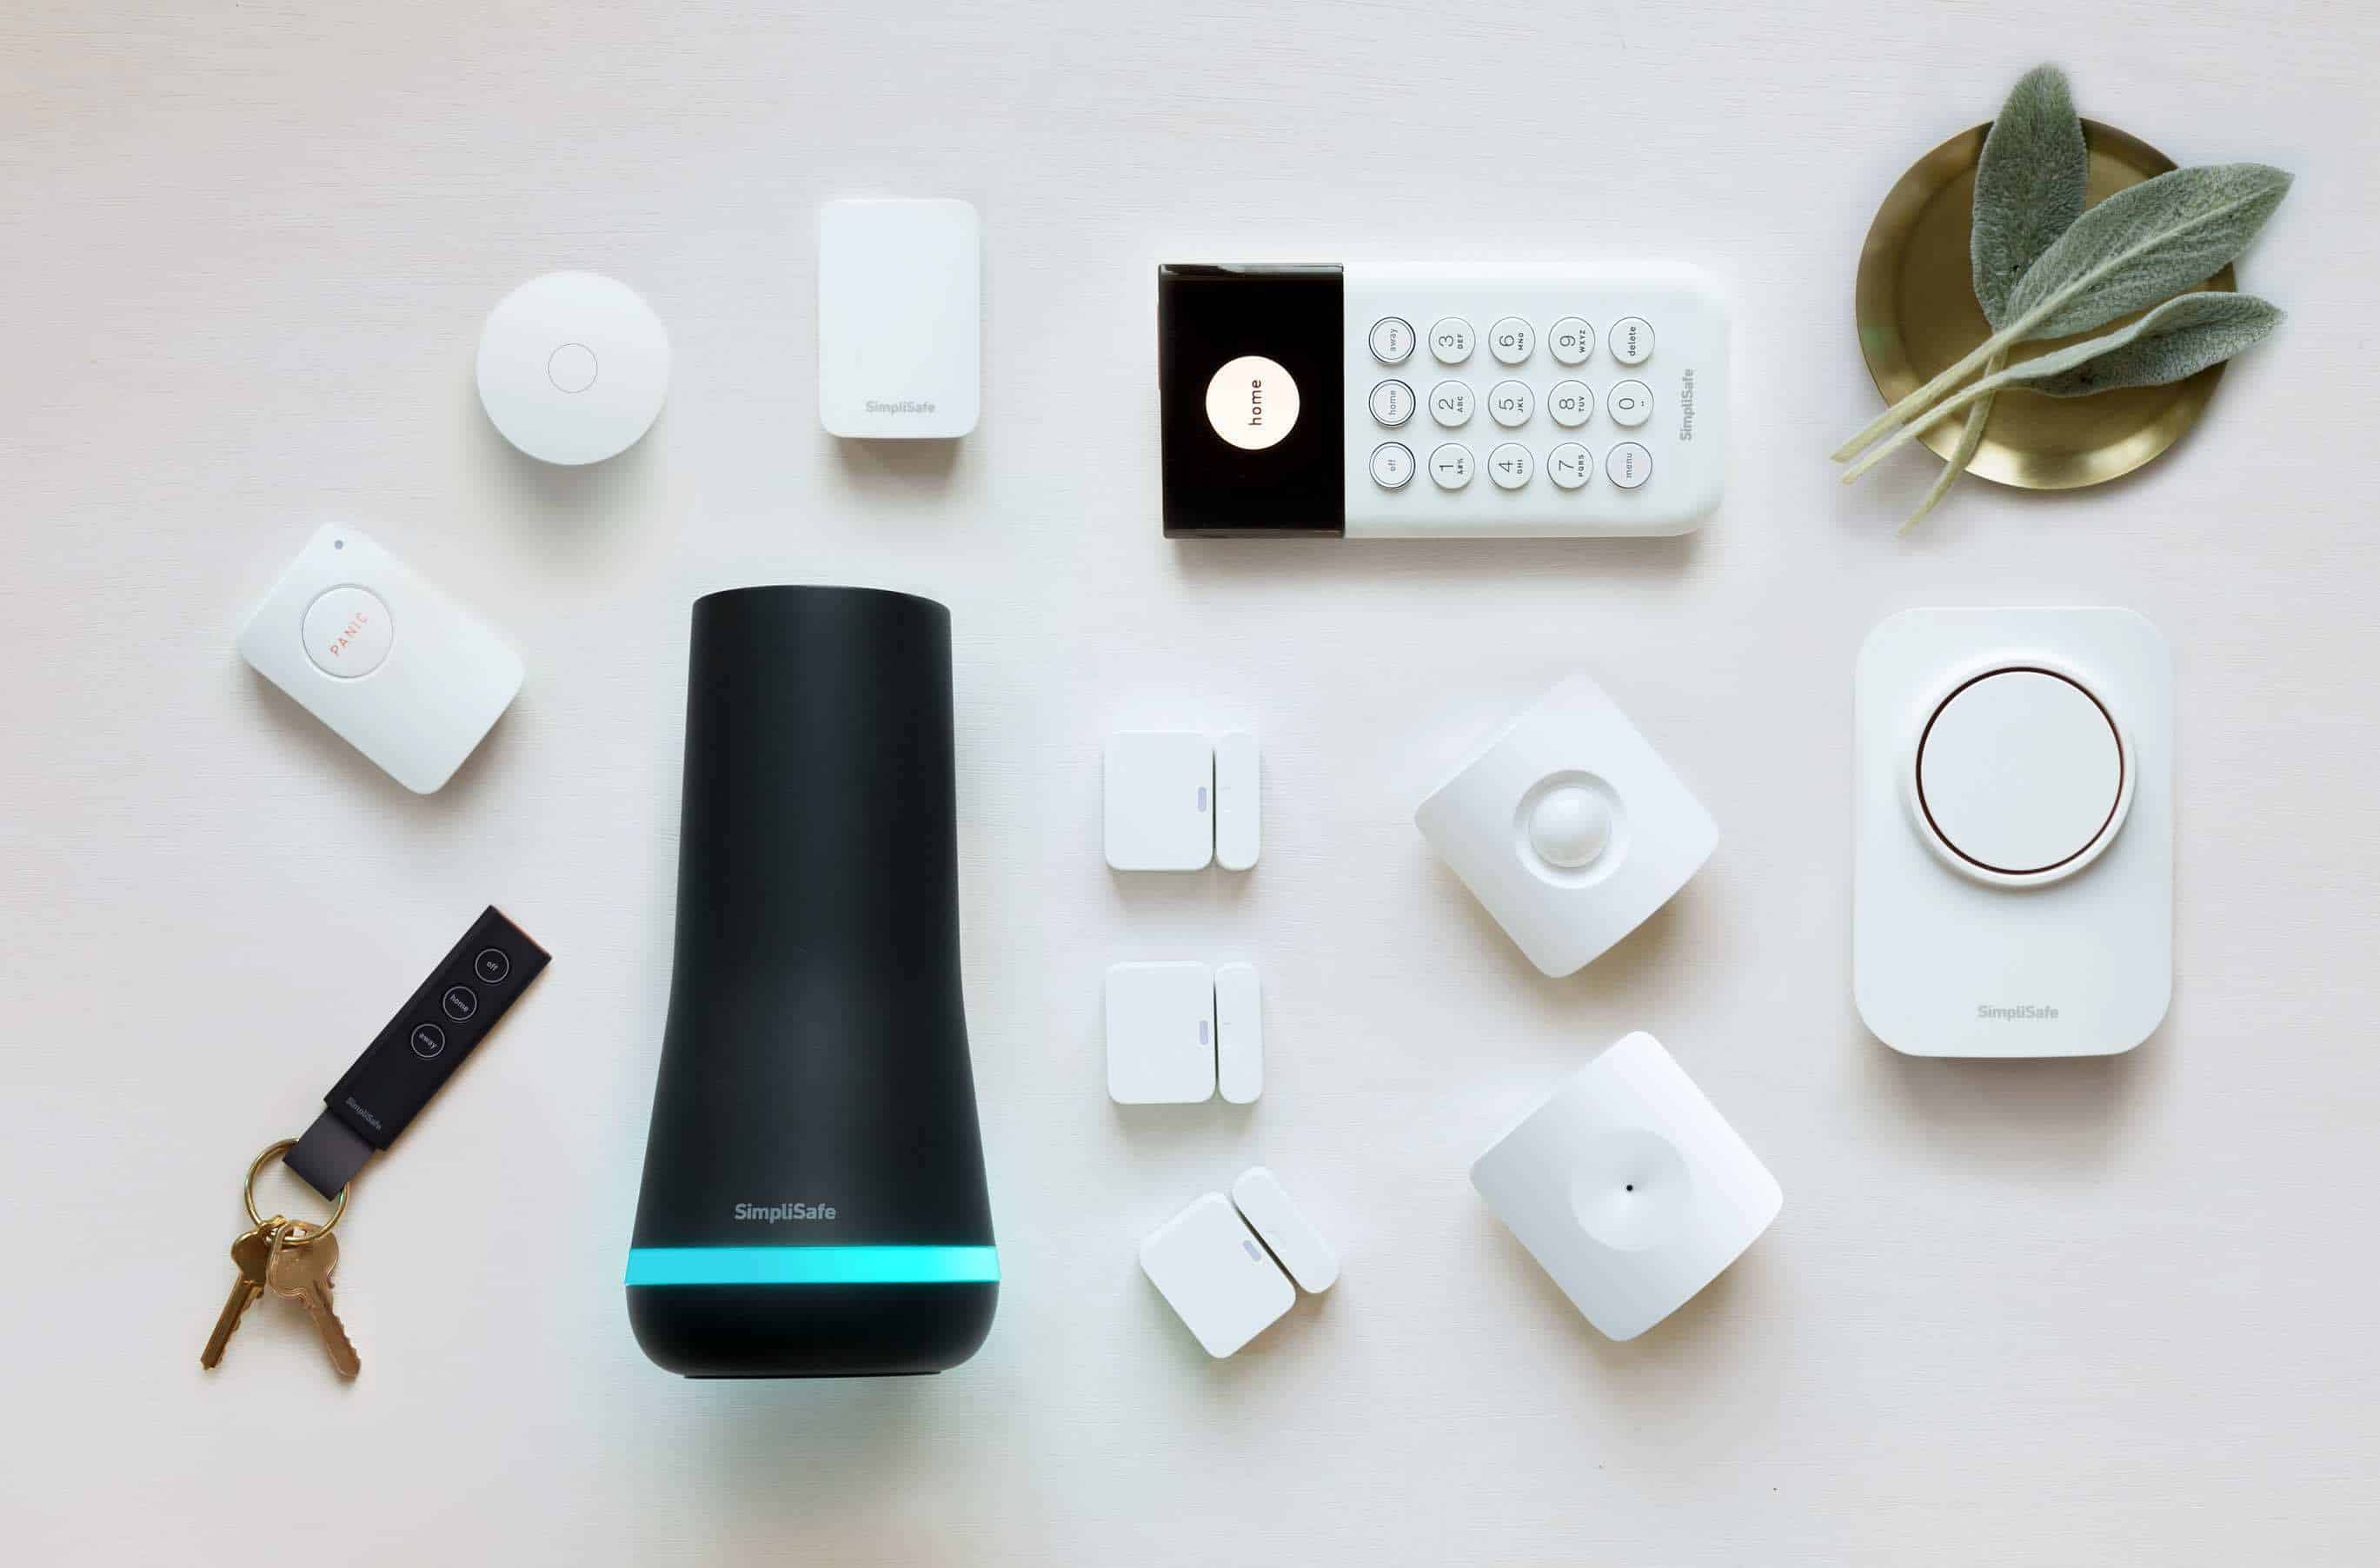
Upon receiving your SimpliSafe package, the first step is to carefully unbox everything and conduct a thorough inventory check against the packing slip. Your kit will typically include:
- Base Station: The brain of your system, housing the siren and cellular module.
- Keypad: Your primary interface for arming/disarming and system control.
- Entry Sensors: For doors and windows.
- Motion Sensors: To detect movement in rooms.
- Keyfob: A convenient remote for arming/disarming.
- Panic Button (Optional): For immediate alerts.
- SimpliCam/Outdoor Camera/Doorbell Pro (Optional): For visual monitoring.
- Environmental Sensors (Optional): Smoke, CO, Water.
- User Manuals and Installation Guides: Essential reading.
Take a moment to familiarize yourself with each component. Understanding what each gadget does will greatly aid in strategic placement. Ensure all components are present and undamaged. This initial “Tech” review prevents delays later in the process.
Strategic Placement: Mapping Your Home’s Vulnerabilities
This is perhaps the most critical planning stage. Before you even think about mounting, walk through your home with an analytical eye, identifying potential entry points and high-traffic areas. Consider:
- Entry Sensors: Every exterior door and accessible window on the ground floor, and any easily accessible windows on upper floors.
- Motion Sensors: Place them in corners of rooms with clear sightlines to entry points and high-value items. Avoid placing them directly facing windows, heat sources, or in areas where pets frequently roam to prevent false alarms. They work best in a strategic cross-path.
- Base Station: Centrally located in your home, away from direct sunlight, major appliances, and large metal objects that might interfere with its signal. It needs to be near an electrical outlet and have good cellular reception for monitoring.
- Keypad: Near the main entry/exit door for convenient arming/disarming.
- Cameras: Positioned to cover entry points, high-traffic areas, or valuable zones. Consider angles that capture faces clearly.
- Environmental Sensors: Smoke/CO detectors should be on every level, especially near bedrooms. Water sensors go in basements, bathrooms, or near water heaters.
Sketching a simple floor plan and marking ideal sensor locations can be incredibly helpful. This strategic thinking aligns with “Digital Security” best practices, ensuring comprehensive coverage and minimizing blind spots.
Essential Tools and Preparations
While SimpliSafe is largely tool-free, having a few items handy can make the process smoother:
- Small Phillips-head screwdriver: For battery compartments or if you choose screw-mounting over adhesive.
- Pencil: To mark sensor placement.
- Cleaning wipes/rubbing alcohol: To clean surfaces before applying adhesive mounts. This ensures maximum adhesion and prevents sensors from falling off.
- Step stool/ladder: For high windows or ceiling-mounted components.
- Your smartphone: Essential for the SimpliSafe app.
- Your Wi-Fi network name and password: For base station setup.
Ensuring you have these basic preparations in place will prevent interruptions during the installation process, making it a streamlined and productive endeavor.
Step-by-Step SimpliSafe Installation Guide
Now that you’re prepared, let’s dive into the core process of bringing your SimpliSafe system to life. Each component plays a vital role in your home’s digital security, and installing them correctly ensures optimal performance.
Activating Your Base Station and Keypad: The System’s Core
The Base Station is the central hub of your SimpliSafe system, communicating with all sensors and the monitoring center. The Keypad is your primary interface.
- Power Up the Base Station: Plug the Base Station into a wall outlet, preferably one that isn’t controlled by a light switch. It will announce “Welcome to SimpliSafe.”
- Insert Battery in Keypad: Open the back of the Keypad and insert the four AA batteries provided. Close the cover.
- Find a Home for the Keypad: Mount the Keypad near your most frequently used entry/exit door. You can use the adhesive strips or screws provided.
- Connect to Wi-Fi: The Keypad will guide you through connecting your Base Station to your home Wi-Fi network. This is crucial for app control, camera streaming, and software updates. Enter your Wi-Fi name and password carefully.
- Create Your Account (or Log In): Follow the prompts on the Keypad to create a new SimpliSafe account or log into an existing one. This links your system to your personal profile and monitoring service (if subscribed). The SimpliSafe app will also guide you through this, making it simple to manage your new “Gadgets” and “Apps.”
Deploying Entry Sensors: Securing Doors and Windows
Entry Sensors consist of two parts: a main sensor and a magnet. When the door or window opens, the connection between them breaks, triggering an alarm.
- Clean the Surface: Use an alcohol wipe to clean the surface where you plan to attach the sensor on both the door/window frame and the door/window itself. Allow it to dry completely.
- Attach the Main Sensor: Adhere the larger sensor component to the door or window frame.
- Attach the Magnet: Adhere the smaller magnet component to the moving part of the door or window, aligning it with the main sensor. The gap between them should be no more than 2 inches, ideally less than 1 inch. Ensure they are aligned with the small grooves/lines on each component facing each other.
- Test: Open and close the door/window a few times. The Keypad or app should indicate that the sensor is open or closed, confirming it’s working.
- Name the Sensor: Use the Keypad or app to assign a name to each sensor (e.g., “Front Door,” “Kitchen Window”). This is vital for quickly identifying alarm sources.
Installing Motion Sensors: Guarding Open Spaces
Motion sensors detect movement in areas where an intruder might walk.
- Placement: Mount motion sensors in a corner of a room, about 7-8 feet high. Angle them to cover the intended area, avoiding direct lines of sight to windows, heat vents, or pet activity zones. SimpliSafe motion sensors are generally pet-immune for animals up to 50 lbs if mounted correctly.
- Mounting: Use the adhesive strips or screws to attach the sensor.
- Test: Walk through the sensor’s detection zone while the system is in “Test Mode.” The Keypad should confirm motion detection.
- Name: Assign a descriptive name to the sensor (e.g., “Living Room Motion,” “Hallway Motion”).

Setting Up Environmental Sensors (Optional but Important): Smoke, CO, Water
These sensors provide crucial protection against non-intrusion threats.
- Smoke/CO Detectors: Mount on ceilings or high on walls, following local fire codes and manufacturer instructions (typically on every level and outside sleeping areas).
- Water Sensors: Place directly on the floor in areas prone to leaks, such as basements, under sinks, or near water heaters.
- Testing & Naming: Activate and test them according to the SimpliSafe app’s instructions and name them clearly. These sensors are paramount for comprehensive “Digital Security.”
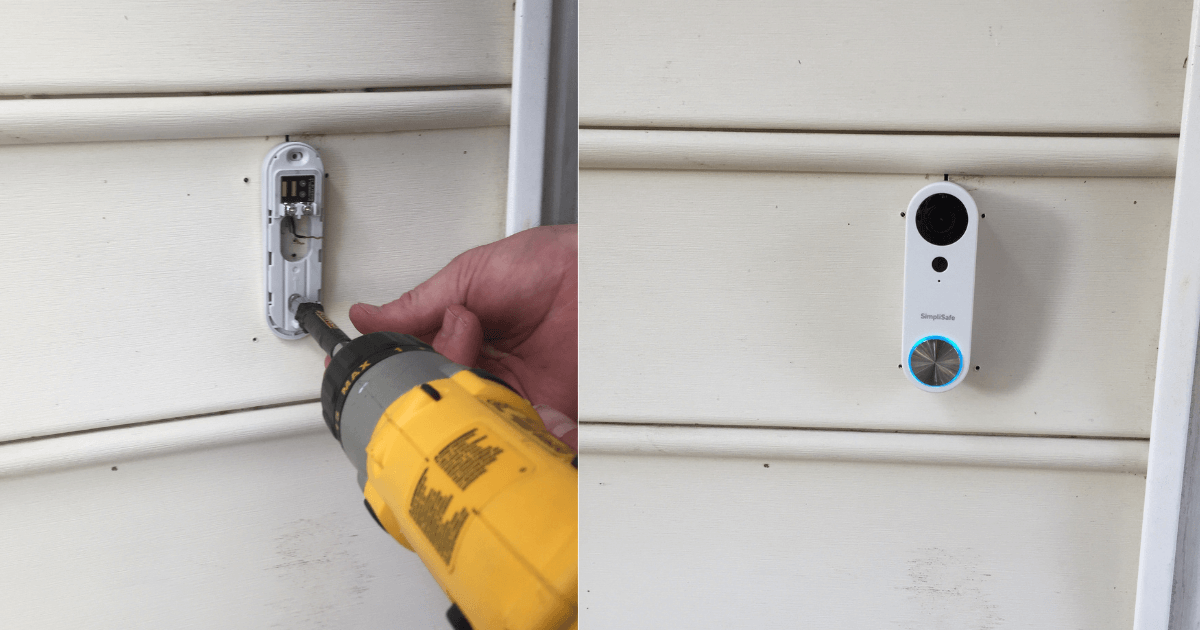
Integrating Cameras (SimpliCam, Outdoor Camera, Doorbell Pro)
SimpliSafe cameras provide visual verification and live streaming, enhancing your system’s capabilities.
- Power Up: Plug in your SimpliCam or Outdoor Camera, or ensure your Doorbell Pro is wired correctly.
- Pairing: Open the SimpliSafe app. Navigate to the camera section and follow the on-screen prompts to pair your camera(s) with your Base Station. This usually involves scanning a QR code or pressing a button on the camera.
- Placement: Position cameras for optimal viewing angles, covering entrances or vulnerable areas. Outdoor cameras are designed to withstand elements, while indoor cameras offer discreet monitoring.
- Settings: Customize motion detection zones, sensitivity, and recording preferences within the app. Leverage the “AI Tools” features like smart person detection for advanced monitoring.
Adding KeyFobs and Sirens: Enhanced Control and Deterrence
- KeyFobs: Simply pull the plastic tab from the battery compartment. The Keyfob will automatically link to your system. You can then name it via the Keypad or app.
- Extra Siren: Mount the wireless siren in a central or less accessible location, such as a hallway or second floor, to maximize its deterrent effect. Pair it through the Keypad’s menu.
Testing Your SimpliSafe System: Ensuring Robust Protection
Once all components are installed, a thorough system test is critical to confirm everything is functioning correctly and providing the “Digital Security” you expect.
Running a Comprehensive System Test
- Activate Test Mode: On your Keypad, go to Menu > Test Mode. This mode allows you to trigger sensors without alerting the monitoring center (if you have a plan). The Base Station will announce “Test Mode On.”
- Test Each Sensor: Individually trigger every sensor you’ve installed:
- Open and close each door and window with an Entry Sensor.
- Walk in front of each Motion Sensor.
- Press the test button on your Smoke, CO, or Panic Button.
- Carefully pour a small amount of water on your Water Sensors.
- For cameras, ensure live view is accessible and motion detection triggers within the app.
- Verify Feedback: As you trigger each sensor, the Base Station will announce which sensor has been activated, and the Keypad will display its status. The SimpliSafe app will also update in real-time. This feedback loop is essential for confirming proper communication.
- Check Signal Strength: Within the app or Keypad settings, you can often check the signal strength for each component, ensuring reliable connectivity.
- Exit Test Mode: Once you’ve tested every component, remember to exit Test Mode via the Keypad menu.
Understanding Monitoring Options and Emergency Protocols
If you’ve opted for professional monitoring, it’s crucial to understand how it works.
- Monitoring Plans: SimpliSafe offers various monitoring plans, from basic cellular backup to comprehensive plans with video verification and unlimited recording. Understand the differences and choose one that aligns with your security needs and “Money” budget.
- Duress PIN: Set up a Duress PIN (a unique code different from your master PIN) that, when entered on the Keypad, silently signals the monitoring center that you’re under duress and need immediate police assistance. This is a critical “Digital Security” feature.
- Emergency Contacts: Ensure your emergency contact list is up-to-date with the monitoring center. They will call these contacts if an alarm is triggered and they cannot reach you.
- False Alarm Prevention: Familiarize yourself with how to quickly disarm your system to prevent false alarms, which can incur fines from local authorities.
Utilizing the SimpliSafe App for Daily Management and Monitoring
The SimpliSafe mobile “App” is your command center for daily security management.
- Remote Control: Arm and disarm your system from anywhere.
- Real-time Alerts: Receive instant notifications for alarms, sensor events, and system status changes.
- Live View & Recording: Access live camera feeds, review recorded footage, and manage your camera settings.
- System Status: Check battery levels, sensor status, and connection health.
- Customization: Adjust entry/exit delays, modify sensor settings, and manage monitoring preferences.
Regularly interacting with the app will help you stay on top of your home’s security, turning your smartphone into a powerful “Gadget” for peace of mind.
Post-Installation Tips and Maximizing Your Security
Installing your SimpliSafe system is a significant step, but continuous attention to its performance and capabilities will ensure long-term, robust “Digital Security.”
Customizing Settings and Alerts for Personalized Protection
Your SimpliSafe system is highly customizable. Take advantage of this to tailor its operation to your specific lifestyle.
- Entry/Exit Delays: Adjust the time you have to enter and exit before the alarm arms/disarms. Shorter delays improve security; longer delays offer convenience.
- Alarm Settings: Decide which sensors trigger an instant alarm versus those that have a delay. For example, a basement window might trigger instantly, while a main door has a delay.
- Alert Preferences: Configure push notifications, email alerts, and SMS messages for specific events. You might want an alert every time a specific door opens, even when disarmed. This fine-tuning enhances your “Productivity” by giving you relevant information without overwhelming you.
- Secret Alerts: For specific sensors (like a liquor cabinet or safe), you can set up “secret alerts” that notify you without triggering the main alarm, offering discreet monitoring.
Integrating with Other Smart Home Platforms
SimpliSafe seamlessly integrates with major smart home platforms, expanding its functionality and convenience.
- Amazon Alexa & Google Assistant: Link your SimpliSafe account to your voice assistant apps. You can then use voice commands to arm your system (e.g., “Alexa, arm SimpliSafe home”).
- IFTTT (If This Then That): For advanced users, IFTTT allows you to create custom automations between SimpliSafe and hundreds of other smart devices and “Apps.” For example, “If SimpliSafe is armed away, then turn off all smart lights.” This connectivity transforms your individual “Gadgets” into a cohesive, intelligent network, aligning with advanced “Technology Trends” in home automation.
Regular Maintenance and Troubleshooting
Like any “Tech” gadget, your SimpliSafe system benefits from routine checks.
- Battery Checks: The app will alert you to low battery levels, but periodically checking sensor batteries (typically every 3-5 years) is good practice. Keep spare batteries on hand.
- Connectivity: Ensure your Base Station maintains a strong Wi-Fi and cellular connection. If you experience issues, try moving the Base Station or checking your router.
- Software Updates: SimpliSafe frequently releases firmware updates for its components, often delivered wirelessly via the Base Station’s Wi-Fi connection. Ensure your system is always up-to-date to benefit from new features and enhanced “Digital Security.”
- Sensor Cleaning: Keep sensors clean and free from dust or obstructions, especially motion and camera lenses, to ensure optimal performance.
Keeping Your Digital Security Up-to-Date
The landscape of “Digital Security” is constantly evolving. Staying informed and proactive is key.
- Password Management: Use strong, unique passwords for your SimpliSafe account and enable two-factor authentication if available. Regularly review your login credentials.
- Privacy Settings: Understand and manage the privacy settings for your cameras and other data within the SimpliSafe app.
- Awareness: Stay informed about general cybersecurity best practices to protect your entire digital footprint, as your smart home security is part of a larger interconnected network.
By following these post-installation tips, you’ll not only maintain an effective home security system but also fully leverage the smart capabilities and “Technology Trends” SimpliSafe offers, ensuring lasting peace of mind.
Conclusion
Installing your SimpliSafe system is an empowering step towards taking control of your home’s “Digital Security.” This comprehensive guide, from understanding the brand’s value proposition to the final testing and customization, demonstrates that robust home protection doesn’t require professional installers or daunting technical expertise. SimpliSafe’s commitment to user-friendly “Tech,” combined with its flexible “Money” options and strong “Brand” reputation for reliability, makes it an ideal solution for modern homeowners.
By following these steps, you’ve not only set up a sophisticated network of “Gadgets” designed to safeguard your property but also embraced a proactive approach to your personal safety. With SimpliSafe, you gain not just an alarm system, but a vigilant partner in creating a secure, smart, and serene living environment for you and your family. Enjoy the confidence that comes with a well-protected home, managed effortlessly at your fingertips.
aViewFromTheCave is a participant in the Amazon Services LLC Associates Program, an affiliate advertising program designed to provide a means for sites to earn advertising fees by advertising and linking to Amazon.com. Amazon, the Amazon logo, AmazonSupply, and the AmazonSupply logo are trademarks of Amazon.com, Inc. or its affiliates. As an Amazon Associate we earn affiliate commissions from qualifying purchases.