The ability to manage remote servers and network infrastructure is a cornerstone of effective IT administration. For users of Windows operating systems, the Remote Server Administration Tools (RSAT) have long been an indispensable suite for this purpose. RSAT provides a collection of Microsoft management consoles and PowerShell modules that enable administrators to manage Windows Server features, roles, and even other computers running Windows client operating systems, all from a local workstation. If you’re a Windows 11 user looking to leverage these powerful tools, this guide will walk you through the process of installing RSAT on your system.
Understanding RSAT and Its Importance for IT Professionals
Before diving into the installation process, it’s crucial to understand what RSAT is and why it’s so vital for those working in technology. RSAT is not a standalone application that you download and install like a typical program. Instead, it’s a feature that can be added to your Windows 11 installation. This allows administrators to perform a wide array of tasks without needing direct physical access to the servers they are managing.
The components within RSAT are designed to streamline server administration, offering graphical interfaces for tasks that would otherwise require command-line expertise or dedicated server consoles. This significantly enhances productivity and flexibility for IT professionals, network administrators, and system engineers.
The types of tools included in RSAT are diverse and cater to various administrative needs:
- Active Directory Domain Services (AD DS) and Related Tools: Essential for managing user accounts, groups, organizational units, and group policies within a Windows domain.
- DHCP Server Tools: For managing Dynamic Host Configuration Protocol settings, crucial for network addressing.
- DNS Server Tools: To administer Domain Name System services.
- File Services Tools: To manage Distributed File System (DFS) and server for NFS.
- Hyper-V Management Tools: For managing virtual machines hosted on Hyper-V.
- Remote Access Management Tools: To configure and manage VPNs and DirectAccess.
- Task Scheduler: For scheduling administrative tasks remotely.
- System Tools: Including Event Viewer, Computer Management, and Registry Editor for in-depth system analysis and troubleshooting.
- Windows PowerShell Modules: Providing command-line automation for a vast number of administrative tasks.
For anyone whose role involves maintaining and troubleshooting server environments, whether on-premises or in cloud-based infrastructures that utilize Windows Server, RSAT is not just a convenience; it’s a necessity. It empowers them to be more agile, responsive, and efficient in their work.
Who Benefits from RSAT?
- Network Administrators: Responsible for maintaining network infrastructure, including servers, DNS, DHCP, and Active Directory.
- System Administrators: Overseeing the installation, configuration, and maintenance of server operating systems and applications.
- IT Support Specialists: Providing technical assistance and troubleshooting for server-related issues.
- DevOps Engineers: Automating and managing IT infrastructure, often interacting with Windows Servers for deployment and management.
- Anyone managing Windows Server environments remotely.
The efficiency gains are substantial. Instead of logging into each server individually, a single RSAT installation on a Windows 11 client allows for centralized management, saving considerable time and reducing the risk of human error. This also contributes to better security practices by minimizing direct exposure to production servers.
Installing RSAT on Windows 11: A Step-by-Step Guide
Installing RSAT on Windows 11 is a straightforward process, primarily involving enabling optional features within the operating system. Microsoft has made this more integrated compared to older versions of Windows, where RSAT often required a separate download.
Method 1: Using the Settings App (Recommended)
This is the most user-friendly and recommended method for installing RSAT on Windows 11.
Step 1: Accessing Optional Features
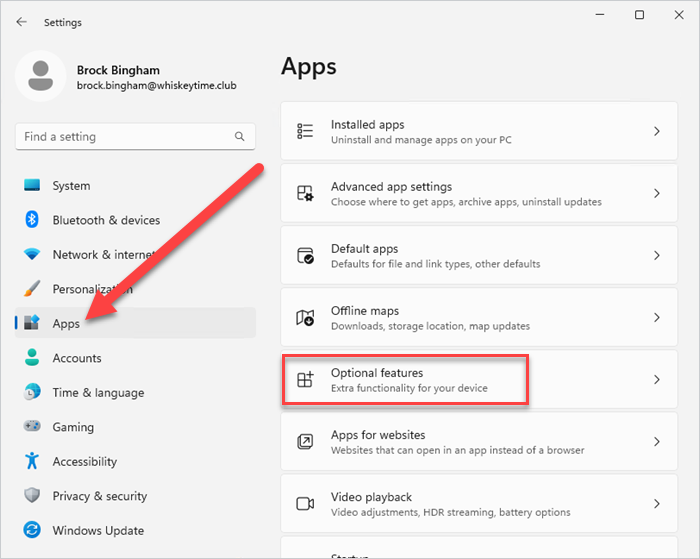
- Click on the Start button and select Settings (the gear icon).
- In the Settings window, navigate to Apps in the left-hand pane.
- Click on Optional features.
Step 2: Adding RSAT Components
-
On the Optional features page, click on the View features button, which is usually located near the top right of the window.
-
A new window titled “Add an optional feature” will appear. In the search bar within this window, type “RSAT”.
-
You will see a list of RSAT components. You can choose to install the entire suite or specific tools depending on your needs. For most administrators, installing the comprehensive package is advisable.
- RSAT: Active Directory Domain Services and Lightweight Directory Services Tools
- RSAT: DHCP Server Tools
- RSAT: DNS Server Tools
- RSAT: File Services Tools
- RSAT: Hyper-V Management Tools
- RSAT: Network Controller Management Tools
- RSAT: Remote Access Management Tools
- RSAT: Server Manager
- RSAT: Storage Replica Tools
- RSAT: System Insights Tools
- RSAT: Volume Activation Services Tools
- RSAT: Windows Server Update Services Tools
- RSAT: BitLocker Drive Encryption Tools
- RSAT: Remote Desktop Services Tools
- RSAT: TDS Tools
-
Select the checkboxes next to the RSAT components you wish to install. If you’re unsure, selecting the primary ones like “RSAT: Active Directory Domain Services and Lightweight Directory Services Tools” and “RSAT: Server Manager” is a good starting point. For full server administration capabilities, consider selecting all that apply to your server environment.
-
After selecting your desired components, click the Next button.
Step 3: Installation Process
- On the next screen, you’ll see a summary of the features you’ve chosen. Click the Install button.
- Windows 11 will now download and install the selected RSAT components. This process can take several minutes, depending on your internet connection speed and the number of components you’ve selected.
- You’ll see a progress bar indicating the installation status. Once completed, the “Installation successful” message will appear.
Step 4: Verifying the Installation
- After the installation is complete, you can verify that RSAT is installed by searching for its components in the Start menu. For instance, try searching for “Active Directory Users and Computers,” “DNS Manager,” “DHCP,” or “Server Manager.”
- You might need to restart your computer for all components to be fully recognized and functional. It’s generally a good practice to restart after installing optional features.
Method 2: Using PowerShell (Advanced Users)
For users who prefer command-line management or need to automate the installation process, PowerShell offers an efficient alternative.
Step 1: Open PowerShell as Administrator
- Click on the Start button.
- Type “PowerShell” in the search bar.
- Right-click on Windows PowerShell in the search results and select Run as administrator.
Step 2: Install RSAT Components via PowerShell
You can install specific RSAT components or the entire suite using the Add-WindowsCapability cmdlet.
To install all RSAT components, you can use the following command:
Get-WindowsCapability -Online | Where-Object Name -like 'Rsat*' | Add-WindowsCapability -Online
This command first lists all available Windows capabilities, filters them to include only those starting with “Rsat”, and then adds them online.
If you want to install specific components, you need to know their exact names. For example, to install only the Active Directory Domain Services tools:
Add-WindowsCapability -Online -Name Rsat.ActiveDirectory.DS-LDS.Tools~~~~0.0.1.0
You can find the exact names by running Get-WindowsCapability -Online | Where-Object Name -like 'Rsat*' and then selecting the desired ones.
Step 3: Monitoring the Installation
The PowerShell command will execute the installation in the background. You’ll see progress indicators or messages in the PowerShell console.
Step 4: Verifying the Installation
Similar to the Settings app method, verify the installation by searching for the tools in the Start menu or by trying to run their respective PowerShell cmdlets. A system restart may be beneficial here as well.
Accessing and Using RSAT Tools
Once RSAT is successfully installed, accessing and utilizing its tools is simple.
Launching RSAT Applications
- Click the Start button.
- Type the name of the specific tool you want to use (e.g., “Active Directory Users and Computers,” “DNS Manager,” “Server Manager,” “Hyper-V Manager”).
- The tool should appear in the search results, and you can click on it to launch it.
Alternatively, you can find them under:
- Settings > Apps > Optional features. After installation, the RSAT components will be listed under “Installed features.” Clicking on them might offer an option to launch the associated management console.
- Navigate through Control Panel > Administrative Tools. Many of the RSAT applications will be listed here after installation.
Key RSAT Tools and Their Uses
- Server Manager: This is your central hub for managing local and remote servers. You can add servers, assign roles and features, and monitor server performance.
- Active Directory Users and Computers (ADUC): The primary tool for managing users, groups, and organizational units (OUs) in an Active Directory domain.
- DNS Manager: For configuring and managing DNS zones and records.
- DHCP Manager: To administer DHCP scopes, reservations, and options.
- Hyper-V Manager: To create, manage, and monitor virtual machines.
- Group Policy Management Console (GPMC): For creating, editing, and deploying Group Policy Objects (GPOs) to control user and computer settings across the domain.
Troubleshooting Common RSAT Installation Issues
While the installation process is generally smooth, you might encounter a few hiccups. Here are some common issues and their solutions:
Issue 1: RSAT Components Not Appearing in Search or Administrative Tools
- Solution: Ensure the installation was fully completed. Sometimes, a system restart is mandatory for Windows to recognize newly installed optional features. Try restarting your PC. If the issue persists, try uninstalling and then reinstalling the specific RSAT components through the Settings app or PowerShell.
Issue 2: Installation Fails with an Error Code
- Solution: Error codes often point to specific problems.
- Windows Update Issues: RSAT installation relies on Windows Update components. Ensure your Windows 11 is up-to-date and that there are no pending updates or corrupt update components. Running the Windows Update Troubleshooter can help.
- Corrupt System Files: System file corruption can interfere with optional feature installations. Open Command Prompt as administrator and run
sfc /scannowto check and repair system files. - Disk Space: Ensure you have sufficient free disk space on your C: drive.
Issue 3: Tools Prompt for Credentials or Fail to Connect to a Server
- Solution: This is usually not an installation issue but a configuration or network connectivity problem.
- Firewall Rules: Ensure that the necessary firewall ports are open on both your Windows 11 client and the target server(s) for remote management protocols (e.g., RPC, WMI).
- Network Connectivity: Verify that your Windows 11 machine can reach the target server(s) over the network.
- Permissions: Ensure the user account you are using has the appropriate administrative privileges on the target server.
- Server Configuration: The target server must be configured to allow remote management. For example, Remote Management must be enabled in Server Manager on the target server.

Issue 4: Specific RSAT Tool Not Working
- Solution: If one specific tool isn’t functioning correctly, try uninstalling and reinstalling just that particular RSAT component. If the problem is widespread across multiple RSAT tools, a more general troubleshooting approach like system file checks or Windows Update repair might be necessary.
By following these steps and understanding the troubleshooting tips, you should be able to successfully install and utilize RSAT on your Windows 11 machine, enhancing your server administration capabilities significantly. This integration makes Windows 11 a more powerful platform for IT professionals.
aViewFromTheCave is a participant in the Amazon Services LLC Associates Program, an affiliate advertising program designed to provide a means for sites to earn advertising fees by advertising and linking to Amazon.com. Amazon, the Amazon logo, AmazonSupply, and the AmazonSupply logo are trademarks of Amazon.com, Inc. or its affiliates. As an Amazon Associate we earn affiliate commissions from qualifying purchases.