In an increasingly connected world, smart home technology is no longer a luxury but a fundamental component of modern living. Among the myriad of innovations enhancing our daily lives, the smart doorbell stands out as a critical piece of the digital security puzzle. With its promise of peace of mind, convenience, and an added layer of protection, the Ring Doorbell camera has become a household name, transforming the way we interact with our front doors. This comprehensive guide will walk you through every step of installing your Ring Doorbell camera, empowering you to bolster your home’s security with confidence and ease. Whether you’re a seasoned DIY enthusiast or new to smart home installations, we’ll demystify the process, ensuring a smooth setup from start to finish.
The appeal of a Ring Doorbell extends beyond merely seeing who’s at your door. It’s about creating a smarter, safer, and more responsive home environment. Imagine being able to answer your door from anywhere in the world, receiving instant alerts when motion is detected, or even deterring potential intruders with two-way talk functionality. These capabilities, once relegated to science fiction, are now accessible through a relatively simple installation process. This article serves as your ultimate resource, breaking down the often-intimidating technical aspects into digestible, actionable steps. We will cover everything from understanding the different Ring models and gathering the necessary tools to the crucial app setup and fine-tuning of settings for optimal performance. By the end of this guide, you’ll not only have successfully installed your Ring Doorbell but also gained a deeper understanding of its potential to integrate seamlessly into your broader smart home ecosystem, truly enhancing your digital security and daily productivity.
Why Choose a Ring Doorbell? Enhancing Your Home Security
The decision to invest in a smart doorbell like Ring is often driven by a desire for enhanced security, but its benefits extend far beyond simple surveillance. Ring products have carved out a significant niche in the smart home market by offering a blend of innovative technology, user-friendly design, and robust features that cater to a wide range of needs. Understanding these advantages can help you appreciate the value you’re adding to your home by choosing Ring.
Peace of Mind at Your Fingertips
One of the most compelling reasons to install a Ring Doorbell is the unparalleled peace of mind it offers. With a Ring device, your front door is constantly monitored, even when you’re not home. Motion detection sensors trigger immediate alerts to your smartphone, tablet, or PC whenever someone approaches your property. This proactive vigilance means you’re always aware of activity, whether it’s a delivery driver, a visiting friend, or an unexpected visitor. The ability to see, hear, and speak to anyone at your door in real-time, no matter where you are, is a game-changer. This two-way audio feature is not only convenient for answering the door remotely but also acts as a powerful deterrent against package theft or unauthorized entry. The feeling of being connected to your home, even when miles away, significantly reduces anxiety and empowers you with control over your personal space, aligning perfectly with modern digital security trends.
Seamless Integration with Smart Home Ecosystems
Ring’s strength also lies in its ability to integrate effortlessly into existing smart home ecosystems. As a prominent player in the smart home arena, Ring devices are designed to work harmoniously with other smart gadgets and platforms, particularly those compatible with Amazon Alexa. This interoperability allows for a truly connected home experience. Imagine asking your Alexa-enabled device to “show me the front door,” and instantly seeing a live feed on your Echo Show. You can link your Ring Doorbell with smart locks, allowing you to grant access to trusted visitors remotely after verifying their identity through the doorbell camera. Furthermore, Ring’s compatibility with various IFTTT (If This Then That) applets enables custom automations, such as turning on smart lights when motion is detected at your door after dark. This level of integration transforms individual smart devices into a cohesive, intelligent network, streamlining your daily routines and significantly boosting your home’s overall security and automation capabilities, marking a true advancement in technology trends for residential living.
The Ring Ecosystem: Beyond the Doorbell
Choosing a Ring Doorbell is often just the first step into a larger, comprehensive security ecosystem. Ring has expanded its product line to include a wide array of smart home security devices that work together to create a formidable defense for your property. Beyond video doorbells, the Ring ecosystem includes security cameras (like the Stick Up Cam and Floodlight Cam), smart lighting, alarm systems, and even professional monitoring services (available with a Ring Protect Plus plan). This interconnected suite of products allows you to scale your home security from a single doorbell to a full-fledged, multi-layered system that covers every angle of your property. Each device can be managed through the same intuitive Ring app, providing a centralized control hub for all your security needs. This holistic approach ensures consistent performance, simplified management, and a unified security strategy, making Ring a compelling brand choice for those serious about safeguarding their home and leveraging the latest in digital security technology.
Preparation is Key: Before You Begin Your Ring Installation
Before you even think about picking up a screwdriver, proper preparation is paramount to a successful Ring Doorbell installation. Rushing through this stage can lead to frustrating roadblocks and potential delays. Taking the time to understand your specific Ring model, gather the right tools, and conduct essential pre-installation checks will not only save you time but also ensure a secure and functional setup. This systematic approach is a hallmark of any successful tech implementation and is crucial for digital security devices.
Identifying Your Ring Model: Wired vs. Battery-Powered
Ring offers a variety of doorbell models, and a critical first step is to identify whether yours is a battery-powered or a wired version. This distinction dictates the installation process significantly.
- Battery-Powered Models (e.g., Ring Video Doorbell 2, 3, 4, Peephole Cam): These are generally easier to install as they don’t require existing doorbell wiring. They are ideal for homes without a traditional doorbell or those looking for a completely wireless solution. Battery-powered models rely on a rechargeable battery pack that needs to be periodically removed and charged.
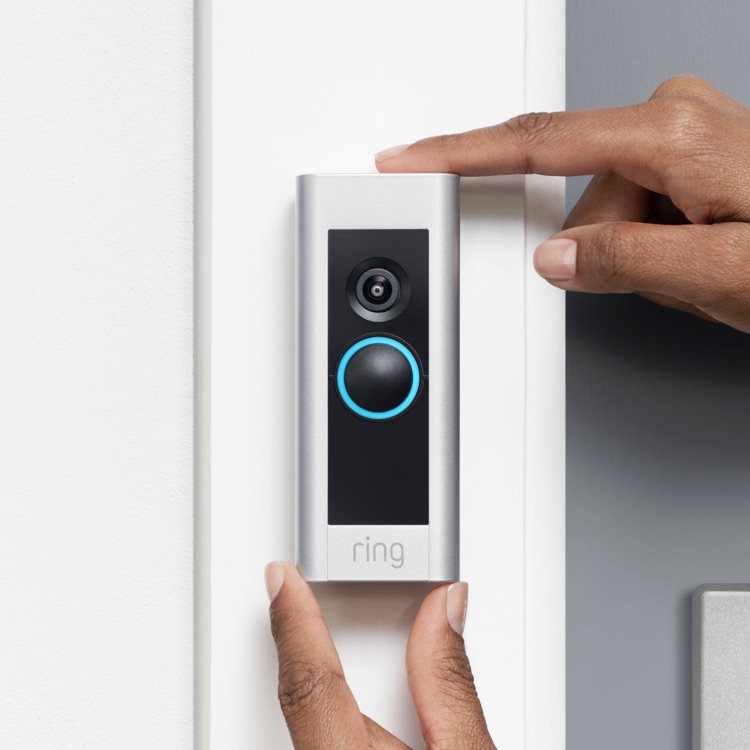
- Wired Models (e.g., Ring Video Doorbell Pro, Pro 2, Elite, Wired): These models connect directly to your home’s existing doorbell wiring (typically 8-24 VAC). While they offer continuous power and often more advanced features like pre-roll video and enhanced Wi-Fi, their installation requires safely handling electrical connections. Some wired models also require a Ring Chime or a compatible existing chime transformer.
Check the packaging or the device itself for specific model information. Understanding your model will guide you through the correct set of instructions in the subsequent steps.
Gathering Your Tools and Supplies
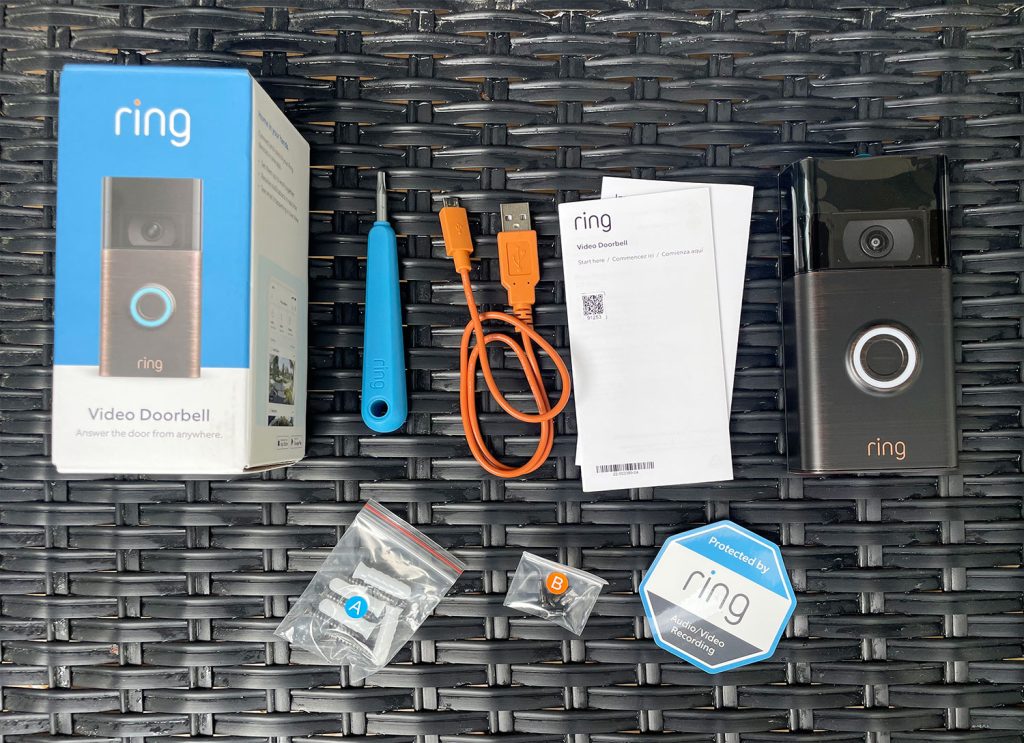
Having the right tools on hand prevents interruptions and ensures a smooth installation. Most Ring Doorbells come with a basic installation kit, but you might need a few additional items. Here’s a typical checklist:
- Ring Installation Kit: (Usually includes a screwdriver, drill bit, mounting screws, anchors, wedge/corner kits, and a jumper cable for wired installations).
- Power Drill (Optional but Recommended): For pre-drilling pilot holes, especially on stucco, brick, or masonry surfaces.
- Pencil: For marking drill holes.
- Level: To ensure your doorbell is mounted straight.
- Phillips-head Screwdriver: For general screw tightening (if not provided).
- Ladder or Step Stool: If your doorbell location is high.
- Voltage Tester (for wired installations): Crucial for verifying that power to your existing doorbell wiring is off.
- Small Pliers or Wire Strippers (for wired installations): If wires need to be trimmed or adjusted.
- Safety Goggles: Always recommended when drilling or working with electrical components.
Essential Pre-Installation Checks
Before you start any physical work, perform these critical checks to ensure a trouble-free installation and optimal performance:
- Check Your Wi-Fi Signal Strength: Your Ring Doorbell needs a strong 2.4 GHz Wi-Fi signal at its installation location to function effectively. Use your smartphone to check the signal strength at your front door. If it’s weak, consider repositioning your router or investing in a Wi-Fi extender to ensure reliable video streaming and instant alerts. A robust Wi-Fi connection is foundational for any smart gadget’s performance and is a key “technology trend” consideration.
- Verify Existing Doorbell Wiring (for wired models):
- Voltage: Most wired Ring Doorbells require 8-24 VAC. Locate your doorbell transformer (often in your basement, garage, or near your electrical panel) and check its voltage rating. If it’s below 8 VAC, you might need to upgrade it, which may require professional electrical help.
- Chime Type: Identify if you have a mechanical or digital chime. Ring provides a “jumper cable” for mechanical chimes to bypass them during installation, ensuring constant power to the Ring device while still allowing a separate Ring Chime to sound. Digital chimes often require a power kit.
- Safety First: For wired installations, ALWAYS turn off power to your existing doorbell at your circuit breaker before touching any wires. Use a voltage tester to confirm the power is off before proceeding. This is a non-negotiable step for personal safety and to prevent damage to your device or home’s electrical system.
- Choose the Optimal Mounting Location: While typically installed where your old doorbell was, consider height and viewing angle. The ideal height is usually around 48 inches (1.2 meters) from the ground. Use the included wedge or corner kits if necessary to angle the doorbell for a better view of visitors and to reduce motion detection of street traffic.
Step-by-Step Installation: Bringing Your Ring Doorbell to Life
With your preparations complete, you’re ready to embark on the physical installation. This section will guide you through the process, catering to both wired and battery-powered Ring models, with a focus on safety and accuracy.
Removing Your Old Doorbell (Safety First!)
For wired installations, this is your first and most critical step.
- Cut the Power: Go to your home’s circuit breaker box and turn off the power to your doorbell transformer. This is usually labeled “doorbell,” “chime,” or “general purpose.” Use your voltage tester to confirm no power is running through the doorbell wires.
- Unscrew and Detach: Carefully unscrew your existing doorbell button from the wall. Gently pull it away to expose the wires connected to it.
- Disconnect Wires: Loosen the terminal screws holding the wires in place and disconnect them. Be careful not to let the wires fall back into the wall, as retrieving them can be challenging. If necessary, tape them to the wall temporarily.
Mounting the Bracket and Wiring Your Ring (for wired models)
This is where your Ring device starts to take shape on your wall.
- Position the Mounting Bracket: Hold the Ring mounting bracket (or the entire doorbell unit for some models) against the wall where you want to install it. Use a level to ensure it’s straight and a pencil to mark the drill holes. If using a wedge or corner kit, install that first, then attach the main bracket to it.
- Drill Pilot Holes: Using the drill bit provided (or one appropriate for your wall material), drill pilot holes at the marked locations. If drilling into stucco, brick, or concrete, insert the provided wall anchors flush with the wall surface.
- Connect the Wires: For wired Ring doorbells, carefully loop the existing doorbell wires around the terminal screws on the back of your Ring device or its mounting plate. Ensure the wires are securely fastened; it doesn’t matter which wire connects to which screw. If your existing wires are too short, use the wire extenders provided in the kit. If you have a mechanical chime, connect the Ring jumper cable to your chime unit as per the instructions to bypass it.
- Attach to Mounting Bracket: Align your Ring Doorbell with the mounting bracket and push it firmly into place. For some models, it will click; for others, you’ll secure it with screws.
Securing the Ring Device and Powering Up
Once the wiring is complete (for wired models) or the battery is charged (for battery models), it’s time to fully secure the device and restore power.
- Secure the Doorbell: Use the security screws provided by Ring to fasten the bottom of the doorbell to the mounting bracket. This typically requires the special star-shaped screwdriver included in your kit. These screws help deter theft.
- Restore Power (for wired models): Return to your circuit breaker and turn the power back on to your doorbell. Your Ring Doorbell should light up, indicating it’s receiving power and ready for setup.
The All-Important App Setup and Configuration
This is the digital heart of your Ring experience and is essential for bringing your new gadget to life.
- Download the Ring App: If you haven’t already, download the Ring app from the Apple App Store or Google Play Store. Create an account or log in to your existing one.
- Add a Device: In the Ring app, tap “Set Up a Device” and select “Doorbells.”
- Scan the QR Code: The app will instruct you to scan the QR code located on your Ring Doorbell or its packaging. This automatically identifies your specific device.
- Follow In-App Instructions: The app will then guide you through connecting your Ring Doorbell to your home’s Wi-Fi network. You’ll select your network and enter your Wi-Fi password.
- Name Your Device: Give your Ring Doorbell a descriptive name (e.g., “Front Door”).
- Test the Doorbell: The app will prompt you to press the doorbell button and test the two-way audio. Ensure you can hear and speak clearly through the device.
- Configure Motion Settings: This is a crucial step for optimal performance. Adjust the motion sensitivity zones to cover only the areas you want to monitor and avoid unnecessary alerts from street traffic or pets. You can customize motion frequency and create privacy zones to exclude certain areas from being recorded.
Battery-Powered Installation: Simplicity Redefined
For battery-powered Ring Doorbells, the process is even simpler.
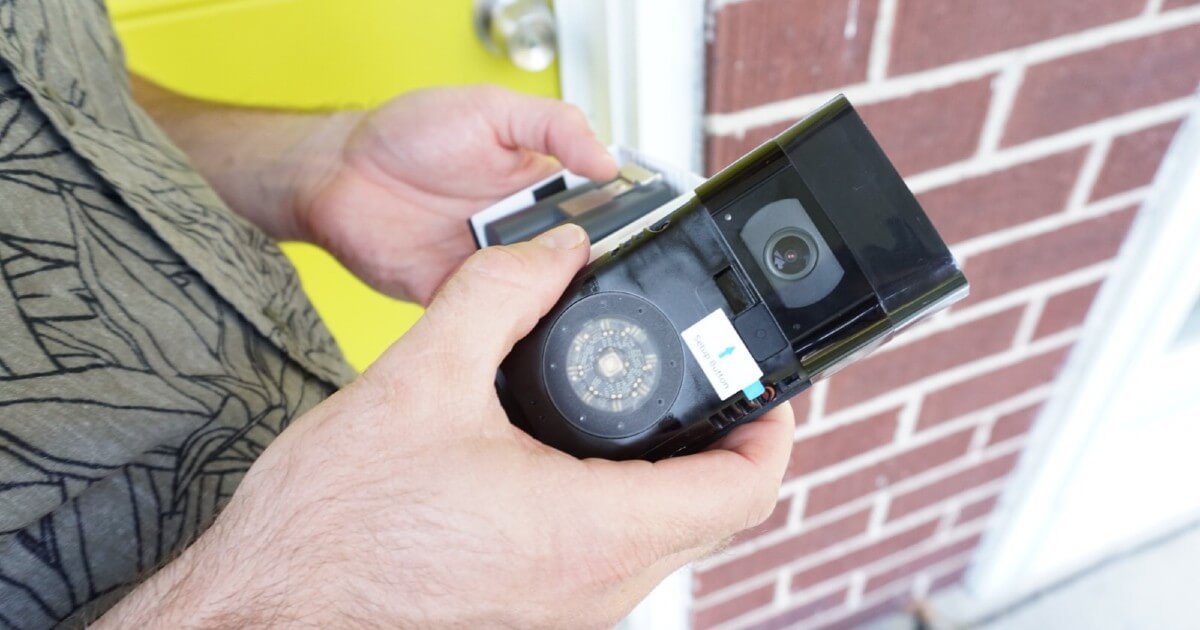
- Charge the Battery: Fully charge the provided battery pack using the included USB cable. A full charge can take several hours.
- Insert the Battery: Once charged, insert the battery pack into the bottom of your Ring Doorbell until it clicks securely into place.
- Mount the Device: Position the doorbell, mark drill holes, and drill pilot holes as described for wired models. Secure the mounting bracket to the wall, then snap the Ring Doorbell onto the bracket.
- Secure with Security Screws: Fasten the bottom of the doorbell with the security screws using the star-shaped screwdriver.
- Proceed with App Setup: Follow steps 1-7 from the “App Setup and Configuration” section above. The battery-powered nature simplifies the physical installation significantly, making it an excellent option for apartment dwellers or renters.
Optimizing Your Ring Experience and Troubleshooting Common Issues
Installing your Ring Doorbell is just the beginning. To truly maximize its potential and ensure long-term satisfaction, it’s essential to optimize its settings and know how to troubleshoot common issues. This proactive approach will enhance your digital security and ensure your smart gadget operates seamlessly within your daily life.
Fine-Tuning Motion Detection and Privacy Settings
The Ring app offers extensive customization options that can significantly improve your device’s performance and respect your privacy.
- Customizable Motion Zones: Navigate to “Motion Settings” in the Ring app. Instead of a general sensitivity setting, create specific “Motion Zones” that focus on the areas most important to you, like your walkway or front porch. Exclude busy sidewalks or neighbor’s property to reduce false alarms.
- Motion Frequency: Adjust how often your Ring detects motion. Options like “Frequent,” “Standard,” and “Light” can conserve battery life (for battery models) or reduce notifications, balancing security with convenience.
- People Only Mode: Some Ring models offer “People Only Mode,” which uses advanced algorithms to specifically detect human shapes, further minimizing irrelevant alerts from passing cars or animals.
- Privacy Zones: Critical for respecting your neighbors’ privacy, create “Privacy Zones” within the camera’s field of view. These areas will be blacked out in live view and recordings, ensuring you only capture what’s relevant to your property.
- Alert Frequency: Manage notification settings to avoid being overwhelmed. You can set specific times for alerts or snooze them when you’re home and less likely to need constant notifications.
Understanding Ring Protect Plans
While your Ring Doorbell offers live view and motion alerts for free, subscribing to a Ring Protect Plan unlocks its full potential, particularly regarding recorded video and advanced features. This is where the “money” aspect subtly intertwines with “tech” and “digital security.”
- Ring Protect Basic: Covers one Ring device. It enables video recording and storage for up to 180 days in the cloud, allowing you to review, save, and share important footage. Without this, once a live event ends, the footage is gone.
- Ring Protect Plus: Covers all Ring devices at one location. It includes all Basic features, plus extended warranty for all devices, and often a discount on Ring products.
- Ring Protect Pro: For Ring Alarm users, this plan adds professional monitoring for the alarm system, cellular backup, and other advanced security features, significantly bolstering your home’s protection.
Consider these plans as an investment in comprehensive home security. The ability to review past events can be crucial for identifying suspicious activity or providing evidence to authorities, making the subscription a valuable extension of your digital security infrastructure.
Common Installation Hurdles and Quick Fixes
Even with careful preparation, you might encounter minor issues. Here are some common problems and their solutions:
- No Power to Wired Doorbell:
- Double-check that the circuit breaker is on.
- Ensure wires are securely connected to the terminals on the Ring device and your transformer.
- Verify your transformer voltage (8-24 VAC). If it’s too low, you’ll need an upgrade.
- Confirm the jumper cable (for mechanical chimes) is correctly installed.
- Doorbell Not Connecting to Wi-Fi:
- Ensure your Wi-Fi password is correct.
- Move your router closer or use a Wi-Fi extender if the signal is weak at the doorbell’s location.
- Make sure you are connecting to a 2.4 GHz network (most Ring devices prefer this for range).
- Restart your router and modem.
- Poor Video Quality/Lag:
- This is almost always a Wi-Fi issue. Improve signal strength.
- Reduce video resolution settings in the Ring app if your internet speed is limited.
- False Motion Alerts:
- Adjust motion zones to exclude busy areas.
- Lower motion sensitivity.
- Utilize “People Only Mode” if available.
- Check for objects like tree branches or flags that might be swaying and triggering alerts.
- Battery Drains Too Quickly (for battery models):
- Reduce motion detection frequency.
- Limit live view usage.
- Ensure your Wi-Fi signal is strong; a weak signal makes the device work harder.
- Consider a solar charger if available for your model.
Maintaining Your Ring for Long-Term Performance
Like any smart gadget, your Ring Doorbell benefits from a little care to ensure its longevity and reliable performance.
- Regular Cleaning: Periodically wipe the camera lens and surrounding area with a soft, damp cloth to remove dirt, dust, and spiderwebs that can obscure the view or trigger false motion alerts. Avoid harsh chemicals.
- Software Updates: Ensure your Ring app and doorbell firmware are always up to date. Ring regularly releases updates to improve features, security, and performance. The app will usually prompt you for these.
- Battery Health (for battery models): Monitor battery levels regularly through the app and recharge promptly. Avoid letting the battery completely drain repeatedly, as this can reduce its overall lifespan.
- Weather Protection: While Ring devices are built to withstand various weather conditions, consider using weather-resistant mounting plates or covers in extreme climates to provide extra protection.
By diligently following these optimization and maintenance tips, you’ll ensure your Ring Doorbell camera continues to serve as an effective and reliable component of your home’s digital security, offering lasting peace of mind and seamless integration into your smart home ecosystem for years to come.
The installation of a Ring Doorbell camera is a rewarding DIY project that significantly elevates your home’s security posture and integrates seamlessly with modern smart home technology. From the initial unboxing and identification of your model to the final tweaks of motion detection and privacy settings, each step is designed to be manageable, equipping you with the tools to take control of your home’s perimeter. By choosing Ring, you’re not just installing a camera; you’re investing in a sophisticated system that offers constant vigilance, instant communication, and comprehensive coverage, all managed from the convenience of your smartphone. Embrace the future of home security and enjoy the unparalleled peace of mind that comes with knowing your home is watched over by a reliable, intelligent guardian.
aViewFromTheCave is a participant in the Amazon Services LLC Associates Program, an affiliate advertising program designed to provide a means for sites to earn advertising fees by advertising and linking to Amazon.com. Amazon, the Amazon logo, AmazonSupply, and the AmazonSupply logo are trademarks of Amazon.com, Inc. or its affiliates. As an Amazon Associate we earn affiliate commissions from qualifying purchases.