In an increasingly connected world, safeguarding your home and loved ones has never been more accessible. Ring, a leader in smart home security, offers a diverse range of devices—from video doorbells to security cameras and alarm systems—designed to provide peace of mind through innovative technology. This comprehensive guide will walk you through the entire process of installing your Ring device, from initial preparation and physical setup to app configuration and optimization, ensuring you leverage its full potential for a smarter, more secure living space.
Whether you’re a tech enthusiast eager to dive into the latest gadgets, a homeowner looking to enhance digital security, or simply someone wanting a clear, step-by-step tutorial, this article is for you. We’ll break down the complexities, offer practical tips, and address common challenges, making your Ring installation a smooth and rewarding experience.
Preparing for Your Ring Installation: What You Need to Know and Gather
Before you even unbox your new Ring device, a little preparation can save a lot of time and potential headaches. Understanding your specific device, gathering the right tools, and checking your home environment are crucial first steps toward a successful installation.
Identifying Your Ring Device Type
Ring’s product line is extensive, and installation procedures can vary significantly between models. Knowing whether you have a battery-powered video doorbell, a wired security camera, or a floodlight cam is essential.
- Ring Video Doorbells: These come in two primary types:
- Battery-Powered: E.g., Ring Video Doorbell 3, 4, or Battery Doorbell Plus. These are generally easier to install as they don’t require existing wiring, relying on a rechargeable battery.
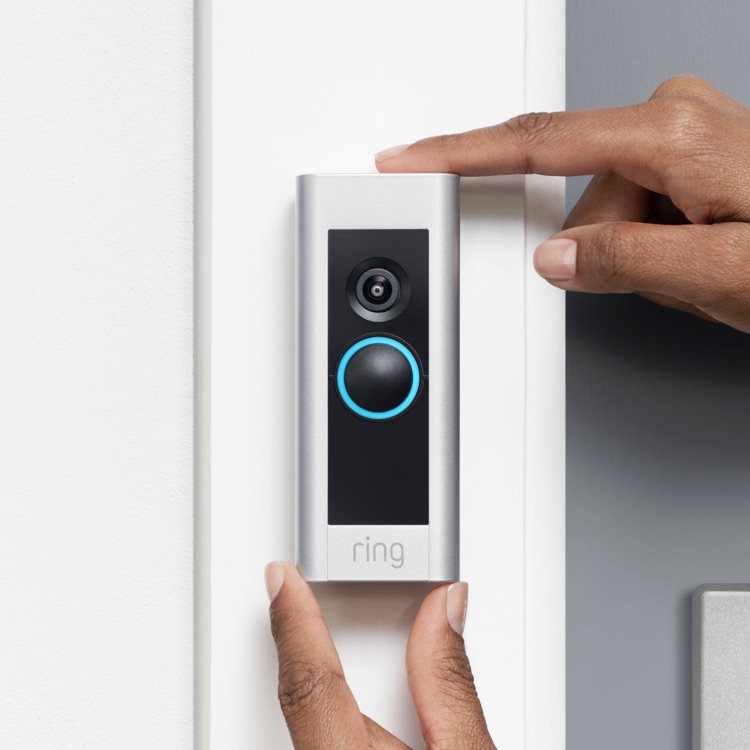
- Wired: E.g., Ring Video Doorbell Pro, Pro 2, Wired. These connect to your existing doorbell wiring, providing continuous power and often more advanced features like pre-roll video or enhanced Wi-Fi.
- Ring Security Cameras:
- Stick Up Cam: Available in battery, plug-in, and solar versions, offering flexible placement indoors or outdoors.
- Spotlight Cam: Often hardwired or solar, featuring built-in spotlights and a siren for added deterrence.
- Floodlight Cam: The most robust option, typically hardwired to an outdoor electrical box, combining powerful LED floodlights, a siren, and a camera.
- Ring Alarm Systems: These involve a base station, keypad, door/window sensors, and motion detectors. While the individual sensors are simple to install, the system setup is more integrated.
Always refer to the specific model you purchased, as the packaging and quick-start guide will confirm its type and specific requirements.
Essential Tools and Supplies
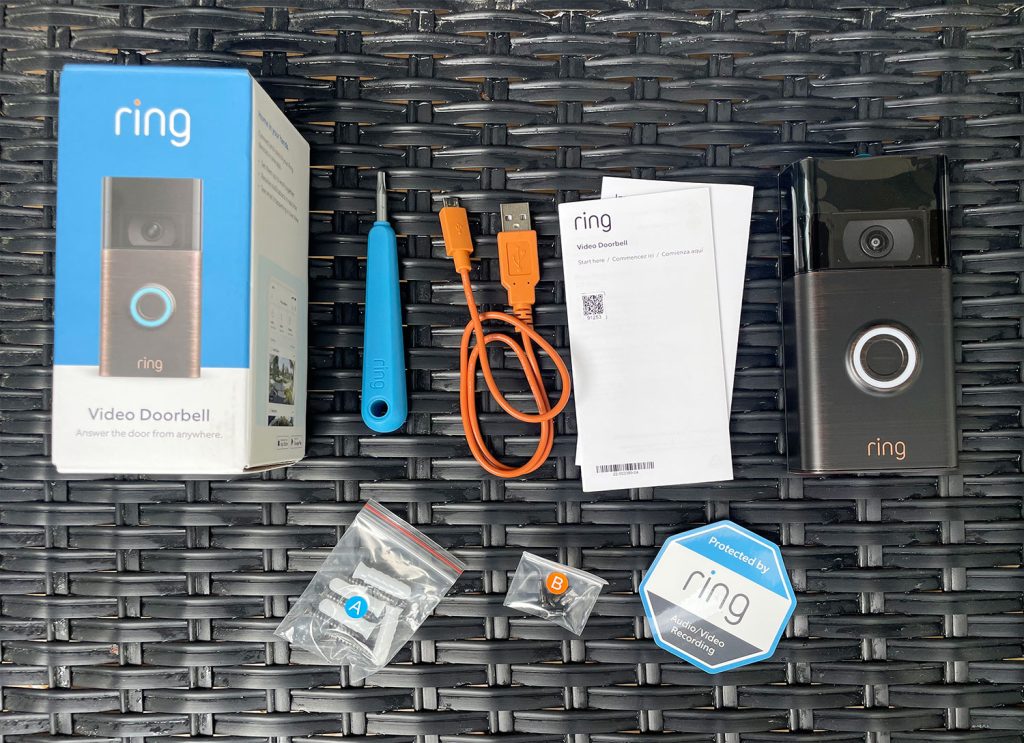
While Ring devices often come with basic mounting hardware, having a few common household tools on hand will ensure a smoother process.
- Screwdriver: A Phillips head screwdriver is almost always needed. Some Ring devices (especially doorbells) also include a special star-shaped security screwdriver to secure the faceplate.
- Drill and Drill Bits: Necessary for drilling pilot holes if mounting on brick, stucco, or other hard surfaces. Ensure you have bits appropriate for your wall material.
- Level: To ensure your device is mounted straight and aesthetically pleasing.
- Pencil: For marking drill holes accurately.
- Ladder or Step Stool: If installing a camera or floodlight cam in an elevated position.
- Multimeter (for wired installations): Useful for testing existing doorbell transformer voltage to ensure it meets Ring’s requirements (typically 16-24 VAC).
- Safety Glasses and Gloves: Recommended, especially when working with power tools or electrical wiring.
- Wi-Fi Extender/Chime Pro (Optional but Recommended): If your installation location has weak Wi-Fi signal, a Wi-Fi extender can significantly improve performance. Ring’s Chime Pro doubles as a Wi-Fi extender specifically designed for Ring devices.
Pre-Installation Checklist and Considerations
A little foresight goes a long way. Before you start drilling, run through these critical checks:
- Wi-Fi Connectivity: Ring devices rely heavily on a strong and stable 2.4GHz Wi-Fi connection. Use your smartphone to test the Wi-Fi signal strength at your intended installation location. A weak signal can lead to dropped connections, poor video quality, and delayed notifications. If the signal is poor, consider repositioning your router or investing in a Wi-Fi extender.
- Power Source:
- For Wired Devices (Doorbells, Floodlight Cams): Confirm you have an existing, compatible power source. For wired doorbells, this means existing doorbell wiring with adequate voltage. For floodlight cams, an outdoor junction box with household electrical wiring. Always turn off power at the breaker before working with electrical wiring.
- For Battery-Powered Devices: Fully charge the battery before installation. Most Ring batteries take several hours to charge. It’s a good practice to have a spare battery if you want continuous operation while one charges.
- Optimal Location and Viewing Angle:
- Doorbells: Aim for a height of about 48 inches (1.2 meters) from the ground for optimal face detection. Consider glare from direct sunlight or reflections.
- Cameras: Position for maximum coverage of your desired area, while also being mindful of privacy for neighbors. Avoid placing cameras where they constantly trigger motion alerts from busy streets or public pathways unless specifically desired, as this can drain battery life and flood your notifications. Test the field of view using the Live View feature in the Ring app before final mounting.
- Download the Ring App: Get the Ring app from the Apple App Store or Google Play Store and create an account if you don’t already have one. This is crucial for device setup and management. Ensure your phone’s Bluetooth is enabled, as many devices use it for initial setup.
Step-by-Step Installation Guides for Popular Ring Devices
Once you’ve prepared everything, it’s time for the hands-on installation. We’ll cover the most common Ring devices, providing clear instructions for each. Remember to always follow the specific instructions included in your device’s manual, as models can have subtle differences.
Installing Ring Video Doorbells (Battery-Powered Models)
These are arguably the easiest Ring devices to install, offering great flexibility.
- Charge the Battery: Fully charge the provided battery using the included USB cable. The indicator light will change to solid green when complete.
- Mount the Bracket:
- Choose your desired location on your doorframe or wall. Aim for about 48 inches (1.2 meters) from the ground.
- Place the mounting bracket against the wall, use a level to ensure it’s straight, and mark the screw holes with a pencil.
- For brick, stucco, or concrete, drill pilot holes using an appropriate drill bit (usually 1/4 inch or 6mm) and insert the provided wall anchors. For wood, simply screw the bracket directly.
- Secure the mounting bracket to the wall using the screws provided.
- Insert Battery and Attach Doorbell: Slide the fully charged battery into the bottom of the doorbell until it clicks into place. Then, hook the top of the doorbell onto the mounting bracket and push the bottom firmly until it snaps into place.
- Secure with Security Screw: Use the star-shaped security screw (and the included screwdriver) to secure the doorbell to the bottom of the bracket, preventing easy removal.
Installing Ring Video Doorbells (Wired Models)
Wired doorbells provide continuous power and more consistent performance, but require working with existing electrical wiring.
- Turn Off Power at Breaker: This is critical for your safety. Locate your home’s circuit breaker box and turn off the power to your existing doorbell chime. If unsure, turn off the main breaker.
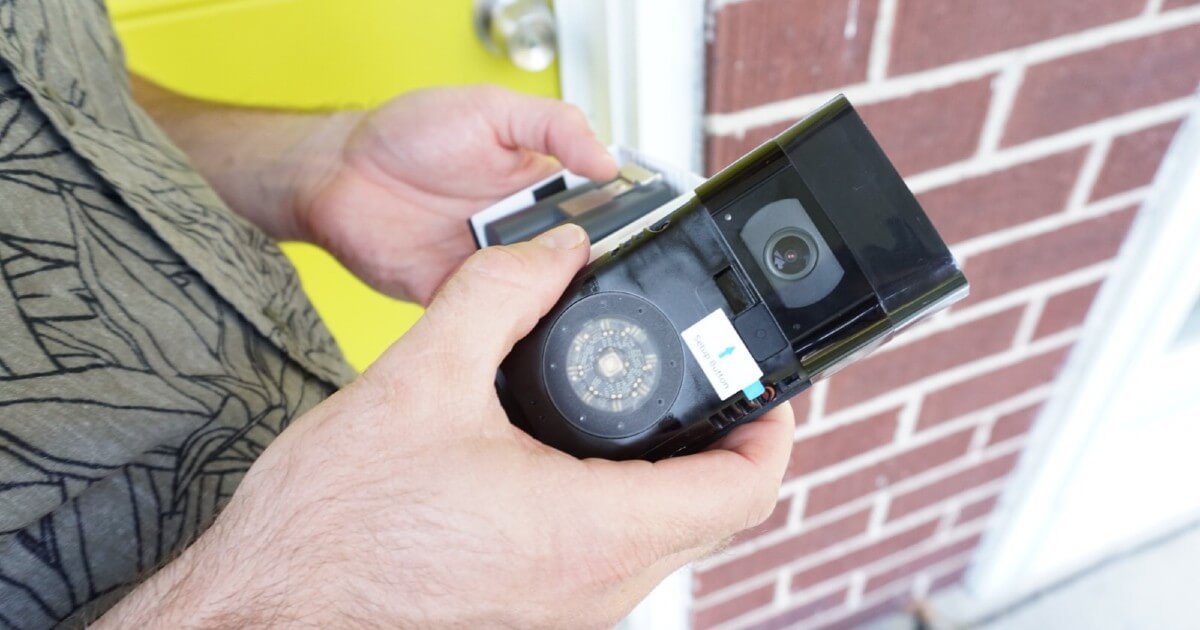
- Remove Existing Doorbell: Unscrew your old doorbell button from the wall. Gently pull it away and disconnect the two wires connected to its terminals. Be careful not to let the wires fall back into the wall.
- Connect Ring Wires: Take the two wires coming from your wall and connect one to each of the screw terminals on the back of your Ring Video Doorbell. The polarity (which wire goes to which terminal) typically doesn’t matter for Ring doorbells. Ensure the wires are securely fastened.
- Mount the Doorbell: Gently push any excess wiring back into the wall. Align your Ring doorbell with the existing holes if possible, or mark new ones. Use the provided screws and anchors to secure the doorbell to the wall. Some models may include a wedge kit to angle the doorbell for a better view.
- Restore Power: Go back to your circuit breaker and turn the power back on. Your Ring doorbell should power up.
- Install Chime Kit (if applicable): Some wired Ring doorbells require a “Pro Power Kit” or similar bypass kit to be installed inside your existing indoor chime unit. Follow the specific instructions provided with your doorbell for this step, ensuring it’s wired correctly.
Installing Ring Security Cameras (Stick Up Cam – Battery/Plug-in)
The Stick Up Cam offers versatile placement options.
- Charge Battery (if applicable) / Power On (if plug-in): If battery-powered, fully charge the battery. If plug-in, ensure the power adapter is ready.
- Choose Mounting Location: Decide whether you want to place it on a flat surface, wall, or ceiling.
- Mount the Camera:
- Flat Surface: Attach the stand to the bottom of the camera and place it.
- Wall/Ceiling: Attach the stand to the back of the camera, then use the provided screws and anchors to secure the stand to your chosen surface. Adjust the camera’s angle for optimal viewing.
- Secure Camera to Mount: Tighten any adjustment screws on the mount to hold the camera firmly in position.
- Insert Battery / Plug In: Insert the charged battery or plug in the power adapter.
Installing Ring Floodlight Cam / Spotlight Cam (Wired)
These devices replace existing outdoor light fixtures and require careful electrical work. If you’re uncomfortable with wiring, consider hiring a qualified electrician.
- Turn Off Power: Crucially, turn off the power to the light fixture at your circuit breaker. Test the existing wires with a voltage tester to ensure they are dead.
- Remove Existing Fixture: Carefully unscrew and remove your old light fixture from the electrical junction box. Disconnect the wires (usually black for hot, white for neutral, and bare copper or green for ground).
- Mount the Crossbar: Attach the mounting crossbar (usually included with the Ring cam) to your outdoor electrical junction box using the screws provided.
- Connect Wiring:
- Connect the ground wire (bare copper or green) from your home’s wiring to the green screw on the mounting crossbar, then connect the ground wire from the Ring cam to the same green screw.
- Connect the neutral wire (white) from your home’s wiring to the white wire from the Ring cam using a wire nut.
- Connect the hot wire (black) from your home’s wiring to the black wire from the Ring cam using a wire nut.
- Ensure all connections are tight and secure.
- Mount the Camera Base: Carefully tuck all wires into the junction box. Align the Ring camera’s base with the screw holes on the mounting crossbar and secure it tightly with the provided cap nuts. Ensure a good seal against the wall to prevent water intrusion.
- Adjust Lights and Camera: Once mounted, you can loosen the adjustment screws to position the floodlights and camera lens to your desired angles. Tighten them firmly once set.
- Restore Power: Return to your circuit breaker and turn the power back on. Your Floodlight Cam should illuminate and begin its startup sequence.
Configuring Your Ring Device with the Ring App
Physical installation is only half the battle. The Ring app is the central hub for managing your device, connecting it to your Wi-Fi, and customizing its settings.
Downloading and Setting Up the Ring App
- Download: Search for “Ring” in your smartphone’s app store (Apple App Store for iOS, Google Play Store for Android).
- Create Account/Log In: Open the app. If you’re new, tap “Create Account” and follow the prompts to enter your email and password. If you already have an account, simply log in.
- Enable Bluetooth: Ensure Bluetooth is enabled on your phone, as Ring devices often use it for initial discovery during setup.
Adding Your New Device
- Tap “Set Up a Device”: On the Ring app’s home screen, tap the “+” icon or “Set Up a Device.”
- Scan QR Code: The app will prompt you to scan the QR code located on your Ring device or its packaging. This automatically identifies your specific model. If scanning fails, you can manually select your device type from a list.
- Follow On-Screen Prompts: The app will guide you through connecting your phone to the Ring device’s temporary Wi-Fi network (usually named something like “Ring Setup [last four digits of MAC address]”).
Connecting to Wi-Fi
- Select Home Wi-Fi: After connecting to the Ring device’s temporary network, the app will ask you to select your home Wi-Fi network from a list.
- Enter Password: Input your home Wi-Fi password carefully. Most Ring devices connect to 2.4GHz Wi-Fi networks. If you have a dual-band router, ensure you select the 2.4GHz option.
- Confirmation: Once connected, the Ring device will confirm with a voice prompt, and the app will indicate a successful connection.
Naming Your Device and Setting Location
- Name Your Device: Choose a descriptive name, such as “Front Door,” “Garage Camera,” or “Backyard Floodlight.” This helps differentiate devices if you have multiple.
- Set Location: Enter your device’s address. This is crucial for features like emergency dispatch (with Ring Alarm) and location-based alerts (e.g., Neighbors app).
Initial Settings and Customization
With your device connected, it’s time to tailor its operation to your needs.
- Motion Zones: Define specific areas within the camera’s field of view where you want motion to be detected. This helps reduce unwanted alerts from busy streets, trees swaying, or pets.
- Motion Sensitivity: Adjust how sensitive the device is to movement. Higher sensitivity means more alerts, but also potentially more false alarms. Experiment to find the right balance.
- Notification Settings: Customize how you receive alerts (e.g., push notifications, email). You can also schedule when you want to receive alerts (e.g., only when you’re away).
- Live View and Two-Way Talk: Test these features to ensure your camera is working correctly and that audio is clear.
- Linked Devices: If you have multiple Ring devices or a Ring Chime, you can link them. For example, your Ring Doorbell can trigger your Ring Chime indoors, or motion on one camera can activate recording on another.
Optimizing Your Ring Experience and Troubleshooting Common Issues
Once installed and configured, ongoing optimization ensures your Ring devices perform at their best, providing reliable security and convenience. Knowing how to troubleshoot common issues can also save you a support call.
Best Practices for Ring Performance
- Wi-Fi Strength and Stability: This is paramount. A weak Wi-Fi signal (indicated by a low RSSI number in the Device Health section of the Ring app) can lead to delayed notifications, choppy video, and battery drain. Consider a Ring Chime Pro or a general Wi-Fi extender if your signal is consistently poor at the device’s location.
- Battery Management (for Battery Devices): Fully charge batteries regularly. Consider purchasing a second battery so you can swap them out without downtime. Cold weather significantly impacts battery life, so expect more frequent charging in winter months.
- Motion Zone Tuning: Periodically review and adjust your motion zones. Overly broad zones or zones that include frequent, irrelevant motion sources (like trees or passing cars) can lead to excessive notifications and faster battery depletion. Utilize features like People Only mode (with Ring Protect subscription) to filter out non-human motion.
- Privacy Zones: Use privacy zones to mask areas within your camera’s view that you do not wish to record, respecting neighbors’ privacy or public spaces.
- Subscription (Ring Protect Plan): While Ring devices work without a subscription, the Ring Protect Plan unlocks critical features like video history (allowing you to review past events), advanced motion detection (person detection), and rich notifications. For a relatively small monthly fee, this plan significantly enhances your device’s utility and acts as a valuable investment in your home’s digital security infrastructure.
- Digital Security: Just like any online account, your Ring account needs robust protection. Use a strong, unique password and enable two-factor authentication (2FA) for an added layer of security. Regularly review who has access to your Ring account (shared users).
Common Troubleshooting Steps
Even with the best setup, issues can arise. Here’s how to address the most frequent problems:
- Device Offline:
- Check Wi-Fi: Ensure your router is working and broadcasting. Try restarting your router.
- Check Power: Verify the device is receiving power (battery charged, wired connection secure).
- Ring App Status: Check the “Device Health” section in the app for Wi-Fi signal strength (RSSI).
- Reconnection/Reset: If Wi-Fi changed or is unstable, you may need to reconnect the device via the app or perform a soft reset (holding down the setup button).
- Poor Video Quality:
- Wi-Fi Signal: A weak signal is the most common cause. Improve Wi-Fi strength.
- Clean Lens: A dirty lens can cause blurry video. Gently wipe it with a soft cloth.
- Lighting: Ensure adequate lighting. Infrared night vision can be affected by reflective surfaces close to the camera.
- Motion Detection Issues (Too many/Too few alerts):
- Adjust Sensitivity: Lower sensitivity for fewer alerts, increase for more.
- Refine Motion Zones: Redraw zones to include only relevant areas.
- Placement: Ensure the device isn’t positioned where it’s constantly triggered by irrelevant motion (e.g., tree branches, busy street).
- Delay Settings: Some devices have a “Motion Frequency” setting to reduce consecutive alerts.
- Battery Draining Fast:
- High Motion Frequency: Too many motion events will quickly deplete the battery. Adjust motion zones and sensitivity.
- Live View Usage: Frequent use of Live View consumes significant battery.
- Cold Weather: Batteries perform less efficiently in cold temperatures.
- Weak Wi-Fi: The device works harder to maintain connection, leading to faster drain.
- Audio Problems (No sound or distorted audio):
- App Settings: Check the app’s microphone and speaker settings.
- Obstructions: Ensure the device’s microphone and speaker holes are not blocked.
- Wi-Fi Quality: Poor Wi-Fi can also impact audio transmission.
- Installation Verification (for wired devices): If a wired device isn’t powering on, double-check all electrical connections. Ensure wires are firmly seated in terminals/wire nuts and that the power breaker is on.
By understanding these common issues and troubleshooting steps, you can maintain optimal performance and maximize the longevity of your Ring devices, contributing to a robust digital security setup for your home.
Integrating Ring into Your Broader Smart Home Ecosystem
Ring devices, while powerful on their own, truly shine when integrated into a larger smart home ecosystem. This not only enhances convenience but also creates a more comprehensive security and automation network. This touches upon advanced “Tech” integration and the value added beyond basic functionality.
Connecting with Amazon Alexa
Ring is an Amazon company, so its integration with Amazon Alexa is seamless and robust.
- Enable Ring Skill: Open the Alexa app, go to “Skills & Games,” search for “Ring,” and enable the skill.
- Link Accounts: You’ll be prompted to link your Ring account to your Alexa account.
- Discover Devices: Alexa will then discover your Ring devices.
- Voice Commands:
- “Alexa, show me the front door.” (Requires an Echo Show, Fire TV, or other screen-enabled Alexa device).
- “Alexa, answer the front door.” (For Doorbells, allows two-way talk via Echo Show).
- “Alexa, turn on the backyard floodlight.” (For Floodlight or Spotlight Cams).
- “Alexa, arm Ring in Home/Away mode.” (For Ring Alarm system).
- You can also receive doorbell press announcements and motion alerts directly on your Echo devices.
This integration transforms your smart speakers and displays into interactive monitoring and communication hubs, enhancing your ability to respond to events even when your phone isn’t handy.
Compatibility with Other Smart Home Platforms
While Ring’s deepest integration is with Alexa, there are avenues for limited compatibility with other platforms:
- IFTTT (If This Then That): IFTTT is a web-based service that allows you to create custom applets connecting various smart devices and services. You can set up applets like: “If Ring doorbell detects motion, then turn on Philips Hue lights” or “If Ring Alarm is disarmed, then unlock August smart lock.” This provides a bridge to many non-Alexa compatible devices.
- Ring Alarm and Z-Wave: The Ring Alarm system acts as a Z-Wave hub, allowing you to connect certain third-party Z-Wave devices (like smart locks, light switches, or additional sensors) directly to the Ring Alarm base station. This expands your security system’s capabilities beyond just Ring-branded peripherals.
- Google Assistant: Integration with Google Assistant is more limited compared to Alexa, typically allowing for basic commands like “Hey Google, show me the front door” (on Google Nest Hubs) but often lacking two-way talk or advanced control.
Building a Comprehensive Security Network
The true power of Ring lies in building a multi-layered security network.
- Ring Ecosystem Synergy: Combine Ring Video Doorbells with Ring Security Cameras to cover all entry points and blind spots. If you have the Ring Alarm system, integrate your cameras so they start recording when the alarm is triggered, providing visual verification of events.
- Smart Routines: Leverage your smart home platform (primarily Alexa) to create automated routines. For example:
- “If Ring Doorbell detects motion at night, turn on the smart porch light.”
- “If Ring Alarm is armed Away, ensure all smart locks are locked.”
- “When I say ‘Goodnight,’ arm Ring Alarm and turn off all Ring lights.”
- Enhanced Deterrence: The combination of lights, sirens (on Spotlight/Floodlight Cams), and two-way talk from your Ring devices provides strong deterrence against potential intruders. The Neighbors app also connects you to a community of local Ring users, allowing you to share and receive crime and safety alerts, further bolstering local security.
By intelligently integrating Ring into your wider smart home, you create a cohesive and proactive security system that offers not just surveillance, but active protection and automation, making your home significantly smarter and safer.
Conclusion
Installing a Ring device is a straightforward process that offers substantial benefits for your home’s security and your peace of mind. By following these detailed steps—from identifying your device and gathering the right tools to executing the physical installation and configuring it via the intuitive Ring app—you can confidently set up your smart security system.
Remember, optimization through fine-tuning settings like motion zones and understanding basic troubleshooting ensures your device performs reliably day in and day out. Furthermore, integrating Ring into your smart home ecosystem, especially with platforms like Amazon Alexa, unlocks a world of convenience and enhanced automation, transforming your living space into a truly intelligent and secure environment.
In a world where digital security and peace of mind are paramount, taking control of your home’s safety with Ring is a smart and accessible investment. Embrace the technology, follow these guidelines, and enjoy the comfort of knowing your home is always under your watchful eye.
aViewFromTheCave is a participant in the Amazon Services LLC Associates Program, an affiliate advertising program designed to provide a means for sites to earn advertising fees by advertising and linking to Amazon.com. Amazon, the Amazon logo, AmazonSupply, and the AmazonSupply logo are trademarks of Amazon.com, Inc. or its affiliates. As an Amazon Associate we earn affiliate commissions from qualifying purchases.