In the fast-paced digital landscape, the performance of your computer is paramount. Whether you’re a hardcore gamer, a creative professional, a remote worker, or simply someone who enjoys seamless multitasking, sluggishness and frequent freezes can be major roadblocks to productivity and enjoyment. One of the most impactful and cost-effective upgrades you can perform to breathe new life into an aging machine, or boost a relatively new one, is increasing its Random Access Memory (RAM). This guide will walk you through the entire process of installing RAM memory, transforming your computing experience and solidifying your digital efficiency.
Why Upgrade Your RAM? Unlocking Performance and Value
Before diving into the nuts and bolts of installation, it’s crucial to understand why a RAM upgrade is often the smartest move for your computer and your wallet. Unlike permanent storage (like an SSD or HDD), RAM is your computer’s short-term memory, where it stores data and instructions actively being used by the operating system and running applications. The more RAM you have, the more information your computer can juggle simultaneously, leading to significantly smoother performance.
Identifying Your RAM Needs
Are you experiencing frustrating slowdowns, applications crashing, or delays when switching between tasks? These are classic symptoms of insufficient RAM. Every application, from your web browser (especially with multiple tabs open) to demanding video editing software or modern games, consumes RAM. If your computer runs out of available RAM, it resorts to using a portion of your much slower storage drive (virtual memory or paging file), which drastically impacts speed and responsiveness.
An upgrade is particularly beneficial if you:
- Multitask heavily: Run several applications concurrently (e.g., a browser with dozens of tabs, Photoshop, Spotify, and a word processor).
- Engage in memory-intensive tasks: Video editing, graphic design, 3D rendering, or running virtual machines.
- Game extensively: Modern games often require substantial amounts of RAM for optimal performance and loading times.
- Notice frequent disk activity when idle: This often indicates the system is constantly swapping data to and from the slower virtual memory.
Upgrading your RAM isn’t just about speed; it’s about enhancing your overall digital experience, which in turn reflects positively on your personal brand as someone who values efficiency and competence. For businesses, ensuring employees have adequately specced machines with sufficient RAM translates directly into higher productivity and reduced downtime, bolstering the corporate identity of innovation and operational excellence.
The Cost-Benefit Analysis: DIY vs. New PC
From a financial perspective, a RAM upgrade often presents an exceptional return on investment (ROI). Purchasing new RAM modules is typically far less expensive than buying an entirely new computer, especially if your existing CPU, motherboard, and storage are still perfectly adequate for your needs. A 16GB or 32GB RAM kit might cost a fraction of a new machine, yet it can deliver a noticeable performance boost that makes your current system feel like new again.
Embracing the DIY approach to RAM installation not only saves you the labor costs of a professional service but also empowers you with valuable tech skills. It demystifies your computer’s internal workings, contributing to a more self-reliant and financially astute approach to technology maintenance. This proactive stance aligns perfectly with managing personal finances wisely, ensuring you get the most out of your existing assets before incurring significant new expenses.
Preparing for Your RAM Installation: The Crucial Pre-Flight Check
A successful RAM upgrade hinges on thorough preparation. This isn’t just about having the right tools; it’s about ensuring compatibility and taking necessary safety precautions. Skipping these steps can lead to frustration, component damage, or even system instability.
Verifying Compatibility and Sourcing the Right Modules
This is arguably the most critical step. RAM is not a one-size-fits-all component. You need to identify the correct type, generation, speed, and capacity that your motherboard supports.
-
Determine Current RAM and Motherboard Specifications:
- Using Software: Tools like CPU-Z (Windows) or “About This Mac” (macOS) can provide detailed information about your current RAM (type, speed, size, number of slots used) and motherboard model. For Windows, you can also open Task Manager (Ctrl+Shift+Esc), go to the “Performance” tab, select “Memory,” and observe the “Speed,” “Slots used,” and “Form factor” details.
- Physical Inspection: If comfortable, open your PC case and look at the RAM sticks themselves. They usually have labels indicating their type (e.g., DDR4, DDR5), speed (e.g., 3200MHz), and capacity (e.g., 8GB). Your motherboard manual or manufacturer’s website will list supported RAM types, maximum capacity, and number of slots.
- Crucial System Scanner: Websites like Crucial.com offer system scanners that automatically detect your system’s specifications and recommend compatible RAM modules.
-
Understand RAM Types (DDR generations):
- Most modern PCs use DDR4 or DDR5 RAM. These are not cross-compatible (a DDR4 slot will not accept DDR5, and vice-versa).
- Laptops use smaller modules called SO-DIMM (Small Outline Dual In-line Memory Module), while desktops use DIMM (Dual In-line Memory Module). Ensure you buy the correct form factor.
-
Speed (MHz) and Latency (CL):
- RAM speed is measured in MHz (e.g., 3200MHz, 3600MHz). Your new RAM should ideally match or exceed the speed of your existing RAM (if you’re mixing, all modules will operate at the lowest common speed).
- Latency (CAS Latency or CL) indicates how many clock cycles RAM takes to respond to a request. Lower CL is better. While less critical than type and speed, aim for lower latency if given a choice.
-
Capacity (GB):
- Common capacities are 8GB, 16GB, 32GB, and 64GB. For most users, 16GB is a sweet spot, while 32GB is excellent for heavy multitasking and demanding applications.
- Consider your motherboard’s maximum supported RAM capacity and the number of available slots. If you have two slots and want 16GB, you might buy two 8GB sticks. If you have four slots, you could buy four 4GB, or two 8GB leaving two for future expansion. Buying RAM in “kits” (e.g., 2x8GB) ensures optimal compatibility.
Essential Tools and Safety Precautions
Before you lay a hand on your computer, gather these items and follow these crucial safety steps:
-
Tools:
- Phillips Head Screwdriver: For opening the computer case.
- Anti-Static Wrist Strap (Recommended): This is highly advisable to prevent electrostatic discharge (ESD), which can permanently damage sensitive computer components.
- Clean, Well-Lit Work Surface: A clear area helps prevent dropping screws and provides good visibility.
- Compressed Air (Optional): Useful for cleaning out dust while the case is open.
-
Safety Precautions:
- Power Down Completely: Shut down your computer, not just sleep. Disconnect the power cable from the wall outlet and the back of your PC.
- Unplug All Peripherals: Disconnect monitors, USB devices, Ethernet cables, etc.
- Ground Yourself: This is paramount to prevent ESD.
- The simplest method is to touch a bare metal part of your computer case after it’s unplugged but before opening it. This equalizes your static charge with the chassis.
- Better yet, wear an anti-static wrist strap, attaching its clip to a bare metal part of the PC case.
- Avoid working on carpet, which can generate static. If unavoidable, frequently touch a grounded metal object.
- Organize Screws: Keep track of where each screw came from. A small bowl or magnetic mat can be very helpful.
- Handle with Care: Always hold RAM modules by their edges, avoiding contact with the gold electrical contacts or the chips themselves.
Taking these preparatory steps ensures a smooth, safe, and successful upgrade, preventing costly mistakes and allowing you to maximize your investment in your PC’s longevity and performance.
The Step-by-Step RAM Installation Process

With your preparations complete, it’s time for the physical installation. This process is generally straightforward, but precision and gentle handling are key.
Opening Your Computer Case
- Lay the PC Down: Gently lay your desktop computer case on its side on your clean work surface. This provides better access and prevents components from shifting.
- Remove Side Panel: Most desktop cases have a side panel secured by two or three thumbscrews or standard Phillips head screws at the back. Unscrew them and gently slide the panel backward to remove it. Some cases might have a latch mechanism. Consult your PC’s manual if unsure. For laptops, the process is more involved, usually requiring removal of the entire back panel, which can vary greatly by model.
- Locate RAM Slots: Once the case is open, you’ll see the motherboard, a large circuit board. The RAM slots are typically located near the CPU, often in groups of two or four, long and slender, with clips at either end. They are usually color-coded or labeled.
Locating and Removing Existing RAM (If Applicable)
If you’re replacing existing RAM or adding to existing modules, you’ll need to work with the occupied slots.
- Identify Occupied Slots: Note which slots already have RAM installed.
- Release RAM Modules: At each end of a RAM slot, there’s a small plastic or metal retention clip. To remove a module, gently push these clips outward (away from the RAM stick) simultaneously. The RAM stick will pop up slightly.
- Remove the Module: Carefully grasp the RAM module by its edges and lift it straight out of the slot. Place it in an anti-static bag or a safe, non-conductive surface if you plan to keep it.
Inserting the New RAM Modules
This is the moment of truth. Pay close attention to orientation and apply even pressure.
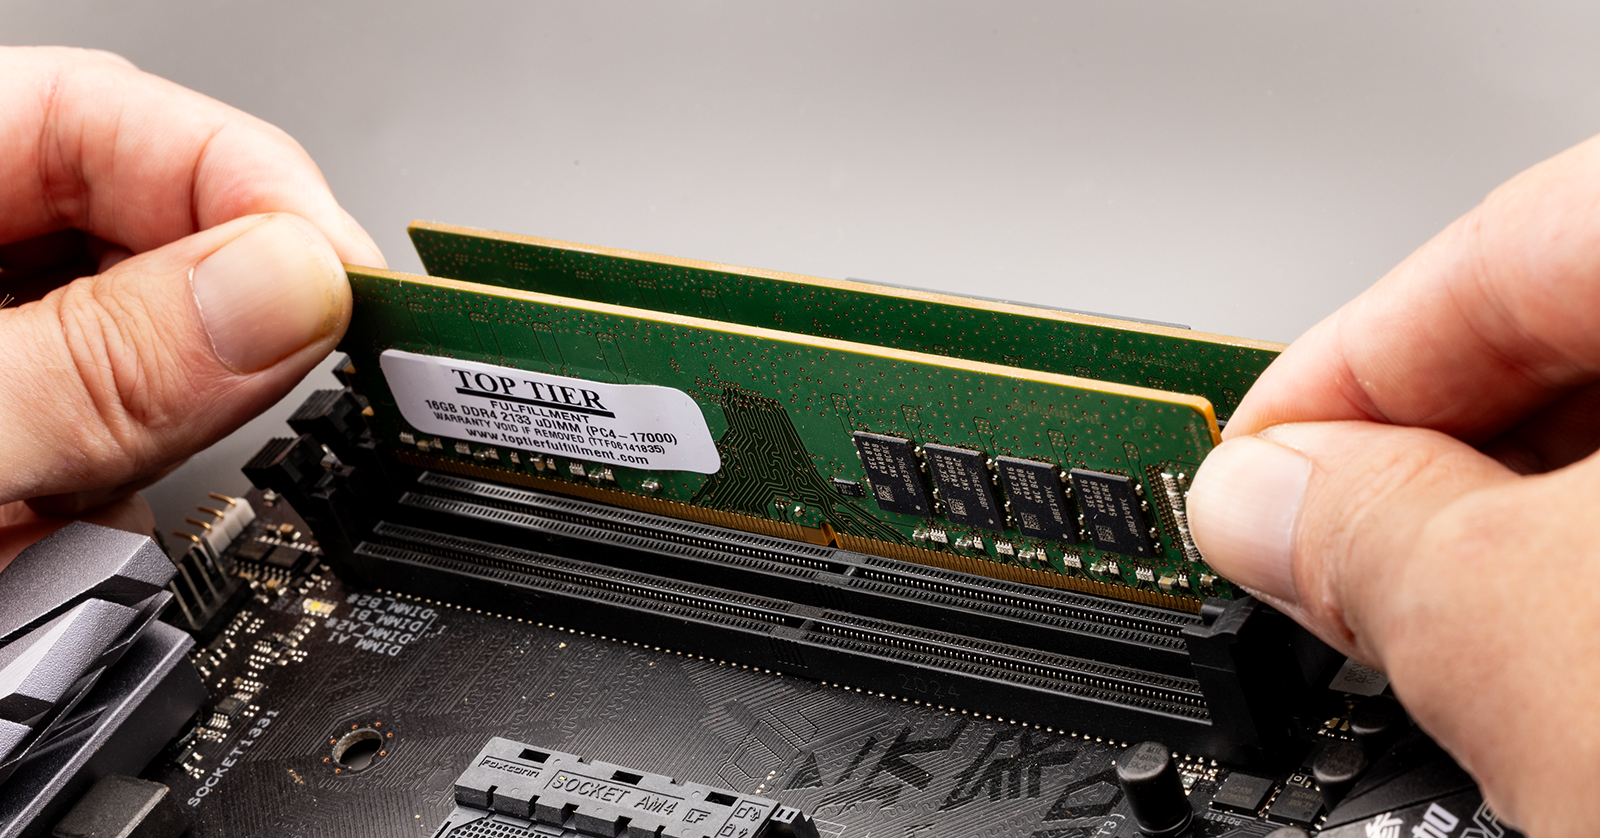
- Identify the Notch: Each RAM module has a notch or key along its gold contacts. The RAM slot on the motherboard also has a corresponding ridge. This notch ensures the RAM can only be inserted in one direction.
- Align the Module: Carefully align the notch on your new RAM module with the ridge in the DIMM slot. Ensure the module is directly above the slot, with the clips fully open.
- Insert and Apply Pressure: With the module correctly aligned, place it into the slot. Then, using both thumbs, apply even and firm pressure downwards on both ends of the RAM stick simultaneously. You should hear a distinct “click” as the retention clips snap into place, securing the module.
- Verify Seating: Double-check that both clips are fully closed and that the RAM module is seated flush and level in the slot. If a clip isn’t fully closed, the RAM isn’t properly installed, and your computer won’t boot. Gently push on the clips until they secure the module.
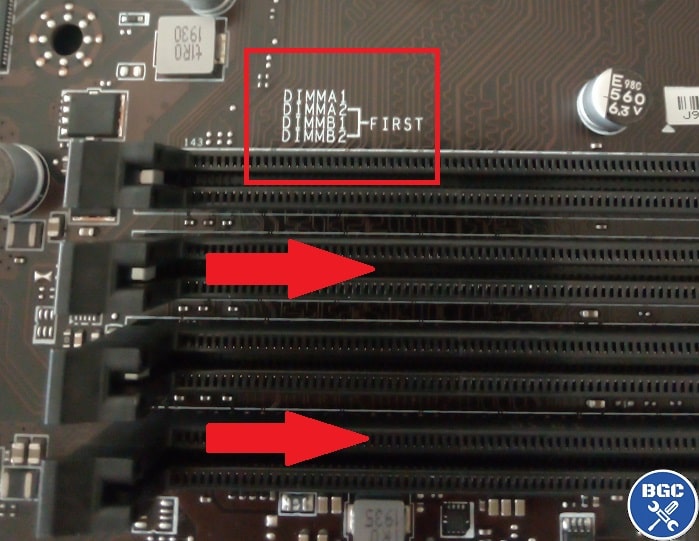
- Populate Slots Correctly: If you’re installing multiple modules, consult your motherboard manual. Motherboards often have “dual-channel” or “quad-channel” configurations, meaning RAM performs best when installed in specific paired slots (e.g., slots 2 and 4, or 1 and 3, often indicated by color-coding). Installing them correctly maximizes performance.
Once all new RAM modules are securely in place, carefully reattach the side panel of your computer case, ensuring all screws are tightened. Reconnect all peripherals and the power cable.
Post-Installation Checks and Optimization
The physical installation is complete, but your journey isn’t over. It’s vital to verify the installation and perform any necessary optimizations to ensure your new RAM is working as intended.
Verifying the Installation in BIOS/OS
-
First Boot: Power on your computer. If everything went well, it should boot normally. You might notice a slight delay on the first boot as the system registers the new memory. If it doesn’t boot, refer to the troubleshooting section.
-
Check in BIOS/UEFI: Before your operating system loads, you can usually enter the BIOS/UEFI settings (often by pressing DEL, F2, F10, or F12 during startup, depending on your motherboard). Within the BIOS, there’s typically a section that displays the total installed RAM. Confirm that the amount matches your new configuration.
-
Verify in Operating System:
- Windows: Right-click on “This PC” (or “My Computer”) and select “Properties.” Alternatively, open Task Manager (Ctrl+Shift+Esc), go to the “Performance” tab, and select “Memory.” It will display the total installed RAM.
- macOS: Click the Apple menu in the top-left corner, then “About This Mac.” It will show the total memory.
- Linux: Open a terminal and type
free -horsudo lshw -c memory.
-
Enable XMP/DOCP (Optional, for higher speed RAM): If you purchased high-speed RAM (e.g., 3600MHz), your motherboard might default to a lower safe speed (e.g., 2133MHz or 2400MHz). To unlock its full advertised speed, you’ll need to enable the eXtreme Memory Profile (XMP for Intel) or DOCP (Direct Overclock Profile for AMD) in your BIOS/UEFI settings. Look for an option related to “memory profile” or “overclocking.” Enabling this profile will automatically set the correct voltage, timings, and speed for your RAM.
Troubleshooting Common Issues
If your computer doesn’t boot after installing RAM, don’t panic. Here are common issues and solutions:
- No Display/Beep Codes: This is the most common symptom of improperly seated RAM.
- Solution: Power down, unplug, open the case, and re-seat each RAM module. Ensure the clips snap firmly into place. Try one stick at a time if you installed multiple.
- Check Compatibility: Double-check that the RAM type (DDR4/DDR5) is correct for your motherboard.
- Wrong Amount of RAM Displayed:
- Solution: Re-seat the modules. Ensure all modules are fully inserted. Check your motherboard manual for correct slot population order, especially for dual-channel setups.
- System Instability/Crashes:
- Solution: Run a memory diagnostic tool (e.g., Windows Memory Diagnostic, MemTest86). This can identify faulty RAM modules. If a module is bad, it needs to be replaced. Also, ensure XMP/DOCP settings are stable; sometimes, manually adjusting timings or slightly increasing voltage (if you know what you’re doing) might be necessary, but usually, default XMP works.
- RAM Not Running at Advertised Speed:
- Solution: Enter BIOS/UEFI and enable XMP/DOCP. If it’s still not correct, ensure your motherboard and CPU officially support that RAM speed.
Maximizing Your Investment: Beyond the Physical Install
Congratulations! You’ve successfully upgraded your RAM. But the benefits extend beyond the immediate performance boost. This DIY project is an investment that continues to pay dividends.
Performance Monitoring and Maintenance
Even after a successful upgrade, it’s good practice to monitor your system. Keep an eye on Task Manager (Windows) or Activity Monitor (macOS) to see how your applications utilize the new memory. This helps you understand your system’s capabilities and identify any lingering bottlenecks. Regularly cleaning dust from your PC’s interior, especially around RAM slots and fans, ensures optimal cooling and longevity for all components, protecting your investment.
The Ongoing Value of a DIY Approach
By taking the initiative to install your RAM, you’ve not only saved money but also gained invaluable technical experience. This newfound confidence can extend to other DIY upgrades or troubleshooting, further reducing future expenses on professional services. This aligns perfectly with sound personal finance principles – empowering yourself with knowledge and skills to manage your assets effectively.
Furthermore, a well-maintained and high-performing PC enhances your digital productivity, which is crucial for modern work and life. A machine that runs smoothly allows you to focus on tasks rather than technical frustrations, indirectly bolstering your professional output and personal brand. You’re not just installing memory; you’re investing in a more efficient, capable, and enjoyable computing future.
Embrace the power of your upgraded system, explore new software, conquer demanding tasks, and enjoy the seamless performance you’ve earned through your efforts. Your PC is now primed to meet the demands of tomorrow’s digital world.
aViewFromTheCave is a participant in the Amazon Services LLC Associates Program, an affiliate advertising program designed to provide a means for sites to earn advertising fees by advertising and linking to Amazon.com. Amazon, the Amazon logo, AmazonSupply, and the AmazonSupply logo are trademarks of Amazon.com, Inc. or its affiliates. As an Amazon Associate we earn affiliate commissions from qualifying purchases.