In today’s fast-paced digital world, a sluggish computer can be a major bottleneck to productivity, creativity, and even leisure. While buying a brand-new laptop might seem like the obvious solution, it often comes with a hefty price tag. For many HP laptop users, a more strategic and cost-effective approach to revitalizing their device lies in a simple yet impactful upgrade: installing more RAM (Random Access Memory). This tutorial will not only guide you through the process of upgrading RAM in your HP laptop but also illuminate the profound benefits, from unlocking superior performance to extending the lifespan of your valuable tech investment.
At its core, RAM acts as your computer’s short-term memory, enabling it to access data quickly for active applications. The more RAM you have, the more applications your laptop can run simultaneously without slowing down, and the faster it can switch between tasks. For modern users grappling with demanding software, extensive web browsing, or multimedia editing, a RAM upgrade isn’t just a luxury—it’s often a necessity. This detailed guide, drawing on principles of efficient tech management and smart financial decisions, will empower you to undertake this upgrade with confidence, ensuring your HP machine continues to serve your needs effectively.
Why Upgrade Your HP Laptop’s RAM? The Performance Imperative
Before diving into the mechanics of the upgrade, it’s crucial to understand the “why.” A RAM upgrade for your HP laptop isn’t merely about adding more components; it’s about fundamentally transforming your computing experience. It’s a strategic decision that touches upon technology, personal finance, and even the longevity of your digital assets.
Unlocking Speed and Multitasking Power
The most immediate and noticeable benefit of increasing your laptop’s RAM is a dramatic improvement in speed and responsiveness. Imagine trying to juggle multiple tasks – perhaps you’re editing a high-resolution image, streaming a 4K video, and researching online with a dozen browser tabs open. With insufficient RAM, your HP laptop would struggle, leading to frustrating delays, stuttering performance, and even application crashes.
When your system runs out of physical RAM, it resorts to using a portion of your hard drive as “virtual memory.” While this helps prevent crashes, accessing data from a hard drive is significantly slower than from RAM, resulting in the dreaded “lag.” Upgrading your RAM directly addresses this bottleneck. More RAM means your operating system and applications have ample space to store frequently accessed data, allowing for:
- Smoother Multitasking: Seamlessly switch between applications without performance hiccups.
- Faster Application Loading: Programs launch quicker and respond more swiftly.
- Enhanced Productivity: Spend less time waiting for your computer and more time accomplishing tasks.
- Improved Gaming/Creative Performance: More demanding applications, like video editors, CAD software, or modern games, will run more fluidly.
This immediate boost in performance translates directly into increased personal productivity and a more enjoyable user experience, making your HP laptop feel brand new without the cost of a full replacement.
Future-Proofing Your Digital Investment
Beyond immediate performance gains, a RAM upgrade is a savvy investment in the longevity and relevance of your HP laptop. Technology evolves at an astonishing pace, with software becoming increasingly resource-intensive. Operating systems receive updates that demand more memory, and new applications consistently push the boundaries of what older hardware can comfortably handle.
By proactively upgrading your RAM, you are effectively future-proofing your device. This means:
- Extending Laptop Lifespan: Instead of having to replace your laptop in 2-3 years due to declining performance, a RAM upgrade can comfortably add several more years of useful service, saving you hundreds, if not thousands, of dollars.
- Maintaining Competitiveness: Your upgraded HP laptop will remain capable of running contemporary software and operating systems, keeping you competitive whether for work, study, or creative pursuits.
- Boosting Resale Value: Should you decide to sell your laptop in the future, an upgraded component like RAM can enhance its market appeal and command a higher resale price, offering a better return on your initial investment.
Considering the “Money” aspect, the cost of a RAM module is a fraction of a new laptop’s price. This makes it an incredibly high-ROI (Return on Investment) upgrade, delivering substantial performance improvements and extending product life for minimal outlay. It’s a testament to the brand quality of HP that their laptops are designed with upgradability in mind, allowing users to enhance their devices rather than being forced into constant replacements.
Essential Preparations: Gathering Your Tools and Knowledge
Before you even think about opening your HP laptop, thorough preparation is paramount. This stage involves not only gathering the right physical tools but also acquiring crucial information about your specific laptop model and the RAM it requires. Skipping these steps can lead to compatibility issues, damage to your device, or even data loss.
Identifying the Right RAM Module for Your HP Laptop
The single most critical step in a successful RAM upgrade is selecting the correct RAM module. RAM is not a one-size-fits-all component. HP, like other major brands, utilizes specific types of RAM, and using an incompatible module will either prevent your laptop from booting or cause instability.
You need to consider three main specifications:
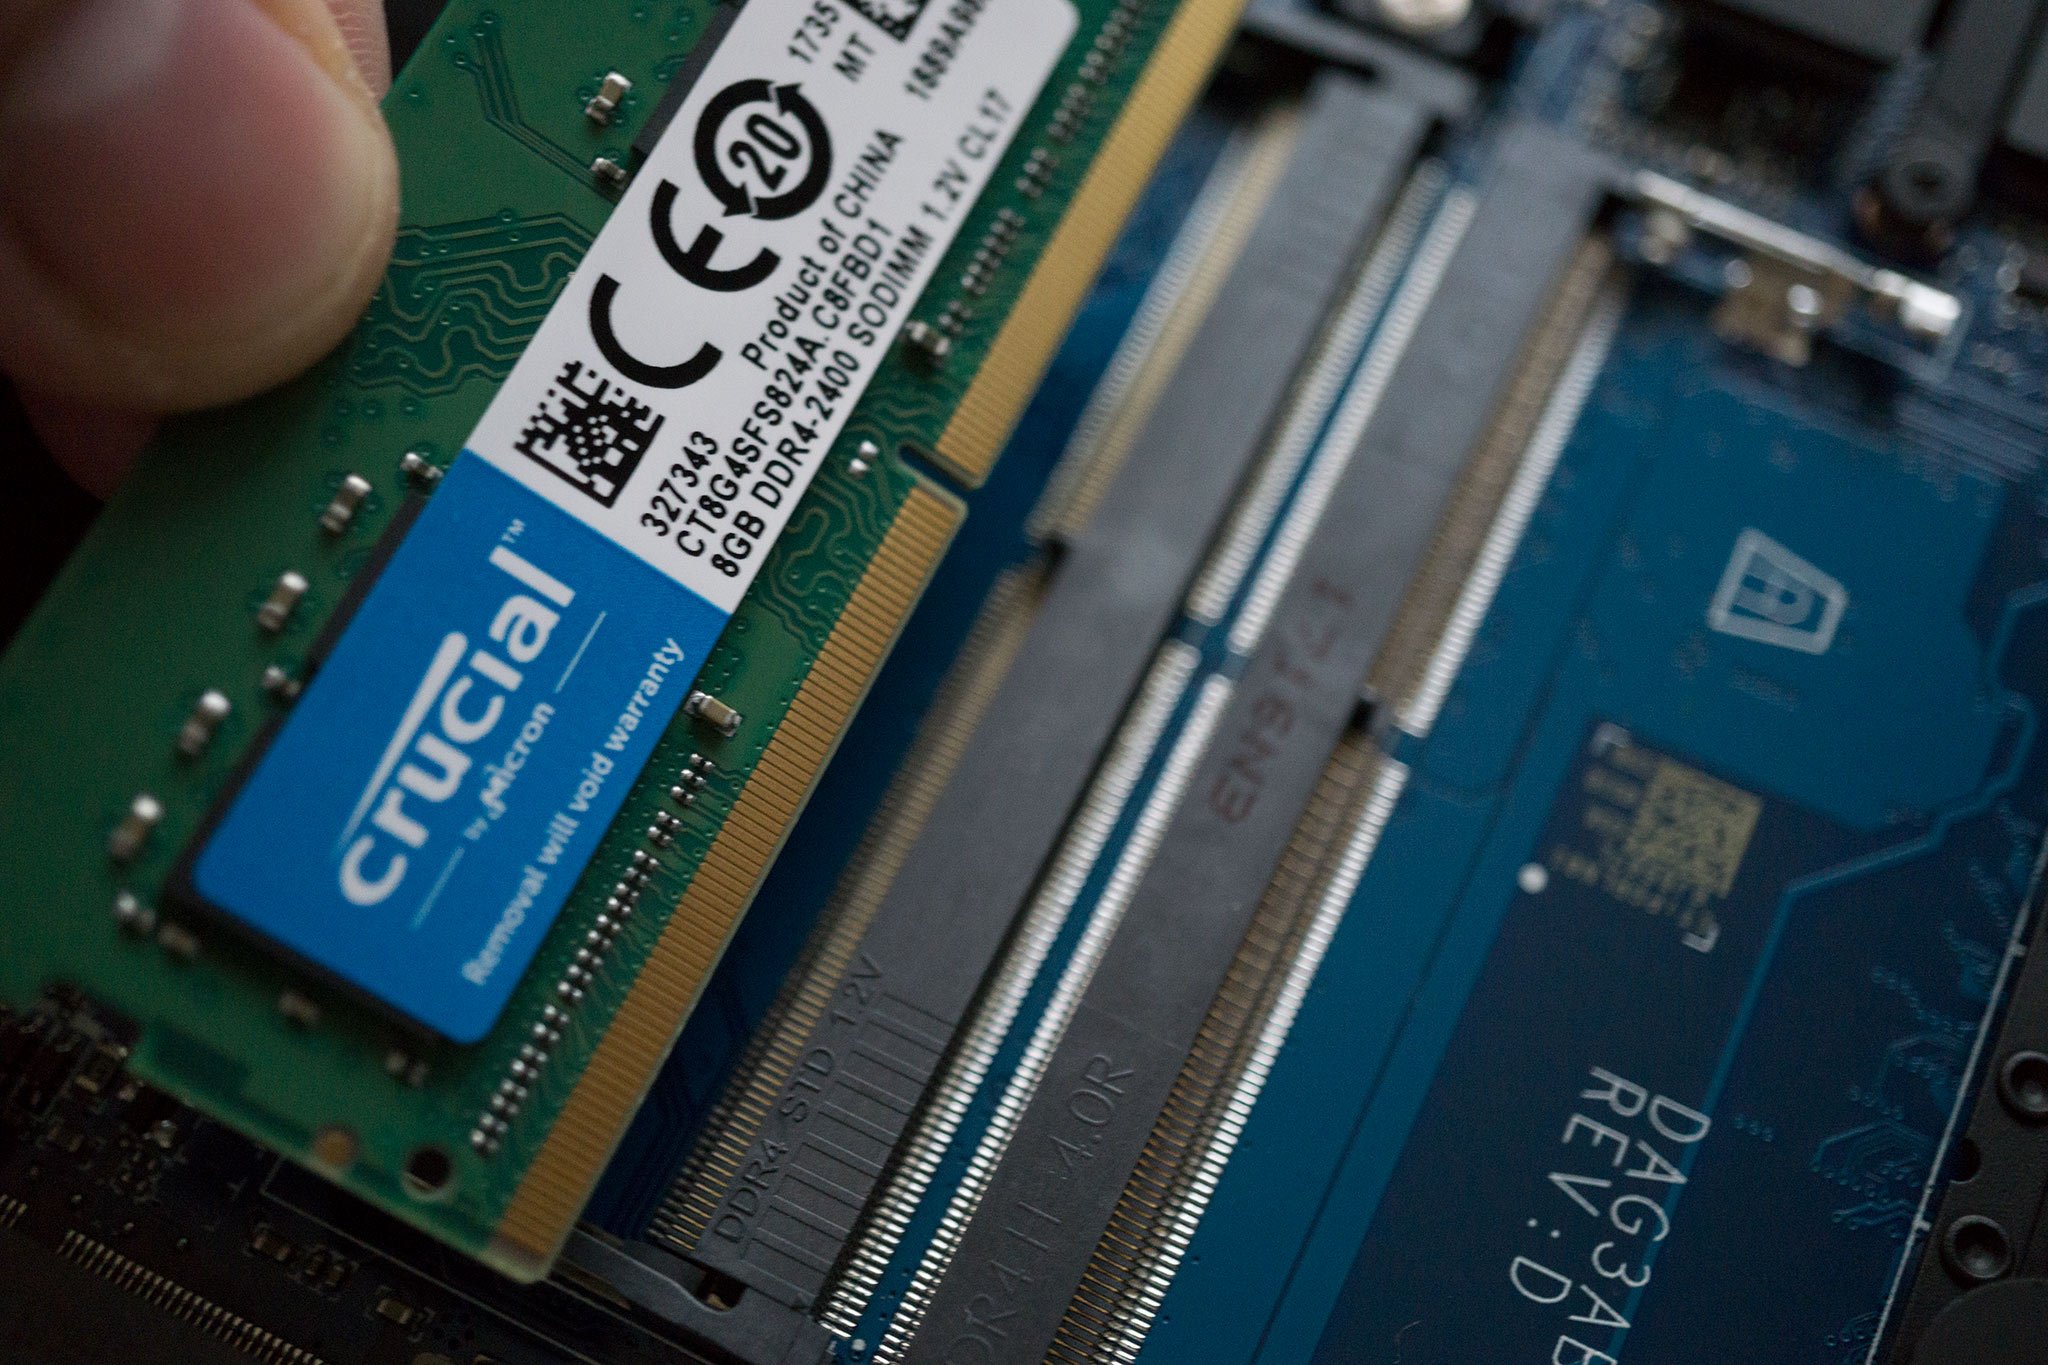
- Form Factor (SODIMM): Laptops use smaller RAM modules called Small Outline Dual In-line Memory Modules (SODIMM), distinct from the larger DIMMs used in desktop PCs. Ensure you purchase SODIMM RAM.
- Generation (DDR3, DDR4, DDR5): RAM generations are not interchangeable. A laptop designed for DDR4 RAM will not accept DDR3 or DDR5, and vice versa. Using the wrong generation is the most common mistake.
- Speed (MHz): RAM speed, measured in MHz, affects performance. Ideally, you should match the speed of your existing RAM or purchase modules that are compatible with your laptop’s motherboard. While faster RAM might downclock to match existing slower RAM, it’s best to aim for compatibility.
- Capacity (GB): Determine the maximum RAM your HP laptop supports and how many slots it has. Most modern laptops have 2 RAM slots. Check if you’re replacing existing modules or adding to an empty slot. Common capacities are 4GB, 8GB, 16GB, and 32GB per stick.
How to Identify Your Laptop’s RAM Specifications:
- System Information (Windows): Type “msinfo32” in the Windows search bar and look for “Installed Physical Memory (RAM)” and “System Type.” While this shows current RAM, it might not detail speed or generation.
- Task Manager (Windows): Go to the “Performance” tab, then “Memory.” It will show your current RAM, speed, and how many slots are used.
- Third-Party Software (e.g., CPU-Z): This free tool provides detailed information about your CPU, motherboard, and RAM (type, speed, timings). Highly recommended.
- HP Support Website: The most reliable method is to visit HP’s official support website, search for your specific laptop model (e.g., “HP Pavilion 15-csxxxx”), and look up its specifications or user manual for RAM compatibility. This also tells you the maximum supported RAM.
- Crucial.com or Kingston.com RAM Scanners: These websites offer tools where you can input your laptop’s make and model, and they will recommend compatible RAM upgrades.
By diligently performing this research, you ensure that your RAM purchase is a wise “Money” investment, guaranteeing compatibility and optimal performance without the hassle of returns or potential damage to your HP “Brand” laptop.
Safety First: Static Electricity and Data Backup
Once you’ve secured the correct RAM, the next crucial step is ensuring a safe working environment. Handling internal computer components requires precautions against static electricity and data loss.
- Back Up Your Data: While a RAM upgrade is generally safe, any internal hardware modification carries a minuscule risk. Before proceeding, perform a full backup of all critical data to an external hard drive or cloud service. This is a fundamental “Tech” security practice and a wise “Money” decision to protect your valuable information.
- Gather Your Tools: You’ll typically need:
- A small Phillips-head screwdriver (magnetic tips are a plus).
- A plastic pry tool (optional, but useful for opening stubborn plastic clips without scratching).
- An anti-static wrist strap: This is highly recommended to discharge static electricity from your body, preventing damage to sensitive components. If you don’t have one, frequently touch a grounded metal object (like a bare metal part of your laptop chassis before disconnecting the power) to dissipate static buildup.
- Find a Clean, Well-Lit Workspace: A clutter-free area minimizes the risk of losing small screws or damaging components. Avoid working on carpeted floors, which can generate more static electricity.
- Power Down and Disconnect:
- Completely shut down your HP laptop (don’t just put it to sleep).
- Unplug the power adapter.
- Remove any external peripherals (USB drives, mice, etc.).
- Crucially: If your HP laptop has a removable battery, remove it. For models with internal batteries, you’ll need to disconnect the battery cable from the motherboard once the back panel is off. This step is vital to prevent electrical shorts while working inside.
- Discharge Residual Power: After disconnecting power, press and hold the power button for 10-15 seconds. This helps drain any residual power from the system, making it safer to work on.
These safety measures are not just recommendations; they are critical to protecting your “Tech” investment and ensuring a smooth, damage-free upgrade process for your HP “Brand” laptop.
The Installation Process: A Detailed Walkthrough
With preparations complete, you’re ready for the actual physical installation. This section details each step, emphasizing caution and precision. Remember, HP’s diverse laptop lineup means that exact screw locations and panel designs may vary, but the fundamental process remains consistent.
Accessing the RAM Compartment
- Flip and Unscrew: Gently close your laptop and carefully flip it over onto a soft, clean surface (like a microfiber cloth) to prevent scratches. Locate all the screws on the bottom panel. HP laptops typically use standard Phillips-head screws. Some screws might be hidden under rubber feet or stickers; carefully peel these back if necessary. Keep track of where each screw came from, as they might vary in length. A magnetic parts tray or a labeled egg carton can be incredibly helpful for organizing screws.
- Remove the Bottom Panel: Once all screws are removed, the back panel should be slightly loose. For some HP models, there might be a dedicated access panel for RAM, while others require removing the entire bottom cover.
- Dedicated Panel: If your HP laptop has a small, clearly marked access panel, gently pry it open using your plastic pry tool or even a fingernail.
- Full Bottom Cover: If you need to remove the entire bottom cover, start from a corner (often near the hinges or a vent) and gently pry it up with your plastic tool. You’ll hear soft clicking sounds as the plastic clips release. Work your way around the edges until the cover is completely detached. Be patient and apply gentle, even pressure to avoid breaking the plastic clips. Set the cover aside in a safe place.
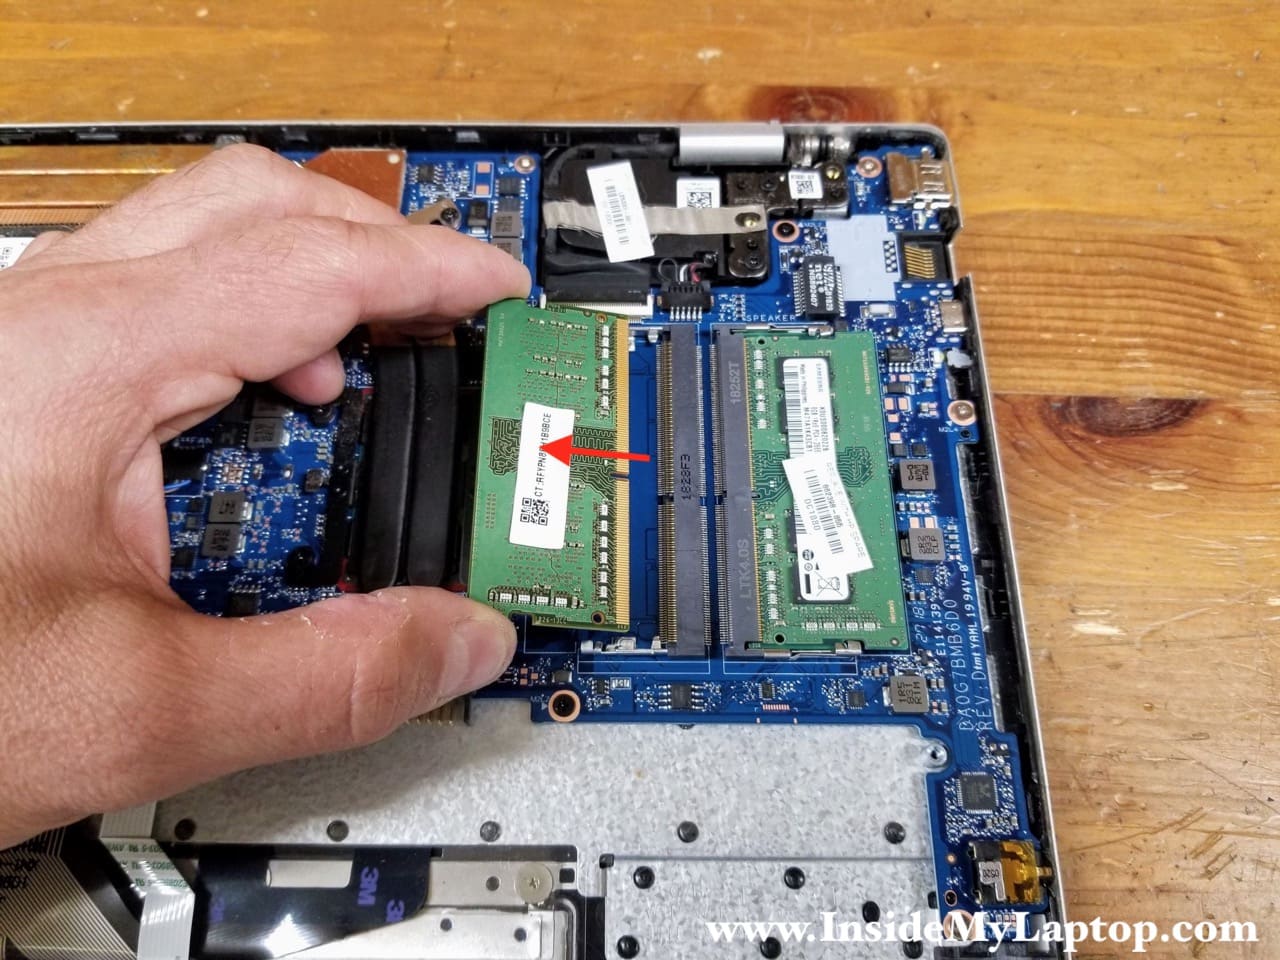
- Locate the RAM Slots: Once the cover is off, identify the RAM slots. They are usually located near the center of the motherboard and will contain either one or two SODIMM modules, often stacked or side-by-side.
Removing Existing RAM (If Applicable)
If you are replacing existing RAM modules rather than adding to an empty slot, you’ll need to remove them first.
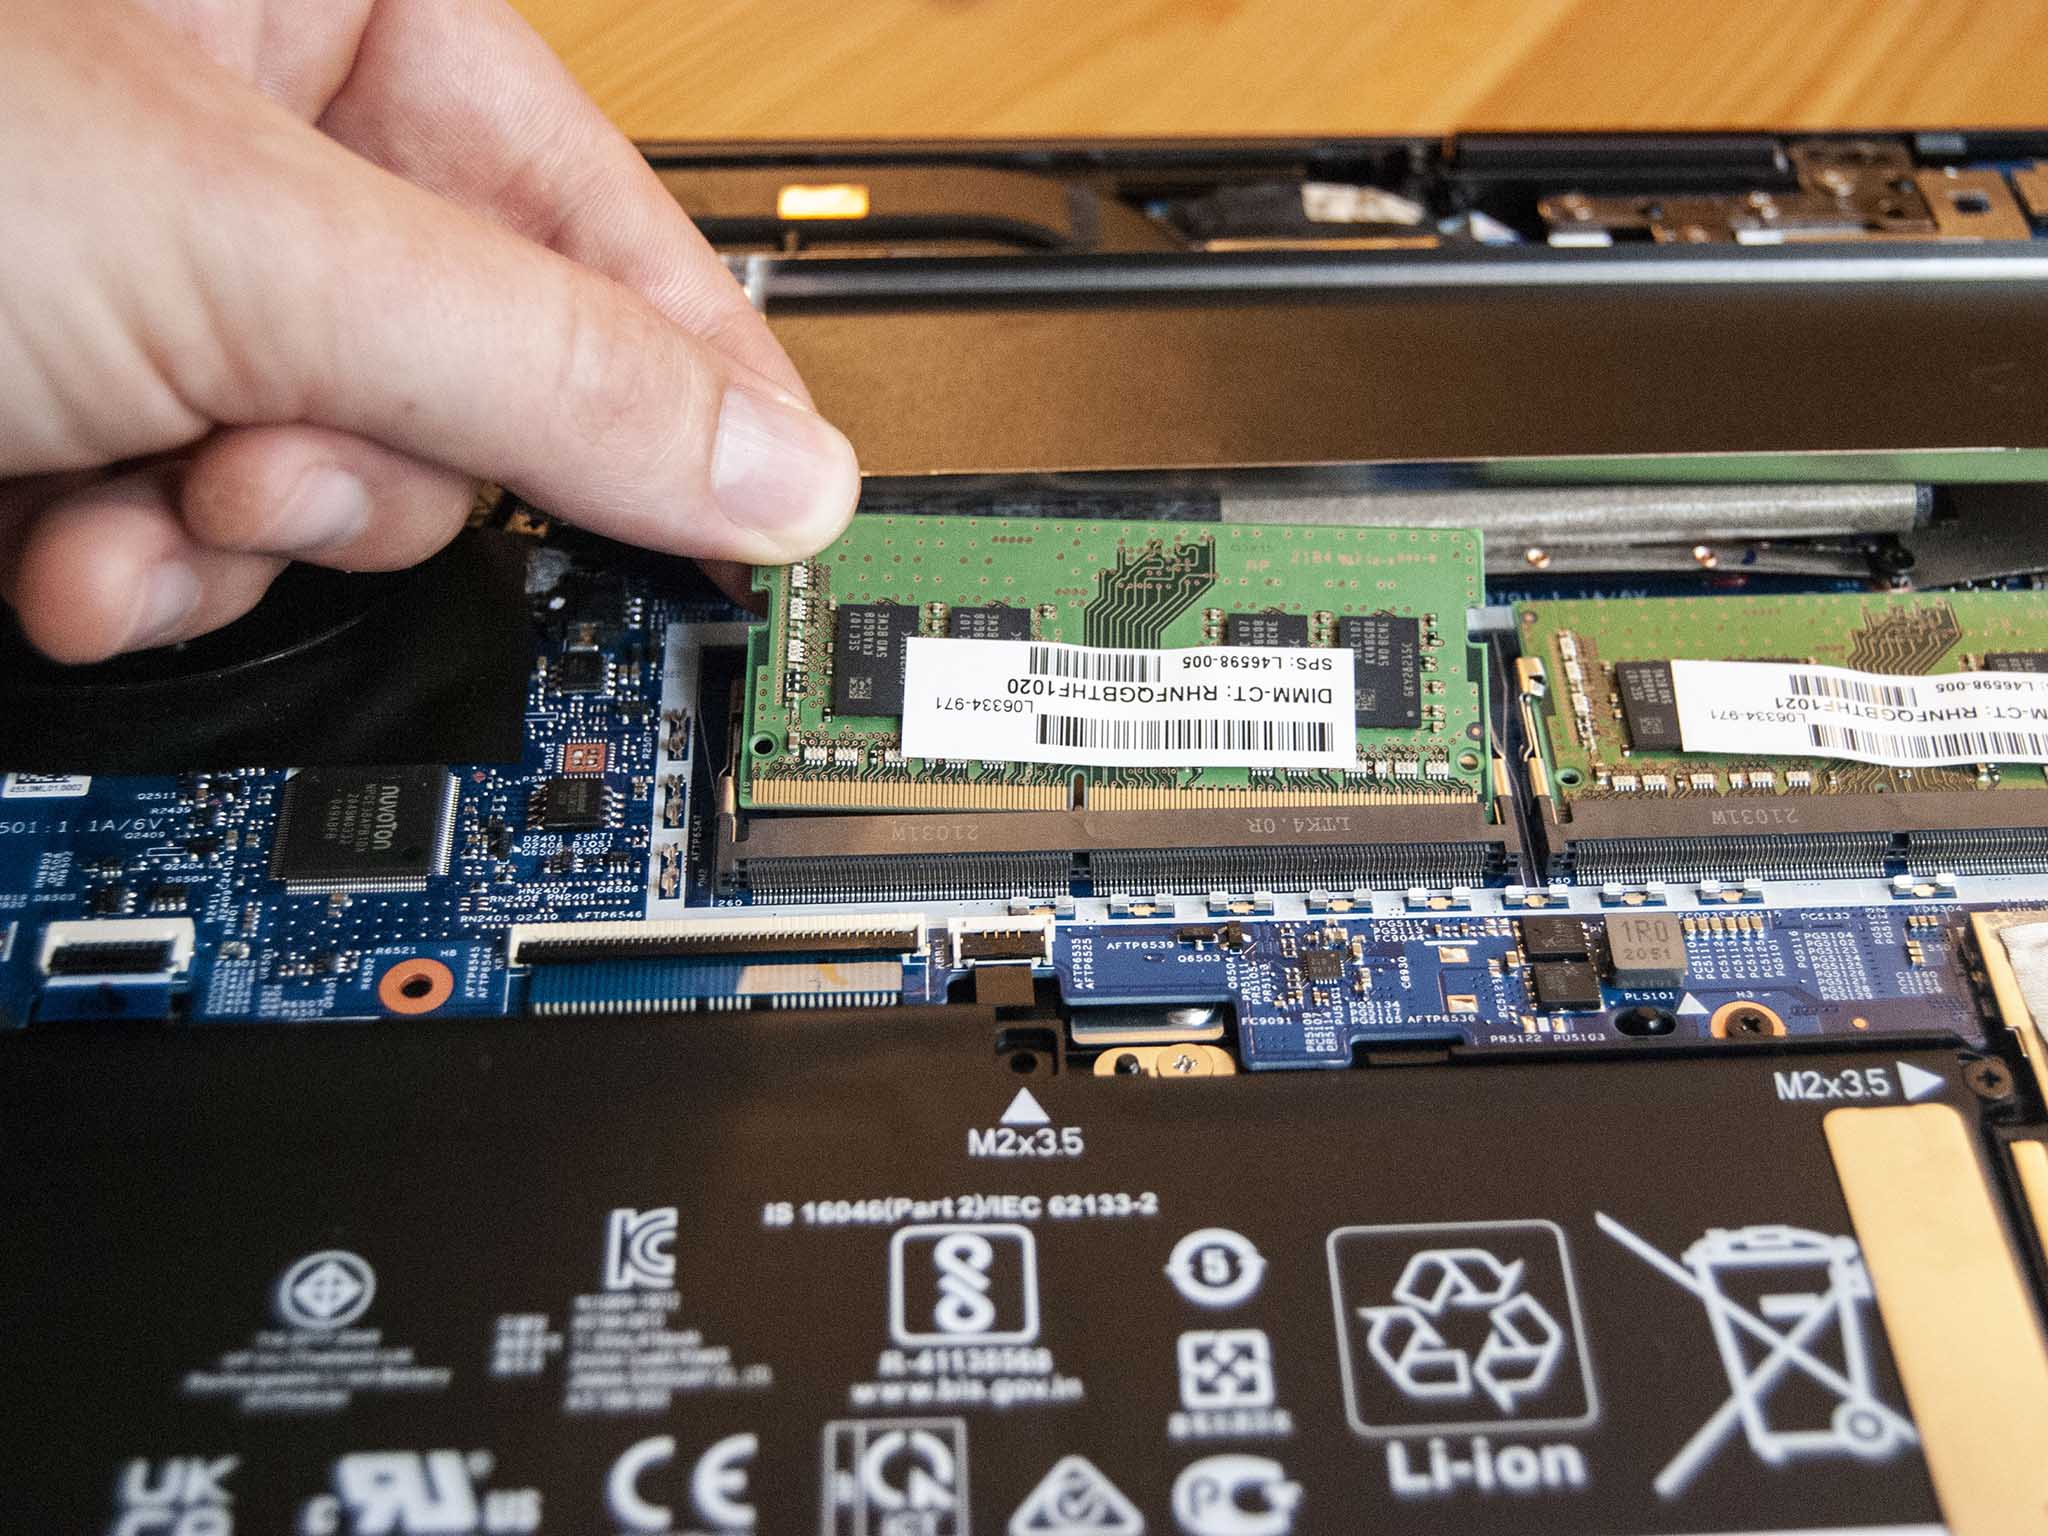
- Release the Clips: Each RAM module is held in place by two small metal or plastic clips on either side. Gently push these clips outwards simultaneously. The RAM stick will pop up at an angle (usually around 30-45 degrees).
- Gently Pull Out: Once the module is angled, carefully slide it straight out of the slot without forcing it. Hold the module by its edges to avoid touching the gold connectors or the chips.
- Store Safely: If you plan to keep the old RAM, place it in an anti-static bag or a safe container.
Seamlessly Installing New RAM Modules
This is the core of the upgrade. Take your time and be gentle.
- Orient the New RAM: Take your new RAM module out of its anti-static packaging. Hold it by the edges. Notice the small notch on the bottom edge of the RAM stick. This notch must align perfectly with the corresponding key in the RAM slot. This ensures the module is inserted correctly and prevents improper installation.
- Insert at an Angle: With the notch aligned, gently slide the RAM module into the slot at the same 30-45 degree angle that the old one popped out (or a similar angle if installing into an empty slot). Insert it firmly but without excessive force until the gold connectors are almost entirely hidden within the slot, with only the top edge visible.
- Press Down to Secure: Once inserted, gently but firmly push the RAM module downwards until it lies flat and the side clips snap into place, securing the module. You should hear a soft click on both sides. Double-check that both clips have fully engaged and the RAM module is snug and level.
- Install Additional Modules: If your laptop has two RAM slots and you’re installing two modules, repeat the process for the second stick.
Reassembly and Initial Power-Up
Once the RAM is securely installed, it’s time to put your HP laptop back together.
- Reconnect Battery (if disconnected): If you disconnected the internal battery cable, carefully reattach it to the motherboard connector.
- Replace the Bottom Panel: Align the bottom panel with the laptop chassis. Start by pressing along the edges to snap the plastic clips back into place. Ensure there are no gaps.
- Reinsert Screws: Carefully put all the screws back into their original positions. Do not overtighten them, as this can strip the screw threads or crack the plastic.
- Reattach External Battery (if applicable): Reinsert the external battery.
- Power On and Verify: Plug in your power adapter and power on your HP laptop. The first boot after a RAM upgrade might take slightly longer than usual as the system initializes the new memory. Do not panic if you see a blank screen for a few extra seconds.
Post-Upgrade Verification and Troubleshooting
After the physical installation, it’s essential to confirm that your new RAM has been successfully recognized and is functioning correctly. This final verification step ensures that your “Tech” efforts have yielded the desired “Money” value and enhanced the “Brand” experience of your HP laptop.
Confirming Successful RAM Recognition
Once your HP laptop boots up, you’ll want to verify that the operating system recognizes the newly installed RAM.
- Windows:
- Right-click on the “Start” button and select “System” or go to “Settings” > “System” > “About.”
- Look for “Installed RAM” or “Installed physical memory.” The displayed amount should reflect your total new RAM (e.g., if you had 8GB and added 8GB, it should now show 16GB).
- For more detailed information, open “Task Manager” (Ctrl+Shift+Esc), go to the “Performance” tab, and select “Memory.” This will show you the total RAM, speed, and how many slots are being used.
- BIOS/UEFI: You can also check the system’s BIOS or UEFI settings during startup. The method to access BIOS varies by HP model (commonly F10, F2, Esc, or Del immediately after powering on). Within the BIOS, navigate to a section like “System Information” or “Main” to see the recognized RAM amount.
Seeing the correct RAM amount confirms that the installation was physically successful and your HP laptop is now leveraging its enhanced memory.
Common Issues and Quick Fixes
Even with careful installation, minor issues can sometimes arise. Here are some common problems and their troubleshooting steps:
- Laptop Does Not Boot (Black Screen/No Display):
- Reseat the RAM: The most common cause is that the RAM modules are not fully seated in their slots. Open the laptop again, gently push down on the RAM sticks until you hear a clear click from both retaining clips, ensuring they are perfectly flush.
- Check Compatibility: Double-check that the new RAM is indeed compatible with your HP laptop’s model (DDR generation, speed, SODIMM form factor). Incorrect RAM will prevent booting.
- Try One Stick at a Time: If you installed two modules, try booting with just one stick in the first slot. If it boots, try the other stick. This helps identify if one of the modules is faulty.
- Reset CMOS: In rare cases, the BIOS might need to be reset. This usually involves removing the CMOS battery for a few minutes (a more advanced step, consult your HP manual).
- Laptop Boots, But RAM Not Fully Recognized (e.g., shows 4GB instead of 8GB):
- Check Slot Engagement: One of the RAM sticks might not be fully seated or correctly installed. Reseat both modules.
- Faulty Slot/Module: Try swapping the RAM modules between slots to isolate if one slot or one module is faulty.
- Motherboard Limitation: Verify again your HP model’s maximum supported RAM. Some older HP laptops might have a lower maximum capacity, or an older 32-bit operating system might only recognize up to ~3.5GB regardless of installed RAM (though most modern HP laptops run 64-bit OS).
- System Instability or Blue Screens:
- Faulty RAM: This could indicate a defective RAM module. Try testing with the old RAM or one stick at a time.
- Overheating: Ensure your laptop’s fans are clean and functioning, as increased load on a faster system can sometimes expose underlying cooling issues.
By systematically addressing these potential issues, you can usually resolve any post-installation snags. The ability to troubleshoot these “Tech” problems independently not only saves “Money” on professional repair services but also enhances your understanding of your HP “Brand” device.
The Long-Term Benefits: An Investment in Productivity and Value
Completing a RAM upgrade on your HP laptop is more than just a technical task; it’s a strategic decision that offers substantial long-term benefits across multiple facets of your digital life. You’ve not only revitalized your machine but also made an intelligent “Money” investment in its future.
From a “Tech” perspective, your HP laptop will now operate with a newfound agility. Applications will launch faster, multitasking will be smoother, and resource-intensive programs will run more efficiently. This translates directly into enhanced productivity, whether you’re a professional managing complex projects, a student juggling research and assignments, or a creative working with demanding multimedia software. The frustration of slowdowns and crashes will be significantly reduced, allowing you to focus on your tasks without interruption.
Furthermore, this upgrade profoundly impacts the “Brand” experience of your HP laptop. By choosing to upgrade rather than replace, you’ve optimized a device from a reputable manufacturer, reaffirming its inherent quality and design for longevity. It demonstrates that HP laptops, like many quality brands, offer users the flexibility to adapt their hardware to evolving needs, extending the value proposition beyond the initial purchase. This DIY upgrade also empowers you, the user, fostering a deeper connection and understanding of your device.
Financially, the return on investment for a RAM upgrade is exceptionally high. The cost of a new RAM module is a fraction of what a new high-performance laptop would entail. By extending the useful life of your existing HP laptop, you defer the significant expense of a full replacement for several years. Moreover, a laptop with upgraded RAM holds its value better in the secondary market, providing a greater resale value should you decide to upgrade to a newer model in the future. It’s a prime example of smart personal finance, maximizing utility from existing assets.
In conclusion, upgrading the RAM in your HP laptop is a highly recommended endeavor. It’s an accessible project that delivers immediate, tangible performance improvements while also serving as a smart, long-term investment. By following this comprehensive guide, you’ve gained the knowledge and confidence to transform your HP laptop from a potentially lagging device into a high-performance workhorse, ready to tackle the demands of today’s digital landscape and beyond.
aViewFromTheCave is a participant in the Amazon Services LLC Associates Program, an affiliate advertising program designed to provide a means for sites to earn advertising fees by advertising and linking to Amazon.com. Amazon, the Amazon logo, AmazonSupply, and the AmazonSupply logo are trademarks of Amazon.com, Inc. or its affiliates. As an Amazon Associate we earn affiliate commissions from qualifying purchases.