In the rapidly evolving landscape of artificial intelligence and machine learning, PyTorch has emerged as a cornerstone for researchers, developers, and businesses alike. Its flexibility, Pythonic nature, and strong community support make it a preferred choice for building and deploying sophisticated AI models. Whether you’re a seasoned data scientist or just beginning your journey into the world of deep learning, understanding how to install and set up PyTorch is a fundamental step. This comprehensive guide will walk you through the process, covering different installation scenarios and essential considerations.

Understanding PyTorch: Why It Matters
Before diving into the installation process, it’s beneficial to understand what PyTorch is and why it has gained such significant traction in the AI community. PyTorch is an open-source machine learning library, primarily developed by Facebook’s AI Research lab (FAIR). It’s built on a dynamic computational graph, which offers significant advantages in terms of flexibility and ease of debugging compared to static graph frameworks.
Key Features and Benefits:
- Dynamic Computational Graphs: This allows for more intuitive debugging and easier handling of variable-length inputs, common in natural language processing and other sequential tasks.
- Pythonic Interface: PyTorch integrates seamlessly with Python, making it accessible to a vast number of developers. Its syntax and structure feel natural to Python programmers.
- GPU Acceleration: PyTorch leverages NVIDIA’s CUDA platform to accelerate deep learning computations on GPUs, dramatically speeding up training times for complex models.
- Extensive Ecosystem: A rich ecosystem of libraries and tools complements PyTorch, including TorchVision for computer vision tasks, TorchText for natural language processing, and TorchAudio for audio processing.
- Active Community and Research: PyTorch is backed by a vibrant community of researchers and developers, ensuring continuous development, abundant tutorials, and quick solutions to common problems.
The decision to use PyTorch often stems from its ability to accelerate research and development cycles. For businesses looking to implement cutting-edge AI solutions, from personalized marketing campaigns (Brand) to predictive financial modeling (Money), PyTorch provides the robust framework needed to build and scale these applications. The accessibility for developers, coupled with its power, makes it a strategic technology choice.
Preparing for Installation: Prerequisites and Considerations
Before you can install PyTorch, it’s crucial to ensure your system is properly configured. This section will outline the essential prerequisites and help you make informed decisions about your installation.
System Requirements
PyTorch can be installed on various operating systems, including Windows, macOS, and Linux. The specific requirements will depend on your chosen installation method and whether you plan to utilize GPU acceleration.
- Operating System: A compatible version of Windows, macOS, or a Linux distribution.
- Python: PyTorch requires a specific range of Python versions. It’s highly recommended to use a recent version of Python (e.g., 3.7 or later) and ideally manage your Python environments using tools like
venvor Conda. - Package Manager: You’ll need either
pip(Python’s default package installer) orconda(a popular package and environment manager). Conda is often preferred for managing complex dependencies, especially when dealing with GPU support.
GPU vs. CPU Installation
One of the most significant performance boosters for deep learning is utilizing a Graphics Processing Unit (GPU). If you have a compatible NVIDIA GPU, installing the GPU-enabled version of PyTorch will drastically reduce your model training times.
- CPU-Only Installation: This is the simplest and most universal option. It’s suitable for learning, experimentation, and running models that are not computationally intensive.
- GPU Installation (CUDA Enabled): This requires an NVIDIA GPU and the NVIDIA CUDA Toolkit. The version of CUDA you install must be compatible with the PyTorch version you intend to use. This is a critical step; mismatching CUDA and PyTorch versions is a common source of installation errors.
Choosing Your Environment Manager: Pip vs. Conda
The choice between pip and conda for managing your Python environment and installing PyTorch can significantly impact your installation experience, especially with GPU support.
pip: This is Python’s standard package installer. It’s straightforward for CPU-only installations. However, managing CUDA dependencies withpipcan sometimes be more challenging.conda: Developed by Anaconda,condais a powerful cross-platform package and environment manager. It excels at handling complex dependencies, including those related to CUDA and other system-level libraries. For GPU installations,condais often the recommended route due to its robust dependency resolution capabilities.
Recommendation: If you plan to use a GPU, Conda is generally the preferred method for installing PyTorch. It simplifies the process of ensuring compatibility between PyTorch, CUDA, and your GPU drivers.
Installing PyTorch: Step-by-Step Guides
This section provides detailed instructions for installing PyTorch on your system, covering both CPU-only and GPU-enabled scenarios.
Installing PyTorch with Pip (CPU-Only)
For users who don’t have an NVIDIA GPU or prefer a simpler setup, a CPU-only installation is straightforward using pip.
-
Ensure Python and Pip are Installed:
Open your terminal or command prompt and verify your Python and pip installations:python --version pip --versionIf they are not installed, download and install Python from the official website (python.org). Pip is usually bundled with modern Python installations.
-
Create a Virtual Environment (Recommended):
It’s best practice to create a virtual environment to isolate your PyTorch installation and its dependencies from other Python projects.python -m venv pytorch_env source pytorch_env/bin/activate # On Linux/macOS pytorch_envScriptsactivate # On WindowsYou’ll see
(pytorch_env)prepended to your command prompt, indicating the virtual environment is active. -
Install PyTorch:
Visit the official PyTorch website (pytorch.org) and use their “Get Started” section to generate the correctpipcommand. Typically, it will look like this (check the website for the latest version):pip install torch torchvision torchaudio --index-url https://download.pytorch.org/whl/cputorch: The core PyTorch library.torchvision: A library containing popular datasets, model architectures, and image transformations for computer vision.torchaudio: A library for audio processing.
-
Verify Installation:
Once the installation is complete, you can verify it by opening a Python interpreter within your activated virtual environment and running:
python

import torch

print(torch.__version__)

print(torch.cuda.is_available()) # This should print False for a CPU-only installation

Installing PyTorch with Conda (GPU Enabled)
For users with NVIDIA GPUs, the Conda installation method is highly recommended for seamless CUDA integration.
-
Install Anaconda or Miniconda:
If you don’t have Conda installed, download and install either Anaconda (anaconda.com) or Miniconda (docs.conda.io/en/latest/miniconda.html). Miniconda is a lighter-weight version. -
Install NVIDIA Drivers and CUDA Toolkit:
This is a critical step.- NVIDIA Drivers: Ensure you have the latest compatible NVIDIA drivers installed for your GPU. You can download them from the NVIDIA Driver Downloads.
- CUDA Toolkit: PyTorch installation on Conda often handles the CUDA toolkit installation for you, provided you select the correct options. However, understanding your CUDA version is important. You can check your installed CUDA version by running
nvcc --versionin your terminal. The PyTorch website will specify which CUDA versions are supported for each PyTorch release.
-
Create a Conda Environment:
It’s highly recommended to create a dedicated Conda environment for PyTorch. This isolates dependencies and prevents conflicts.conda create -n pytorch_gpu_env python=3.9 # You can choose a different Python version conda activate pytorch_gpu_envReplace
pytorch_gpu_envwith your desired environment name and3.9with your preferred Python version. -
Install PyTorch:
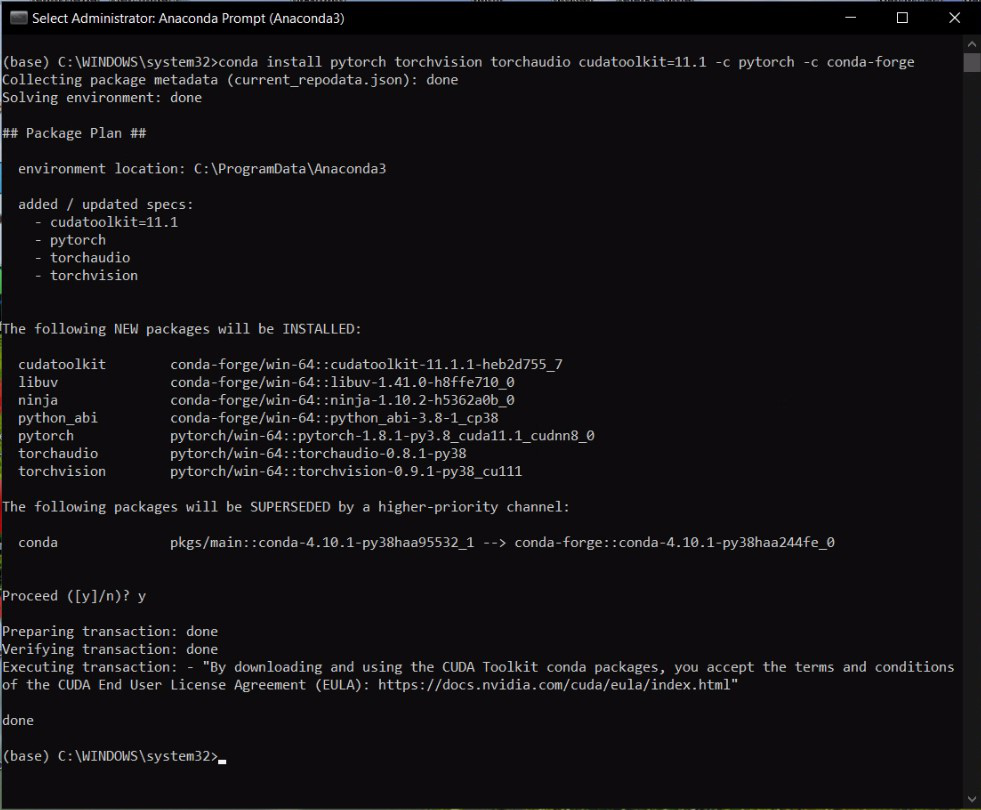
Go to the official PyTorch website (pytorch.org). Select your desired PyTorch build (stable or preview), operating system, package manager (Conda), and CUDA version. The website will generate a command similar to this (this is an example, always check the official site for the most up-to-date command):conda install pytorch torchvision torchaudio cudatoolkit=11.3 -c pytorch -c conda-forgecudatoolkit=11.3: This specifies the CUDA toolkit version to be installed. Ensure this matches a version compatible with your NVIDIA drivers and the PyTorch version. Conda will handle installing the correct CUDA libraries.-c pytorch: This tells Conda to look for packages in thepytorchchannel.-c conda-forge: This specifies theconda-forgechannel, which hosts a wide variety of packages.
-
Verify Installation:
After the installation completes, verify your PyTorch installation within the activated Conda environment:
python

import torch

print(torch.__version__)

print(torch.cuda.is_available()) # This should print True if the GPU is detected and configured correctly.

print(torch.cuda.get_device_name(0)) # This should print the name of your GPU
Installing PyTorch with Pip (GPU Enabled)
While Conda is often preferred for GPU installations, it is possible to install GPU-enabled PyTorch using pip. This requires manually ensuring compatibility with your CUDA installation.
-
Prerequisites:
- NVIDIA Drivers: Installed and up-to-date.
- CUDA Toolkit: Manually installed from the NVIDIA CUDA Toolkit Archive. Crucially, the CUDA version you install must be compatible with the PyTorch version you intend to download. Check the PyTorch installation guide on their website for specific version compatibility.
- cuDNN: A GPU-accelerated deep neural network library, often required by PyTorch. Download and install it, ensuring it’s compatible with your CUDA Toolkit version.
-
Create and Activate a Virtual Environment:
python -m venv pytorch_gpu_pip_env source pytorch_gpu_pip_env/bin/activate # On Linux/macOS pytorch_gpu_pip_envScriptsactivate # On Windows -
Install PyTorch:
Go to the PyTorch website (pytorch.org) and select the appropriate command for apipinstallation with your desired CUDA version. It will look something like this (check the website for the exact command and latest versions):pip install torch torchvision torchaudio --index-url https://download.pytorch.org/whl/cu113cu113: This indicates the CUDA version (e.g., CUDA 11.3). Make sure this matches the CUDA Toolkit you installed.
-
Verify Installation:
Open a Python interpreter and run:
python

import torch

print(torch.__version__)

print(torch.cuda.is_available()) # Should be True

print(torch.cuda.get_device_name(0)) # Should show your GPU name
Troubleshooting Common Installation Issues
Even with detailed guides, installation problems can arise. Here are some common issues and their solutions:
CUDA Version Mismatches
This is the most frequent problem when installing GPU-enabled PyTorch.
- Symptom:
torch.cuda.is_available()returnsFalseafter a GPU installation, or you encounter runtime errors related to CUDA. - Solution:
- Verify Driver Compatibility: Ensure your NVIDIA drivers are up-to-date and compatible with the CUDA Toolkit version you (or Conda) installed.
- Check PyTorch CUDA Support: Refer to the official PyTorch website for the specific CUDA versions supported by the PyTorch release you installed.
- Reinstall with Correct Version: If using Conda, try creating a new environment and using the specific
cudatoolkitversion recommended by PyTorch. If using Pip, ensure you’ve manually installed a compatible CUDA Toolkit and cuDNN and that the installation command correctly specifies your CUDA version. - Environment Variables: Sometimes, CUDA environment variables (
PATH,LD_LIBRARY_PATH) might need to be set correctly, though Conda usually handles this.
Package Conflicts with Pip
When using pip, conflicting dependencies between different Python packages can lead to installation failures.
- Symptom:
pip installfails with dependency resolution errors. - Solution:
- Use Virtual Environments: Always use virtual environments (
venvor Conda environments) to isolate projects and avoid global conflicts. - Start with a Clean Environment: If you encounter persistent issues, try creating a fresh virtual environment and installing only PyTorch and its immediate dependencies.
- Check
pipOutput Carefully: Read the error messages provided bypipthoroughly. They often pinpoint the conflicting packages. - Consider Conda: For complex dependency management, especially with CUDA, Conda is generally more robust.
- Use Virtual Environments: Always use virtual environments (
Network or Proxy Issues
Sometimes, installation can fail due to network connectivity problems or firewall restrictions.
- Symptom:
piporcondacommands fail with network timeouts or “could not resolve host” errors. - Solution:
- Check Internet Connection: Ensure you have a stable internet connection.
- Proxy Settings: If you are behind a corporate proxy, you may need to configure
piporcondato use your proxy.- For
pip:pip install --proxy=http://user:password@proxy.server:port <package>or set environment variables (HTTP_PROXY,HTTPS_PROXY). - For
conda:conda config --set proxy_servers.http http://user:password@proxy.server:portandconda config --set proxy_servers.https https://user:password@proxy.server:port.
- For
Conclusion: Empowering Your AI Journey
Installing PyTorch is the gateway to unlocking the vast potential of deep learning. By following the steps outlined in this guide, whether you’re opting for a straightforward CPU-only installation or leveraging the power of your GPU, you’ll be well on your way to building and experimenting with cutting-edge AI models.
Remember, the PyTorch ecosystem is constantly growing. Regularly visiting the official PyTorch website for updates, tutorials, and community forums will ensure you stay at the forefront of AI development. With PyTorch installed, you’re equipped to explore complex technological frontiers, develop innovative applications that can redefine brand engagement, and potentially create intelligent systems that transform financial forecasting and investment strategies. Happy coding!
aViewFromTheCave is a participant in the Amazon Services LLC Associates Program, an affiliate advertising program designed to provide a means for sites to earn advertising fees by advertising and linking to Amazon.com. Amazon, the Amazon logo, AmazonSupply, and the AmazonSupply logo are trademarks of Amazon.com, Inc. or its affiliates. As an Amazon Associate we earn affiliate commissions from qualifying purchases.