In the digital age, while paperless initiatives gain traction, the trusty printer remains an indispensable tool for homes, small businesses, and large corporations alike. Among the myriad of printer brands, HP consistently stands out for its reliability, innovation, and widespread adoption. From crisp documents to vibrant photos, HP printers deliver quality results, but only when fueled by properly installed ink. Understanding “how to install printer ink HP” isn’t just a matter of following instructions; it’s about ensuring the longevity of your device, maintaining print quality, and ultimately, optimizing your productivity.

This guide will walk you through the process of replacing HP ink cartridges, touching upon best practices, troubleshooting common issues, and even delving into the strategic choice of ink that impacts both your wallet and your printing experience. Whether you’re a tech-savvy user or new to printer maintenance, mastering this essential skill will empower you to keep your HP printer running smoothly and efficiently, embodying the core principles of effective technology management.
Preparing for a Smooth Ink Cartridge Replacement
Before you embark on the journey of replacing your HP ink cartridges, a little preparation goes a long way. Taking a few moments to gather the necessary supplies and understand some basic precautions can prevent frustrating errors, messy spills, and unnecessary delays, ensuring a streamlined process that aligns with smart tech practices.
Essential Tools and Supplies
The cornerstone of any successful ink replacement is having the right components at hand. This isn’t merely about having the new ink; it’s about creating an optimal environment for the task.
Firstly, and most importantly, you’ll need the new HP ink cartridges. It’s crucial to ensure you have the correct cartridge numbers for your specific HP printer model. These numbers are typically listed on the empty cartridge itself, inside the printer’s access door, or in your printer’s manual. We highly recommend using genuine HP ink cartridges. While third-party alternatives might seem like a cost-saving measure upfront, they often lead to compromised print quality, lower page yields, and potential damage to your printer’s printhead, which can invalidate your warranty and lead to higher long-term costs. From a “Money” perspective, investing in genuine HP ink is often a financially prudent decision for sustained performance.
Next, have some disposable gloves ready. Ink, especially black ink, can be notoriously difficult to remove from skin. Wearing gloves will keep your hands clean and prevent accidental smudges on your printer or documents. A few paper towels or a clean cloth are also invaluable. These can be used to wipe away any stray ink, clean the cartridge contacts if necessary, or simply protect your workspace from potential spills. Finally, ensure you have a well-lit, clean, and stable work surface where you can comfortably access your printer. A cluttered or dimly lit area can increase the chances of errors or dropping delicate components.
Safety First: Precautions Before You Start
Safety and care are paramount when dealing with electronic devices and delicate components. Even for a seemingly simple task like changing ink, a few precautions can safeguard both you and your printer.
Always ensure your printer is powered on during the ink replacement process. This allows the print carriage to move into the correct position for cartridge access. Attempting to force the carriage or change cartridges while the printer is off can cause mechanical damage. However, it’s generally advisable to unplug the printer after the carriage has moved to the center and before you start handling the cartridges if you’re concerned about static electricity or accidental shocks, though for most modern printers, remaining plugged in during the process is standard.
Avoid touching the electrical contacts or print nozzles on the ink cartridges. The electrical contacts are small copper or gold-colored plates, and the nozzles are typically located on the bottom of the cartridge. Both are extremely sensitive. Finger oils or debris can interfere with the cartridge’s ability to communicate with the printer or deliver ink properly, leading to print quality issues or the printer not recognizing the cartridge. Handle cartridges by their plastic casing only.
Take your time. Rushing through the process can lead to mistakes like installing a cartridge incorrectly, failing to remove protective tape, or accidentally damaging the printer’s internal mechanisms. A calm, methodical approach ensures that each step is performed correctly, contributing to the “Productivity” aspect by minimizing downtime and reprinting.
Step-by-Step Guide to Installing HP Ink Cartridges
Installing ink cartridges in an HP printer is generally a straightforward process, but the exact steps can vary slightly depending on your specific model. This section will cover the common procedure for most HP inkjet printers and briefly touch upon the unique system of HP Smart Tank models.
Common Procedure for Traditional Inkjet Printers (DeskJet, ENVY, OfficeJet)
The majority of HP’s consumer and small business inkjet printers, including popular DeskJet, ENVY, and many OfficeJet series, follow a similar cartridge replacement method.
-
Power On and Locate the Cartridge Access Door:
Begin by ensuring your HP printer is turned on. Once powered, locate the cartridge access door. This is typically on the front or top of the printer. Gently lift or open the door until it locks into an open position. On some models, it might be a front panel that pulls down, while others have a lid that lifts. -
Wait for the Print Carriage to Move:
After opening the access door, the print carriage (the component that holds the ink cartridges) will usually move automatically to the center of the printer. This is the designated position for cartridge access. Do not attempt to manually move the carriage, as this can damage the printer. Wait until it stops moving and is silent. -
Removing the Old Cartridge:
Identify the empty cartridge(s) you need to replace. HP cartridges are often color-coded (black, cyan, magenta, yellow) and clearly labeled. To remove an old cartridge, gently press down on its back until you hear a click or feel it release. Then, lift the cartridge straight out of its slot. Be careful not to tilt or force it. If it doesn’t come out easily, double-check that you’ve pressed down sufficiently on the tab. Immediately place the old cartridge aside for recycling, preferably through HP’s Planet Partners program. -
Unpacking the New Cartridge:
Remove the new HP ink cartridge from its packaging. You’ll typically find a small piece of protective plastic tape or a pull tab covering the electrical contacts and/or print nozzle area. Carefully remove only this tape/tab. Do not touch the copper-colored electrical contacts or the ink nozzles. Also, avoid removing any other strips or seals unless explicitly instructed by the printer’s specific manual, as these might protect internal components. -
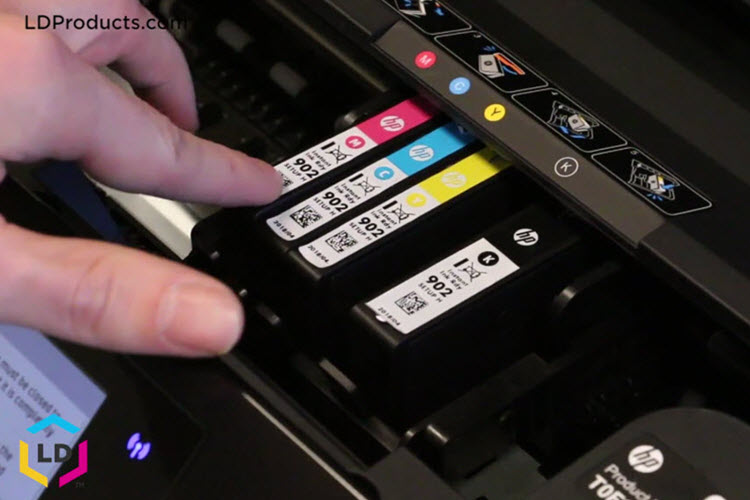
Inserting the New Cartridge:
Hold the new cartridge with the electrical contacts facing towards the printer and the label facing up (or as indicated by the slot’s design). Match the cartridge’s color or symbol with the corresponding slot in the print carriage. Gently slide the cartridge into its slot until it clicks firmly into place. You should feel a distinct click, confirming that it’s properly seated. If it doesn’t click, try pushing it a bit more firmly or ensuring it’s aligned correctly. Never force a cartridge into a slot; if it doesn’t fit, double-check that you have the correct cartridge and that it’s oriented properly. -
Closing and Calibration:
Once all new cartridges are securely installed, close the cartridge access door. The printer will typically perform an automatic calibration or alignment process. This involves printing a test page to ensure optimal print quality. Follow any on-screen prompts on your printer’s display or your computer. This alignment step is crucial for sharp text and accurate colors, reflecting a commitment to quality output which is vital for any professional “Brand” communication.
Special Considerations for HP Smart Tank Printers
HP Smart Tank printers represent a significant departure from traditional cartridge-based systems. Instead of replacing cartridges, these models feature high-capacity, refillable ink tanks. This system is designed for users with high-volume printing needs, offering extremely low cost per page and extended periods between refills, aligning perfectly with “Money” savings for frequent users.
For HP Smart Tank printers, the process involves filling the ink tanks with bottled ink rather than installing solid cartridges.
- Access the Ink Tank Area: Open the ink tank cover, usually located on the side of the printer.
- Open Tank Caps: Identify the specific color tank you need to refill and open its cap.
- Unseal Ink Bottle: Open the corresponding ink bottle. HP Smart Tank bottles are designed with a unique key-lock system, ensuring that each color ink bottle can only fit into its designated tank, preventing accidental misfills.
- Fill the Tank: Invert the ink bottle and insert its nozzle into the tank’s inlet. The ink will drain automatically into the tank without squeezing. Fill until the ink reaches the maximum fill line, but do not overfill.
- Close Caps: Remove the bottle, re-cap the ink tank, and close the ink tank cover.

This system highlights HP’s innovation in “Tech” and offers a different user experience, eliminating the frequent cartridge changes associated with traditional inkjet printers.
Troubleshooting Common HP Ink Installation Issues
Even with the clearest instructions, occasional hiccups can occur during ink installation. Knowing how to diagnose and resolve these common problems can save you time, frustration, and a potential call to technical support, boosting your “Productivity.”
Cartridge Not Recognized or Error Messages
This is perhaps the most common issue after installing new ink. Your printer might display an error message like “Ink Cartridge Missing or Damaged,” “Ink Cartridge Problem,” or simply fail to recognize the new cartridge.
- Re-seat the Cartridge: The first and simplest solution is often to remove the problematic cartridge and re-insert it, ensuring it clicks firmly into place. Sometimes, a cartridge might not be seated perfectly the first time.
- Clean Electrical Contacts: If re-seating doesn’t work, remove the cartridge. Using a lint-free cloth or a cotton swab lightly dampened with distilled water (do not use tap water), gently wipe the copper-colored electrical contacts on both the cartridge and inside the printer carriage. Allow both to dry completely before re-inserting the cartridge. Fingerprints or debris can interfere with the connection.
- Power Cycle the Printer: Turn off your printer, unplug it from the wall outlet for about 60 seconds, then plug it back in and turn it on. This can reset the printer’s internal system and resolve temporary communication glitches.
- Check for Protective Tape: Double-check that all protective tape (especially the clear or colored plastic strip covering the nozzle/contacts) has been completely removed from the new cartridge. Failure to do so will prevent the printer from recognizing the ink.
- Genuine HP Cartridges: If you are using a non-HP or refilled cartridge, the printer might specifically reject it due to built-in safeguards. This is where the “Brand” aspect of using genuine HP ink becomes critical for compatibility and reliability.
Poor Print Quality After Installation
You’ve installed new ink, but your printouts are streaky, faded, or show incorrect colors. This indicates an issue with ink delivery or printhead alignment.
- Run Printhead Cleaning Cycle: Most HP printers have a built-in utility to clean the printheads. Access this feature through your printer’s control panel or your computer’s printer software. A printhead cleaning cycle forces ink through the nozzles to clear any clogs. You might need to run this cycle 2-3 times for optimal results.
- Perform Printer Alignment: After cleaning, or if print quality issues persist, run a printer alignment. This calibrates the printheads to ensure accurate placement of ink drops on the page. Again, this is typically done via the printer’s control panel or software.
- Check Ink Levels: While you just installed new ink, visually confirm the ink levels on your printer’s display or software. Sometimes, a faulty cartridge or an air bubble can give a false reading or restrict ink flow.
- Inspect Cartridge Vents: Small vents on the cartridge allow air to enter as ink exits. If these vents are clogged, a vacuum can form, preventing ink flow. Gently check these small holes for any obstructions.
Leaks or Messy Installation
While rare with genuine HP cartridges, ink leaks can occur, turning a simple task into a cleanup job.
- Proper Handling: Always handle cartridges carefully, holding them upright and avoiding squeezing them, especially after removing the protective tape.
- Overfilling (Smart Tank): For HP Smart Tank users, ensure you don’t overfill the tanks past the maximum fill line, as this can lead to leaks or spillage.
- Damaged Cartridge: If a new cartridge leaks excessively even with careful handling, it might be faulty. Contact HP support or your retailer for a replacement.
By systematically addressing these common issues, you can quickly return your HP printer to optimal working condition, minimizing downtime and maximizing your “Productivity.”
Maximizing Your HP Printer’s Lifespan and Print Quality
Beyond simply knowing how to install ink, understanding the broader context of ink choice and printer maintenance can significantly extend your HP printer’s lifespan and ensure consistent, high-quality output. This ties directly into themes of “Brand” reliability, smart “Money” management, and leveraging “Tech” for long-term benefit.
The Value of Genuine HP Ink
The choice of ink is not merely a preference; it’s a critical decision with far-reaching implications for your printer and your budget. Choosing genuine HP ink cartridges is a strategic investment that pays dividends in performance, reliability, and peace of mind.
HP engineers its original ink cartridges to work in perfect harmony with its printers. This synergy ensures optimal print quality, producing crisp text, vibrant colors, and accurate details that third-party inks often struggle to replicate. From a “Brand” perspective, consistent, high-quality printouts reflect positively on your personal or corporate image, especially when dealing with client presentations, reports, or marketing materials.
Furthermore, genuine HP ink cartridges are designed for maximum reliability and consistent page yield. You get the pages you pay for, without the common issues associated with refilled or generic cartridges, such as clogs, leaks, or inaccurate ink level readings. These problems not only waste ink and paper but can also cause permanent damage to your printer’s delicate printhead, leading to costly repairs or even printer replacement. This directly impacts your “Money” by potentially nullifying initial savings from cheaper ink with much larger repair or replacement costs down the line. Moreover, using non-HP ink can sometimes void your printer’s warranty, leaving you unprotected if an issue arises.
In essence, while the upfront cost of genuine HP ink might seem higher, its long-term value – superior quality, extended printer lifespan, and warranty protection – makes it a financially sound and strategically smart choice for any HP printer owner. It’s an investment in your “Tech” that ensures sustained “Productivity” and protects your “Money.”
Essential Maintenance and Usage Tips
Beyond proper ink installation and selection, a few routine maintenance practices can keep your HP printer in peak condition.
- Print Regularly: Printers, especially inkjet models, benefit from regular use. Printing at least once a week helps prevent the ink nozzles from drying out and clogging. If you leave your printer dormant for extended periods, the ink can solidify in the printhead, leading to blockages and print quality issues.
- Proper Cartridge Storage: If you buy ink cartridges in bulk, store them correctly. Keep them in their original, sealed packaging in a cool, dry place away from direct sunlight and extreme temperatures. Do not open a new cartridge until you are ready to install it, as exposure to air can cause the ink to dry out.
- Utilize Printer Utilities: Regularly use your printer’s built-in maintenance utilities, such as printhead cleaning and alignment tools, as needed. These tools are designed to keep the printheads clear and calibrated, ensuring the best possible output.
- Keep Firmware Updated: Periodically check for and install firmware updates for your HP printer. These updates often improve printer performance, fix bugs, and ensure compatibility with the latest operating systems and ink cartridges, enhancing the overall “Tech” experience.
Lastly, consider the environmental impact. HP is committed to sustainability through its HP Planet Partners program. This free and convenient recycling service allows you to return used HP original ink and toner cartridges. Participating in this program not only helps reduce waste but also demonstrates a commitment to responsible technology use, aligning with broader “Brand” values and corporate social responsibility.
Conclusion
Mastering “how to install printer ink HP” is a fundamental skill that underpins the effective use and longevity of your HP printer. By following the detailed steps for preparation, installation, and troubleshooting, you can ensure your printer operates smoothly, delivering consistent, high-quality results.
The choices you make, particularly regarding the ink you use, have a significant impact. Opting for genuine HP ink is not just about brand loyalty; it’s a strategic decision that safeguards your printer’s health, maintains your warranty, and offers the best value for your “Money” in the long run through superior print quality and extended device lifespan. Coupled with diligent maintenance and responsible recycling, you empower yourself to get the most out of your HP technology.
Your HP printer is a valuable “Tech” asset, crucial for your “Productivity” and professional “Brand” image. By investing a little time in understanding its care, you ensure it remains a reliable partner for all your printing needs, seamlessly integrating into your digital and financial ecosystem.
aViewFromTheCave is a participant in the Amazon Services LLC Associates Program, an affiliate advertising program designed to provide a means for sites to earn advertising fees by advertising and linking to Amazon.com. Amazon, the Amazon logo, AmazonSupply, and the AmazonSupply logo are trademarks of Amazon.com, Inc. or its affiliates. As an Amazon Associate we earn affiliate commissions from qualifying purchases.