In today’s digitally interconnected world, the ability to print documents, photos, and important records remains a fundamental need for both individuals and businesses. Whether you’re setting up a new home office, upgrading your existing setup, or simply bringing a new device into your workflow, understanding how to install a printer is an essential skill. This comprehensive guide will walk you through the process, ensuring a smooth and efficient setup, regardless of your technical expertise. We’ll cover everything from initial considerations to troubleshooting common issues, drawing upon the principles of technology, brand integration, and even the financial implications of efficient printing.
Understanding Your Printer and Setup Needs
Before diving into the physical installation, taking a moment to understand your printer and its intended use is crucial. This foundational step can save you time and frustration down the line.
Choosing the Right Printer for Your Needs
The market offers a vast array of printers, each designed for specific purposes. Consider the following factors to ensure you select a device that aligns with your requirements:
- Type of Printer:
- Inkjet Printers: Ideal for home users, small offices, and those who prioritize color printing for photos and graphics. They are generally more affordable upfront but can have higher ink costs over time.
- Laser Printers: Best suited for high-volume text printing, especially in office environments. They offer faster printing speeds and lower cost per page for monochrome documents, but color laser printers can be more expensive.
- All-in-One/Multifunction Printers (MFPs): These devices combine printing, scanning, copying, and often faxing capabilities. They are a space-saving and cost-effective solution for many users.
- Specialty Printers: This category includes photo printers, label printers, and large-format printers, each designed for very specific tasks.
- Connectivity Options:
- USB: The most common and straightforward connection method, offering a direct link between your computer and the printer.
- Wi-Fi/Wireless: Allows for printing from multiple devices without physical cables, offering great flexibility. Ensure your home or office network is robust enough to support wireless printing.
- Ethernet: Provides a wired network connection, often favored in business settings for its stability and speed.
- Bluetooth: Less common for standard printers, but found in some portable or mobile printing solutions.
- Print Volume and Speed: Consider how many pages you anticipate printing regularly. High-volume users will benefit from faster print speeds and larger ink/toner capacities.
- Print Quality: For professional documents or high-resolution photos, look for printers with higher DPI (dots per inch) resolutions.
- Operating System Compatibility: Ensure the printer you choose is compatible with your operating system (Windows, macOS, Linux).
Essential Tools and Materials
While the printer itself is the star of the show, having the right tools can make the installation process smoother. You’ll typically need:
- The Printer: Of course!
- Power Cable: Usually included with the printer.
- USB Cable (if applicable): Some printers come with one, while others require you to purchase it separately.
- Ink Cartridges or Toner Cartridges: These are often pre-installed or come in the box.
- Setup Guide or Manual: Always keep this handy for device-specific instructions.
- Your Computer/Device: With an internet connection (highly recommended for driver downloads).
Step-by-Step Printer Installation Process
Installing a printer can be broadly categorized into two main types: wired (USB) and wireless (Wi-Fi). While the specifics may vary slightly between manufacturers, the general steps are remarkably similar.
Installing a Wired (USB) Printer
This is often the most straightforward method of installation.
1. Unboxing and Initial Setup
- Carefully unbox your printer and remove all packing materials, including tape, protective films, and foam inserts. Ensure you check inside the printer for any hidden packing materials that might obstruct movement.
- Install the ink or toner cartridges according to the manufacturer’s instructions. This usually involves opening a specific compartment, inserting the cartridges, and closing the lid.
- Connect the power cable to the printer and plug it into a power outlet.
- Turn on the printer. It may go through an initial setup or calibration process.
2. Connecting the Printer to Your Computer
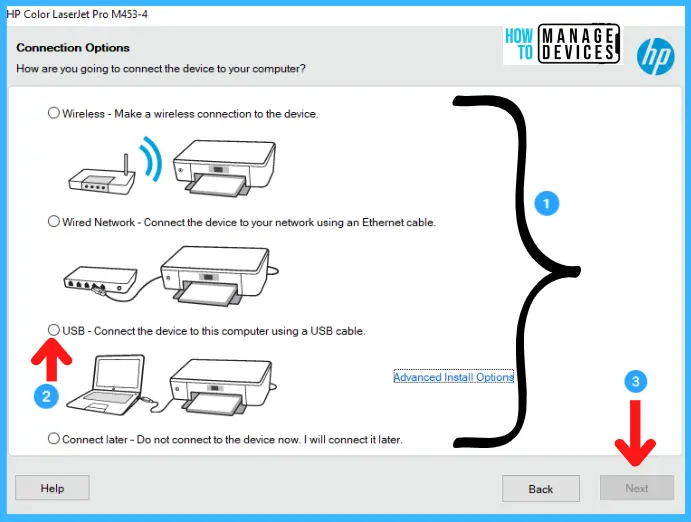
- Do NOT connect the USB cable yet. Most manufacturers recommend installing the printer software and drivers before physically connecting the printer. This ensures your operating system is ready to recognize the device when it’s plugged in.
- Insert the installation CD/DVD that came with your printer (if you have one). Most modern printers will prompt you to download the latest drivers and software from the manufacturer’s website.
- Navigate to the manufacturer’s website and find the support or downloads section. Enter your printer model number to locate the correct drivers and software for your operating system.
- Download and run the installer. Follow the on-screen prompts. The installer will guide you through the process.
- When prompted by the software installer, connect the USB cable from your printer to an available USB port on your computer.
- Your operating system should now detect the printer. The software installer will typically guide you through the final steps of registration and setup.
- Once the installation is complete, the software may prompt you to print a test page. This is a good way to confirm that everything is working correctly.
Installing a Wireless (Wi-Fi) Printer
Wireless installation offers more flexibility but can sometimes involve a few more steps.
1. Initial Printer Setup (as with USB)
- Follow the same unboxing, cartridge installation, and power-on steps as described for a USB printer.
- Your printer will likely have a control panel or display screen. Use this to initiate its network setup.
2. Connecting the Printer to Your Wi-Fi Network
There are usually a few ways to do this:
- Using the Printer’s Control Panel: Many printers allow you to connect directly to your Wi-Fi network through their on-screen menus. You’ll typically need to select your network name (SSID) from a list and enter your Wi-Fi password.
- Using Wi-Fi Protected Setup (WPS): If your router supports WPS, you can often press a WPS button on both your router and your printer to establish a connection automatically. This is a quick and easy method, but not all routers or printers have WPS functionality.
- Using a USB Cable Temporarily: Some printers require you to connect them via USB to your computer during the initial setup to transfer your Wi-Fi network settings. Once the network connection is established, you can disconnect the USB cable.
3. Installing Printer Software and Drivers on Your Computer
- Once your printer is connected to your Wi-Fi network, you’ll need to install the printer drivers and software on your computer(s) so they can find and communicate with the printer over the network.
- Again, it’s best to download the latest software and drivers from the manufacturer’s website.
- Run the installer and choose the “Wireless” or “Network” installation option when prompted.
- The installer should automatically scan your network for the printer or guide you through searching for it by its IP address (which can usually be found on the printer’s display).
- Follow the on-screen prompts to complete the installation.
- Print a test page to verify the connection and functionality.
Integrating Your Printer with Different Devices and Operating Systems
Once your printer is installed on one device, you’ll often want to make it accessible to other devices on your network. This is where the advantages of network printing truly shine.
Sharing Printers on a Network (Windows and macOS)
- Windows:
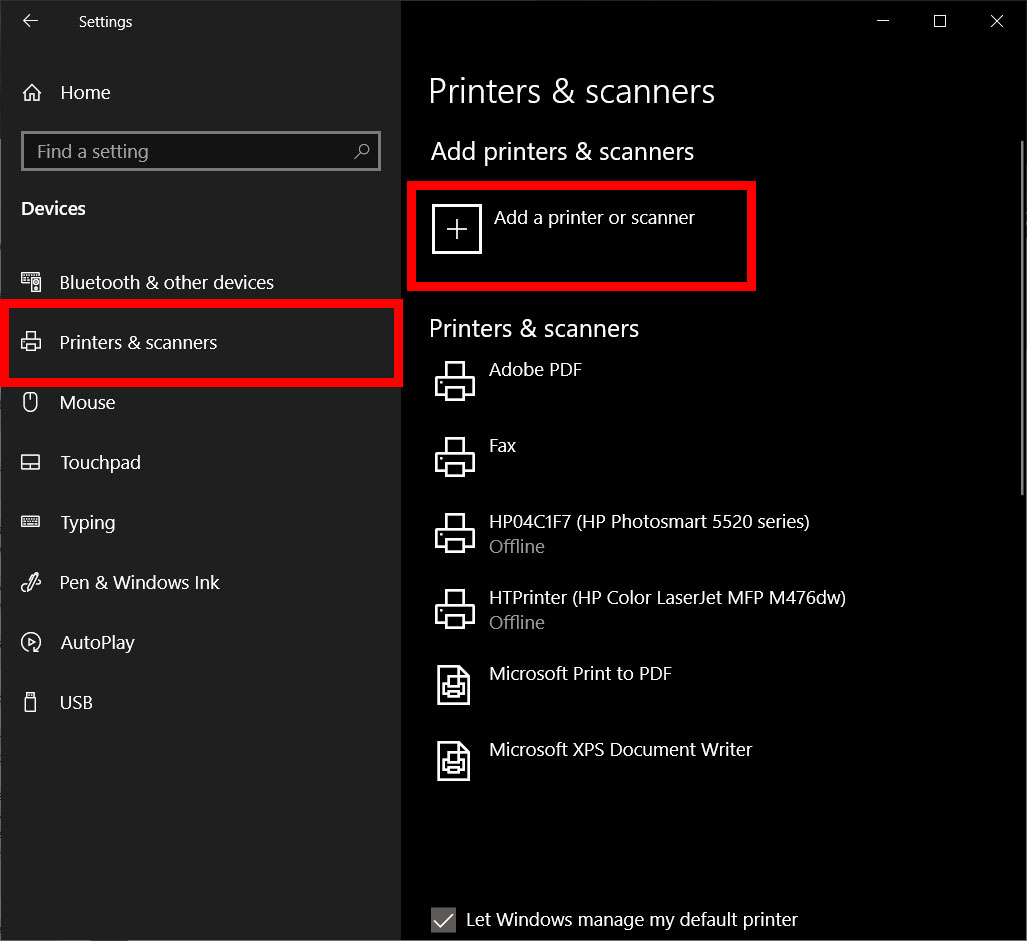
- Go to “Settings” > “Devices” > “Printers & scanners.”
- Click on your printer, then select “Manage.”
- Click on “Printer properties” and navigate to the “Sharing” tab.
- Check the box that says “Share this printer” and give it a descriptive share name.
- Other Windows computers on the same network can then add this shared printer by going to “Settings” > “Devices” > “Printers & scanners” > “Add a printer or scanner” and selecting “The printer that I want isn’t listed,” then choosing the shared printer.
- macOS:
- Open “System Settings” (or “System Preferences” on older versions).
- Go to “Printers & Scanners.”
- Select your printer from the list.
- Click the “Share this printer on the network” checkbox.
- Other Macs on the network can add this printer by going to “System Settings” > “Printers & Scanners” and clicking the “+” button to add a printer.
Mobile Printing (Smartphones and Tablets)
Most modern printers support mobile printing through various technologies:
- Manufacturer Apps: Many brands offer dedicated apps (e.g., HP Smart, Canon PRINT Inkjet/SELPHY, Epson iPrint) that allow you to print directly from your smartphone or tablet over Wi-Fi.
- AirPrint (iOS): If you have an Apple device, your printer likely supports AirPrint, which enables wireless printing to compatible printers without the need for additional drivers or software. Simply open the document or photo you want to print, tap the share icon, and select “Print.”
- Mopria Print Service (Android): Similar to AirPrint, the Mopria Print Service allows Android users to print wirelessly to a wide range of printers without installing specific apps for each brand. You might need to download the Mopria Print Service app from the Google Play Store.
Leveraging Cloud Printing Services
Services like Google Cloud Print (though now discontinued) and others aim to provide a universal printing solution. While direct cloud printing setups are less common now, many printer manufacturers integrate with cloud storage services for easier printing from cloud-based documents.
Troubleshooting Common Printer Installation Issues
Even with the best intentions, you might encounter a hiccup during the installation process. Here are solutions to some common problems:
Printer Not Detected by the Computer
- Wired (USB):
- Ensure the USB cable is securely connected to both the printer and the computer.
- Try a different USB port on your computer.
- Restart both your printer and your computer.
- Reinstall the printer drivers and software, ensuring you connect the USB cable only when prompted by the installer.
- Wireless (Wi-Fi):
- Verify that your printer is successfully connected to your Wi-Fi network (check the printer’s display).
- Ensure your computer is connected to the same Wi-Fi network as the printer.
- Restart your router, printer, and computer.
- Temporarily disable your firewall or antivirus software to see if it’s blocking the connection, and then re-enable it.
- Check your router’s settings to ensure that wireless isolation is not enabled, which can prevent devices from communicating with each other.
“Driver is Unavailable” or “Incorrect Driver” Errors
- This usually means you’ve downloaded the wrong driver for your operating system or printer model.
- Double-check the exact model number of your printer.
- Visit the manufacturer’s official website and navigate to the support section.
- Download the latest drivers specifically for your operating system (e.g., Windows 10 64-bit, macOS Ventura).
- Uninstall any previous printer installations for that device and then run the new installer.
Print Quality Issues (Streaks, Faded Print, Wrong Colors)
- Inkjet Printers:
- Run the print head cleaning utility from the printer’s software or control panel.
- Check ink levels and ensure cartridges are properly installed.
- Perform a print head alignment.
- Ensure you are using genuine or high-quality compatible ink cartridges.
- Laser Printers:
- Ensure toner cartridges are properly seated.
- Shake the toner cartridge gently (if recommended by the manufacturer) to distribute the toner.
- Clean the printer’s rollers.
- Check printer settings to ensure the correct paper type and quality settings are selected.
Printer is Offline
- Ensure the printer is powered on and connected to the network (if wireless).
- Check the print queue on your computer: Right-click on the printer icon, select “See what’s printing,” and then go to “Printer” and make sure “Use Printer Offline” is unchecked.
- Restart the print spooler service on Windows.
The Long-Term Value of a Well-Installed Printer
Beyond the immediate convenience, a correctly installed printer contributes to greater productivity and can even impact your financial well-being. By understanding your printer’s capabilities and ensuring it’s set up efficiently, you minimize downtime, reduce the likelihood of costly repairs due to incorrect setup, and can make informed decisions about ink and toner usage. Choosing the right printer for your needs and ensuring its seamless integration into your digital life is an investment in a smoother, more productive workflow. Whether for personal projects or professional endeavors, a functional printer is an indispensable tool, and mastering its installation is the first step to unlocking its full potential.
aViewFromTheCave is a participant in the Amazon Services LLC Associates Program, an affiliate advertising program designed to provide a means for sites to earn advertising fees by advertising and linking to Amazon.com. Amazon, the Amazon logo, AmazonSupply, and the AmazonSupply logo are trademarks of Amazon.com, Inc. or its affiliates. As an Amazon Associate we earn affiliate commissions from qualifying purchases.