In the ever-evolving digital landscape, where visual communication reigns supreme, accessible yet powerful tools are indispensable for everyone from graphic design enthusiasts to small business owners. Paint.NET stands out as a formidable, free image editing software that beautifully bridges the gap between basic photo editors and professional suites like Adobe Photoshop. While its core features are robust, the true magic of Paint.NET lies in its vibrant community and the wealth of user-created plugins that can dramatically extend its capabilities.
For those looking to push the boundaries of their digital artistry, streamline their workflow, or simply gain access to specialized tools without breaking the bank, mastering plugin installation is a crucial skill. This guide will walk you through the entire process, from understanding what plugins are to troubleshooting common issues, ensuring you can seamlessly integrate these powerful add-ons into your Paint.NET experience. By harnessing the power of plugins, you’re not just enhancing software; you’re investing in your productivity, expanding your creative toolkit, and potentially saving significant costs on expensive proprietary software – a perfect blend of technology empowerment, brand enhancement, and smart financial management.
Understanding Paint.NET Plugins: Expanding Your Creative Toolkit
At its heart, Paint.NET is a testament to efficient software design, offering a clean interface and solid performance. However, no single software can cater to every niche need. This is where plugins come into play, transforming a capable editor into a highly versatile powerhouse tailored to your specific demands.
What Are Paint.NET Plugins?
Paint.NET plugins are essentially small software extensions, typically distributed as Dynamic Link Library (.dll) files, that add new functionalities to the core application. Unlike standalone programs, plugins are designed to integrate directly with Paint.NET, appearing as new menu options, effects, or adjustment layers within the program itself. They are predominantly developed by the Paint.NET user community, a testament to the open and collaborative spirit fostered around the software.
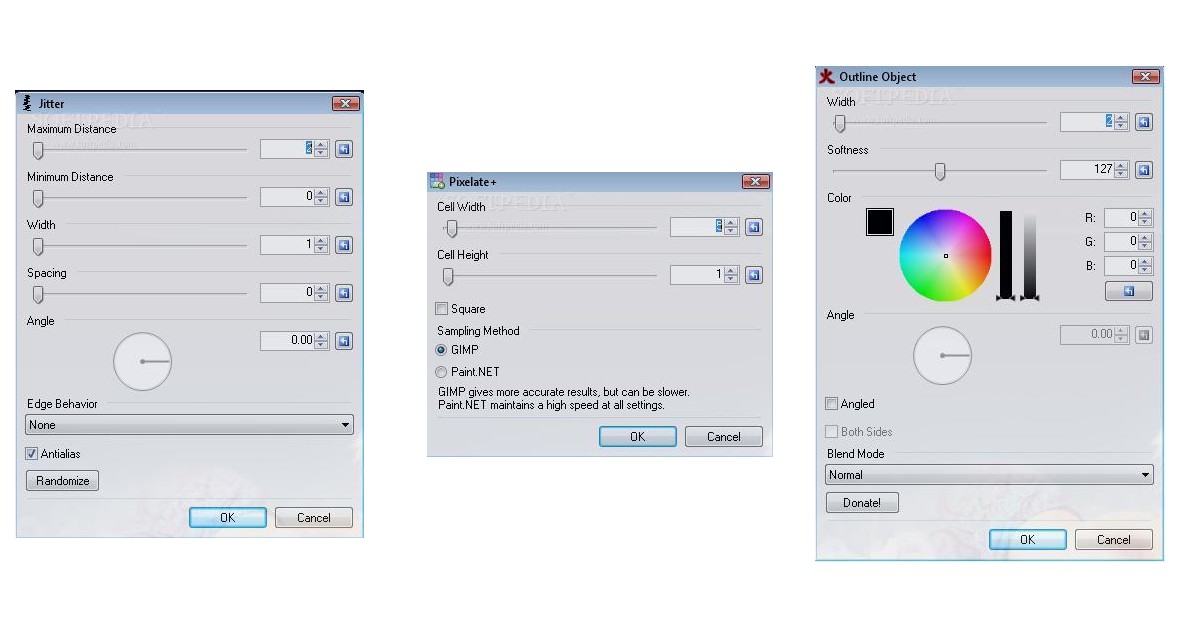
These plugins can range from simple color adjustment tools and artistic filters to complex generators that create intricate textures or geometrical patterns. Some plugins even extend Paint.NET’s compatibility with various image file formats, allowing you to open or save files that aren’t natively supported. This ecosystem of user-generated content ensures that Paint.NET continuously evolves, driven by the collective creativity and problem-solving prowess of its global user base. It’s a prime example of how open-source contributions and community engagement can lead to a highly customizable and potent technological tool, democratizing access to advanced functionalities often found only in costly alternatives.
Why Use Plugins? The Value Proposition for Tech, Brand, and Money
The decision to integrate plugins into your Paint.NET workflow is a strategic one, offering substantial benefits across several key areas:
- Enhanced Functionality & Creative Freedom (Tech/Productivity): Plugins unlock an entirely new dimension of possibilities. Need to create a specific visual effect not available in Paint.NET’s default settings? There’s likely a plugin for it. Want to automate repetitive tasks like watermarking or batch resizing? Plugins can handle that too. This expanded toolkit means less time spent searching for alternative software or complex workarounds, significantly boosting your digital productivity. For tech enthusiasts, it’s about optimizing software performance and personalizing tools to fit individual needs.
- Elevated Visuals & Stronger Brand Identity (Brand/Design): In today’s competitive market, a strong visual brand is paramount. Whether you’re a content creator, a small business, or simply managing your personal online presence, compelling imagery is crucial. Plugins provide access to advanced artistic filters, precise selection tools, and sophisticated manipulation capabilities that can elevate the quality of your graphics, logos, social media visuals, and website imagery. This ability to create polished, unique, and professional-looking assets directly contributes to building a distinctive and memorable brand identity, helping you stand out from the crowd without needing a dedicated graphic designer.
- Cost-Effectiveness & Smart Financial Management (Money/Business Finance): Perhaps one of the most compelling reasons to embrace Paint.NET and its plugin ecosystem is the financial advantage. Professional image editing software often comes with a hefty price tag, either through expensive perpetual licenses or recurring subscription fees. By leveraging a free core application like Paint.NET and augmenting it with free community-developed plugins, you gain access to high-level functionality at virtually no cost. This is an incredible boon for startups, freelancers, students, or anyone operating on a tight budget, allowing them to allocate resources to other critical areas of their business or personal finance while still maintaining a professional creative output. It exemplifies smart financial planning by maximizing free resources without compromising on quality or capability.
Preparing for Plugin Installation: Essential Steps
Before you dive into downloading and installing plugins, a bit of preparation can save you time and prevent potential headaches. A systematic approach ensures a smooth installation and a stable Paint.NET environment.
Locating Reliable Plugin Sources: Prioritizing Digital Security
The internet is a vast place, and while it offers an abundance of free resources, it also harbors risks. When downloading plugins, digital security should be your top priority. Malicious software can be disguised as legitimate plugins, potentially compromising your system.
- The Official Paint.NET Forum: The absolute safest and most recommended place to find Paint.NET plugins is the official Paint.NET forum (forums.getpaint.net). This forum hosts a dedicated “Plugins” section where developers share their creations, often with detailed descriptions, screenshots, and user feedback. Plugins shared here are typically well-vetted by the community and often maintained by their creators.
- Developer Websites: Sometimes, plugin developers might host their creations on personal websites or GitHub repositories. If you find a plugin mentioned elsewhere, always trace it back to a reputable source. Look for active communities, clear documentation, and positive reviews.
- Avoid Unofficial Download Sites: Steer clear of generic “free software” or “plugin pack” websites that aren’t directly associated with Paint.NET or the plugin’s developer. These sites often bundle legitimate software with adware, spyware, or even viruses. Prioritizing trusted sources is a fundamental aspect of digital security, ensuring your tech investments remain secure and your productivity uninterrupted.
Understanding Plugin Compatibility: Ensuring Seamless Integration
Not all plugins are created equal, and compatibility can be a key factor in their successful operation. Before downloading, take a moment to check a few details:
- Paint.NET Version: Plugins are typically developed for specific versions of Paint.NET. While many older plugins work with newer versions, some may require a particular build. Always check the plugin’s description for any stated version requirements. Keeping Paint.NET updated is generally a good practice for both security and compatibility.
- .NET Framework: Paint.NET itself is built on Microsoft’s .NET Framework. Most plugins inherit this requirement. Ensure your system has an up-to-date .NET Framework installed. Windows typically manages this automatically, but older systems or custom configurations might need a manual update.
- System Architecture (32-bit vs. 64-bit): While less common now, some older plugins might be compiled specifically for 32-bit or 64-bit systems. Modern Paint.NET installations are typically 64-bit, so ensure your plugin matches your system’s architecture if specified.
Backup Your Work (and Paint.NET): A Safety Net for Your Digital Assets
Before making any significant changes to software, especially by adding third-party components, it’s always wise to create a backup.
- Backup Important Files: If you have ongoing projects or valuable images, ensure they are saved and backed up. This is a general best practice for any digital work.
- Consider a Paint.NET Backup (Optional but Recommended): While rare, a faulty plugin could potentially cause instability in Paint.NET. If you’re particularly cautious, you could back up your entire Paint.NET installation folder. However, for most users, simply noting down which plugins you install and from where is usually sufficient for troubleshooting. If a problem arises, uninstalling the problematic plugin is usually enough to restore stability. This proactive approach to data management aligns with best practices in tech and productivity, minimizing downtime and safeguarding your creative output.
The Step-by-Step Guide to Installing Paint.NET Plugins
With your preparations complete, you’re ready to add new capabilities to Paint.NET. The installation process is generally straightforward, but there are a couple of methods depending on how the plugin is packaged.
Method 1: The Standard Installation (Most Common)
This method applies to the vast majority of Paint.NET plugins, which come as standalone .dll files or a collection of files within a compressed archive.
Step 1: Download the Plugin
Navigate to your chosen reliable source (e.g., the official Paint.NET forum) and download the plugin file. Most plugins will be packaged in a .zip archive. Save this file to an easily accessible location, such as your Downloads folder.
Step 2: Extract the Files (if zipped)
Plugins are frequently compressed to save download time and bandwidth.
- Locate the downloaded
.zipfile. - Right-click on it and select “Extract All…” (on Windows) or use an archiving tool like 7-Zip or WinRAR.
- Choose a temporary location for extraction, like your desktop or a new folder within your Downloads.
- Once extracted, you will typically find one or more
.dllfiles, possibly areadme.txtfile, or other supporting files. The.dllfiles are the core of the plugin.
Step 3: Locate the Paint.NET Installation Directory
This is the critical destination for your plugin files.
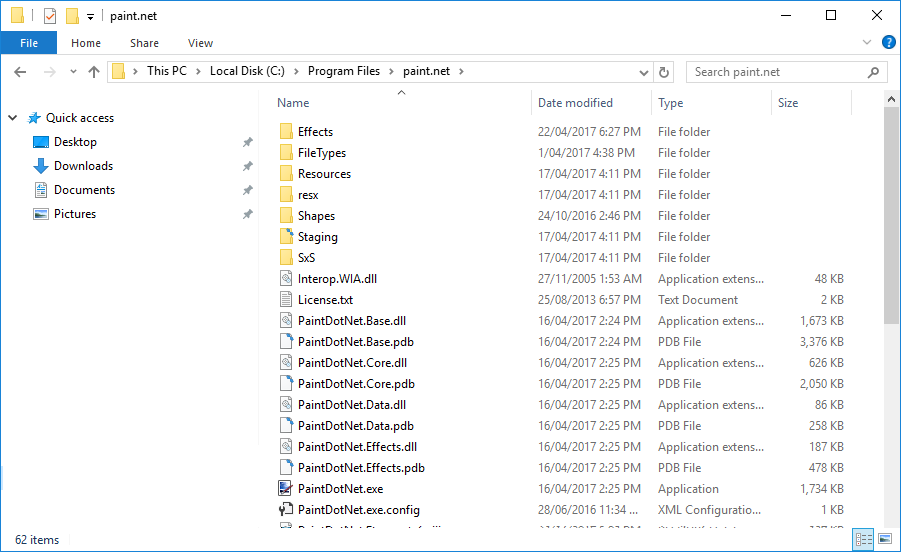
- By default, Paint.NET installs in
C:Program Filespaint.net. - If you installed it elsewhere, navigate to that custom location.
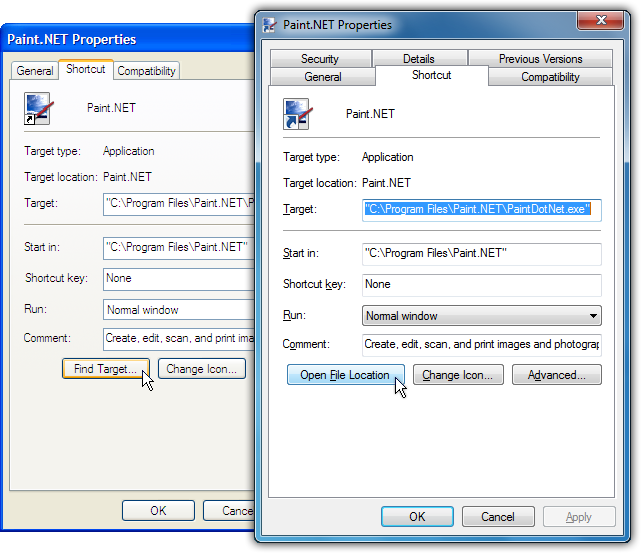
- Tip: The easiest way to find it is to right-click on your Paint.NET desktop shortcut, select “Open file location,” and it should take you directly there.
Step 4: Navigate to the Effects or FileTypes Folder
Inside the Paint.NET installation directory, you’ll find several subfolders. Plugins specifically belong in one of two main folders:
Effectsfolder: This is where the vast majority of plugins go. These are plugins that add new filters, adjustments, generators, or tools that appear under the “Effects,” “Adjustments,” or “Tools” menus within Paint.NET.FileTypesfolder: A smaller number of plugins are designed to add support for new image file formats (e.g., PSD, DDS). These specific plugins should be placed in theFileTypesfolder. If your plugin description indicates it’s a file type plugin, use this folder; otherwise, default toEffects.
Step 5: Copy the .dll file(s) into the Correct Folder
- Go back to your extracted plugin files.
- Select the
.dllfile(s) (and any other associated files the plugin documentation explicitly states need to be in the same folder). - Copy these files (Ctrl+C).
- Navigate to the Paint.NET
EffectsorFileTypesfolder (from Step 4). - Paste the files into this folder (Ctrl+V).
- Important: You may be prompted for administrator permission. Click “Continue” or “Yes” to grant permission. This is a common security feature in Windows when modifying files in
Program Files.
Step 6: Restart Paint.NET
Paint.NET only scans for new plugins when it starts up. If Paint.NET was open during the installation process, close it completely and then relaunch it.
Step 7: Verify Installation
Open Paint.NET and check the relevant menus:
- Effects plugins: Look under the “Effects,” “Adjustments,” or “Tools” menus for the new entry.
- FileTypes plugins: Go to “File” > “Open” or “File” > “Save As” and check if the new file format options are available in the “Files of type” dropdown.
If you see the plugin, congratulations! You’ve successfully expanded Paint.NET’s capabilities.
Method 2: Installing Plugins with Their Own Installers (Less Common)
Occasionally, a more complex plugin might come with its own .exe installer. This is less common for Paint.NET plugins but does happen.
- Run the installer: Double-click the
.exefile. - Follow on-screen prompts: The installer will typically guide you through the process, often detecting your Paint.NET installation path automatically.
- Restart Paint.NET: After the installation is complete, close and restart Paint.NET to ensure the plugin is loaded.
This method is usually simpler as the installer handles file placement automatically, reducing the chances of human error.
Troubleshooting Common Plugin Installation Issues
Even with careful execution, sometimes a plugin might not appear or function as expected. Don’t worry; most issues are easily resolved.
Plugin Not Appearing in Paint.NET
- Did you restart Paint.NET? This is the most common oversight. Plugins are loaded on startup.
- Is the
.dllfile in the correct folder? Double-check that it’s inPaint.NETEffectsorPaint.NETFileTypesand not directly in thepaint.netroot directory. - Check for subfolders: Some plugin developers package multiple
.dllfiles within a single plugin, or create a subfolder within theEffectsdirectory. Ensure you’ve copied the primary.dllfile to the correct location. If the plugin came with its own subfolder (e.g., “MyCoolPlugin” folder containing a .dll), ensure that entire folder is placed inEffects. - Compatibility: Did you check the plugin’s requirements against your Paint.NET version and system?
Plugin Causing Crashes or Errors
- Remove the problematic plugin: If Paint.NET starts crashing immediately after you install a new plugin, the plugin is likely the culprit. Close Paint.NET, go to the
EffectsorFileTypesfolder, and delete the recently added plugin’s.dllfile(s). Restart Paint.NET. - Check for updates: The plugin developer might have released an updated version that fixes bugs.
- Report the bug: If it’s a known issue, consider reporting it on the Paint.NET forum so the developer can address it.
- Conflicting plugins: Very rarely, two plugins might conflict. If removing the most recent one doesn’t help, consider temporarily removing other recently added plugins.
“Error loading effect” or “File not found” Messages
- Corrupted download: The plugin file might have been corrupted during download. Try downloading it again.
- Missing dependencies: Some advanced plugins might require other files (e.g., additional
.dllfiles not in the main plugin file) to be present in the same folder. Read the plugin’s documentation carefully. - Permissions: Ensure you have the necessary administrator permissions to write to the Paint.NET installation directory. If you manually copied files without admin rights, they might not have been properly registered.
Administrator Permissions
Windows User Account Control (UAC) can sometimes interfere with file operations in Program Files. If you’re having trouble copying files, try running your file explorer or the extraction tool as an administrator (right-click, “Run as administrator”). This ensures that you have the necessary privileges to modify files in system directories, a crucial aspect of maintaining digital security and system integrity.
Optimizing Your Paint.NET Workflow with Plugins
Successfully installing plugins is just the first step. To truly unlock their potential, it’s essential to integrate them intelligently into your creative and productive workflow.
Curating Your Plugin Collection: Quality Over Quantity
While it might be tempting to download every cool plugin you find, a bloated plugin folder can sometimes lead to slower startup times or an overly cluttered menu.
- Be selective: Install only the plugins you genuinely need and anticipate using regularly.
- Organize (mentally or physically): If a plugin comes with its own subfolder within the
Effectsdirectory, that’s already a good start. Otherwise, familiarize yourself with where each plugin resides in the menu structure so you can quickly find it. - Regular review: Periodically review your installed plugins. If you haven’t used a plugin in months, consider uninstalling it by simply deleting its
.dllfile from theEffectsorFileTypesfolder. A lean, purposeful toolkit enhances productivity and keeps your software running optimally, aligning with the “Tech” principle of efficient resource management.
Boosting Productivity and Creativity: The Synergy of Software and Add-ons
Plugins are more than just new features; they are accelerators for your creative process and powerful tools for efficiency.
- Streamline repetitive tasks: Batch processing plugins can apply the same effect to multiple images, saving hours of manual work. Watermarking, resizing, or format conversion can be done in moments.
- Enable advanced effects: Access sophisticated filters, distortion tools, or generative art capabilities that would otherwise require much more expensive or complex software. This frees you to experiment with unique visual styles, push creative boundaries, and develop a distinctive aesthetic for your brand.
- Foster unique designs: By combining various plugins, you can create entirely new effects and textures, allowing for truly original and captivating visuals. This direct impact on design capabilities directly translates into stronger brand narratives and more engaging content, resonating with the “Brand” aspect of our website.
Cost-Effective Graphic Design: A Strategic Financial Move
For individuals and businesses alike, the combination of Paint.NET and its plugins represents a compelling financial strategy. Instead of investing hundreds or thousands of dollars annually in subscription-based professional software, you gain access to a powerful and versatile suite of tools for free.
- Budget-friendly branding: Small businesses or startups can create high-quality marketing materials, social media graphics, and website assets without incurring significant software costs, allowing them to allocate precious capital to other growth areas.
- Accessible learning: Aspiring designers or hobbyists can learn and hone their skills on professional-grade tools without financial barriers, fostering growth and expertise.
- Freelancer advantage: Freelancers can offer competitive rates by keeping their software overhead low while still delivering top-tier visual solutions to clients. This directly impacts “Money” by offering a viable and high-quality alternative to expensive paid software, promoting smart financial decisions in the realm of digital content creation.
Conclusion
Installing plugins in Paint.NET is a straightforward process that unlocks a world of advanced functionalities, transforming a capable free image editor into a truly versatile creative powerhouse. By following the steps outlined in this guide, you can confidently integrate new tools, effects, and features, dramatically enhancing your productivity and expanding your creative horizons.
From the meticulous preparation of identifying reliable sources to the precise placement of .dll files, each step ensures a stable and efficient expansion of your Paint.NET ecosystem. Furthermore, by strategically curating your plugin collection, you’re not just adding features; you’re actively optimizing your digital workflow, fostering innovative designs, and making smart financial choices. In an age where digital presence is paramount, leveraging free, powerful tools like Paint.NET and its vibrant plugin community is a testament to the intelligent application of technology for personal and professional growth. Embrace the power of plugins, and unleash the full potential of your creative vision with Paint.NET.