In the rapidly evolving landscape of web development, ensuring the quality, reliability, and performance of web applications is paramount. Modern web applications are dynamic, interactive, and often complex, making manual testing a bottleneck and an inefficient use of resources. This is where robust automation tools become indispensable. Among the myriad of testing frameworks available today, Playwright has emerged as a powerful, versatile, and highly efficient solution for end-to-end web testing. Developed by Microsoft, Playwright offers a compelling suite of features that empower developers and quality assurance engineers to build reliable, fast, and cross-browser automation scripts.
This guide will walk you through the entire process of installing Playwright, from setting up your development environment to running your first automated test. Whether you’re a seasoned developer looking to integrate a new tool into your workflow or a QA professional aiming to enhance your testing capabilities, mastering Playwright installation is the foundational step towards unlocking a new level of productivity and confidence in your web applications. By streamlining the testing process, Playwright not only helps catch bugs earlier but also frees up valuable time for innovation, aligning perfectly with the ethos of leveraging technology for peak productivity.
Understanding Playwright: The Power Behind Modern Web Automation
Before diving into the technicalities of installation, it’s crucial to understand what Playwright is and why it has garnered such significant attention in the tech community. At its core, Playwright is a Node.js library designed to automate Chromium, Firefox, and WebKit with a single API. This means you can write a test once and run it across all major browser engines, ensuring a consistent user experience regardless of the browser your users choose.
Why Playwright Stands Out: Key Features and Benefits
Playwright isn’t just another automation tool; it offers several distinct advantages that set it apart and contribute significantly to improved development workflows and product quality:
- Cross-Browser Compatibility: The ability to test across Chromium (Google Chrome, Microsoft Edge), Firefox, and WebKit (Safari) from a single API is a game-changer. This eliminates the need for separate testing frameworks or complex configurations for each browser, saving immense development time and effort.
- Auto-Waiting and Retries: Playwright intelligently waits for elements to be ready before performing actions. This built-in auto-waiting mechanism dramatically reduces flakiness in tests, a common pain point with many other automation tools. It also offers powerful retry mechanisms to make tests more resilient.
- Rich Set of Actions and Assertions: Playwright provides a comprehensive API for interacting with web elements, simulating user actions like clicks, typing, navigation, and file uploads. It also integrates seamlessly with popular assertion libraries, allowing for flexible and expressive test validation.
- Headless and Headful Modes: For faster execution in CI/CD pipelines, Playwright supports headless mode (running browsers without a visible UI). However, it also offers headful mode, which is invaluable for debugging and visualizing test execution in real-time.
- Parallel Execution: Playwright supports running tests in parallel, significantly reducing the total execution time for large test suites. This feature is critical for maintaining rapid feedback loops in modern development environments.
- Test Generators (Codegen): One of Playwright’s most innovative features is its Codegen tool, which can automatically generate tests by recording user interactions in the browser. This is an incredibly powerful feature for quickly scaffolding new tests, allowing even those less familiar with coding to contribute to test automation.
- Emulation Capabilities: Playwright allows for comprehensive mobile device emulation, geolocation testing, and even network throttling, enabling developers to simulate various real-world scenarios and ensure their applications perform optimally under diverse conditions.
- Developer-Friendly API: The API is designed to be intuitive, well-documented, and easy to learn, making it accessible to developers and QA engineers of varying experience levels.
Who Should Use Playwright?
Playwright is an excellent choice for:
- Software Developers: For unit, integration, and end-to-end testing of web applications. Its robust API and debugging features make it a powerful ally in development.
- Quality Assurance Engineers: To build comprehensive and reliable test suites, ensuring high-quality releases.
- Automation Engineers: For developing complex automation scripts, data scraping, or any task involving automated browser interaction.
- Teams focused on DevOps and CI/CD: Playwright’s parallel execution and headless capabilities make it ideal for integration into continuous integration and delivery pipelines, providing fast and reliable feedback.
By leveraging Playwright, organizations can embrace a culture of quality, accelerate their release cycles, and ultimately deliver superior web experiences.
Prerequisites: Preparing Your Development Environment
Before you can install Playwright, you need to ensure your system has the necessary foundational software. Playwright is a Node.js library, which means you’ll need Node.js and its package manager (npm or Yarn) installed on your machine.
Installing Node.js and npm (or Yarn)
Node.js is a JavaScript runtime built on Chrome’s V8 JavaScript engine. It allows you to run JavaScript code outside of a web browser. npm (Node Package Manager) is the default package manager for Node.js, used to install and manage JavaScript libraries and tools. Yarn is an alternative package manager that offers similar functionality, often with performance improvements.
Step-by-Step for Installation:
-
Download Node.js: The easiest way to install Node.js is to download the installer directly from the official Node.js website: nodejs.org.
- You’ll typically see two versions: the LTS (Long Term Support) version, which is recommended for most users due to its stability, and the Current version, which includes the latest features but might be less stable. For Playwright, the LTS version is usually sufficient and preferred.
- Download the installer appropriate for your operating system (Windows, macOS, or Linux).
-
Run the Installer:
- Windows/macOS: Double-click the downloaded
.msi(Windows) or.pkg(macOS) file and follow the on-screen prompts. Accept the license agreement, choose the installation location (default is usually fine), and ensure that “Node.js runtime” and “npm package manager” are selected for installation. - Linux: For Linux, it’s often recommended to use a version manager like
nvm(Node Version Manager) for easier management of multiple Node.js versions.
bash

curl -o- https://raw.githubusercontent.com/nvm-sh/nvm/v0.39.1/install.sh | bash
After installing nvm, close and reopen your terminal. Then install the latest LTS version:
bash

nvm install --lts

nvm use --lts
Alternatively, you can use your system’s package manager (e.g.,sudo apt install nodejs npmfor Debian/Ubuntu), butnvmoffers more flexibility.
- Windows/macOS: Double-click the downloaded
-
Install Yarn (Optional but Recommended by Some): If you prefer Yarn, you can install it globally via npm after Node.js is set up:
bash

npm install -g yarn
Verifying Your Node.js and npm/Yarn Installation
After installation, it’s crucial to verify that everything is set up correctly. Open your terminal or command prompt and run the following commands:
-
Check Node.js version:
node -vYou should see a version number, e.g.,
v18.17.0. -
Check npm version:
npm -vYou should see a version number, e.g.,
9.6.7. -
Check Yarn version (if installed):
bash

yarn -v
You should see a version number, e.g.,1.22.19.
If these commands return version numbers, your environment is ready for Playwright. If you encounter errors, double-check your installation steps, restart your terminal, or consult the Node.js documentation for troubleshooting.
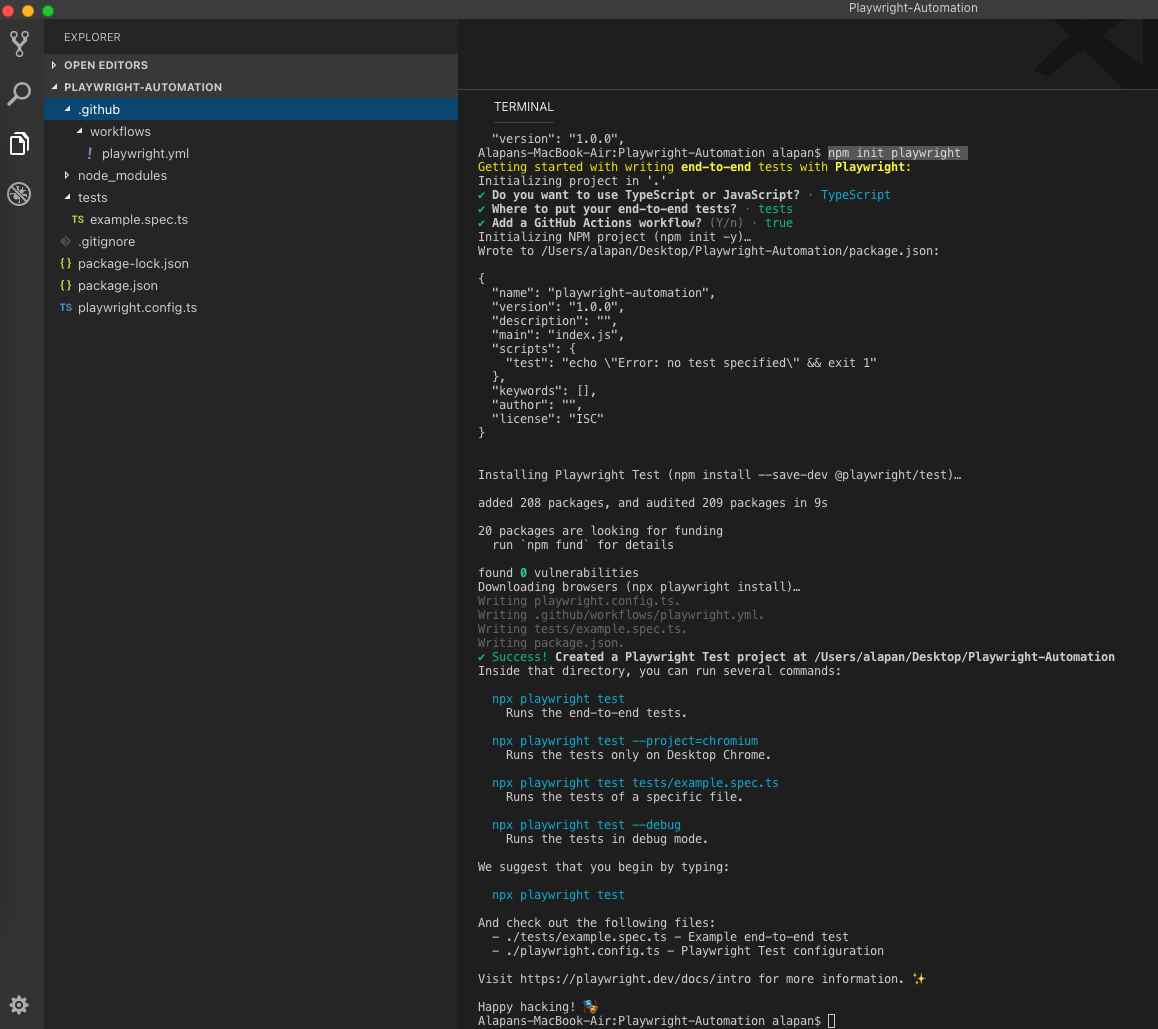
Step-by-Step Installation: Getting Playwright Up and Running
With Node.js and npm (or Yarn) successfully installed, you can now proceed with installing Playwright itself. The process involves creating a new project, installing the Playwright test runner, and then downloading the necessary browser binaries.
Initializing Your Project
Before installing Playwright, it’s good practice to create a new directory for your project and initialize it with a package.json file. This file will keep track of your project’s dependencies, including Playwright.
-
Create a Project Directory:
mkdir my-playwright-project cd my-playwright-project -
Initialize
package.json:npm init -yThe
-yflag answers “yes” to all prompts, creating a defaultpackage.jsonfile. If you prefer to customize the settings, omit-yand follow the prompts.If you are using Yarn:
yarn init -y
Installing the Playwright Library
Now you can install the Playwright test runner. Playwright provides a dedicated test runner called @playwright/test, which includes the core Playwright library along with a test framework designed for convenience and efficiency.
In your project directory, run one of the following commands:
-
Using npm:
npm install @playwright/test -
Using Yarn:
bash

yarn add @playwright/test
This command downloads and installs the @playwright/test package and its dependencies into your node_modules folder, and adds it as a dependency in your package.json file.
Installing Browser Binaries
A crucial and often overlooked step is installing the actual browser binaries that Playwright will use to run your tests. Playwright doesn’t bundle these browsers directly with the @playwright/test package to keep the initial download size small. Instead, it provides a command to download and install them.
Immediately after installing @playwright/test, run this command:
npx playwright install
This command will download the recommended versions of Chromium, Firefox, and WebKit browsers. This process might take a few minutes depending on your internet connection, as it involves downloading several hundred megabytes of browser files.
Understanding npx: npx is a tool that comes with npm (since npm 5.2.0) and allows you to run Node.js package executables without explicitly installing them globally or locally. In this case, npx playwright install executes the playwright command-line tool that comes bundled with @playwright/test to manage browser installations.
To install specific browsers only (optional):
If you only need certain browsers (e.g., just Chromium), you can specify them:
npx playwright install chromium
npx playwright install firefox
npx playwright install webkit
This completes the core installation of Playwright. Your environment is now fully equipped to start writing and executing automated tests.
Verifying Your Setup: Running Your First Playwright Test
After installing Playwright and its browser binaries, the next logical step is to verify that everything works as expected by running a simple test. This will confirm your setup is correct and provide a foundational understanding of how Playwright tests are structured.
Creating a Simple Test File
Let’s create a basic test that navigates to a website and asserts something about its content.
-
Create a
testsdirectory: It’s common practice to store your test files in a dedicatedtestsfolder.mkdir tests -
Create a new test file: Inside the
testsdirectory, create a file namedexample.spec.js(Playwright typically uses*.spec.js,*.spec.ts,*.test.js, or*.test.tsas naming conventions).// tests/example.spec.js import { test, expect } from '@playwright/test'; test('has title', async ({ page }) => { await page.goto('https://playwright.dev/'); // Expect a title "to contain" a substring. await expect(page).toHaveTitle(/Playwright/); }); test('get started link', async ({ page }) => { await page.goto('https://playwright.dev/'); // Click the get started link. await page.getByRole('link', { name: 'Get started' }).click(); // Expects page to have a heading with the name of Playwright. await expect(page.getByRole('heading', { name: 'Installation' })).toBeVisible(); });This example includes two simple tests:
- The first test navigates to the Playwright homepage and asserts that its title contains the word “Playwright”.
- The second test navigates to the same page, clicks on the “Get started” link, and then asserts that a heading with the text “Installation” becomes visible on the new page.
The
{ page }argument in the test function is a fixture provided by@playwright/test, representing a browser page instance, making it easy to interact with web elements.
Executing Your Test

Now that you have a test file, you can run it using the Playwright test runner.
Navigate back to your project’s root directory in the terminal (if you’re inside the tests folder). Then, execute the following command:
npx playwright test
Upon running this command, Playwright will:
- Launch each of the installed browsers (Chromium, Firefox, WebKit) in headless mode by default.
- Execute your
example.spec.jstests within each browser. - Report the results to your terminal.
You should see output similar to this, indicating that all tests passed across all three browsers:
Running 6 tests using 3 workers

  ✓  tests/example.spec.js:6:5 - has title (chromium) (2s)
  ✓  tests/example.spec.js:13:5 - get started link (chromium) (1s)
  ✓  tests/example.spec.js:6:5 - has title (firefox) (2s)
  ✓  tests/example.spec.js:13:5 - get started link (firefox) (1s)
  ✓  tests/example.spec.js:6:5 - has title (webkit) (2s)
  ✓  tests/example.spec.js:13:5 - get started link (webkit) (1s)

  6 passed (5s)
Congratulations! You have successfully installed Playwright and run your first set of automated tests. This successful execution is a strong indicator that your environment is configured correctly and you’re ready to delve deeper into Playwright’s capabilities.
Understanding the Test Report
Playwright provides clear and concise test reports. In the default terminal output, you’ll see:
- The number of tests run and the number of workers (parallel processes) used.
- A list of each test (
✓for passed,✗for failed), including the file, line number, and the browser it ran on. - The total time taken for the test run.
For more detailed reporting, Playwright also generates an HTML report by default if any tests fail. You can open this report using:
npx playwright show-report
This interactive report allows you to view detailed steps, screenshots, and even trace viewer recordings for each test, which is incredibly useful for debugging.
Advanced Configurations and Best Practices for Enhanced Productivity
While the basic installation gets you started, leveraging Playwright’s full potential often involves some advanced configurations and adhering to best practices. These steps can significantly enhance your testing workflow, improve debugging, and make your tests more robust and maintainable, directly contributing to higher productivity.
Integrating with VS Code for a Seamless Workflow
Visual Studio Code (VS Code) is a popular IDE for web development, and Playwright offers excellent integration.
- Install the Playwright Test for VS Code Extension: Search for “Playwright Test” in the VS Code Extensions Marketplace and install the official extension by Microsoft.
- Run and Debug Tests from VS Code: This extension adds a Testing tab to your sidebar, allowing you to discover, run, and debug your Playwright tests directly within the IDE. You can set breakpoints in your test code, inspect variables, and step through execution, making debugging much more efficient.
- Codegen and Trace Viewer Integration: The extension also provides quick access to the Playwright Codegen tool (to record new tests) and the Trace Viewer (to analyze test execution) directly from the command palette.
This integration transforms VS Code into a powerful Playwright development environment, dramatically speeding up test creation and maintenance.
Headless vs. Headful Modes: When and Why
By default, Playwright runs tests in “headless” mode, meaning the browser UI is not visible. This is generally preferred for:
- Faster execution: No UI rendering means less overhead.
- CI/CD pipelines: Headless mode is ideal for server environments where a graphical interface isn’t available or desired.
However, for debugging and visualizing test execution, “headful” mode is invaluable. To run tests in headful mode, you can use the --headed flag:
npx playwright test --headed
Or, you can configure it in your playwright.config.js file:
// playwright.config.js
import { defineConfig } from '@playwright/test';

export default defineConfig({
  use: {
    headless: false, // Set to false for headful mode by default
  },
});
Understanding when to switch between these modes is a key best practice for efficient test development.
Playwright and Continuous Integration/Continuous Deployment (CI/CD)
Integrating Playwright tests into your CI/CD pipeline is crucial for maintaining a high-quality codebase and enabling rapid, confident deployments.
- CI Configuration: Configure your CI service (e.g., GitHub Actions, GitLab CI, Jenkins, Azure DevOps) to run
npx playwright testas part of your build process. - Browser Installation in CI: Ensure your CI environment explicitly installs the browser binaries using
npx playwright installbefore running tests. Many CI runners are minimalist and won’t have browsers pre-installed. - Reporting: Leverage Playwright’s reporting capabilities (e.g., JUnit, HTML reports) to integrate test results directly into your CI/CD dashboard for clear visibility of test outcomes.
- Parallelism: Configure parallel test execution to maximize efficiency in your CI/CD pipeline, taking full advantage of the available resources.
Automating tests in CI/CD ensures that every code change is validated against your test suite, catching regressions early and maintaining code integrity.
Targeting Specific Browsers and Mobile Emulation
Playwright allows fine-grained control over which browsers to target and supports extensive emulation capabilities.
-
Specify Browsers for Tests: You can specify which browsers to run tests on directly from the command line:
npx playwright test --project=chromium
npx playwright test --project=firefox
Or define projects in
playwright.config.jsto run on multiple browsers. -
Mobile Device Emulation: Playwright makes it easy to emulate specific mobile devices, screen sizes, user agents, and even touch input:
import { test, devices } from '@playwright/test';

test.use({ ...devices['iPhone 13'] }); // Emulate iPhone 13

test('test on iPhone 13', async ({ page }) => {
  await page.goto('https://www.example.com');
  // ... test specific mobile behavior
});
This is invaluable for ensuring your responsive designs and mobile-specific features work correctly across a wide array of devices.
By implementing these advanced configurations and best practices, you can transform Playwright from a basic testing tool into a powerhouse for ensuring application quality and developer productivity.
Troubleshooting Common Installation and Execution Issues
Even with a comprehensive guide, sometimes things don’t go exactly as planned. Here are some common issues you might encounter during Playwright installation or test execution, along with their solutions.
Node.js/npm Version Mismatches
Problem: Playwright, being a Node.js library, has minimum Node.js version requirements (typically Node.js 16 or newer for recent Playwright versions). If your Node.js or npm is outdated, you might encounter installation errors or runtime issues.
Solution:
- Check your versions: Run
node -vandnpm -v. - Update Node.js: If your versions are old, it’s best to update Node.js. If you’re using
nvm(Node Version Manager), runnvm install --ltsandnvm use --lts. If you used an installer, download and run the latest LTS installer from nodejs.org. - Clear npm cache: Sometimes, a corrupted npm cache can cause issues. Run
npm cache clean --force.
Browser Download Failures
Problem: The npx playwright install command might fail to download browser binaries due to network issues, firewall restrictions, or insufficient disk space.
Solution:
- Check network connection: Ensure you have a stable internet connection.
- Firewall/Proxy: If you’re behind a corporate firewall or proxy, you might need to configure environment variables (
HTTP_PROXY,HTTPS_PROXY) or allowlist the domains Playwright uses to download browsers. Consult your IT department if unsure. - Disk Space: Verify you have enough free disk space (each browser can be hundreds of MBs).
- Run with
--debug: TryDEBUG=pw:install npx playwright installto get more verbose output, which might pinpoint the exact download failure. - Re-run: Sometimes, a temporary network glitch can cause a failure; simply re-running the command often works.
Test Execution Errors (Selectors, Timeouts)
Problem: Your tests might fail during execution, often due to elements not being found or actions timing out.
Solution:
- Selector Issues:
- Inspect elements: Use your browser’s developer tools to carefully inspect the element you’re trying to interact with. Ensure your Playwright selector (e.g.,
page.getByRole('link', { name: 'Get started' }),page.locator('#myButton')) accurately targets the element. - Unique selectors: Prioritize resilient, unique selectors like
getByRole,getByText,getByLabel, orgetByTestId. Avoid fragile CSS or XPath selectors that might change frequently.
- Inspect elements: Use your browser’s developer tools to carefully inspect the element you’re trying to interact with. Ensure your Playwright selector (e.g.,
- Timeout Errors:
- Increase timeout: If an element takes longer than the default 5 seconds to appear or become actionable, you can increase the timeout for a specific action or the entire test.
javascript

await page.getByRole('button', { name: 'Submit' }).click({ timeout: 10000 }); // 10 seconds
Or inplaywright.config.js:
javascript

export default defineConfig({

  testTimeout: 60 * 1000, // 60 seconds for each test

  use: {

    actionTimeout: 10 * 1000, // 10 seconds for actions

    navigationTimeout: 30 * 1000, // 30 seconds for navigation

  },

});
- Wait for specific conditions: Instead of relying solely on
page.waitForTimeout(), use more robust waiting mechanisms likepage.waitForSelector(),page.waitForLoadState('networkidle'), or assertions with retry (e.g.,await expect(locator).toBeVisible()).
- Increase timeout: If an element takes longer than the default 5 seconds to appear or become actionable, you can increase the timeout for a specific action or the entire test.
- Debugging:
- Headful mode: Run tests in headful mode (
npx playwright test --headed) to visually observe what’s happening. - Playwright Inspector: Use
npx playwright test --debugto launch the Playwright Inspector, which allows you to step through tests, hover over elements to get selectors, and see logs. - Trace Viewer: Analyze the trace file generated for failed tests using
npx playwright show-report. The Trace Viewer provides a detailed timeline, DOM snapshots, network logs, and screenshots, offering deep insights into failures.
- Headful mode: Run tests in headful mode (
Environmental Variables and Permissions
Problem: On some operating systems, particularly Linux, you might encounter permissions errors or issues related to missing system dependencies for the browser binaries.
Solution:
- System Dependencies: Playwright’s browser binaries often rely on certain system libraries. The error message usually indicates which libraries are missing. For Debian/Ubuntu, common fixes involve installing packages like
libgtk-3-0,libgconf-2-4,libnss3,libxss1,libasound2,libgbm-dev. A comprehensive list can often be found in the Playwright documentation under the “System requirements” section. - Permissions: Ensure your user has the necessary permissions to create files and directories in your project folder and where Playwright stores its browser binaries (usually within your Node.js global modules or project’s
node_modules).
By being aware of these common pitfalls and knowing how to troubleshoot them, you can quickly overcome obstacles and maintain a smooth, productive testing workflow with Playwright.
Maximizing Productivity with Playwright
Playwright is more than just a tool for automating browser actions; it’s a gateway to significantly enhanced productivity and reliability in modern web development. By mastering its installation and fundamental usage, you’ve taken a crucial step towards leveraging cutting-edge technology to streamline your workflows.
The ability to write robust, fast, and cross-browser tests with a single API radically changes how teams approach quality assurance. It means faster feedback loops for developers, fewer bugs reaching production, and ultimately, a more stable and high-quality product for end-users. Features like auto-waiting, parallel execution, and the Playwright Inspector reduce the common frustrations associated with test automation, making the process more enjoyable and efficient.
Furthermore, integrating Playwright into your CI/CD pipelines transforms testing from a sporadic task into an integral, continuous part of your development lifecycle. This continuous validation is key to adopting modern DevOps practices and delivering software with speed and confidence.
As you become more comfortable with Playwright, explore its advanced features:
- API testing: While primarily for UI, Playwright can also be used for API interactions alongside UI tests.
- Accessibility testing: Integrate tools to check for accessibility compliance within your Playwright tests.
- Visual Regression Testing: Pair Playwright with libraries that perform visual comparisons to detect unintended UI changes.
- Performance monitoring: Use Playwright’s network interception capabilities to gather performance metrics.
In an era where technology trends dictate rapid innovation, Playwright empowers you to keep pace without compromising on quality. It’s a prime example of an AI-powered (through its intelligent waiting and selectors) and productivity-boosting tool that aligns perfectly with the needs of contemporary tech professionals. Embrace Playwright, and watch your development efficiency and application quality reach new heights.
aViewFromTheCave is a participant in the Amazon Services LLC Associates Program, an affiliate advertising program designed to provide a means for sites to earn advertising fees by advertising and linking to Amazon.com. Amazon, the Amazon logo, AmazonSupply, and the AmazonSupply logo are trademarks of Amazon.com, Inc. or its affiliates. As an Amazon Associate we earn affiliate commissions from qualifying purchases.