In the modern landscape of data science and software engineering, Python has established itself as the primary language for data manipulation, analysis, and automation. At the heart of this ecosystem lies Pandas, an open-source library providing high-performance, easy-to-use data structures, and data analysis tools. However, a library is only as good as the environment it runs in. For many developers, Visual Studio Code (VS Code) has become the definitive Integrated Development Environment (IDE) due to its lightweight nature, versatility, and extensive extension marketplace.
Setting up Pandas within VS Code may seem like a straightforward task, but for those new to the Python ecosystem, it involves navigating interpreters, virtual environments, and package managers. This guide provides a comprehensive, professional walkthrough of the installation process, ensuring your environment is optimized for high-level data analysis.
1. Preparing the Essential Infrastructure
Before installing Pandas, you must ensure that the foundational components of a Python development environment are correctly configured on your machine. Visual Studio Code does not come with Python pre-installed; it acts as an interface that interacts with the Python version existing on your operating system.
Installing Python and Verifying Path Configuration
The first step is to download and install Python from the official Python Software Foundation website. During the installation process on Windows, it is critical to check the box labeled “Add Python to PATH.” This ensures that the Python executable and its companion package manager, pip, are accessible from the command line.
Once installed, verify the installation by opening your terminal (Command Prompt, PowerShell, or Terminal on macOS/Linux) and typing python --version. If the system returns a version number (e.g., Python 3.10.x), your foundation is secure.
Equipping Visual Studio Code for Python
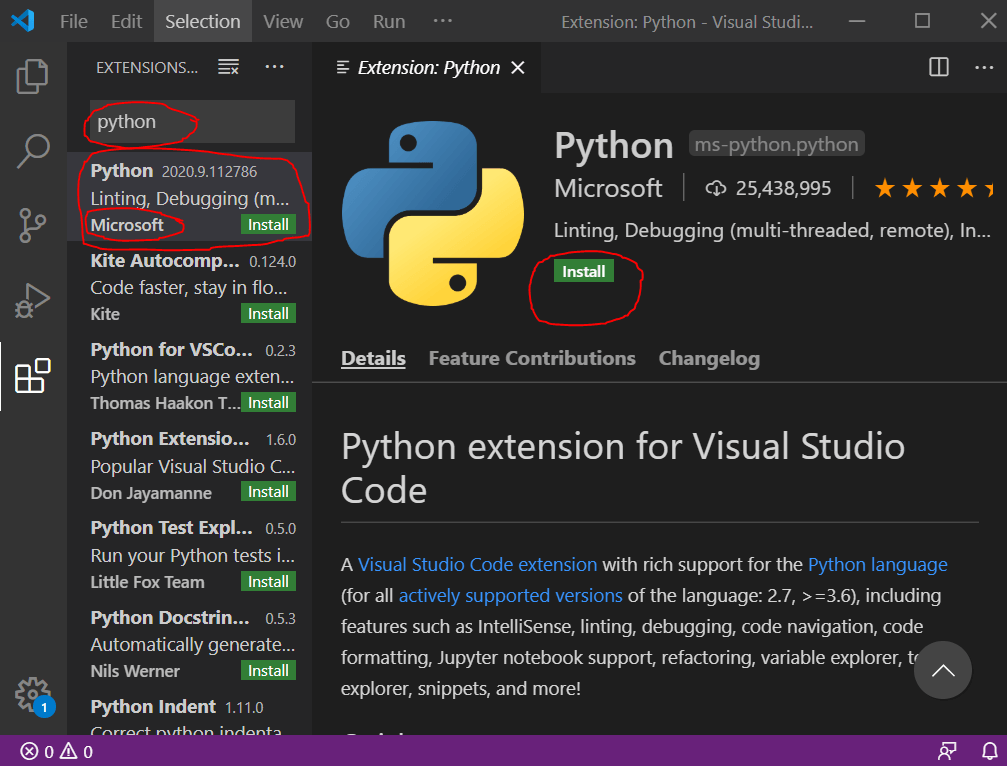
While VS Code is a powerful text editor, it requires specific extensions to transform into a full-fledged Python IDE. Navigate to the “Extensions” view (Ctrl+Shift+X) and search for the “Python” extension by Microsoft. This extension is non-negotiable; it provides IntelliSense (code completion), linting, debugging, and, most importantly, the ability to switch between different Python environments easily.
Selecting the Correct Interpreter
In VS Code, the “Interpreter” refers to the specific Python executable the editor uses to run your code. Even if you have Python installed, VS Code might not automatically select it. Press Ctrl+Shift+P to open the Command Palette, type “Python: Select Interpreter,” and choose the version you recently installed. This step ensures that when you install Pandas, the library is linked to the same environment the editor is currently monitoring.
2. The Installation Process: Utilizing Pip and the Integrated Terminal
With the groundwork laid, you can move to the actual installation of the Pandas library. The primary tool for this is pip, the standard package-management system used to install and manage software packages written in Python.
Opening the Integrated Terminal
One of the most significant advantages of VS Code is the integrated terminal, which allows you to run commands without leaving your coding environment. To open it, use the shortcut Ctrl+` or navigate to “Terminal > New Terminal” in the top menu. Ensure that the terminal reflects the environment you intend to use.
Executing the Pip Install Command
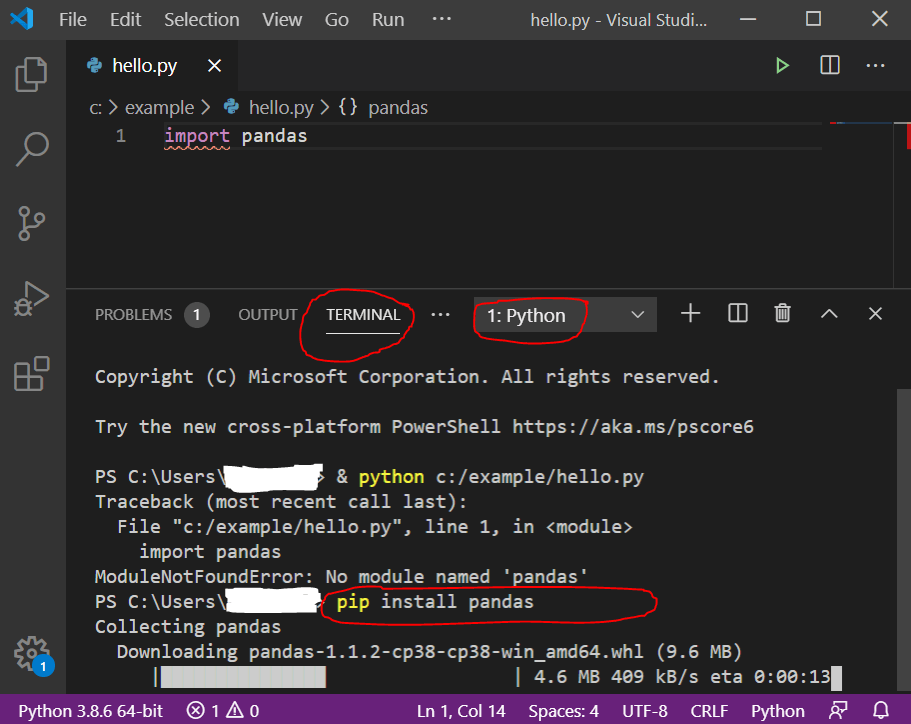
To install Pandas, type the following command into the terminal and press Enter:
pip install pandas
This command triggers a sequence where pip connects to the Python Package Index (PyPI), downloads the latest stable version of Pandas, and installs its dependencies, such as NumPy and pytz. If the installation is successful, you will see a message stating “Successfully installed pandas.”
Handling Permission and Versioning Issues
Occasionally, users may encounter “Permission Denied” errors, especially on macOS or Linux. In such cases, you might be tempted to use sudo pip install, but this is generally discouraged as it can interfere with system-level packages. Instead, use the --user flag: pip install --user pandas. Additionally, if you are working on a project that requires a specific version of Pandas for compatibility, you can specify it using pip install pandas==1.5.0.
3. Implementing Best Practices: Virtual Environments
While global installation is the quickest path, professional developers prefer using virtual environments. A virtual environment is an isolated directory that contains its own copy of Python and its own set of installed packages. This prevents “dependency hell,” where different projects require conflicting versions of the same library.
Creating a Virtual Environment with venv
VS Code makes it easy to manage virtual environments. In your project folder, run the following command in the terminal:
python -m venv .venv
This creates a folder named .venv in your directory. VS Code will usually detect this new environment and ask if you would like to select it for the workspace. Always select “Yes” to ensure your current project remains isolated from the global Python installation.
Activating the Environment and Installing Pandas
Once the environment is created, it must be activated. On Windows, use .venvScriptsactivate; on macOS/Linux, use source .venv/bin/activate. You will notice the name of the environment appearing in parentheses in your terminal prompt. Now, when you run pip install pandas, the library is installed strictly within this project folder. This ensures that your project is portable and won’t break if you update Python globally.
Managing Dependencies with requirements.txt
As your project grows, you may install more libraries like Matplotlib or SciPy. To keep track of these, it is professional practice to create a requirements.txt file. You can generate this by running pip freeze > requirements.txt. This allows other developers to replicate your exact environment by simply running pip install -r requirements.txt.
4. Testing and Verifying the Installation
After the installation is complete, it is vital to verify that Pandas is correctly recognized by VS Code and can be imported into your scripts without errors.
Writing a Verification Script
Create a new file named test_pandas.py in your workspace. Enter the following lines of code:
import pandas as pd

data = {
    'Project': ['Alpha', 'Beta', 'Gamma'],
    'Status': ['Active', 'Completed', 'On Hold']
}

df = pd.DataFrame(data)
print("Pandas version:", pd.__version__)
print(df)
Running the Code
Run the script by clicking the “Play” button in the top right corner of the editor or by typing python test_pandas.py in the terminal. If the terminal outputs the version number and a neatly formatted table (a DataFrame), your installation is a success.
Troubleshooting Common Import Errors
If you see an ImportError: No module named 'pandas', the issue is almost always a mismatch between where Pandas was installed and which interpreter VS Code is using. Re-check the “Python: Select Interpreter” setting in the Command Palette and ensure it points to the environment where you ran the pip install command. If you are using a virtual environment, ensure the interpreter path points to the Python executable inside the .venv folder.
5. Enhancing the Pandas Experience with Jupyter Notebooks
For data scientists, writing standard .py scripts is often less efficient than using Jupyter Notebooks. VS Code provides native support for Notebooks, which offers a more visual and interactive way to work with Pandas.
Installing the Jupyter Extension
To leverage this, install the “Jupyter” extension from the Microsoft marketplace. This allows you to create and run .ipynb files directly inside VS Code. Notebooks allow you to run code in “cells,” meaning you can load a massive dataset into a Pandas DataFrame once and then perform multiple analyses on it without reloading the data every time.
Using Data Viewer for Deep Inspection
One of the “hidden gems” of VS Code for Pandas users is the Data Viewer. When you are debugging or running a Jupyter Notebook, you can view your Pandas DataFrames in a spreadsheet-like interface. This makes it significantly easier to filter, sort, and inspect your data compared to simply printing it to the terminal.

Optimizing Performance with Caching and Extensions
As you work with larger datasets in Pandas, performance becomes a factor. VS Code supports extensions like “Pylance,” which provides fast and feature-rich language support for Python. Pylance can offer specialized type checking for Pandas, helping you catch errors in your data manipulation logic before you even run the code.
By following this structured approach—from environment preparation to advanced integration—you transform Visual Studio Code from a simple text editor into a powerhouse for data analysis. Installing Pandas is not just about a single command; it is about building a stable, scalable, and professional ecosystem that allows your technical projects to flourish.
aViewFromTheCave is a participant in the Amazon Services LLC Associates Program, an affiliate advertising program designed to provide a means for sites to earn advertising fees by advertising and linking to Amazon.com. Amazon, the Amazon logo, AmazonSupply, and the AmazonSupply logo are trademarks of Amazon.com, Inc. or its affiliates. As an Amazon Associate we earn affiliate commissions from qualifying purchases.