In the rapidly evolving landscape of technology, data has emerged as the new gold. From scientific research to financial markets, from social media analytics to artificial intelligence, the ability to collect, process, and derive insights from vast datasets is a critical skill. At the heart of this data revolution lies Python, a versatile programming language, and its ecosystem of powerful libraries. Among these, Pandas stands out as an indispensable tool for data manipulation and analysis, making it a cornerstone for anyone venturing into data science, machine learning, or even just looking to enhance their productivity with data.

This comprehensive guide will walk you through the process of installing Pandas in Python, covering various methods, best practices, and essential troubleshooting tips. Whether you’re a seasoned developer or a curious beginner, mastering the installation of this powerful library is your first step towards unlocking a world of data-driven possibilities. We’ll not only cover the technical steps but also highlight why Pandas is a game-changer for anyone interested in technology trends, software efficiency, and making data work for them – aspects deeply resonant with the core themes of Tech, Brand, and Money explored on this website. By streamlining your data workflows, Pandas can directly contribute to smarter decisions, enhanced productivity, and ultimately, a more impactful presence in your professional endeavors.
Understanding Pandas: The Powerhouse for Data Analysis
Before diving into the installation process, it’s crucial to grasp what Pandas is and why it has become an almost universal choice for data tasks in Python. Understanding its fundamental role will not only motivate you through the setup but also help you appreciate the immense power you’re about to wield.
What is Pandas and Why is it Indispensable?
Pandas is an open-source software library written for the Python programming language for data manipulation and analysis. It provides data structures and functions needed to work with structured data seamlessly. At its core, Pandas introduces two primary data structures:
- Series: A one-dimensional labeled array capable of holding any data type (integers, strings, floats, Python objects, etc.). Think of it like a single column in a spreadsheet or a SQL table.
- DataFrame: A two-dimensional labeled data structure with columns of potentially different types. You can think of it like a spreadsheet, a SQL table, or a dictionary of Series objects. DataFrames are the workhorse of Pandas, allowing you to store and manipulate tabular data effectively.
Built on top of the NumPy library, which provides robust numerical computing capabilities, Pandas extends these with powerful tools for handling missing data, alignment, group-by operations, merging, reshaping, and much more. Its intuitive API makes complex data operations feel surprisingly straightforward.
Key Benefits and Applications
The reasons for Pandas’ widespread adoption are numerous and compelling:
- Data Cleaning and Preprocessing: Real-world data is rarely clean. Pandas excels at handling missing values, filtering unwanted data, removing duplicates, and transforming data into a usable format. This is an often overlooked but critical step in any data project.
- Efficient Data Manipulation: With its highly optimized C and Cython backends, Pandas offers impressive performance for common data operations, making it suitable for even large datasets.
- Versatile Data Input/Output: Pandas can read and write data from a multitude of formats, including CSV, Excel, SQL databases, JSON, HDF5, and more. This flexibility makes it an ideal central hub for data integration.
- Time-Series Functionality: It provides robust tools for working with time-series data, including date range generation, frequency conversion, moving window statistics, and date shifting.
- Integration with the Python Ecosystem: Pandas seamlessly integrates with other popular Python libraries like Matplotlib and Seaborn for data visualization, Scikit-learn for machine learning, and NumPy for numerical operations, forming a complete data science toolkit.
- Productivity Boost: By abstracting away complex loops and conditions, Pandas allows data professionals to write concise, readable, and highly efficient code for data tasks, significantly boosting productivity and reducing development time.
In the realm of “Tech,” Pandas streamlines software development related to data. For “Brand,” it enables robust analytics for market research, customer behavior, and social media sentiment, empowering data-driven brand strategies. And for “Money,” it’s indispensable for financial modeling, algorithmic trading, risk assessment, and personal finance tracking, helping individuals and businesses make informed economic decisions. Its ability to turn raw data into actionable insights is a direct contributor to both professional advancement and organizational success.
Essential Prerequisites and Environment Setup
Before you can unleash the power of Pandas, there are a few foundational elements you need to have in place. Setting up your environment correctly is not just a formality; it’s a critical step that prevents future headaches and ensures a smooth, stable development experience.
Ensuring Python is Installed
Pandas is a Python library, so having Python installed on your system is the absolute first requirement. Python 3.7 or newer is generally recommended for the latest Pandas versions.
How to Check if Python is Installed:
Open your terminal (on macOS/Linux) or Command Prompt/PowerShell (on Windows) and type:
python --version
or
python3 --version
If Python is installed, you’ll see its version number (e.g., Python 3.9.7). If not, or if you get an error like “command not found,” you’ll need to install it.
How to Install Python:
The most straightforward way to install Python is by downloading the installer from the official Python website (python.org).
- For Windows users: Make sure to check the box that says “Add Python X.Y to PATH” during installation. This makes Python accessible from your command line.
- For macOS users: Python usually comes pre-installed, but it might be an older version. It’s often recommended to install a newer version via Homebrew (
brew install python3). - For Linux users: Python is typically pre-installed. You can often install newer versions via your distribution’s package manager (e.g.,
sudo apt install python3on Debian/Ubuntu,sudo dnf install python3on Fedora).
Verifying Pip: Python’s Package Installer
pip is the standard package manager for Python. It allows you to install and manage libraries and dependencies that are not part of the Python standard library. Modern Python installations (Python 3.4 and above) typically include pip by default.
How to Check if Pip is Installed:
In your terminal or command prompt, type:
pip --version
or
pip3 --version
You should see output similar to pip 21.2.4 from /path/to/python/lib/site-packages/pip (python 3.9). If pip is not found, you might need to install or upgrade it. You can usually do this by running python -m ensurepip or by downloading get-pip.py from the pip website and running python get-pip.py.
Navigating Virtual Environments (Best Practice)
While not strictly mandatory, using virtual environments is a highly recommended best practice for Python development, especially when working with multiple projects or complex dependencies. A virtual environment creates an isolated Python installation for each project, ensuring that dependencies for one project don’t conflict with another.
Why Use Virtual Environments?
Imagine Project A needs pandas version 1.3 and Project B needs pandas version 2.0. Without virtual environments, installing one might break the other. With virtual environments, each project has its own set of installed libraries, preventing such conflicts. This significantly enhances stability and reproducibility.
How to Create and Activate a Virtual Environment:
-
Using
venv(built-in Python module):- Create: Navigate to your project directory and run:
bash

python3 -m venv my_project_env
(Replacemy_project_envwith your desired environment name.) - Activate:
- macOS/Linux:
bash

source my_project_env/bin/activate
- Windows (Command Prompt):
bash

my_project_envScriptsactivate.bat
- Windows (PowerShell):
bash

my_project_envScriptsActivate.ps1
Once activated, your terminal prompt will usually show the environment’s name (e.g.,(my_project_env) your_username@your_machine:~$).
- macOS/Linux:
- Create: Navigate to your project directory and run:
-
Using
conda(if you’re using Anaconda):- Create:
bash

conda create --name my_conda_env python=3.9
- Activate:
bash

conda activate my_conda_env
Deactivate withconda deactivate.
- Create:
Always activate your virtual environment before installing Pandas or any other library for your project. This ensures that the library is installed within that isolated environment. This practice is key to maintaining a clean and manageable development workflow, a core tenet of effective software development and productivity.
Step-by-Step Installation Methods
With your Python environment ready, you can now proceed to install Pandas. There are primarily two widely used methods, each suited to different scenarios and user preferences.
Standard Installation with Pip
The most common and straightforward method to install Pandas (or any other Python package) is using pip, Python’s package installer. This method is ideal for most users and projects.
Steps:
- Activate your virtual environment (if you created one, which is highly recommended). For example:
bash

source my_project_env/bin/activate
- Install Pandas: Once your environment is active, run the following command:
bash
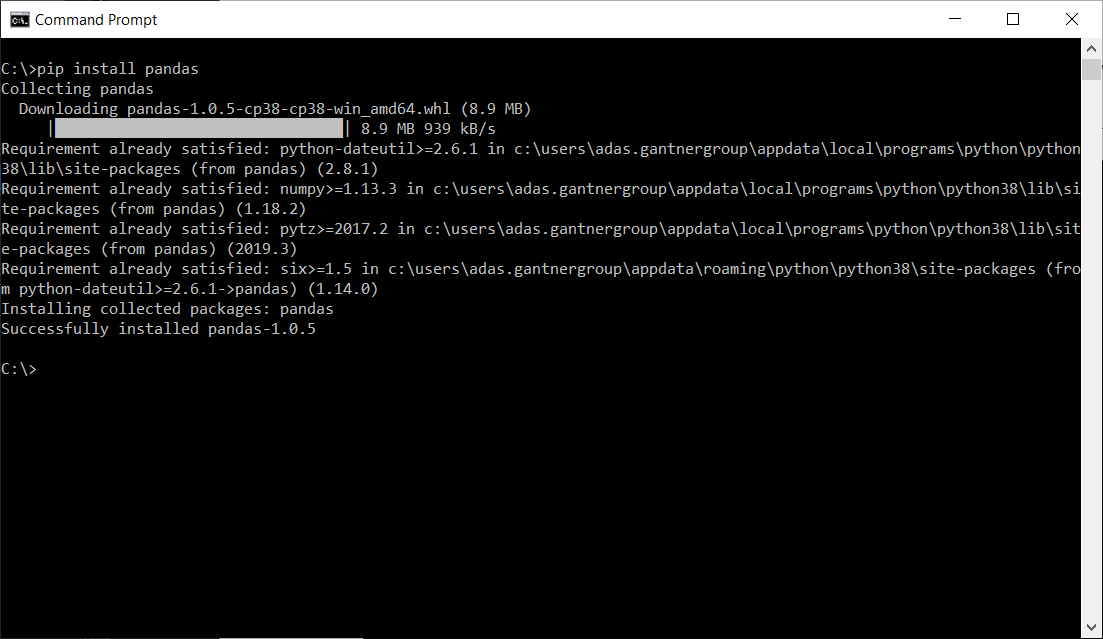
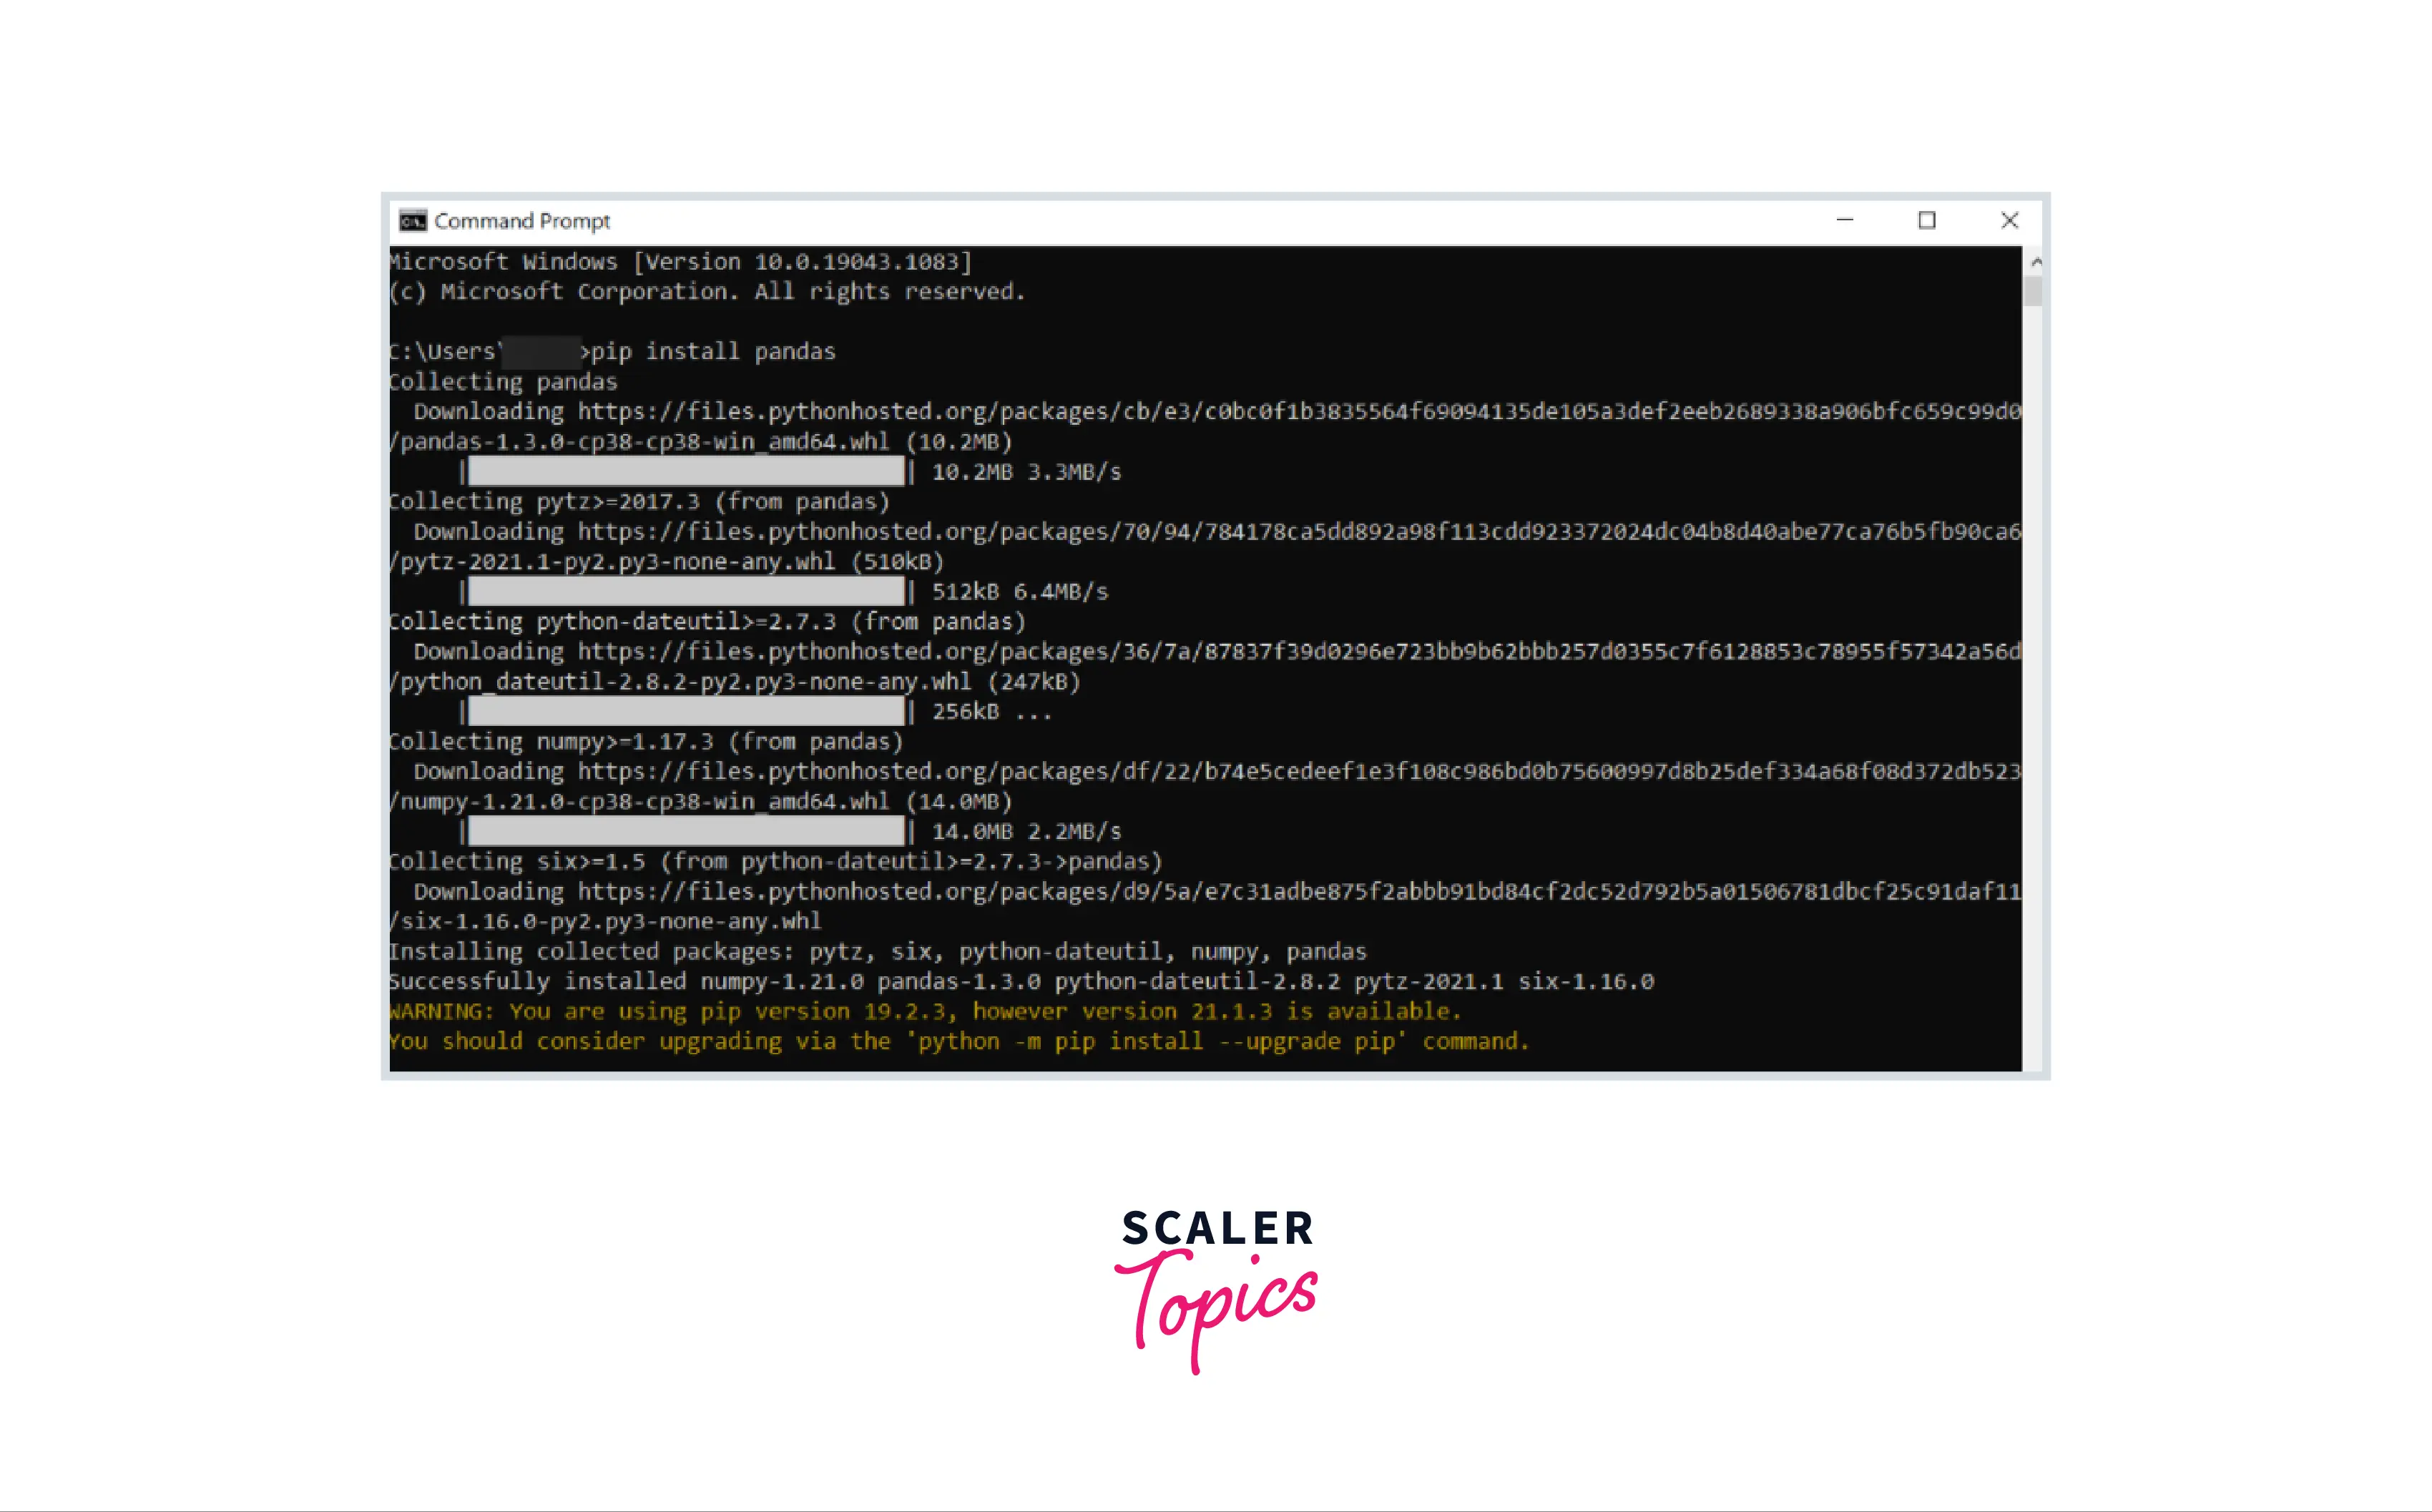
pip install pandas
This command tellspipto find the latest stable version of Pandas from the Python Package Index (PyPI) and install it, along with any necessary dependencies (like NumPy). - Wait for the installation to complete. You’ll see progress indicators as
pipdownloads and installs the packages. Upon successful completion,pipwill usually report something like “Successfully installed numpy-x.y.z pandas-a.b.c”.
Installing a Specific Version:
If your project requires a specific version of Pandas, you can specify it during installation:
pip install pandas==1.4.2
This is useful for ensuring compatibility across development environments or for maintaining older projects.
Upgrading Pandas:
To upgrade an existing Pandas installation to the latest version, use:
pip install --upgrade pandas
Leveraging Anaconda for Data Science Environments
Anaconda is a popular distribution that simplifies package management and deployment for data science, machine learning, large-scale data processing, and predictive analytics. It comes pre-packaged with Python, the conda package manager, and hundreds of scientific packages, including Pandas, NumPy, SciPy, Matplotlib, and scikit-learn.
Why use Anaconda?
For data scientists and analysts, Anaconda offers a “batteries included” approach, meaning many essential tools are available right after installation, reducing setup time. Its conda package manager is more robust than pip for managing non-Python dependencies and handling complex environments.
Steps to Install Pandas with Anaconda:
- Install Anaconda: If you don’t have Anaconda installed, download the Anaconda Individual Edition installer from the official Anaconda website (anaconda.com/products/individual). Follow the installation instructions for your operating system.
- Open Anaconda Prompt (Windows) or Terminal (macOS/Linux):
- On Windows, search for “Anaconda Prompt” in your Start Menu.
- On macOS/Linux, simply open your regular terminal.
condacommands should be available in your PATH after Anaconda installation.
- Activate or Create a Conda Environment:
It’s still good practice to create a separate environment even with Anaconda.- To create a new environment (recommended):
bash

conda create --name my_pandas_env python=3.9

conda activate my_pandas_env
- To use the base environment (less recommended for projects):
If you want to install Pandas directly into yourbaseAnaconda environment, just ensure it’s active. It’s usually active by default when you open the Anaconda Prompt/Terminal.
- To create a new environment (recommended):
- Install Pandas: Once your
condaenvironment is active, run:
bash

conda install pandas
condawill resolve dependencies and ask for your confirmation before proceeding with the installation. Typeyand press Enter.
Benefits of Conda for Pandas:
- Integrated Environment Management:
condahandles Python versions, non-Python libraries, and Python packages all within its environment system. - Pre-compiled Binaries: Often,
condapackages are pre-compiled for your system, leading to faster installations and fewer compilation errors compared topipsometimes.
Installing Specific Versions or from Source (Advanced)
While pip install pandas or conda install pandas covers 99% of use cases, there might be situations where you need more control:
- Installing a specific version with
conda:
bash

conda install pandas=1.4.2
- Installing from a Git repository (e.g., for development versions):
This is typically for developers contributing to Pandas or testing unreleased features.
bash

pip install git+https://github.com/pandas-dev/pandas.git
- Installing from a local source distribution:
If you have downloaded the Pandas source code, you can navigate to its root directory and run:
bash

pip install .
or, for an editable install during development:
bash

pip install -e .
These advanced methods are generally not needed for most users but provide flexibility for specific development or debugging scenarios.
Verifying Your Pandas Installation and First Steps
After going through the installation process, the next crucial step is to verify that Pandas has been installed correctly and is accessible from your Python environment. This simple check confirms that you’re ready to start using the library.
Confirming Successful Installation
There are a couple of straightforward ways to confirm your Pandas installation:
-
Using Python’s Interactive Interpreter:
- Open your terminal or command prompt.
- Activate your virtual or conda environment (if applicable).
- Start the Python interactive interpreter by typing
pythonorpython3. - At the
>>>prompt, type the following:
python

import pandas as pd

print(pd.__version__)
- If Pandas is installed correctly, you should see its version number printed (e.g.,
2.0.3). If you encounter anModuleNotFoundError: No module named 'pandas', it means Pandas was not installed correctly or you are not in the correct environment where it was installed.
-
Running a Simple Python Script:
-
Create a new Python file (e.g.,
test_pandas.py) with the following content:import pandas as pd import numpy as np print("Pandas installed successfully!") print(f"Pandas version: {pd.__version__}") # Try creating a simple DataFrame data = {'Name': ['Alice', 'Bob', 'Charlie'], 'Age': [25, 30, 35], 'City': ['New York', 'Los Angeles', 'Chicago']} df = pd.DataFrame(data) print("nSample DataFrame:") print(df.head()) -
Save the file and then run it from your terminal:
bash

python test_pandas.py
-
If you see the “Pandas installed successfully!” message, the version number, and the sample DataFrame printed without errors, then your installation is working perfectly.
-
A Quick Dive into Basic Pandas Usage
Now that you’ve confirmed your installation, let’s take a tiny step into using Pandas to get a feel for its power. This brief introduction will demonstrate how to create a DataFrame and perform a basic operation.
Creating a DataFrame:
import pandas as pd

# Create a dictionary of data
data = {
    'Fruit': ['Apple', 'Banana', 'Orange', 'Grape'],
    'Quantity': [10, 15, 8, 20],
    'Price_per_unit': [0.50, 0.30, 0.75, 0.20]
}

# Convert the dictionary to a Pandas DataFrame
fruit_df = pd.DataFrame(data)

# Display the DataFrame
print("Our first DataFrame:")
print(fruit_df)
Performing a Basic Operation (Calculating Total Price):
Let’s add a new column for Total_Price by multiplying Quantity and Price_per_unit.
# Calculate Total_Price
fruit_df['Total_Price'] = fruit_df['Quantity'] * fruit_df['Price_per_unit']

# Display the updated DataFrame
print("nDataFrame with Total Price:")
print(fruit_df)

# Get some basic descriptive statistics
print("nDescriptive Statistics for Quantity:")
print(fruit_df['Quantity'].describe())
This simple example illustrates how easily you can create structured data and perform calculations within a DataFrame. This immediate gratification of seeing results is often the most exciting part of setting up new tools, and it’s just a tiny glimpse into the vast capabilities Pandas offers for data exploration, cleaning, and analysis.
Troubleshooting Common Installation Issues
Even with careful steps, you might occasionally encounter issues during installation. Knowing how to diagnose and resolve these common problems can save you a lot of time and frustration.
Permission Errors and How to Fix Them
One of the most frequent problems, especially on Linux and macOS, is a “Permission Denied” error when pip tries to install packages. This usually happens when pip tries to write to system-wide directories that require administrator privileges.
Symptoms:
PermissionError: [Errno 13] Permission denied: '/usr/local/lib/python3.x/dist-packages/...'Can't install to user-site because site-packages is not writeable
Solutions:
- Use a Virtual Environment (Recommended): This is the best long-term solution. When you activate a virtual environment,
pipinstalls packages within that environment’s directory, which you always have permission to write to. - Install to User Site: If you’re not using a virtual environment and still face permission issues, you can tell
pipto install packages only for your current user, rather than system-wide:
bash

pip install --user pandas
This installs Pandas into a user-specific directory (e.g.,~/.local/lib/python3.x/site-packageson Linux/macOS or%APPDATA%PythonPython3xsite-packageson Windows), which doesn’t require administrator rights. Be aware that packages installed this way are only available to your user and might not be picked up by all tools if yourPATHis not configured correctly. - Run as Administrator (Use with Caution): On Windows, you can open Command Prompt or PowerShell as an administrator and then run the
pip install pandascommand. On Linux/macOS, you can usesudo pip install pandas.
WARNING: Usingsudoor running as administrator forpipinstallations is generally discouraged unless you explicitly know why you need to install system-wide packages this way. It can lead to permission issues for regular users later and might interfere with system-managed Python packages. Prefer virtual environments or--userinstalls.
Network and Proxy Issues
Sometimes, your network configuration (firewalls, corporate proxies) can prevent pip or conda from downloading packages from their respective repositories.
Symptoms:
Could not fetch URL ...Connection errorMax retries exceeded with url ...
Solutions:
- Check Internet Connection: Ensure you have an active internet connection.
- Configure Proxy Settings: If you’re behind a corporate proxy, you might need to configure
piporcondato use it.- For
pip: You can set proxy environment variables or use the--proxyflag:
bash

pip install --proxy http://your.proxy.server:port pandas
Or set environment variablesHTTP_PROXYandHTTPS_PROXY. - For
conda: Useconda config:
bash

conda config --set proxy_servers.http http://user:pass@host:port

conda config --set proxy_servers.https https://user:pass@host:port
- For
- Check Firewall/Antivirus: Temporarily disabling your firewall or antivirus software (with caution) might help diagnose if they are blocking the connection.
Version Conflicts and Environment Management
Installing multiple packages over time can sometimes lead to version conflicts where one package requires an older version of a dependency than another.
Symptoms:
Requirement already satisfied:warnings, followed by errors.- Packages behaving unexpectedly after installation.
- Errors about incompatible versions.
Solutions:
- Virtual Environments (Again, Highly Recommended): This is the ultimate solution for version conflicts. Each project gets its isolated set of dependencies. If a project needs
pandas==1.xand another needspandas==2.x, virtual environments allow both to coexist peacefully. - Uninstall and Reinstall: If you suspect a conflict in a non-isolated environment, you might need to uninstall and then reinstall:
bash

pip uninstall pandas numpy # Uninstall pandas and its core dependency

pip install pandas          # Reinstall pandas
Forconda, the process is similar:
bash

conda uninstall pandas

conda install pandas
- Check for Other Python Installations: Sometimes, you might have multiple Python installations on your system (e.g., one from your OS, one from python.org, one from Anaconda). Ensure you are using the
piporpythoncommand associated with the specific Python installation where you intend to install Pandas. Usewhich pythonandwhich pip(on Linux/macOS) orwhere pythonandwhere pip(on Windows) to confirm paths.
By understanding these common pitfalls and their solutions, you’ll be well-equipped to handle most installation challenges, ensuring your data journey remains smooth and productive.
Beyond Installation: Unleashing Pandas for Productivity and Insight
Installing Pandas is merely the first step. The real value comes from actively using and mastering this library. Its capabilities extend far beyond simple data loading and basic calculations, transforming raw information into actionable insights that can drive significant impact.
The Impact of Data Proficiency on Your Career
In today’s data-driven world, proficiency with tools like Pandas is no longer just for specialized data scientists. It’s a skill that empowers professionals across various domains, directly impacting productivity, decision-making, and career trajectories.
- Enhanced Productivity: Imagine spending hours manually sifting through spreadsheets versus writing a few lines of Python code to clean, transform, and analyze gigabytes of data in minutes. Pandas dramatically accelerates data-related tasks, freeing up valuable time for higher-level strategic thinking. This efficiency is a direct boost to individual and team productivity, aligning perfectly with the “Tech” and “Productivity” themes of this website.
- Data-Driven Decision Making: Whether you’re a marketer analyzing campaign performance, a financial analyst tracking investment trends, or a business owner evaluating customer demographics, Pandas provides the tools to extract meaningful patterns. This capability translates directly into smarter, evidence-based decisions, which can lead to increased revenue, optimized spending, and a stronger “Brand” presence through better product development and market positioning. For “Money” matters, the ability to analyze financial data for personal investments, budgeting, or business forecasting is invaluable.
- Career Advancement and Income Potential: As organizations increasingly rely on data, individuals with strong data analysis skills are highly sought after. Mastering Pandas opens doors to roles in data science, business intelligence, analytics, and software development, offering significant career growth opportunities and often leading to higher earning potential. It’s a direct investment in your “Money” prospects by boosting your market value.
- Innovation and Problem Solving: Pandas enables you to explore complex datasets, identify anomalies, uncover hidden correlations, and build predictive models. This capacity for deep analysis fosters innovation and equips you to solve challenging problems that might otherwise remain opaque.
Next Steps and Resources for Deepening Your Skills
With Pandas successfully installed, your journey into data mastery has just begun. To truly leverage its power, continuous learning and practice are key.
- Official Pandas Documentation: The Pandas official documentation (pandas.pydata.org/docs/) is an invaluable resource. It’s comprehensive, well-organized, and offers numerous examples. Start with the “10 minutes to pandas” guide for a quick overview.
- Online Courses and Tutorials: Platforms like Coursera, Udemy, DataCamp, and freeCodeCamp offer excellent courses specifically on Pandas, catering to all skill levels. These often provide structured learning paths and practical exercises.
- Practice with Real-World Data: The best way to learn is by doing. Look for publicly available datasets (e.g., Kaggle, UCI Machine Learning Repository, government data portals) and try to apply Pandas to answer specific questions, clean the data, and perform analyses. Start with small projects and gradually increase complexity.
- Community and Forums: Engage with the Python and Pandas communities on platforms like Stack Overflow, Reddit (e.g., r/datascience, r/learnpython), and GitHub. Asking questions and seeing how others solve problems is a great way to learn.
- Integrate with Other Libraries: As you become comfortable with Pandas, start exploring its integration with other powerful Python libraries:
- NumPy: For advanced numerical operations.
- Matplotlib and Seaborn: For creating compelling data visualizations.
- Scikit-learn: For machine learning tasks where Pandas DataFrames serve as input.
- Jupyter Notebooks/Lab: An interactive environment that makes exploring and presenting Pandas data incredibly effective.
By dedicating time to learning and practicing with Pandas, you’re not just acquiring a technical skill; you’re developing a powerful analytical mindset that can transform how you interact with data, drive efficiency, enhance your brand, and ultimately, amplify your financial and professional success. Welcome to the world of data mastery!
aViewFromTheCave is a participant in the Amazon Services LLC Associates Program, an affiliate advertising program designed to provide a means for sites to earn advertising fees by advertising and linking to Amazon.com. Amazon, the Amazon logo, AmazonSupply, and the AmazonSupply logo are trademarks of Amazon.com, Inc. or its affiliates. As an Amazon Associate we earn affiliate commissions from qualifying purchases.