Minecraft, the ubiquitous sandbox game that has captivated millions, offers an almost limitless canvas for creativity and adventure. However, for many Mac users, the vanilla experience, while enjoyable, can feel a bit… uninspired. This is where OptiFine steps in. OptiFine isn’t just another mod; it’s a game-changing optimization and graphics enhancement tool that can dramatically improve Minecraft’s performance, visual fidelity, and overall gameplay. If you’ve ever dreamt of buttery-smooth frame rates even with intricate builds, stunning shaders that transform your world into a photorealistic masterpiece, or simply a more responsive gaming experience on your Mac, then learning how to install OptiFine is your gateway.

This comprehensive guide will walk you through the entire process, from understanding what OptiFine is and why it’s so beneficial, to the step-by-step installation on your macOS device. We’ll delve into the technicalities, explore the various enhancements it brings, and even touch upon how this seemingly simple software can tie into broader themes of technological advancement, personal productivity, and even the “brand” of your Minecraft experience.
Understanding OptiFine: More Than Just a Mod
Before we dive into the “how-to,” it’s essential to grasp what OptiFine truly is and why it has become an indispensable tool for so many Minecraft players, especially those on macOS who might face unique optimization challenges.
The Powerhouse of Performance and Visuals
At its core, OptiFine is a Minecraft optimization mod. Developed by the independent programmer “sp614x,” its primary goal is to enhance Minecraft’s rendering engine. This translates into several key benefits:
- Massive Performance Boost: OptiFine introduces a highly optimized rendering engine that significantly increases frame rates (FPS) and reduces stuttering. This is particularly noticeable on older Macs or those with integrated graphics, allowing you to play smoothly even with more demanding settings.
- Advanced Graphics Options: Forget the limited graphics settings of vanilla Minecraft. OptiFine unlocks a plethora of new options, allowing for granular control over everything from texture quality and anti-aliasing to fog, lighting, and even dynamic shadows.
- Shader Support: This is arguably one of OptiFine’s most celebrated features. It provides the framework for compatibility with external shader packs, which can completely revolutionize Minecraft’s visuals. Imagine realistic water reflections, volumetric lighting, dynamic shadows that move with the sun, and atmospheric fog – shaders, powered by OptiFine, make it all possible.
- Zoom Functionality: A simple yet incredibly useful addition, OptiFine includes a built-in zoom feature that lets you get closer to distant objects without relying on third-party mods or console commands.
- Dynamic Lighting: Enhance the immersion by having light sources, like torches or glowstone, actually cast dynamic light and shadows in real-time.
- Connected Textures: This feature allows textures to blend seamlessly, creating a more cohesive and aesthetically pleasing look for blocks like glass or bookshelves.
- Configurable Settings: OptiFine’s extensive menu of settings allows you to fine-tune your game to achieve the perfect balance between visual quality and performance, catering to your specific Mac’s capabilities.
Why OptiFine on Mac?
Macs are known for their sleek design and user-friendly interface, but when it comes to gaming, they sometimes have a reputation for being less hardware-intensive than their Windows counterparts, especially for demanding games. While Macs have become increasingly capable, Minecraft, with its evolving graphical demands and the allure of modded experiences, can still push their limits. OptiFine directly addresses this. By optimizing the game’s engine and providing advanced graphics controls, it ensures that Mac users can enjoy a fluid and visually stunning Minecraft experience, often outperforming the base game without any modifications. It democratizes high-fidelity graphics for a wider range of Mac users, making the dream of playing with stunning shaders a reality.
Preparing Your Mac for OptiFine Installation
Before you embark on the installation journey, a little preparation goes a long way in ensuring a smooth and successful process. This section will guide you through the essential prerequisites and best practices.
Installing Minecraft for Mac
First and foremost, you need to have Minecraft installed on your Mac. If you haven’t already, the process is straightforward:
- Purchase and Download Minecraft: Head over to the official Minecraft website (minecraft.net) and purchase the Java Edition of the game. Once purchased, download the Minecraft installer for macOS.
- Run the Installer: Locate the downloaded
.dmgfile and double-click it. Drag the Minecraft application icon to your Applications folder. - Launch Minecraft: Open your Applications folder and launch Minecraft. You’ll be prompted to log in with your Microsoft account. This will also download and install the latest version of the game, along with its necessary files.
Understanding Minecraft Launchers and Versions
Minecraft’s installation can sometimes feel like a labyrinth, especially with different versions and launchers. OptiFine is version-specific. This means that the OptiFine version you download must correspond to the exact version of Minecraft you intend to play it with.
- Official Minecraft Launcher: This is the default launcher you get when you download Minecraft from the official website. It allows you to manage different game versions and installations.
- Third-Party Launchers: Some users opt for third-party launchers like Lunar Client or Badlion Client. These often come with pre-installed mods and optimizations, and sometimes OptiFine is integrated or can be installed through their interfaces. However, for this guide, we will focus on installing OptiFine directly into the official Minecraft launcher for maximum compatibility and understanding.
The Importance of the “Vanilla” Installation
For a clean OptiFine installation, it’s highly recommended to have at least one instance of the desired Minecraft version running without any other mods. This ensures that OptiFine is the primary modification being applied, reducing the chances of conflicts.
- Launch Vanilla Minecraft: Open the official Minecraft launcher. In the bottom-left corner, you should see a “Installations” tab. Click on it.
- Create a New Installation (Optional but Recommended): It’s good practice to create a specific installation profile for the Minecraft version you want to add OptiFine to. Click the “+ New installation” button.
- Give it a name (e.g., “Minecraft 1.20.1 with OptiFine”).
- Under “Version,” select the specific Minecraft version you want to install OptiFine for. Crucially, ensure this matches the OptiFine version you will download.
- Click “Create.”
- Play Once: Before proceeding with OptiFine, select this new installation (or your desired vanilla version) from the “Play” tab and launch the game at least once. Close it after the main menu appears. This ensures all necessary game files for that specific version are downloaded and present.
Installing OptiFine on Your Mac: A Step-by-Step Guide
Now that you’re prepared, let’s get down to the actual installation process. This is where the magic happens, and you’ll soon be enjoying a vastly improved Minecraft experience.
Step 1: Download the Correct OptiFine Version
The most crucial step is downloading the correct OptiFine installer for the version of Minecraft you wish to enhance.
- Visit the Official OptiFine Website: Navigate to the official OptiFine download page: optifine.net/downloads.
- Select Your Minecraft Version: On the downloads page, you’ll see a list of Minecraft versions. Find the version that exactly matches the Minecraft installation you prepared earlier (e.g., 1.20.1, 1.19.4, etc.).
- Download the Installer: Click the “Download” button next to your chosen version. You will likely be redirected to an advertisement page. Do NOT click on any ads. Look for a prominent “SKIP” button, usually in the top-right corner of the page. Click “SKIP.”
- Save the
.jarFile: You will then be presented with the actual download link for the OptiFine installer, which will be a.jarfile. Save this file to a location you can easily find, such as your Downloads folder or Desktop.
Step 2: Run the OptiFine Installer
With the .jar file downloaded, it’s time to execute it.
- Locate the Downloaded
.jarFile: Go to the folder where you saved the OptiFine installer file. - Open with Java:
- Method A (Recommended): Right-click (or Control-click) on the OptiFine
.jarfile. From the contextual menu, select “Open With” and then choose “Java Launcher.” - Method B (If Java Launcher isn’t an option): If “Java Launcher” doesn’t appear, you might need to ensure Java is properly installed and associated with
.jarfiles. Sometimes, simply double-clicking the.jarfile will work if Java is correctly set up. If it opens in a text editor or another program, you’ll need to adjust your file associations or explicitly use “Open With.”
- Method A (Recommended): Right-click (or Control-click) on the OptiFine
- The OptiFine Installer Window: If successful, the OptiFine installer window will pop up. It will typically show the OptiFine version you downloaded and a large “Install” button.
- Click “Install”: Click the “Install” button. The installer will then proceed to modify your Minecraft installation files to integrate OptiFine.
- Confirmation Message: After a few moments, you should see a confirmation message stating that OptiFine has been successfully installed. Click “OK” to close the installer.
Step 3: Launch Minecraft with OptiFine
The final step is to ensure that you’re launching Minecraft using the profile that now includes OptiFine.
- Open the Official Minecraft Launcher: Launch the Minecraft launcher.
- Navigate to the “Play” Tab: Make sure you’re on the “Play” tab.
- Select the OptiFine Installation: In the dropdown menu above the “Play” button (which usually defaults to “Latest Release”), you should now see an entry that includes “OptiFine” and the version number (e.g., “release 1.20.1-OptiFine”). Select this installation. If you created a specific profile earlier, choose that one.
- Click “Play”: Click the “Play” button. Minecraft will now launch with OptiFine integrated.
Step 4: Verifying the Installation and Exploring Settings
Once Minecraft has loaded, you’ll want to confirm that OptiFine is active and then explore its powerful settings.
- Check the Minecraft Main Menu: On the Minecraft main menu, look at the bottom-left corner. You should see text that reads “OptiFine [version number]” displayed alongside the Minecraft version. This confirms a successful installation.
- Accessing OptiFine Settings:
- Go to “Options…”
- Then navigate to “Video Settings…”
- You will immediately notice a significantly expanded menu of graphics options compared to vanilla Minecraft. This is where the power of OptiFine lies.
Important Considerations and Troubleshooting
- Java Installation: Ensure you have Java installed on your Mac. You can download the latest version from the official Oracle Java website. Minecraft and OptiFine rely on Java to run.
- Version Mismatch: The most common issue is downloading an OptiFine version that doesn’t match your Minecraft version. Always double-check before downloading.
- Corrupted Download: If the installer fails, try re-downloading the OptiFine
.jarfile. - Conflicts with Other Mods: If you’re trying to install OptiFine alongside other mods, especially if you’re using a mod loader like Forge or Fabric, the installation process can be different and more complex. OptiFine typically installs as a standalone mod or can be integrated into Forge/Fabric installations with specific steps. For this guide, we focused on the standalone installation for simplicity.
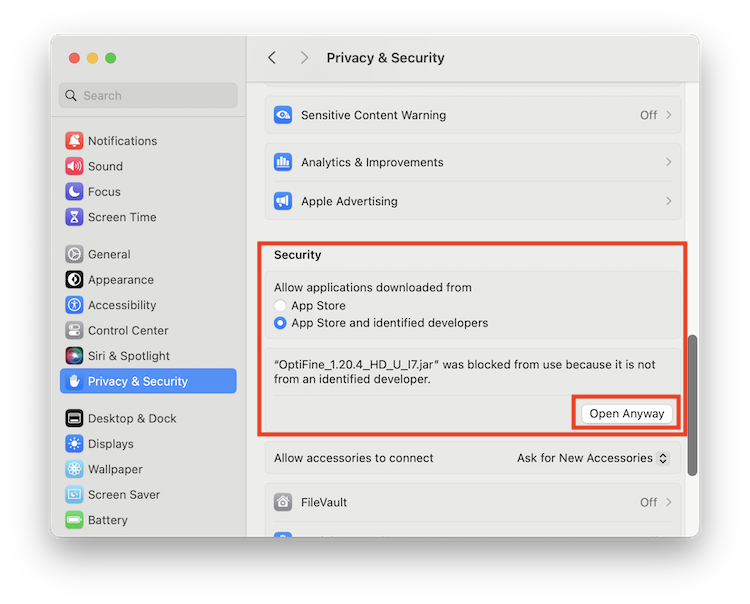
- Mac’s Built-in Security: macOS has security features that might sometimes prevent applications from running. If you encounter issues, ensure you’re allowing applications downloaded from trusted sources to run.
Optimizing Your Gameplay: Leveraging OptiFine’s Features
With OptiFine successfully installed, the real fun begins – tailoring your Minecraft experience to your exact preferences. The “Video Settings” menu is your playground.
Adjusting Graphics Settings for Performance and Aesthetics
OptiFine’s expanded settings allow for an incredible degree of customization. Here are some key areas to focus on:
- Graphics: This is the most impactful setting. Options range from “Fast” (prioritizing performance) to “Fancy” (prioritizing visuals). For Macs that struggle with performance, starting with “Fast” is advisable.
- Render Distance: This controls how many chunks of the world are loaded around you. Lowering this significantly improves performance but reduces how far you can see.
- Simulation Distance: Similar to render distance but for game logic (like mob AI and plant growth).
- Smooth Lighting: Controls how light levels transition. “Minimum” or “Maximum” can offer performance gains.
- Clouds: Setting clouds to “Off” or “Fast” can free up resources.
- Particles: Reducing particle effects (e.g., from rain, explosions, or enchantments) can boost FPS.
- Details: This is a sub-menu that allows you to toggle individual graphical elements like trees, grass, sky, fog, and more. Experimenting here can yield significant performance improvements without sacrificing too much visual appeal.
- Animations: Disabling specific animations (like fire or water) can help.
- Quality: This section allows you to adjust texture quality, anisotropic filtering, and mipmap levels. Lowering these can improve performance.
- Performance: Here you’ll find crucial settings like “Fast Render” (which should generally be ON), “Fast Graphics,” and “Dynamic Updates.” These are designed to maximize your frame rate.
The Magic of Shaders
The true visual transformation of Minecraft often comes with the use of shader packs. OptiFine is the primary enabler for these.
- What are Shaders? Shader packs are external files that modify how Minecraft’s lighting, shadows, water, and other visual elements are rendered, adding realistic effects.
- Finding Shader Packs: Popular shader packs include BSL Shaders, Complementary Shaders, Sildur’s Vibrant Shaders, and Chocapic13’s Shaders. You can find them on websites dedicated to Minecraft mods and shaders. Always download from reputable sources to avoid malware.
- Installing Shader Packs:
- In Minecraft, go to “Options…” > “Video Settings…” > “Shaders…”
- Click the “Shaders Folder” button at the bottom. This will open a folder on your Mac.
- Drag and drop the downloaded shader pack
.zipfile (or extracted folder, depending on the shader’s instructions) into this “shaderpacks” folder. - Go back into Minecraft, and your new shader pack should appear in the list within the Shaders menu. Select it, and your game world will transform!
Note: Shaders are graphically intensive. Even with OptiFine, running complex shaders on a less powerful Mac might still result in lower frame rates. You’ll need to experiment with both OptiFine’s settings and the shader pack’s own quality settings to find a balance.
OptiFine: A Testament to Tech, Branding, and Productivity
The installation of OptiFine, while a technical task, touches upon broader themes relevant to the topics discussed on this website:
Technology Trends and Digital Security
OptiFine exemplifies the power of community-driven technological advancement. A single developer, driven by passion, has created a tool that enhances a widely popular piece of software for millions. This highlights a trend where dedicated individuals and small teams can significantly impact the digital landscape, often filling gaps left by larger commercial entities. Furthermore, the process of downloading and installing mods underscores the importance of digital security. Users must be discerning, only downloading from official or reputable sources to protect their systems from malware. Understanding the .jar file format and Java executables is a small but important step in digital literacy.
The “Brand” of Your Minecraft Experience
In a sense, your Minecraft world has a “brand.” The way it looks, how smoothly it runs, and the overall aesthetic you achieve contribute to this brand. OptiFine, by allowing you to customize visuals and performance, empowers you to curate a unique brand for your gameplay. Do you want a hyper-realistic, cinematic experience? Or perhaps a smooth, high-FPS adventure with minimal distractions? OptiFine, combined with strategic shader and texture pack choices, allows you to build this distinct brand for your digital creations and adventures. It’s about personalizing your digital identity within the vast world of Minecraft.

Enhancing Productivity and Enjoyment
While Minecraft isn’t typically categorized as a “productivity” tool in the traditional sense, the act of building, problem-solving, and managing resources within the game certainly hones certain skills. OptiFine directly enhances the enjoyment and, by extension, the “productivity” of your gaming sessions. When your game runs smoothly and looks stunning, you’re more likely to spend extended periods engaged in creative endeavors or epic adventures. Reduced frustration from lag or poor visuals means more time spent actually playing and achieving your in-game goals. It transforms a potentially frustrating technical hurdle into an opportunity for immersive enjoyment, making your time spent in Minecraft more rewarding.
In conclusion, installing OptiFine on your Mac is a straightforward yet incredibly rewarding process. It unlocks the full potential of Minecraft’s visual capabilities and significantly improves performance, ensuring that your digital creations and explorations are as smooth and beautiful as they can be. By following these steps, you’re not just installing a mod; you’re investing in a more enjoyable, visually rich, and ultimately more productive Minecraft experience on your Mac. Happy crafting!
aViewFromTheCave is a participant in the Amazon Services LLC Associates Program, an affiliate advertising program designed to provide a means for sites to earn advertising fees by advertising and linking to Amazon.com. Amazon, the Amazon logo, AmazonSupply, and the AmazonSupply logo are trademarks of Amazon.com, Inc. or its affiliates. As an Amazon Associate we earn affiliate commissions from qualifying purchases.