Minecraft, a game that has captivated millions with its boundless creativity and exploration, offers an incredible canvas for players to build, survive, and thrive. However, for those seeking an even more refined and feature-rich gameplay experience, the vanilla version of Minecraft can sometimes feel a little… basic. This is where mods come into play, and two of the most sought-after additions for any serious Minecraft player are OptiFine and Forge.
OptiFine is a remarkable optimization mod that significantly enhances Minecraft’s graphical performance, allowing for smoother gameplay, higher frame rates, and a stunning array of visual enhancements like dynamic lighting, shaders, and improved texture quality. Forge, on the other hand, is a powerful modding API (Application Programming Interface) that acts as a foundational framework, enabling a vast ecosystem of other mods to be installed and function seamlessly together. Understanding how to install both OptiFine and Forge is the gateway to unlocking a world of enhanced visuals and an almost limitless variety of gameplay modifications.
This comprehensive guide will walk you through the process of installing OptiFine and Forge, ensuring you can harness the full potential of your Minecraft adventures. We’ll break down each step, address common queries, and provide the clarity needed to successfully integrate these essential tools into your game. Whether you’re a seasoned player looking to boost performance or a newcomer eager to explore the modding landscape, this article is your definitive resource.
Understanding the Role of OptiFine and Forge
Before diving into the installation process, it’s crucial to understand what each of these tools brings to your Minecraft table.
OptiFine: The Performance and Visual Enhancer
OptiFine’s primary objective is to make Minecraft run better and look better. It achieves this through a multifaceted approach:
- Performance Boost: OptiFine meticulously optimizes Minecraft’s rendering engine. This translates to significant frame rate improvements, especially on systems that struggle with the base game. It achieves this by implementing more efficient rendering techniques, managing game resources more effectively, and providing granular control over graphics settings.
- Advanced Graphics Options: Beyond raw performance, OptiFine unlocks a plethora of graphical settings that are not available in the vanilla game. This includes:
- Shaders Support: OptiFine is the de facto standard for running shader packs, which dramatically alter Minecraft’s lighting, shadows, water, and atmospheric effects, creating breathtaking visual realism.
- Dynamic Lighting: Allows for light sources like torches to cast dynamic shadows and illuminate the environment as you move them.
- Detailed World Rendering: Options for variable render distance, chunk loading, and smooth lighting provide finer control over how your world appears and loads.
- Higher Resolution Textures: Enables the use of higher resolution texture packs without the performance hit that vanilla Minecraft might experience.
- Animated Textures and Connected Textures: Enhances the visual fidelity of blocks by allowing for animated textures and seamlessly connecting textures for a more cohesive look.
- Zoom Functionality: A convenient in-game zoom feature, activated by a keybind, allows you to peer at distant objects or meticulously examine your builds.
In essence, OptiFine is your go-to for a visually stunning and smoother Minecraft experience, especially if you dream of running elaborate shader packs.
Forge: The Modding Foundation
Forge is not a mod that you directly “see” in terms of gameplay changes; rather, it’s a foundational library and API. Its purpose is to provide a standardized way for other mods to interact with Minecraft. Think of it as a universal adapter for mods.
- Enabling Mod Installation: Without Forge (or a similar mod loader like Fabric), most Minecraft mods simply wouldn’t work. Forge hooks into Minecraft’s code in a way that allows other mods to register their content, such as new blocks, items, creatures, and mechanics.
- Mod Compatibility: Forge strives to ensure that different mods can coexist and interact without conflicts. While it can’t guarantee perfect compatibility between every single mod ever created, it significantly reduces the likelihood of crashes and bugs that can arise from poorly integrated modifications.
- Modding Community: Forge has been around for a long time and boasts a massive, active community of mod developers. This means there’s an enormous library of mods available for Forge, covering every imaginable aspect of gameplay.
Crucially, OptiFine and Forge generally do not work together out of the box. There are specific, often more complex, methods to get them to coexist, but for a standard installation, you typically choose one or the other to install. This guide will focus on installing Forge first, and then explain how to install OptiFine for use with Forge, which is a common and highly desirable setup.
Preparing for Installation: Essential Pre-Installation Steps
Before you begin downloading and installing, a few preparatory steps will ensure a smooth and error-free process.
1. Identify Your Minecraft Version
This is arguably the most critical step. Both OptiFine and Forge are version-specific. A Forge installer for Minecraft 1.16.5 will not work with Minecraft 1.19.4, and vice-versa.
- Launch Minecraft: Open your Minecraft Launcher.
- Check the Profile: On the main screen, look at the bottom left corner. It usually displays the version of Minecraft you are currently running or have selected.
- Note the Version: Make a note of the exact Minecraft version number (e.g., 1.20.1, 1.19.2, 1.16.5). This is essential for downloading the correct files.
2. Create a Separate Minecraft Profile (Recommended)
While not strictly mandatory, creating a new profile within your Minecraft Launcher for your modded installation is highly recommended. This keeps your vanilla Minecraft experience separate from your modded one, preventing accidental launching of the wrong version or potential conflicts.
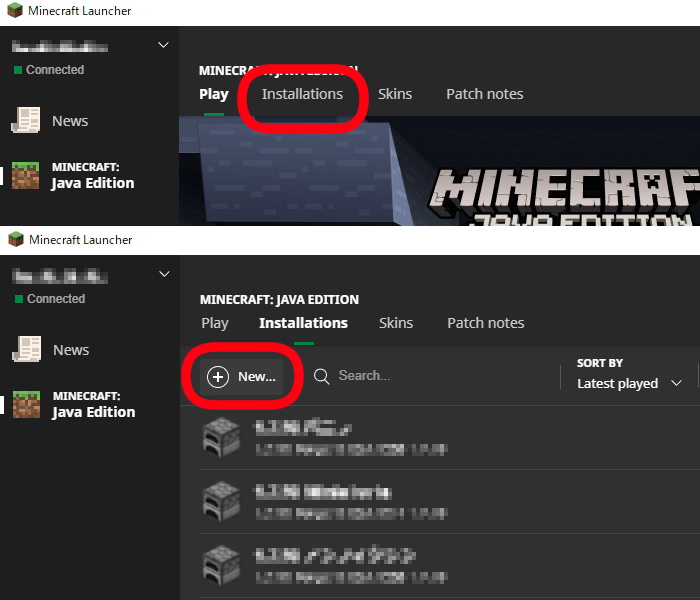
- Open the Minecraft Launcher: Launch the game.
- Navigate to “Installations”: Click on the “Installations” tab at the top of the launcher.
- Click “New Installation”: Press the “+ New Installation” button.
- Name Your Installation: Give it a descriptive name, like “Forge 1.XX.X” or “Modded Minecraft.”
- Select Game Directory: You can leave this as the default, but if you want to keep mods completely separate, you can create a new folder for this installation.
- Select Version: This is where you choose the exact Minecraft version you noted earlier.
- Click “Create”: Save your new installation. You can then select this profile from the dropdown menu before clicking “Play.”
3. Back Up Your Minecraft World (Crucial!)
While modding is generally safe, things can occasionally go wrong, and a corrupted world save is a distressing outcome. Always back up your important worlds before installing any mods.

- Locate Your Minecraft Saves Folder:
- Windows: Press
Windows Key + R, type%appdata%.minecraftsaves, and press Enter. - macOS: Open Finder, press
Command + Shift + G, and type~/Library/Application Support/minecraft/saves. - Linux: Navigate to
~/.minecraft/savesin your home directory.
- Windows: Press
- Copy Your World Folder: Find the folder corresponding to the world you want to back up and copy it to a safe location outside of your Minecraft directory (e.g., your Desktop, a USB drive, or a cloud storage service).
Installing Forge: The Foundation for Modding
With your preparation complete, let’s get Forge installed.
Step 1: Download the Forge Installer
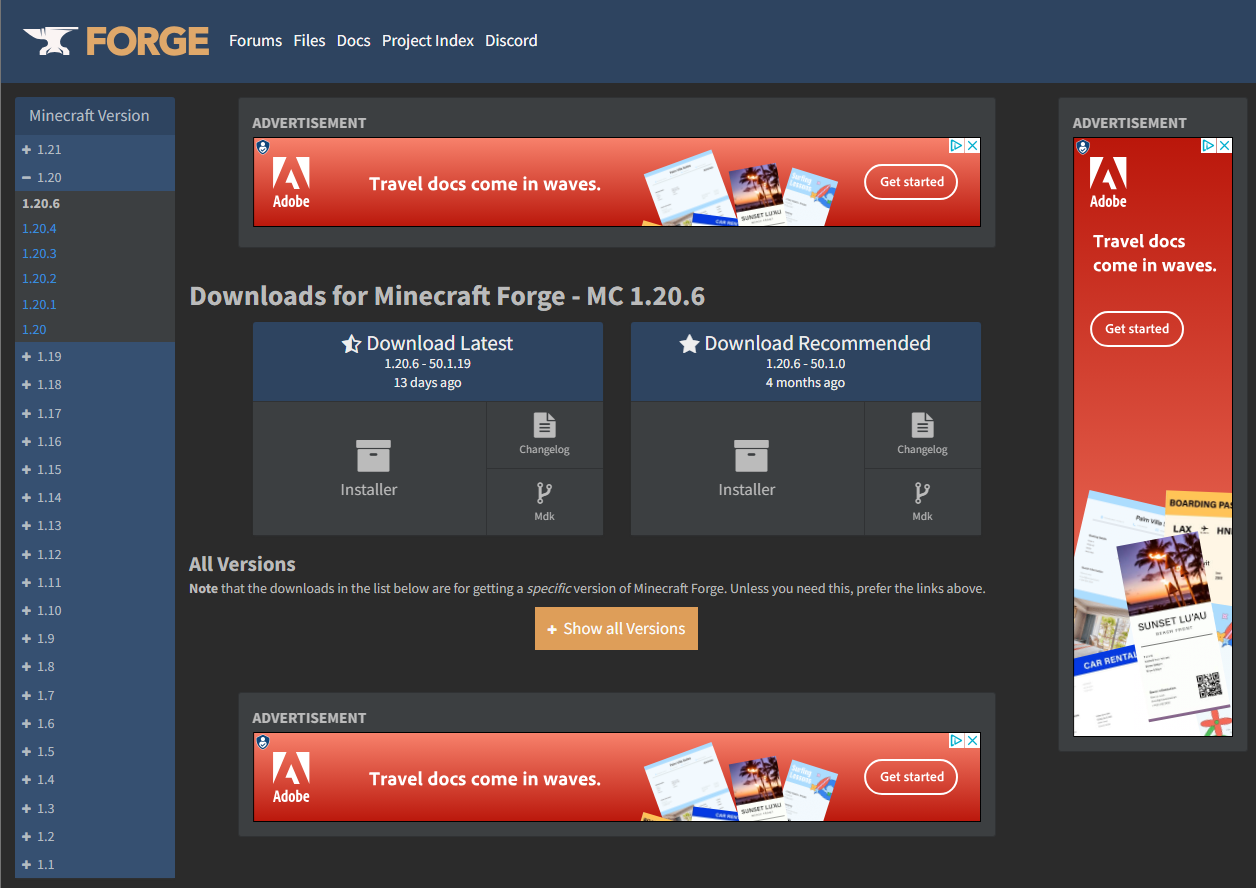
- Visit the Official Forge Website: Go to the official Minecraft Forge website: https://files.minecraftforge.net/
- Select Your Minecraft Version: On the left-hand side of the website, you’ll see a list of Minecraft versions. Click on the specific version you identified earlier.
- Choose the Recommended or Latest Build:
- Recommended: This is the most stable version and is generally preferred for most users.
- Latest: This will have the newest features and bug fixes but might be slightly less tested than the recommended build.
- Click “Installer”: On the download page for your chosen version, click the “Installer” button.
- Wait for the Ad to Skip: You will be taken to an ad page. Do NOT click anything on this page except the “SKIP” button in the top right corner after the countdown. Clicking anywhere else can lead you to unwanted downloads or websites.
- Save the .jar File: The Forge installer, a
.jarfile, will download. Save it to a convenient location, like your Desktop.
Step 2: Run the Forge Installer
- Locate the Downloaded .jar File: Find the Forge installer file you just downloaded.
- Ensure Java is Installed: Forge requires Java to run. If you don’t have Java installed, or have a very old version, you might need to download and install the latest version of Java Development Kit (JDK) from Oracle or adoptium.net.
- Run the Installer:
- Windows: Double-click the
.jarfile. If it doesn’t open, right-click it, select “Open with,” and choose “Java(TM) Platform SE binary” (or similar). - macOS: Double-click the
.jarfile. If it doesn’t open, you might need to open Terminal, navigate to the directory where the file is saved, and runjava -jar forge-installer-filename.jar.
- Windows: Double-click the
- Select “Install client”: The Forge installer window will appear. Ensure that “Install client” is selected.
- Check the Game Directory: Verify that the “Install location” points to your main Minecraft directory. If you created a separate profile and want to install Forge for that specific profile, you might need to browse to its specific game directory.
- Click “OK”: The installer will download and install the necessary Forge files. You’ll see a progress bar. Once complete, you’ll get a success message.
Step 3: Launch Minecraft with Forge
- Open the Minecraft Launcher: Launch your Minecraft Launcher.
- Select the Forge Profile: From the installations dropdown menu (usually at the bottom left), select the Forge profile you created or the one automatically created by the installer (it will likely be named something like “forge-XXXX”).
- Click “Play”: Launch Minecraft. You should see “Forge” mentioned in the loading screen, and the version number.
- Verify Installation: Once Minecraft loads to the main menu, look in the bottom left corner. You should see “Modded” and information about Forge and the mods loaded (initially none). This confirms Forge is successfully installed and running.
Installing OptiFine for Use with Forge
Now that you have Forge set up, you can add OptiFine. The method for installing OptiFine with Forge is slightly different from installing it on its own.
Step 1: Download the Correct OptiFine Version
- Visit the Official OptiFine Website: Go to https://www.optifine.net/downloads.
- Find Your Minecraft Version: Locate the download link for the exact same Minecraft version for which you installed Forge.
- Click “Download”: Click the “Download” button next to your version.
- Wait for the Ad to Skip: Similar to Forge, you’ll be taken to an ad page. Wait for the countdown and click “SKIP” in the top right corner.
- Save the .jar File: Save the OptiFine
.jarfile to a convenient location.
Step 2: Install OptiFine into the Forge Mods Folder
This is the key difference: instead of running the OptiFine .jar as an installer, you’ll place it into your Forge mods folder.
- Locate Your Minecraft Mods Folder:
- If you used the default Minecraft directory: Press
Windows Key + R, type%appdata%.minecraftmods, and press Enter. - If you created a separate game directory for your Forge profile: Navigate to that specific directory and look for a folder named “mods.” If the “mods” folder doesn’t exist, create it.
- If you used the default Minecraft directory: Press
- Copy the OptiFine .jar File: Take the OptiFine
.jarfile you downloaded and copy it directly into this “mods” folder. - Do NOT Run the OptiFine Installer Directly: When using Forge, you do not run the OptiFine
.jaras an installer. Placing it in the mods folder is the correct method.
Step 3: Launch Minecraft with Forge and OptiFine
- Open the Minecraft Launcher: Launch the game.
- Select Your Forge Profile: Ensure you have selected the correct Forge installation profile that you intend to use.
- Click “Play”: Launch Minecraft.
Upon loading, you should now have both Forge and OptiFine installed.
- Graphics Settings: You’ll notice many new graphics options within Minecraft’s Video Settings menu, confirming OptiFine is active.
- Shaders: If you have downloaded shader packs (which are separate downloads and are also placed in the “shaderpacks” folder within your
.minecraftdirectory), you can now select them from the “Shaders” option in the Video Settings.
Troubleshooting Common Issues
Even with careful steps, you might encounter minor hurdles. Here are some common issues and their solutions:
- “Game crashed while loading”:
- Version Mismatch: Ensure your Forge and OptiFine versions precisely match your Minecraft version.
- Conflicting Mods: If you’ve installed other mods, try removing them one by one to identify which one is causing the conflict. OptiFine can sometimes be sensitive.
- Corrupt Installation: Try re-downloading and reinstalling Forge and OptiFine.
- OptiFine not appearing in Video Settings:
- Incorrect Installation: Double-check that you placed the OptiFine
.jarfile directly into the “mods” folder for your Forge installation, and that you are launching the game through the correct Forge profile. - OptiFine Version: Make sure you downloaded the OptiFine version compatible with your Forge installation’s Minecraft version.
- Incorrect Installation: Double-check that you placed the OptiFine
- Poor Performance Despite OptiFine:
- Incorrect Settings: Explore OptiFine’s extensive graphics settings. Sometimes, certain demanding settings (like ultra-detailed shaders or extreme render distances) can still strain your hardware. Experiment with different settings.
- Java Heap Size: For very heavy modpacks or demanding shaders, you might need to allocate more RAM to Minecraft. This is done by editing the launcher’s JVM arguments. (Advanced users only).
- Forge Installer Not Opening:
- Java Installation: Ensure Java is installed and up-to-date.
- File Association: Make sure
.jarfiles are associated with Java on your operating system.
By following these steps, you’ll be well on your way to a significantly enhanced Minecraft experience. OptiFine provides the visual polish and performance boost, while Forge opens the door to a universe of player-created content, transforming Minecraft into an even more dynamic and engaging adventure. Enjoy exploring the possibilities!
aViewFromTheCave is a participant in the Amazon Services LLC Associates Program, an affiliate advertising program designed to provide a means for sites to earn advertising fees by advertising and linking to Amazon.com. Amazon, the Amazon logo, AmazonSupply, and the AmazonSupply logo are trademarks of Amazon.com, Inc. or its affiliates. As an Amazon Associate we earn affiliate commissions from qualifying purchases.