Minecraft, the ever-evolving sandbox of creativity, constantly pushes the boundaries of what’s possible. With each new update, players anticipate exciting features, but often, this comes with a performance cost, especially on less powerful hardware. This is where OptiFine steps in, a legendary mod that has been a staple for Minecraft players seeking smoother gameplay, stunning visual enhancements, and greater control over their game’s performance. While the article title specifically mentions “1.21.4,” it’s crucial to understand that OptiFine versions are typically tied to specific Minecraft releases. Therefore, the process described will generally apply to installing OptiFine for the Minecraft version that 1.21.4 would correspond to.
The core promise of OptiFine is to deliver a significantly improved Minecraft experience without requiring a high-end gaming rig. It achieves this through a sophisticated combination of optimization techniques and a vast array of graphical customization options. For players who dream of intricate builds rendered in high detail, complex Redstone contraptions running without lag, or simply a more fluid and responsive interaction with their virtual world, OptiFine is an indispensable tool. This guide will walk you through the essential steps of installing OptiFine, ensuring you can unlock the full visual and performance potential of your Minecraft adventures.
Understanding OptiFine and Its Importance
OptiFine is not just another mod; it’s a comprehensive performance enhancement and visual upgrade package for Minecraft. Developed by the dedicated individual known as “sp614x,” OptiFine has garnered immense respect within the Minecraft community for its consistent development and profound impact on the game. Its primary goal is to make Minecraft run faster and look better.
Performance Enhancements: The Foundation of Smoother Gameplay
At its heart, OptiFine is a masterclass in optimization. It meticulously analyzes and refines the way Minecraft renders graphics, leading to substantial performance gains. This translates into higher frame rates (FPS), reduced stuttering, and a more playable experience, particularly on systems that might struggle with vanilla Minecraft, especially when using demanding shader packs or playing on servers with many entities. OptiFine achieves these improvements through a variety of clever techniques, including:
- Dynamic Rendering: OptiFine intelligently adjusts what needs to be rendered based on what the player can see, significantly reducing the computational load.
- Better Culling: It efficiently hides parts of the world that are not in the player’s view, further optimizing rendering.
- Optimized Lighting and Shadows: While often associated with graphical enhancements, OptiFine’s lighting engine is also highly optimized, contributing to smoother frame rates even when advanced lighting effects are enabled.
- Chunk Loading Improvements: The way OptiFine manages and loads game chunks can lead to a more consistent and less jarring experience as you explore the world.
Visual Upgrades: Bringing Your Minecraft World to Life
Beyond raw performance, OptiFine unlocks a treasure trove of visual customization options that can transform the look and feel of your Minecraft world. These features allow players to tailor the game’s aesthetics to their precise preferences, from subtle tweaks to dramatic overhauls.
- Dynamic Lighting: This feature allows light sources to cast real-time shadows, adding depth and realism to your environments. Torches, lava, and glowstone will illuminate their surroundings with a palpable sense of presence.
- Connected Textures: OptiFine can seamlessly blend textures for blocks like glass, bookshelves, and sand. This creates a more cohesive and visually appealing look, eliminating the jarring lines that can appear between identical blocks.
- Custom Skyboxes: Players can upload their own custom sky textures, replacing the default blue sky with anything from starry nebulae to vibrant sunsets.
- Antialiasing and Anisotropic Filtering: These advanced graphical settings, often found in high-end PC games, help to smooth out jagged edges and improve texture clarity at oblique angles, respectively.
- Zoom Functionality: A built-in zoom feature, accessible via a hotkey, allows you to get a closer look at distant landscapes or meticulously examine your builds without needing to physically move closer.
- HD Textures and Custom Models: OptiFine provides robust support for high-resolution texture packs and custom block models, allowing for incredibly detailed and unique game visuals.
Step-by-Step Installation Guide for OptiFine
Installing OptiFine is a straightforward process that requires a few key steps. It’s important to note that the specific version of OptiFine you download must match the version of Minecraft you intend to play. If you are looking to install OptiFine for Minecraft 1.21.4, you will need to download the OptiFine version specifically designed for that Minecraft release.
1. Downloading the Correct OptiFine Installer
The first and most crucial step is to download the correct OptiFine installer.
- Visit the Official OptiFine Website: Navigate to the official OptiFine website (optifine.net). Be cautious of unofficial download sites, as they may host malware or outdated versions.
- Locate the Downloads Section: On the website, find the “Downloads” section. You will typically see a list of supported Minecraft versions.
- Select Your Minecraft Version: Find the download link that corresponds to the Minecraft version you are playing. If you are aiming for Minecraft 1.21.4, select the link for that specific version. If 1.21.4 is not directly listed, it might be referred to by a more general version number like 1.21, and the installer will handle the specifics. OptiFine releases often lag slightly behind official Minecraft releases, so it’s common to see OptiFine for the latest stable Minecraft version.
- Download the Installer: Click on the download link. You may be presented with advertisements. Wait for the “Skip” button to appear in the top right corner and click it to proceed to the actual download. The downloaded file will be a
.jarfile.
2. Running the OptiFine Installer
Once you have successfully downloaded the .jar file, you can proceed with the installation.
- Ensure Minecraft is Closed: Before running the installer, make sure that your Minecraft launcher and the game itself are completely closed. Running the installer while Minecraft is open can lead to installation errors.
- Locate the Downloaded
.jarFile: Find the OptiFine installer file you just downloaded. It will likely be in your “Downloads” folder. - Run the Installer:
- Windows: Right-click on the
.jarfile and select “Open with.” If you don’t see “Java(TM) Platform SE binary” in the list, you may need to install Java or ensure that your Java installation is properly associated with.jarfiles. If you do see it, select it and click “OK.” Alternatively, you can open a Command Prompt, navigate to the directory where you downloaded the file, and typejava -jar optifine_installer_file_name.jar(replaceoptifine_installer_file_name.jarwith the actual name of your downloaded file). - macOS/Linux: You can usually double-click the
.jarfile to run it, provided you have Java installed. If not, you might need to run it from the terminal usingjava -jar optifine_installer_file_name.jar.
- Windows: Right-click on the
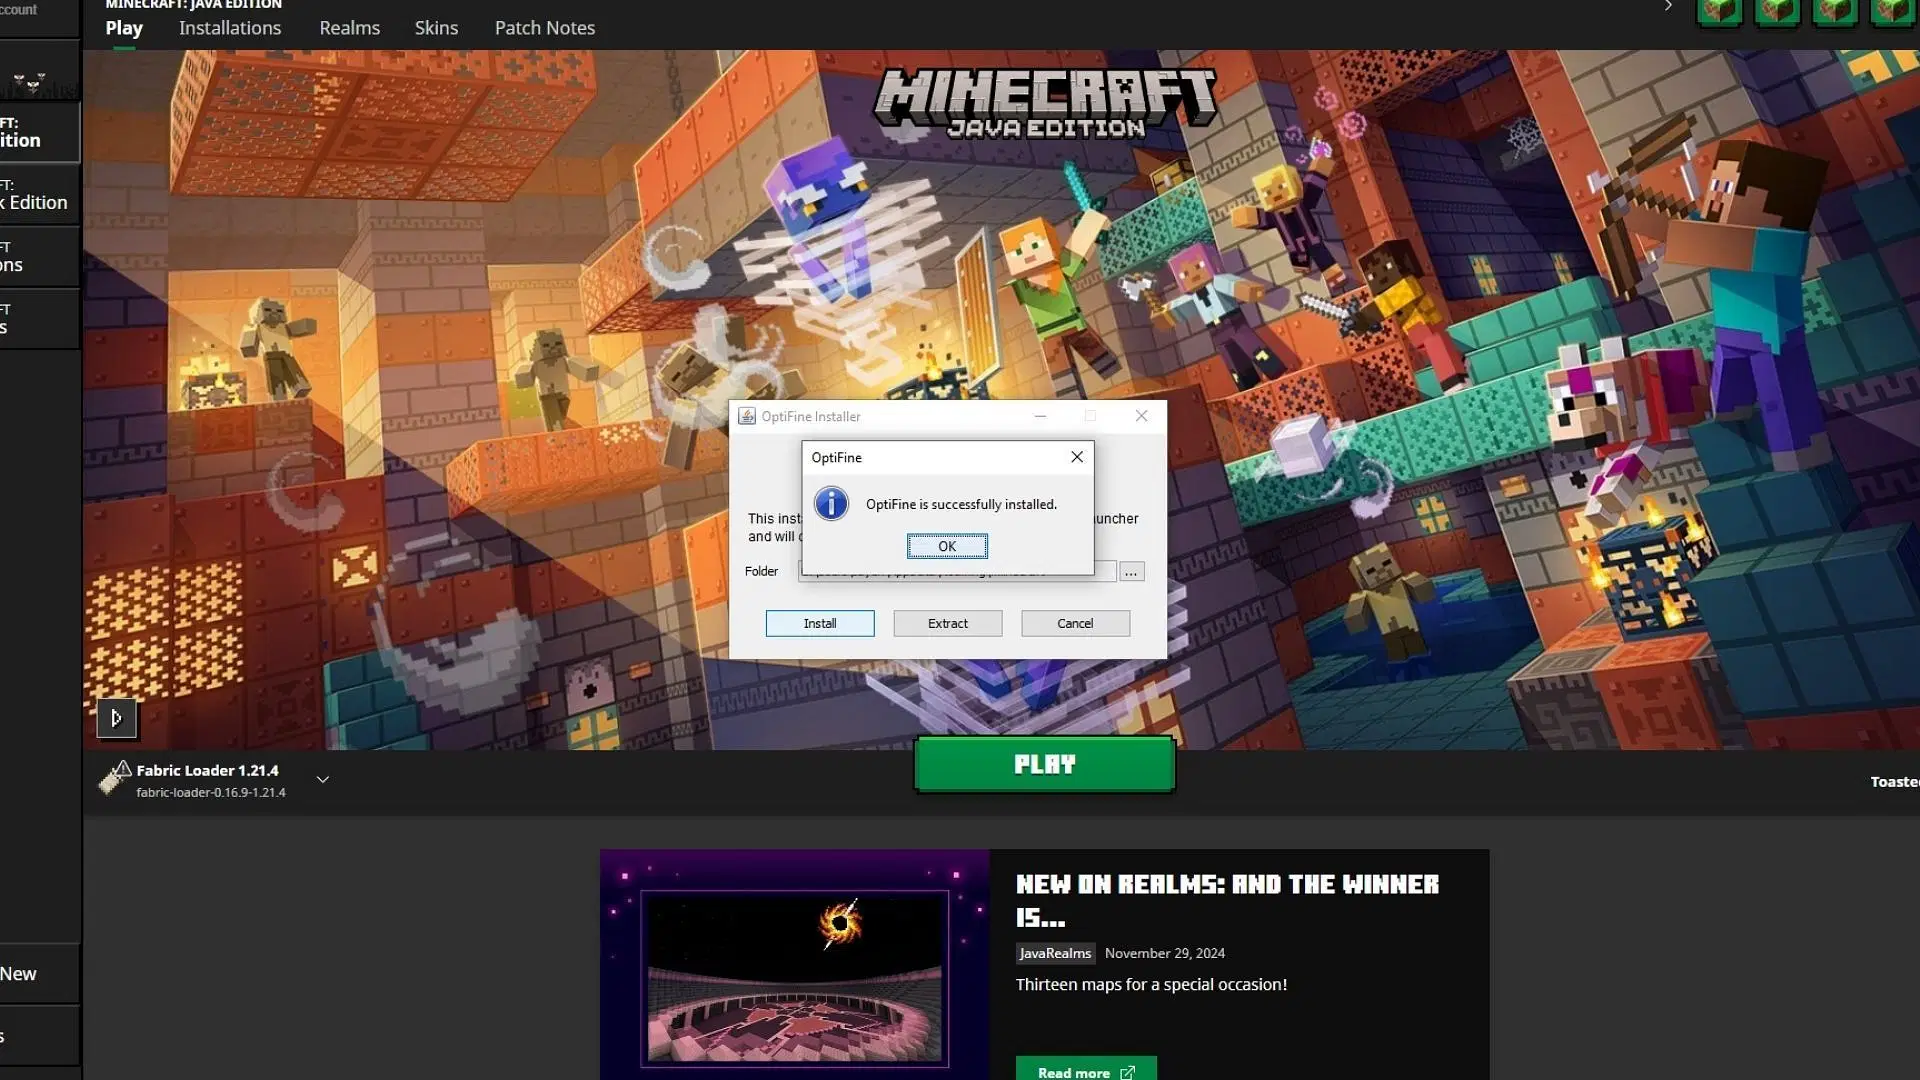
- The OptiFine Installer Window: A small installer window will appear. It will typically show the version of OptiFine and Minecraft it’s intended for.
- Click “Install”: Within the installer window, click the “Install” button. The installer will then automatically detect your Minecraft installation directory and integrate OptiFine.
- Confirmation Message: After a few moments, you should receive a confirmation message stating that OptiFine has been successfully installed. Click “OK.”
3. Launching Minecraft with OptiFine
With OptiFine installed, the final step is to ensure your Minecraft launcher is configured to use it.
- Open the Minecraft Launcher: Launch the official Minecraft launcher.
- Select the OptiFine Profile: In the bottom left corner of the launcher, you’ll see a dropdown menu labeled “Installations” or “Play.” Click on this. You should find a new profile listed, typically named “OptiFine” followed by the version number (e.g., “OptiFine 1.21.4”).
- Select the OptiFine Profile: Choose this newly created OptiFine profile.
- Click “Play”: Click the “Play” button to launch Minecraft with OptiFine enabled.
Upon launching the game, you should see “OptiFine” listed in the bottom left corner of the main menu, confirming that it is active.
Configuring OptiFine for Optimal Performance and Visuals
Once OptiFine is installed and running, the real magic begins: customization. The OptiFine settings menu is a powerful hub that allows you to fine-tune your game to achieve the perfect balance between performance and visual fidelity. Access these settings by going to Options... > Video Settings... within the Minecraft game menu.
Navigating the Video Settings Menu
The “Video Settings” menu is where you’ll spend most of your time tweaking OptiFine. It’s divided into several sections, each controlling different aspects of the game’s graphics and performance.
- Details: This section governs the appearance of various environmental elements. You can toggle features like clouds, trees, fog, and grass on or off, or adjust their quality. For example, setting “Clouds” to “Fast” or “Off” can significantly boost FPS, while “Fancy” can make them look much more realistic. Similarly, “Trees” can be set to “Fast” for better performance or “Fancy” for more detailed leaves.
- Animations: This sub-menu allows you to control which particle effects and animations are displayed. Disabling unnecessary animations, such as fire, water, or portal effects, can free up considerable resources.
- Quality: Here, you can adjust settings that impact the overall visual quality of textures and models. Options like “Antialiasing,” “Anisotropic Filtering,” “Connected Textures,” and “Custom Sky” reside here. Experimenting with these is key to finding the right balance. For instance, enabling “Connected Textures” can greatly improve the look of glass panes, but might slightly impact performance.
- Performance: This is arguably the most critical section for those prioritizing frame rates. OptiFine offers several powerful performance-boosting options:
- Render Regions: This setting improves rendering efficiency by only rendering chunks that are visible.
- Fast Render: This attempts to speed up rendering by optimizing certain graphical processes.
- Smooth FPS: Aims to provide a more consistent frame rate by reducing sudden drops.
- Chunk Updates: Controls how frequently chunks are updated, which can affect performance.
- Lazy Chunk Loading: Allows the game to load chunks more gradually, reducing stuttering.
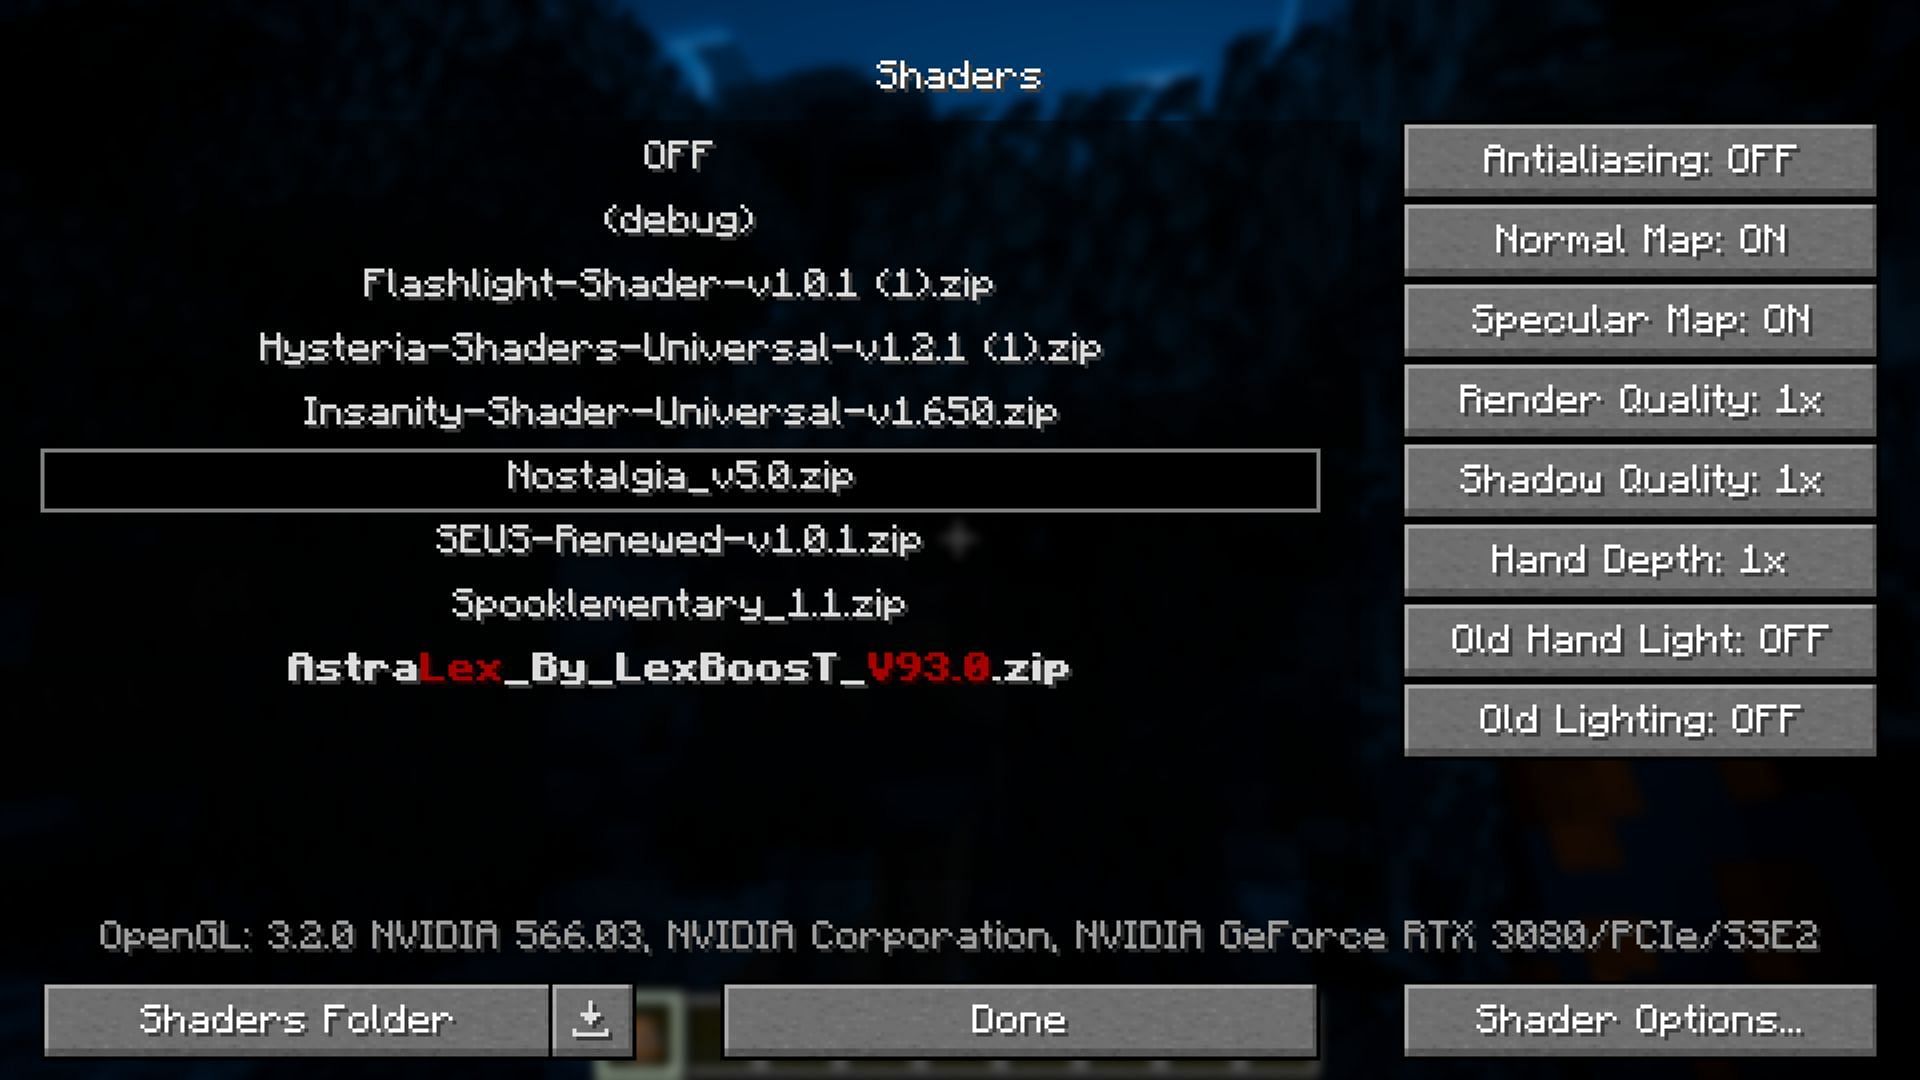
- Shader Options: If you plan on using shader packs (which are separate downloads that dramatically alter lighting, shadows, and post-processing effects), this is where you’ll manage them. OptiFine provides extensive control over individual shader settings, allowing you to customize even the most complex shader packs to suit your hardware.
Tips for Optimization
- Start with Defaults and Adjust Incrementally: Begin by keeping most settings on their default or “Fast” options. Then, gradually enable or increase the quality of specific features you care about most (e.g., a specific texture pack, fancy clouds).
- Monitor Your FPS: Use the in-game FPS counter (usually accessed by pressing F3) to see the impact of your changes. Aim for a consistent frame rate that feels comfortable for you, typically 60 FPS or higher.
- Prioritize Performance Over Visuals (If Needed): If your primary goal is to play smoothly, don’t be afraid to turn down visually impressive but resource-intensive settings. The trade-off is usually worth it for a lag-free experience.
- Consider Your Hardware: The optimal settings will vary greatly depending on your computer’s specifications. Higher-end systems can handle more demanding visual options, while lower-end systems will need to lean heavily on performance settings.
- Experiment with Shader Packs (Optional): If you’re ready to take your visuals to the next level, explore compatible shader packs. Remember that shaders are very demanding, so you’ll likely need to make significant performance compromises in OptiFine’s settings to run them smoothly.
By diligently exploring and adjusting these settings, you can transform your Minecraft experience, making it both visually stunning and incredibly smooth, no matter your hardware. OptiFine truly empowers players to tailor the game to their exact preferences.
aViewFromTheCave is a participant in the Amazon Services LLC Associates Program, an affiliate advertising program designed to provide a means for sites to earn advertising fees by advertising and linking to Amazon.com. Amazon, the Amazon logo, AmazonSupply, and the AmazonSupply logo are trademarks of Amazon.com, Inc. or its affiliates. As an Amazon Associate we earn affiliate commissions from qualifying purchases.