RAM, or Random Access Memory, is a crucial component of any computer. It acts as your PC’s short-term memory, holding all the data your system is actively working with. When you open applications, browse the web, or play games, your CPU constantly fetches and writes data to RAM. The more RAM you have, and the faster it is, the more data your PC can access simultaneously, leading to a smoother, more responsive experience. If you’ve noticed your computer slowing down, experiencing frequent crashes, or struggling with demanding applications, upgrading your RAM is often the most effective and cost-efficient solution.
This guide will walk you through the entire process of installing new RAM in your PC. We’ll cover everything from understanding what RAM is and why you might need an upgrade, to selecting the right modules, preparing your computer, and finally, the physical installation process. Whether you’re a seasoned PC builder or a complete novice, by the end of this tutorial, you’ll be confident in your ability to boost your computer’s performance with new RAM.
Understanding RAM and Identifying Your Upgrade Needs
Before you dive into purchasing new RAM, it’s essential to understand what it is and how it impacts your PC’s performance.
What is RAM and How Does It Work?
Think of your computer’s storage (like your hard drive or SSD) as a library – a place where all your files and programs are permanently stored. RAM, on the other hand, is like your desk. When you need to work on a book from the library, you bring it to your desk so you can access its information quickly and easily. The more books you can fit on your desk, the more efficiently you can work without constantly going back to the library.
In a computer, when you launch an application or open a file, the necessary data is copied from your storage into RAM. Your CPU can then access this data much faster from RAM than from storage. This speed difference is why RAM is critical for overall system responsiveness.
- Capacity (GB): This refers to the total amount of memory available. More capacity means your PC can handle more tasks and larger applications simultaneously without slowing down. For everyday tasks like browsing, email, and document editing, 8GB is often sufficient. For more demanding tasks like gaming, video editing, or running virtual machines, 16GB or even 32GB is recommended.
- Speed (MHz): This indicates how quickly RAM can transfer data. Higher speeds generally lead to better performance, especially in CPU-intensive tasks and gaming. However, the difference in speed might be less noticeable for basic computing.
- Latency (CL): This refers to the delay between the CPU requesting data and the RAM module responding. Lower latency is generally better. However, speed and latency often have a trade-off, and the overall impact is what matters.
- Type (DDR Generation): RAM technology evolves, with each generation (DDR3, DDR4, DDR5) offering improvements in speed, efficiency, and capacity. It’s crucial to know which DDR generation your motherboard supports, as they are not backward or forward compatible.
Diagnosing Your Current RAM Performance and Determining Upgrade Needs
Several signs can indicate that your PC’s RAM is a bottleneck:
- Slow Performance and Lag: If your computer frequently feels sluggish, applications take a long time to open, or you experience stuttering and freezing, especially when multitasking, insufficient RAM is a likely culprit.
- Frequent Application Crashes or “Not Responding” Errors: When your system runs out of available RAM, it may struggle to manage active processes, leading to applications crashing or becoming unresponsive.
- Slow Startup and Shutdown Times: While storage speed plays a role, insufficient RAM can also contribute to longer boot-up and shutdown sequences as the system struggles to load necessary data.
- Task Manager Insights: The most direct way to assess your RAM usage is through your operating system’s Task Manager (Ctrl+Shift+Esc on Windows). Navigate to the “Performance” tab and select “Memory.” You’ll see your current RAM usage. If your usage is consistently high (e.g., 80% or more) during normal use, an upgrade is likely beneficial.
- Specific Application Requirements: If you use demanding software like video editors, 3D rendering programs, or modern games, check their recommended system specifications. These often list a minimum and recommended amount of RAM.
How much RAM do you need?
- 4GB: Sufficient for very basic tasks like light web browsing and word processing. Not recommended for modern systems.
- 8GB: The minimum recommended for most users today. Good for everyday multitasking, web browsing, and light gaming.
- 16GB: Ideal for most gamers, content creators, and power users. Allows for smoother multitasking, running demanding applications, and more intensive gaming.
- 32GB+: Recommended for professionals working with large datasets, complex video editing, 3D rendering, virtual machines, or extreme gaming.
Preparing for the RAM Upgrade: What You Need and How to Proceed
Once you’ve determined that a RAM upgrade is necessary and you have a general idea of the capacity you need, the next steps involve gathering the right components and preparing your workspace.
Selecting the Right RAM Modules
Choosing the correct RAM is paramount to ensuring compatibility and optimal performance. Installing incompatible RAM will prevent your computer from booting or functioning correctly.
-
Identify Your Motherboard Model: This is the most critical piece of information. Your motherboard dictates the type of RAM (DDR generation) and the maximum capacity it supports.
- On Windows: Press
Windows Key + R, typemsinfo32, and press Enter. Look for “BaseBoard Product” or “System Model.” Alternatively, you can download free system information tools like CPU-Z (available at https://www.cpuid.com/softwares/cpu-z.html). In CPU-Z, the “Mainboard” tab will clearly display your motherboard model. - Physically Inspect: If you can’t access this information through software, you might need to open your PC case (after powering it off and unplugging it) and look for the motherboard manufacturer and model name printed directly on the board.
- On Windows: Press
-
Determine RAM Type (DDR Generation): Motherboards are designed for specific DDR generations (e.g., DDR3, DDR4, DDR5). They are physically different and not interchangeable. Your motherboard’s specifications will clearly state the supported DDR generation. You can usually find this information on the motherboard manufacturer’s website by searching for your model.
-
Check Maximum RAM Capacity and Speed Support: Your motherboard has a limit on the total amount of RAM it can support, as well as the maximum speed (MHz) and the number of slots available. This information is also found in your motherboard’s manual or on the manufacturer’s website.
-
Consider Dual-Channel vs. Single-Channel: Most modern motherboards support dual-channel memory configurations. This means installing RAM modules in pairs (e.g., two 8GB sticks instead of one 16GB stick) can significantly improve performance by allowing the CPU to access memory from two modules simultaneously. Ensure you purchase RAM in kits for dual-channel configurations (e.g., a “2x8GB kit”). Your motherboard manual will indicate which slots to use for dual-channel operation.
-
Match Existing RAM (If Adding): If you’re not replacing all your RAM but adding to it, try to match the specifications (DDR generation, speed, and latency) of your existing modules as closely as possible. While not always strictly necessary, mismatched RAM can sometimes lead to it running at the speed of the slowest module or cause instability.
-
Purchase RAM Modules: Once you have this information, you can confidently shop for RAM. Look for reputable brands like Corsair, G.Skill, Crucial, Kingston, and Patriot. Pay attention to the specifications (DDR generation, capacity per stick, total capacity, speed, and CAS Latency).
Essential Tools and Workspace Preparation
Before you begin the physical installation, ensure you have the necessary tools and a safe working environment.
- Phillips Head Screwdriver: This is the primary tool you’ll need to open your PC case and potentially secure components.
- Anti-Static Wrist Strap (Recommended): Static electricity can damage sensitive computer components. An anti-static wrist strap connects you to the grounded metal of your PC case, discharging any static buildup before it can harm your hardware. You can purchase these online or at electronics stores.
- Small Container or Tray: To keep track of any screws you remove from your PC case.
- Good Lighting: A well-lit area will make it easier to see what you’re doing inside the case.
- Clear, Flat Workspace: Ensure you have enough space to comfortably work and lay out components. Avoid working on carpet, as it generates more static electricity.
- Power Off and Unplug: This is the most critical step for safety. Before you touch anything inside your PC, ensure it is completely powered off, and the power cord is disconnected from the wall outlet. Press the power button on your PC for a few seconds after unplugging to discharge any residual power.
The Installation Process: Step-by-Step Guide
With your new RAM and tools ready, you’re prepared for the physical installation. Follow these steps carefully to ensure a successful upgrade.
Step 1: Open Your PC Case
- Locate the Side Panel Screws: Most PC cases have screws on the back that hold the side panel in place. These are usually thumbscrews (which can be loosened by hand) or standard Phillips head screws.
- Remove the Screws: Unscrew them and set them aside in your container.
- Slide or Remove the Panel: Gently slide the side panel towards the back of the case and then lift it off. Some cases may have panels that swing open on hinges.
- Ground Yourself: If you have an anti-static wrist strap, put it on and attach the clip to an unpainted metal part of the PC case.
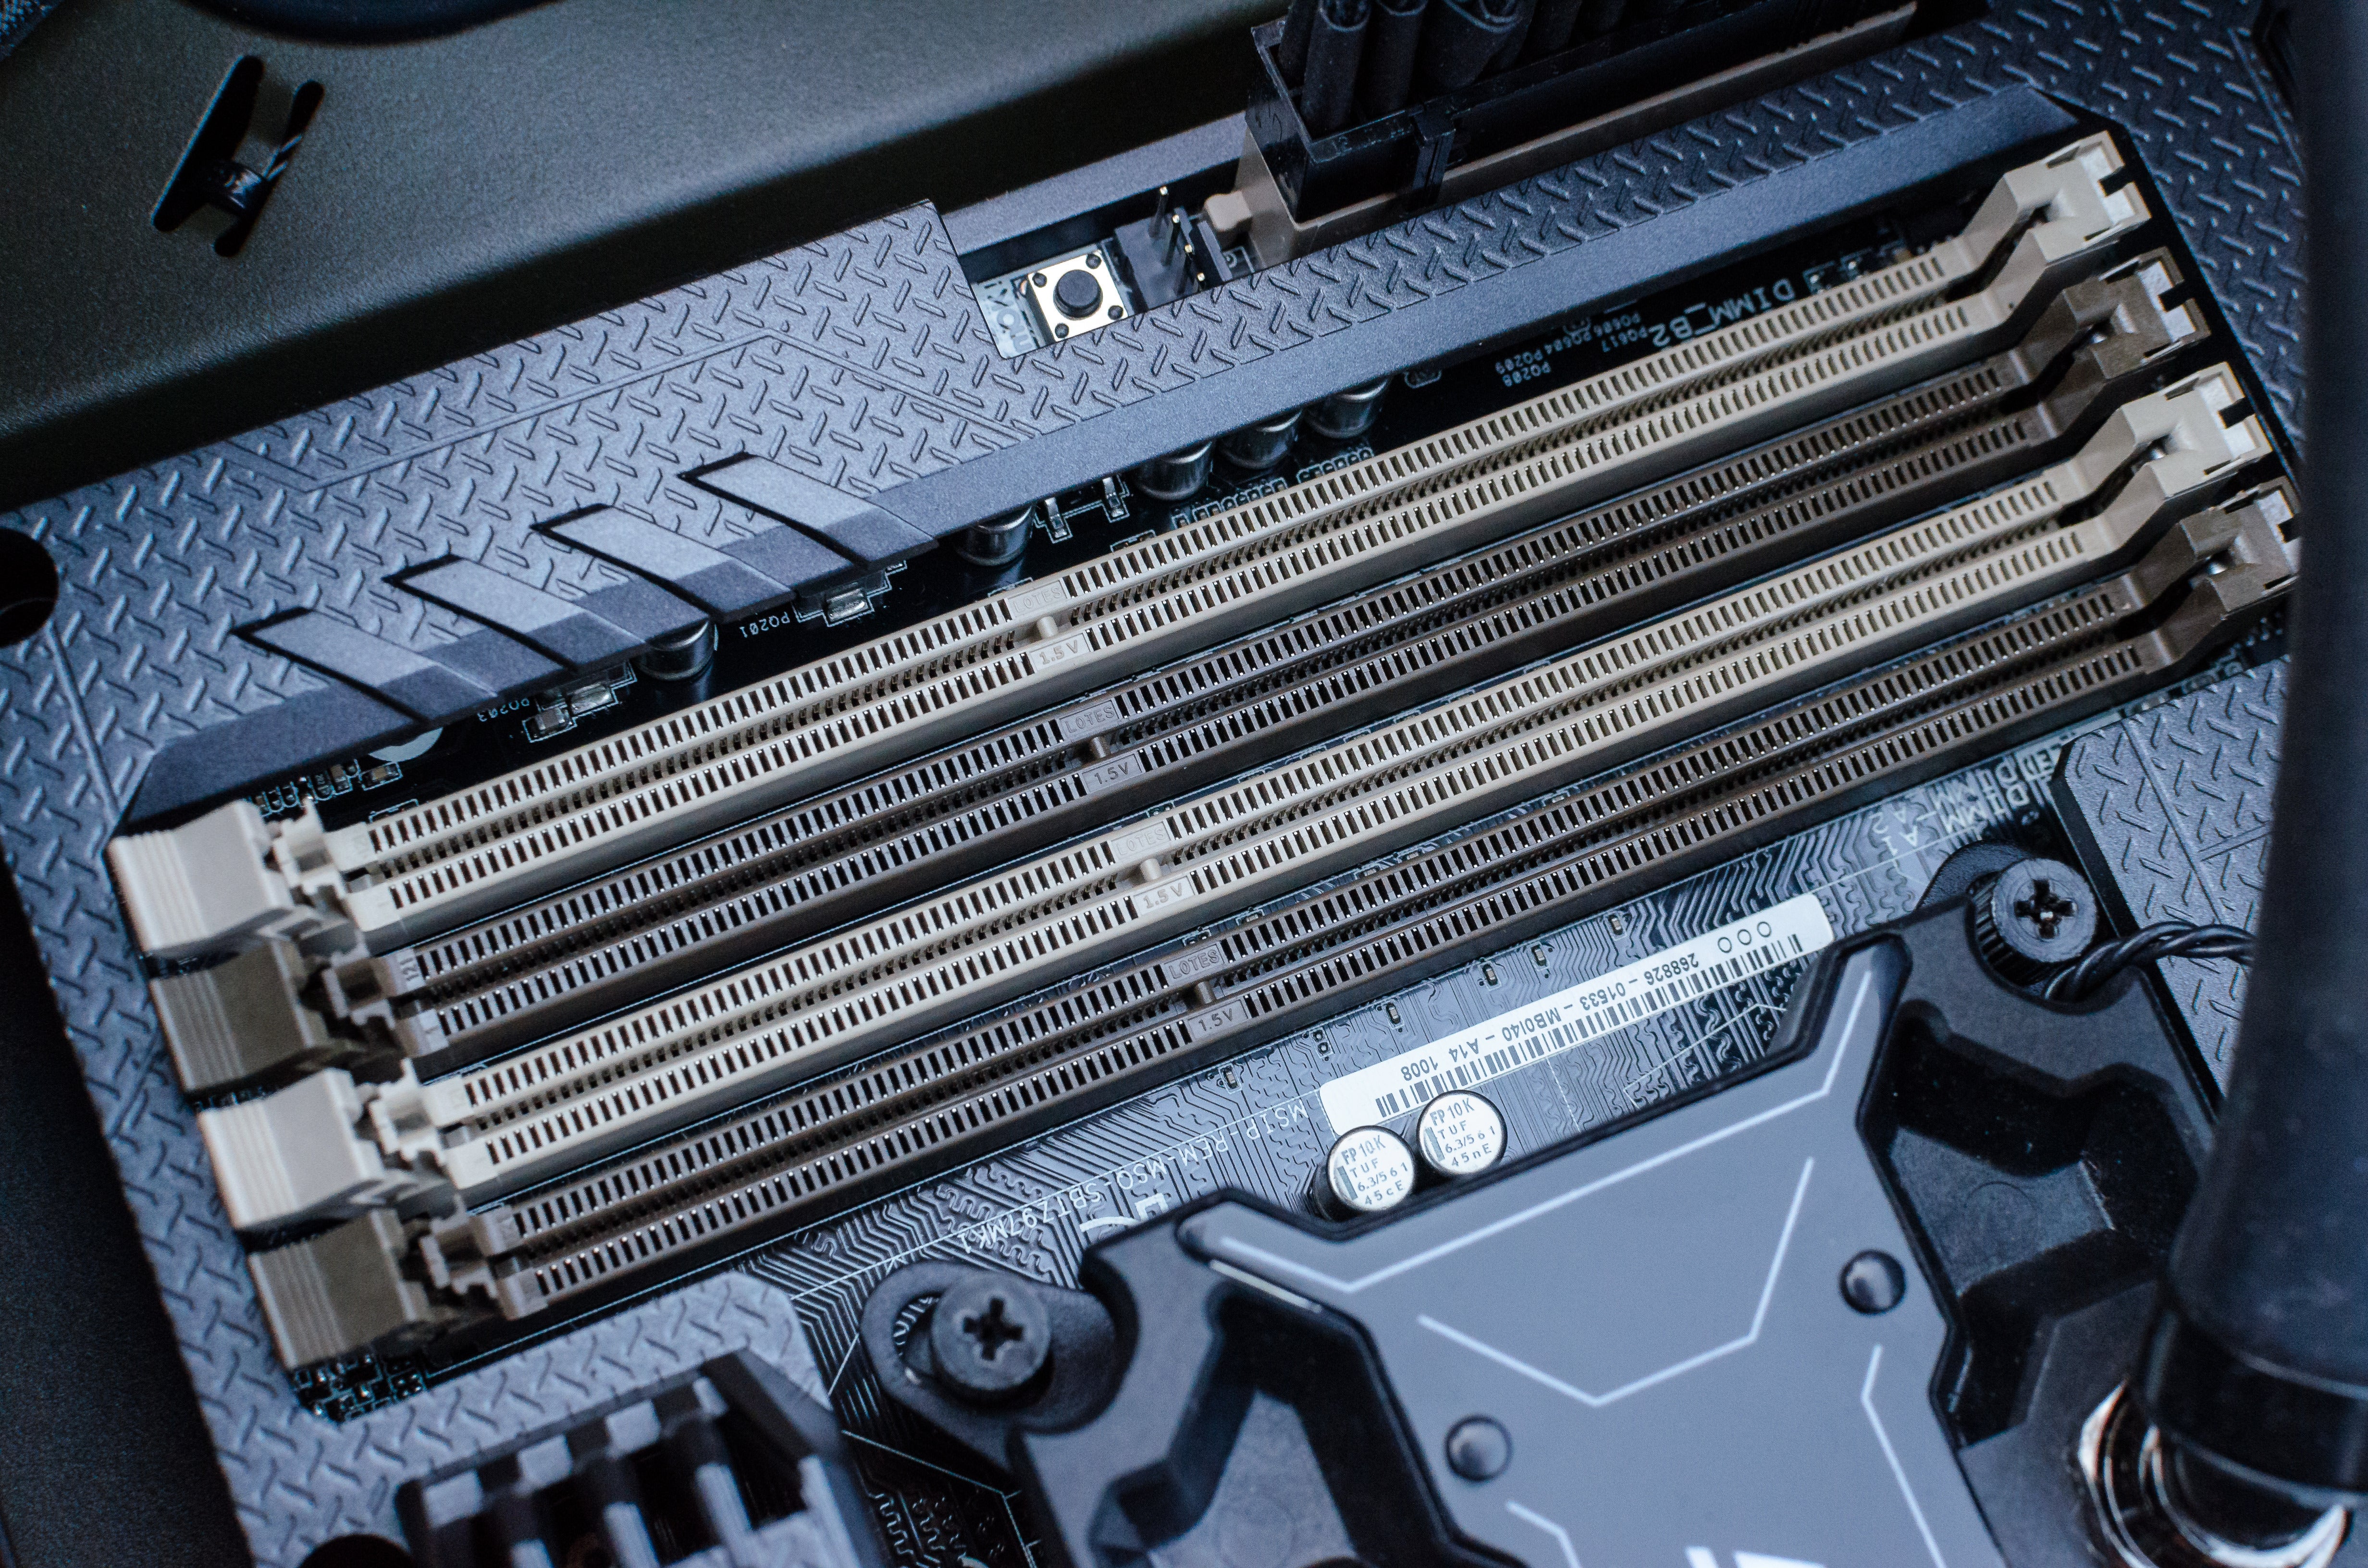
Step 2: Locate the RAM Slots on Your Motherboard
- Identify the RAM Slots: RAM modules are installed in long, narrow slots, typically located next to the CPU socket. They are usually found in banks of two or four.
- Observe the Clips: Each RAM slot has clips on one or both ends. These clips secure the RAM module in place and must be opened to remove or install RAM.
- Note the Color Coding: Motherboards often use color-coded RAM slots to indicate which slots should be used for dual-channel configurations. Refer to your motherboard manual for the correct slot configuration.
Step 3: Remove Old RAM (If Applicable)
If you are replacing existing RAM:
- Open the Clips: Gently push down on the clips at both ends of the RAM module you wish to remove. The module should then pop up slightly.
- Gently Pull Out the Module: Grasp the edges of the RAM module and pull it straight up and out of the slot. Avoid touching the gold connectors at the bottom.
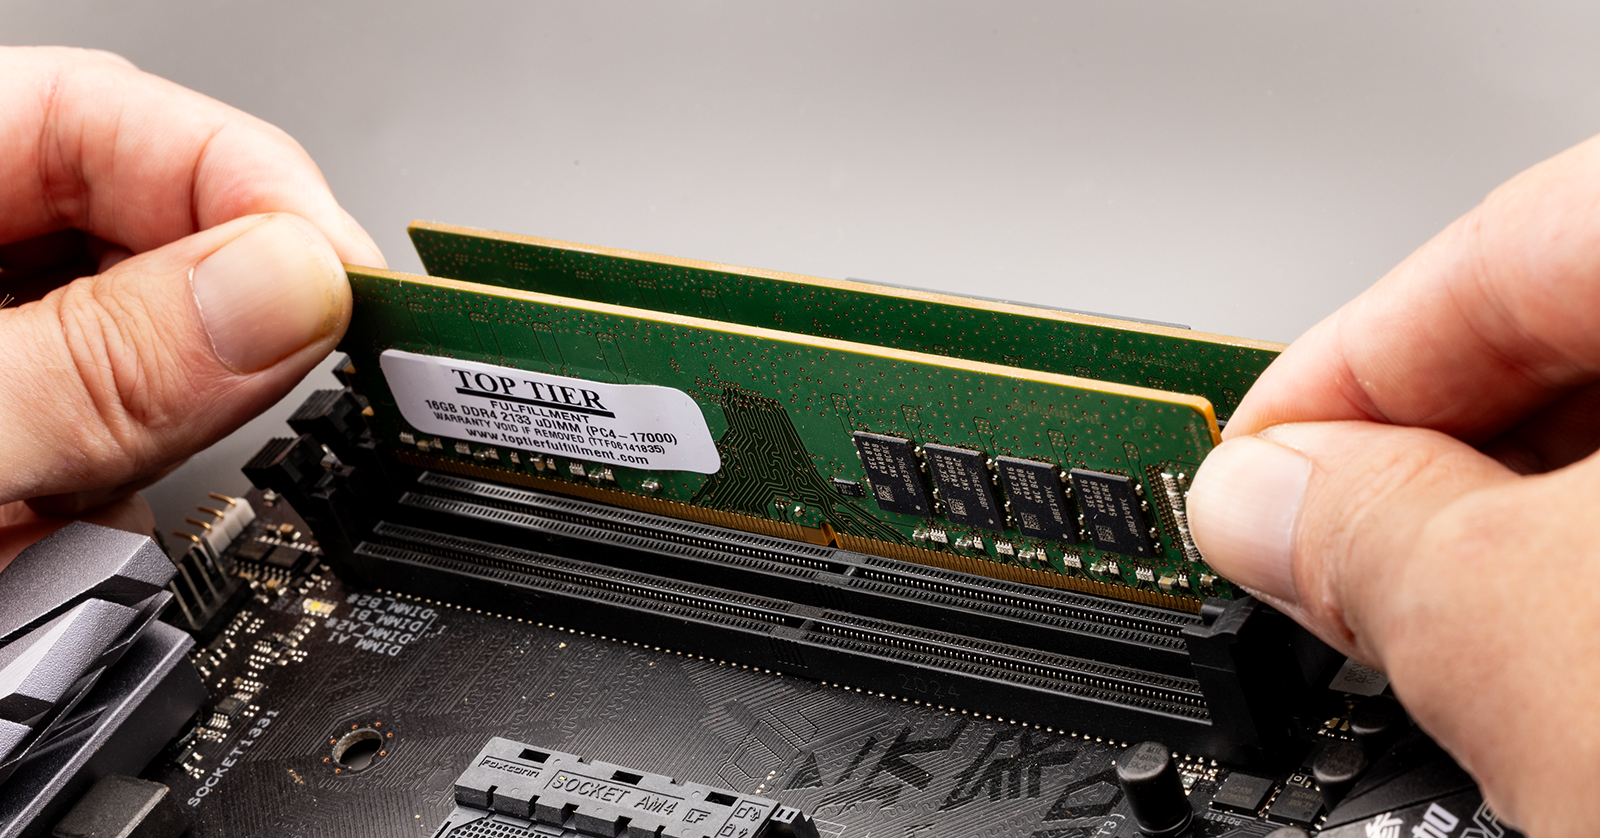
Step 4: Install the New RAM Modules
This is the core of the process.
- Align the Notch: Each RAM module has a notch on its bottom edge, and the RAM slot on the motherboard has a corresponding key. This notch ensures that you can only insert the RAM module in the correct orientation. Align the notch on your new RAM module with the key in the RAM slot. Never force the RAM in if it doesn’t align.
- Position the Module: Place the RAM module into the slot, ensuring it is seated evenly.
- Apply Firm, Even Pressure: With the notch aligned, press down firmly and evenly on both ends of the RAM module. You should hear a distinct “click” as the clips on the sides of the slot snap into place, securing the module. Ensure both clips are fully engaged.
- Install Additional Modules: If you are installing multiple RAM modules, repeat the process for each one, paying attention to the dual-channel configuration guidelines in your motherboard manual.
Step 5: Close the PC Case and Reconnect Peripherals
- Replace the Side Panel: Carefully align the side panel and slide or reattach it.
- Secure the Panel: Reinsert and tighten the screws you removed earlier.
- Reconnect Peripherals: Plug in your monitor, keyboard, mouse, and power cord.
Step 6: Power On and Verify Installation
- Power On Your PC: Turn on your computer.
- Check for POST (Power-On Self-Test): Your PC should go through its normal startup sequence. If you hear beeps or see error messages related to memory, there might be an issue with the installation or the RAM itself.
- Verify RAM in BIOS/UEFI: During startup, you’ll typically see a prompt to press a key (often
Del,F2,F10, orF12) to enter BIOS or UEFI settings. In the BIOS/UEFI, you should be able to see the total amount of RAM installed and its speed. - Verify RAM in Operating System: Once your PC boots into Windows, open Task Manager (Ctrl+Shift+Esc) and go to the “Performance” tab, then select “Memory.” You should see the total amount of RAM you installed.
If your system fails to boot or the RAM is not recognized, power off the PC, unplug it, and carefully re-seat the RAM modules. Ensure they are fully clicked into place and properly aligned.
Troubleshooting Common Issues and Maximizing Your Upgrade
Even with careful preparation, occasional issues can arise. Knowing how to troubleshoot can save you time and frustration.
Troubleshooting Installation Problems
- PC Won’t Boot/Black Screen:
- Reseat RAM: This is the most common fix. Power off, unplug, open case, and firmly press down on each RAM module until the clips engage.
- Incorrect Slotting: Ensure you’re using the correct slots for dual-channel if applicable, as per your motherboard manual.
- Single Module Test: If you’ve installed multiple modules, try booting with just one module at a time in different slots to isolate a potentially faulty stick.
- Compatibility: Double-check that your new RAM is indeed compatible with your motherboard (DDR generation, maximum capacity).
- RAM Not Fully Recognized:
- BIOS/UEFI Update: Sometimes, older motherboards may need a BIOS/UEFI update to fully support newer RAM modules or larger capacities. Check your motherboard manufacturer’s website for updates.
- Check Motherboard Specs: Ensure you haven’t exceeded the maximum RAM capacity supported by your motherboard.
- System Instability/Crashes After Upgrade:
- XMP/DOCP Profile: If your RAM is rated for a speed higher than the default (e.g., 3200MHz), you might need to enable the XMP (Extreme Memory Profile) or DOCP (Direct Overclock Profile) in your BIOS/UEFI to run it at its advertised speed. However, if enabling this causes instability, try running it at the default JEDEC speeds or a slightly lower overclock.
- Faulty Module: It’s possible one of the new RAM modules is defective. Test modules individually.
- Overheating: Ensure your PC’s cooling system is adequate, as increased RAM usage can lead to slightly higher temperatures.
Maximizing Your RAM Upgrade for Performance
- Enable XMP/DOCP in BIOS/UEFI: As mentioned, this is crucial for RAM to run at its advertised speed.
- Utilize Dual-Channel: Always install RAM in pairs in the correct slots for optimal performance.
- Keep Drivers Updated: Ensure your motherboard chipset drivers are up-to-date, as they manage communication with RAM.
- Monitor RAM Usage: Continue to use Task Manager to monitor your RAM usage. If you find yourself consistently hitting the limits of your new RAM, it might be time to consider a further upgrade.
- Consider Faster RAM: If your motherboard supports it, investing in RAM with higher clock speeds (MHz) and lower CAS Latency (CL) can provide a noticeable performance boost, especially in gaming and CPU-intensive applications.

Conclusion: A Swift and Rewarding Upgrade
Upgrading your PC’s RAM is one of the most accessible and impactful hardware modifications you can make. By understanding your system’s requirements, carefully selecting compatible modules, and following these straightforward installation steps, you can significantly enhance your computer’s speed, responsiveness, and multitasking capabilities. From smoother everyday use to tackling demanding professional applications, the benefits of a timely RAM upgrade are tangible and rewarding. With a little preparation and attention to detail, you’ll have your PC running at its peak performance in no time.
aViewFromTheCave is a participant in the Amazon Services LLC Associates Program, an affiliate advertising program designed to provide a means for sites to earn advertising fees by advertising and linking to Amazon.com. Amazon, the Amazon logo, AmazonSupply, and the AmazonSupply logo are trademarks of Amazon.com, Inc. or its affiliates. As an Amazon Associate we earn affiliate commissions from qualifying purchases.