The Nest Thermostat, a pioneer in smart home technology, has revolutionized how we manage our home’s climate. Its ability to learn your habits, optimize energy usage, and offer remote control through your smartphone makes it a coveted gadget for any modern household. While the prospect of installing a new smart thermostat might seem daunting to some, especially for those less inclined towards DIY projects, the process is surprisingly straightforward. This guide, designed to complement a video tutorial, will walk you through each step, ensuring a smooth and successful installation of your Nest Thermostat.

Understanding the Nest Thermostat: Beyond Just Temperature Control
Before diving into the installation process, it’s crucial to appreciate what makes the Nest Thermostat so special. Nest isn’t just about setting a temperature; it’s about intelligent climate management.
The Evolution of the Smart Thermostat and Nest’s Pioneering Role
The traditional thermostat, a simple dial or a set of buttons, has served us for decades. However, its functionality was limited to manual adjustments. The advent of digital thermostats offered a slight improvement with programmable schedules, but they still lacked the adaptability to truly optimize energy consumption.
The Nest Learning Thermostat, launched in 2011, marked a paradigm shift. It introduced the concept of a “learning” thermostat, capable of observing user behavior – when you adjust the temperature, when you’re typically home or away – and automatically creating a personalized schedule. This “set it and forget it” approach not only enhances comfort but also significantly reduces energy waste. Subsequent generations and models like the Nest Thermostat E and the current Nest Thermostat have built upon this foundation, offering enhanced features, improved energy-saving algorithms, and sleeker designs.
Key Features and Benefits of Installing a Nest Thermostat
The allure of a Nest Thermostat extends far beyond its sophisticated technology. Here are some of the key benefits you can expect:
- Energy Savings: This is arguably the most significant advantage. By learning your schedule and automatically adjusting the temperature when you’re away or asleep, the Nest Thermostat can reduce your heating and cooling costs by 10-15% annually. It provides detailed energy reports, allowing you to track your usage and identify further opportunities for savings.
- Remote Control: The Nest app, available on iOS and Android, grants you complete control over your thermostat from anywhere in the world. Forgot to turn down the heat before leaving for vacation? No problem. Want to pre-heat your home before you arrive on a cold evening? Easily done with a few taps on your phone.
- Learning Capabilities: The “learning” aspect is truly revolutionary. Over time, the Nest Thermostat learns your preferred temperatures at different times of the day and week. It automatically creates a schedule that balances comfort with efficiency.
- Sleek Design and User Interface: Nest thermostats are renowned for their minimalist and elegant design. The intuitive circular display and user-friendly interface make it a pleasure to interact with, a stark contrast to the often clunky interfaces of older thermostats.
- Smart Home Integration: Nest thermostats seamlessly integrate with other smart home devices and platforms, such as Google Assistant, Amazon Alexa, and IFTTT. This allows for voice control and the creation of complex automation routines. For instance, you could set up a routine where when you say “Goodnight,” your lights turn off, doors lock, and your Nest Thermostat adjusts to your sleep temperature.
- Safety and Alerts: The Nest Thermostat can send you alerts for critical issues, such as extreme temperature drops that could lead to frozen pipes or if your HVAC system encounters a problem.
Preparing for Installation: What You Need and How to Prepare
A little preparation goes a long way in ensuring a smooth and efficient installation process. Before you even pick up a screwdriver, take the time to gather the necessary tools and perform a few crucial checks.
Tools and Materials Required for Nest Thermostat Installation
Most of the tools you’ll need are common household items. If you don’t have them, they are readily available at any hardware store.
- Screwdriver Set: You’ll likely need a Phillips head screwdriver and possibly a small flathead screwdriver. The Nest Thermostat often comes with a specific mounting screw size, but having a set provides flexibility.
- Wire Strippers/Cutters: These are essential for safely preparing the wires for connection to the Nest base.
- Pliers (optional but helpful): Needle-nose pliers can be useful for manipulating wires.
- Level: To ensure your Nest Thermostat is mounted straight on the wall.
- Drill with Drill Bits (optional): If the existing mounting holes don’t align or if you need to create new ones for the Nest base, a drill might be necessary.
- Pencil: For marking screw hole locations.
- Wall Anchors (if needed): If you’re drilling into drywall and the screws don’t have sufficient grip, wall anchors will be required.
- Your Smartphone: To download the Nest app and for Wi-Fi setup.
- Your Wi-Fi Network Name and Password: Essential for connecting the Nest Thermostat to your home network.
Checking Your HVAC System Compatibility
This is a critical step that can save you a lot of frustration. Not all HVAC systems are compatible with the Nest Thermostat. Fortunately, Google provides an excellent online compatibility checker on their website.
- Visit the Nest Compatibility Checker: Go to the official Nest website and navigate to their compatibility checker tool.
- Identify Your Current Thermostat Wires: The checker will prompt you to identify the wires connected to your current thermostat. This usually involves taking a picture of the wiring or listing the wire labels (e.g., R, G, Y, W, C).
- Follow the Prompts: The tool will analyze your wiring and system type and tell you if your system is compatible. It will also indicate if you have a “C” wire, which is often required for the Nest Thermostat to receive continuous power. If you don’t have a “C” wire, don’t worry, Nest offers solutions.
Understanding the “C” Wire and Alternative Solutions
The “C” wire, or common wire, provides continuous 24-volt AC power to the thermostat. Many older thermostats didn’t require a “C” wire because they had their own batteries or drew power intermittently. However, smart thermostats like Nest, which power Wi-Fi, displays, and processing, generally need a constant power source.
- If you have a “C” wire: Congratulations, your installation will be the most straightforward.
- If you DON’T have a “C” wire: Nest has several solutions:
- Nest Power Connector: This is a small accessory that wires into your HVAC system to provide the necessary power to the Nest Thermostat. It’s a common and effective solution for systems lacking a C wire.
- Using an unused wire: In some systems, there might be an unused wire in the thermostat cable bundle that can be repurposed as a “C” wire. This requires checking your HVAC control board and potentially re-wiring at the furnace or air handler. This is a more advanced step and might be best left to a professional if you’re not comfortable.
- Professional Installation: If you’re unsure about compatibility or the “C” wire situation, hiring a qualified HVAC professional or an electrician is always a recommended option.
The Installation Process: Step-by-Step Video Walkthrough
Now that you’re prepared, let’s walk through the installation process, mirroring what you would see in a video tutorial.
Step 1: Powering Down Your HVAC System
Crucially, the very first step before touching any wires is to turn off the power to your HVAC system. This is a critical safety measure.
- Locate Your Breaker Box: Find your home’s electrical breaker box.
- Identify the HVAC Breaker: Look for a breaker labeled “Furnace,” “Air Handler,” “HVAC,” “AC,” or similar. If there are separate breakers for heating and cooling, turn off both.
- Test the Power: Go back to your thermostat and try to adjust the temperature. The system should not respond, and the screen might be blank or show it’s powered off. This confirms the power is indeed off.
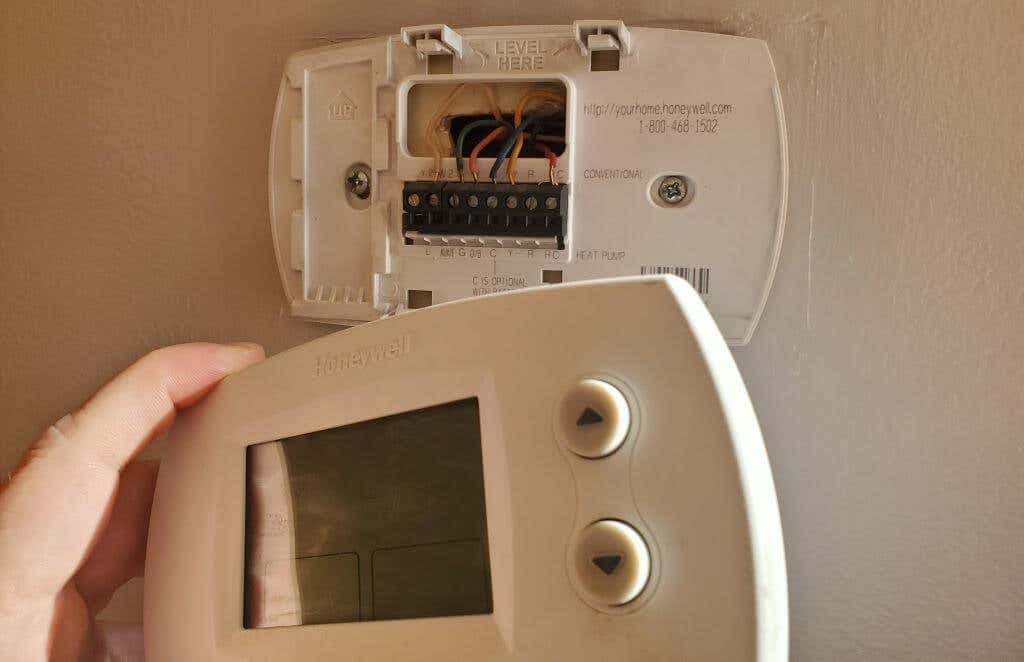
Step 2: Removing Your Old Thermostat
With the power off, you can safely remove your old thermostat.
- Remove the Faceplate: Most thermostats have a faceplate that pulls off. Gently pry it away from the wall. Some might have small clips or screws to release.
- Take a Picture of the Wiring: This is an extremely important step for reference. Before disconnecting any wires, take a clear, well-lit picture of the wires connected to the terminals on your old thermostat. Labeling the wires with masking tape according to their terminal letters (e.g., R, G, Y, W) before disconnecting is also highly recommended.
- Disconnect the Wires: Carefully disconnect each wire from its terminal. You might need to loosen a small screw for each wire.
- Remove the Old Base: Once the wires are disconnected, unscrew the old thermostat’s base from the wall.
- Gently Tuck Wires: Gently push the wires back into the wall so they don’t fall out of reach.
Step 3: Installing the Nest Base and Mounting Plate
Now it’s time to install the Nest components.
- Prepare the Wall: If you’re using the Nest’s mounting plate (which can help with covering old paint marks or larger holes), hold it against the wall where the old thermostat was. Use a level to ensure it’s straight.
- Mark Screw Holes: Use a pencil to mark the screw hole locations on the wall through the mounting plate.
- Drill and Install Anchors (if necessary): If you’re drilling into drywall and need anchors, drill pilot holes at your marked locations and insert the wall anchors.
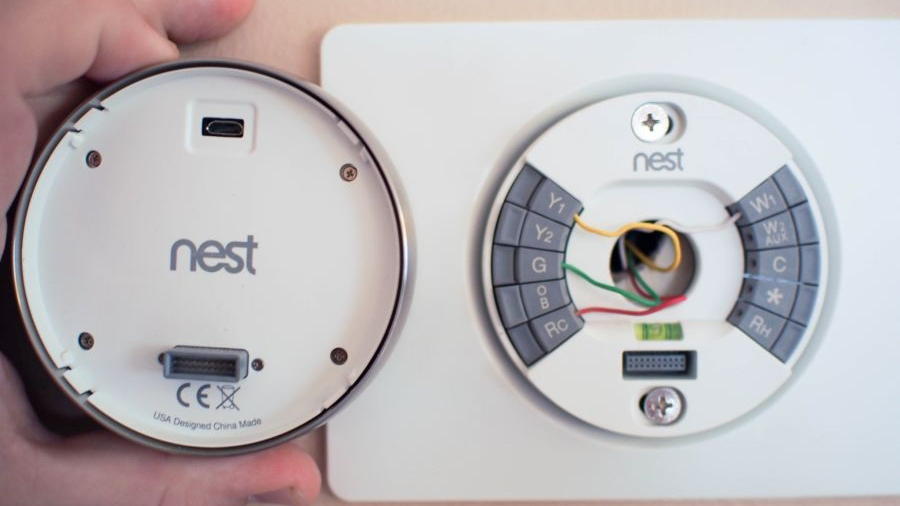
- Mount the Nest Base: Thread the wires through the center opening of the Nest base (or mounting plate, if using one). Secure the Nest base to the wall using the provided screws. Ensure it’s snug but don’t overtighten.
Step 4: Connecting the Nest Thermostat Wires
This is where your picture and wire labels come into play.
- Identify Nest Terminals: The Nest Thermostat base has clearly labeled terminals. Refer to your wiring picture.
- Connect Each Wire: Match each wire from your HVAC system to its corresponding terminal on the Nest base. Gently push the wire into the terminal slot until it’s securely held. Most Nest models use push-in connectors, so you won’t need to loosen screws for each wire.
- R or Rh/Rc: Power wire.
- G: Fan wire.
- Y or Y1: Cooling wire.
- W or W1: Heating wire.
- C: Common wire (for continuous power).
- O/B: Reversing valve for heat pumps.
- Ensure Secure Connections: Give each wire a gentle tug to ensure it’s firmly connected. Loose wires are a common cause of installation issues.
Step 5: Attaching the Nest Thermostat Display
Once all the wires are connected, it’s time to attach the smart display.
- Align the Display: Align the Nest Thermostat display with the base attached to the wall.
- Gently Push: Gently push the display onto the base until it clicks into place.
Step 6: Powering Up and Setup
With the thermostat physically installed, it’s time to bring it to life and configure it.
- Restore Power to Your HVAC System: Go back to your breaker box and turn the HVAC breaker back on.
- Nest Boot-Up: The Nest Thermostat should power on and initiate its setup process.
- Follow On-Screen Prompts: The Nest Thermostat will guide you through the setup process on its display. This typically includes:
- Language Selection: Choose your preferred language.
- Wi-Fi Connection: Select your home Wi-Fi network and enter your password. This is crucial for remote access and software updates.
- HVAC System Type: Confirm the type of HVAC system you have (e.g., gas, electric, heat pump).
- Location: Enter your zip code for local weather data.
- Download the Nest App: If you haven’t already, download the Google Home app (which now manages Nest devices) on your smartphone.
- Connect to the App: Follow the instructions in the app to add your Nest Thermostat to your account. This usually involves scanning a QR code displayed on the Nest or entering a code.
Troubleshooting Common Issues and Maintaining Your Nest Thermostat
Even with the best instructions, sometimes things don’t go perfectly. Here are some common issues and how to address them, along with tips for long-term maintenance.
Addressing Common Installation Problems
- No Power to the Thermostat:
- Check Breaker: Ensure the HVAC breaker is on.
- Check Wire Connections: Double-check that all wires are securely connected to the correct terminals on the Nest base.
- Verify “C” Wire: If you don’t have a “C” wire and haven’t installed a power connector or used an unused wire, the thermostat won’t power on. Revisit compatibility and the “C” wire solutions.
- Heating or Cooling Not Working:
- Incorrect Wire Connections: This is the most common culprit. Refer back to your wiring picture and the Nest terminal labels.
- HVAC System Issues: The problem might be with your HVAC system itself, not the thermostat. Check your furnace/air handler for error codes or obvious problems.
- Incorrect System Type Selection: Ensure you selected the correct HVAC system type during setup.
- Wi-Fi Connectivity Problems:
- Signal Strength: Ensure your Nest Thermostat is within range of your Wi-Fi router.
- Correct Password: Double-check that you entered your Wi-Fi password correctly.
- Router Reboot: Try rebooting your Wi-Fi router.
- Network Compatibility: Ensure your Wi-Fi network is compatible (e.g., 2.4GHz band is generally preferred for smart home devices).
Maintaining Optimal Performance and Energy Efficiency
- Regular Software Updates: Nest thermostats automatically update their software when connected to Wi-Fi. Ensure this feature remains enabled.
- Clean the Display: Periodically wipe down the Nest display with a soft, dry cloth to keep it clean. Avoid harsh chemicals.
- Review Energy Reports: The Nest app provides detailed energy reports. Regularly review these to understand your usage patterns and identify opportunities for further savings. Adjust your schedule as needed.
- Nest Seasonal Adjustments: Nest often prompts you to make seasonal adjustments or offers features like “Home/Away Assist” that automatically adjust based on motion and phone location. Embrace these features to maximize efficiency.
- HVAC System Maintenance: Remember that your Nest Thermostat is only one part of your climate control system. Ensure your HVAC system itself is regularly maintained by a professional (e.g., annual check-ups, filter changes) for optimal performance and longevity.
By following these steps and understanding the underlying principles, you can confidently install your Nest Thermostat and begin enjoying the benefits of a smarter, more energy-efficient home. The investment in a Nest Thermostat is not just about a new gadget; it’s about embracing a more intelligent and sustainable approach to managing your home environment.
aViewFromTheCave is a participant in the Amazon Services LLC Associates Program, an affiliate advertising program designed to provide a means for sites to earn advertising fees by advertising and linking to Amazon.com. Amazon, the Amazon logo, AmazonSupply, and the AmazonSupply logo are trademarks of Amazon.com, Inc. or its affiliates. As an Amazon Associate we earn affiliate commissions from qualifying purchases.