In an era defined by rapid technological advancement, our homes are becoming smarter, more connected, and increasingly intuitive. At the forefront of this revolution are devices designed not just for convenience, but for genuine impact on our daily lives and our wallets. Among these, the smart thermostat stands out as a quintessential example, and the Nest Thermostat, in particular, has carved a significant niche as a leader in intelligent home climate control. Moving beyond simple temperature adjustments, Nest brings an unparalleled blend of advanced technology, elegant design, and tangible financial benefits to the modern household.

This guide aims to demystify the process of installing your Nest Thermostat, transforming what might seem like a daunting technical task into a straightforward, empowering DIY project. Whether you’re upgrading an outdated system or embarking on your first smart home installation, we’ll walk you through every step, ensuring a smooth transition to a more comfortable, energy-efficient future. We’ll not only cover the practical “how-to” but also delve into the underlying benefits—from the cutting-edge technology that learns your preferences to the significant energy savings that positively impact your personal finance, all while exploring the robust brand promise that Nest delivers.
Why Choose a Nest Thermostat? Understanding the Smart Home Advantage
Before we dive into the nuts and bolts of installation, it’s worth understanding why millions of homeowners are making the switch to Nest. It’s more than just a fancy display; it’s an investment in a smarter, more sustainable lifestyle that touches upon key aspects of technology, personal finance, and brand experience.
The Technology Behind Intelligent Comfort
At its core, a Nest Thermostat is a marvel of Tech innovation. It integrates sophisticated sensors and advanced algorithms to learn your daily routines, preferred temperatures, and even how your home heats and cools. This “learning” capability, powered by AI, allows Nest to build an intelligent schedule automatically, ensuring comfort when you’re home and efficiency when you’re away. Features like Auto-Schedule take the guesswork out of programming, while Home/Away Assist uses geofencing and motion detection to automatically adjust temperatures based on whether anyone is in the house.
Furthermore, Nest thermostats offer seamless integration with other smart home ecosystems, particularly Google Assistant, but also supporting Amazon Alexa and various third-party devices. This means you can control your climate with voice commands, incorporate it into complex smart home routines, and monitor your energy usage from anywhere via the intuitive Nest or Google Home app. This level of remote control and automation isn’t just about convenience; it’s about optimizing your home’s performance and enhancing your digital security through secure, cloud-based connectivity. The real-time data and insights provided by the app elevate your Productivity, allowing you to make informed decisions about your energy consumption.
Financial Benefits and Energy Savings
One of the most compelling reasons to install a Nest Thermostat is its direct impact on your Money. By intelligently managing your heating and cooling, Nest can lead to significant reductions in your energy bills. Studies have shown that Nest thermostats can save users an average of 10-12% on heating and 15% on cooling costs annually. These savings aren’t just theoretical; they translate into tangible financial returns over the lifespan of the device, making it a sound Personal Finance investment.
The initial cost of a Nest Thermostat is quickly offset by these ongoing savings. Moreover, many utility companies offer rebates and incentives for installing smart thermostats, further reducing the upfront expense and improving the overall Return on Investment (ROI). By monitoring your Energy History within the app, you gain a clear understanding of your consumption patterns, empowering you to make adjustments that save even more. For homeowners, this isn’t just about saving money today; it’s about increasing the long-term value and marketability of their property by integrating cutting-edge, energy-efficient solutions.
The Nest Brand Promise: Design, Simplicity, and Reliability
The Brand of Nest, now part of Google, stands for a commitment to user-centric design, intuitive functionality, and unwavering reliability. From its sleek, minimalist aesthetic to its satisfying click and smooth rotating ring, every aspect of a Nest Thermostat exudes premium quality and thoughtful engineering. This focus on Corporate Identity and user experience has cultivated a strong Reputation for Nest in the smart home market.
The brand’s success isn’t just about good looks; it’s about delivering on the promise of effortless smart home control. The installation process itself, while requiring some attention to detail, is designed to be as user-friendly as possible, supported by clear instructions and a robust support network. Choosing Nest means investing in a product from a leading brand that prioritizes innovation, data security, and long-term customer satisfaction, reinforcing its position as a trusted gadget in your home.
Pre-Installation Checklist: Essential Preparations for a Smooth Setup
A successful Nest installation begins long before you touch a screwdriver. Proper preparation is key to ensuring compatibility, gathering the necessary tools, and most importantly, guaranteeing your safety. Skipping these preliminary steps can lead to frustration, potential damage, or even a call to an HVAC professional.
Verifying Compatibility and System Requirements
The first and most critical step is to ensure your existing heating and cooling system is compatible with a Nest Thermostat. While Nest supports a wide range of systems, it’s not universally compatible with every setup.
- System Type: Nest Thermostats typically work with most 24V forced air, hydronic, and heat pump systems. It’s less common for them to be compatible with millivolt systems or high-voltage systems (like electric baseboard heaters), which usually require a professional electrician.
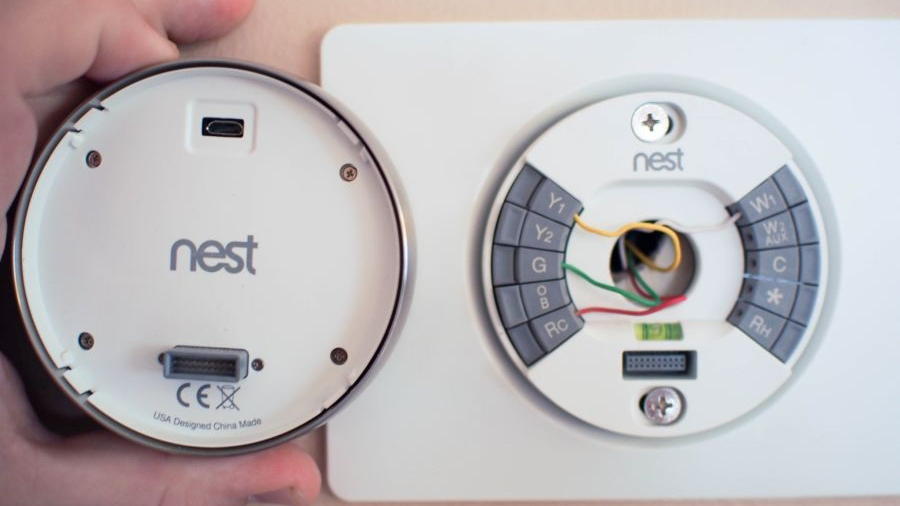
- Wire Check: The Nest website offers a handy compatibility checker tool. You’ll need to know which wires are connected to your old thermostat. Common wire labels include R, G, Y, W, C, O, B, AUX, E. The “C” wire (common wire) is particularly important as it provides continuous power to the Nest. While some Nest models can operate without a C-wire in certain configurations, having one ensures optimal performance and prevents battery drain issues, especially with Wi-Fi connectivity. If you don’t have a C-wire, Nest often includes a Power Connector or you may need to purchase one separately, or have an HVAC professional install one.
- Wi-Fi Connection: Nest requires a stable 2.4 GHz Wi-Fi network for optimal performance and remote control. Ensure your Wi-Fi signal is strong enough at your thermostat’s location. This is crucial for all the Tech features to function correctly, from remote control to software updates.
Gathering Your Tools and Understanding Your Old Thermostat
Before you begin, gather the following tools. Having them on hand will prevent unnecessary interruptions.
- Screwdrivers: Philips and flathead screwdrivers will likely be needed to remove your old thermostat and mount the Nest base.
- Drill (optional): If you need to drill new pilot holes for the Nest base or patch old ones, a drill will be useful.
- Wire Strippers (optional): If your existing wires are too short or damaged, you might need to strip a bit more insulation.
- Level: Most Nest models come with a small bubble level, but having your own can be helpful.
- Pen and Paper / Smartphone Camera: This is crucial for labeling wires and taking reference photos.
- Smartphone or Tablet: You’ll need this for the Nest/Google Home app setup after installation.
Understanding Your Old Thermostat:
Before disconnecting anything, take a moment to observe your current thermostat.
- Take Pictures: Use your phone to take multiple clear photos of your old thermostat’s wiring, especially showing which wire connects to which terminal. This is your most important reference.
- Identify Labels: Pay close attention to the labels on the terminals (R, G, Y, W, C, etc.). These labels are essential for correctly wiring your Nest.
- Note Wall Appearance: Look at the hole in the wall and any discoloration. You might need to patch holes or paint if the Nest doesn’t completely cover the old thermostat’s footprint. Nest typically includes a trim plate for this purpose.
Step-by-Step Installation: From Old Thermostat to Smart Home Hub
With preparations complete, you’re ready for the main event: installing your Nest Thermostat. Follow these steps carefully to ensure a safe and successful installation.
Disconnecting Your Old Thermostat Safely

This is the most critical safety step. Always prioritize turning off the power.
- Turn Off Power: Go to your home’s circuit breaker box and locate the breaker that controls your heating and cooling system. Flip it to the “OFF” position. It’s often labeled “Furnace,” “AC,” or “HVAC.” If unsure, turn off the main breaker to be absolutely safe. Do not skip this step.
- Remove Old Thermostat Cover: Gently pull the front cover of your old thermostat away from the wall plate. Some may have clips, screws, or simply snap off.
- Photograph Wiring: Take another clear photo of the wires connected to the terminals on the wall plate. This is your backup.
- Label Wires: Using the labels provided with your Nest Thermostat (or masking tape and a marker), label each wire according to the terminal it was connected to on your old thermostat. For example, if a wire was connected to “R,” put an “R” label on it.
- Disconnect Wires: Unscrew the terminals and carefully remove each labeled wire. Make sure the wires don’t fall back into the wall, or you’ll have to fish them out.
- Remove Old Wall Plate: Unscrew and remove the old thermostat’s wall plate.
Mounting the Nest Base and Connecting Wires
Now it’s time to install the Nest Thermostat’s backplate, which houses the wiring terminals.
- Thread Wires: Pull the labeled wires through the center opening of the Nest backplate.
- Mount the Backplate: Use the included screws to secure the Nest backplate to the wall. Use the built-in bubble level (or your own) to ensure it’s straight. If drilling new holes, use an appropriate drill bit for your wall material.
- Connect Wires: This is where your labels and photos become invaluable. Push each labeled wire firmly into its corresponding terminal on the Nest backplate until it clicks into place. You should feel a slight resistance, and the button above the terminal should stay down, indicating a secure connection. Do not force wires. If a wire doesn’t fit or is frayed, you might need to use wire strippers to expose a fresh section of copper.
- Crucial Tip for C-wire: If you have a C-wire, connect it to the C terminal. If your system requires a C-wire adapter (e.g., Nest Power Connector) because you don’t have a C-wire, follow the adapter’s specific instructions for installation at your furnace or air handler.
- Tuck Wires: Gently push any excess wire back into the wall opening to create a neat, flush fit for the display.
Attaching the Nest Display and Powering Up
The final physical step is connecting the main thermostat display.
- Attach the Display: Align the Nest display with the mounted backplate. Gently push it onto the backplate until you feel it click securely into place.
- Restore Power: Return to your circuit breaker box and flip the breaker for your heating and cooling system back to the “ON” position.
- Initial Boot: Your Nest Thermostat should now power on. You’ll see the Nest logo, and then it will guide you through the initial setup process on its screen. If it doesn’t power on, immediately turn off the power at the breaker and recheck your wiring connections. A common cause is a loose wire or a missing C-wire when one is required.
Post-Installation: Configuration, Optimization, and Smart Home Integration
With the physical installation complete, the real magic of your Nest Thermostat begins. This phase involves connecting it to your home network, personalizing its settings, and unlocking its full potential as a smart home device.
Initial Setup and App Integration
The on-screen prompts on your Nest Thermostat will guide you through the initial configuration:
- Language and Location: Select your preferred language and input your home’s location (zip code), which helps Nest gather local weather data.
- Wi-Fi Connection: Connect your Nest Thermostat to your home’s 2.4 GHz Wi-Fi network. This step is crucial for all smart features, including remote control and software updates. Follow the on-screen instructions to select your network and enter your password. This ensures your Tech gadget is fully connected.
- Download the App: Download the Google Home app (or Nest app, depending on your device generation) to your smartphone or tablet.
- Account Creation/Login: Create a new Google account if you don’t have one, or sign in to an existing one.
- Device Pairing: Follow the app’s instructions to add your Nest Thermostat. This usually involves scanning a QR code on the back of the thermostat or entering a unique serial number. Once paired, you’ll have full control of your thermostat from anywhere.
Programming and Learning: Harnessing Nest’s Intelligence
Now it’s time to teach Nest about your preferences and let its intelligence shine.
- Initial Schedule (Optional but Recommended): While Nest is designed to learn, setting an initial schedule can jumpstart the process. Input your typical weekday and weekend routines: when you wake up, leave for work, return home, and go to bed.
- Auto-Schedule: As you manually adjust the temperature throughout the first few days and weeks, Nest will observe your patterns and automatically build an “Auto-Schedule.” This is where the AI-driven Technology Trends truly manifest, creating a personalized heating and cooling plan tailored to your lifestyle.
- Home/Away Assist: Ensure Home/Away Assist is enabled in the app. This feature uses your phone’s location (geofencing) and the thermostat’s built-in sensors to detect if you’re home or away, automatically adjusting temperatures to save energy when no one is around. This is a prime example of how Productivity extends to your home’s automation.
- Energy History: Regularly check your Energy History reports in the app. This detailed breakdown of your heating and cooling usage helps you understand your consumption patterns and identify opportunities for further Money savings. The more you interact with Nest, the smarter and more efficient it becomes.
Advanced Features and Troubleshooting Tips
To maximize your Nest experience, explore its advanced features and be prepared for common troubleshooting scenarios.
- Smart Home Integration: Link your Nest Thermostat with other smart devices. For example, connect it to your smart lights so they turn on when your Nest detects you’re home, or integrate it with a smart speaker for voice control. This expands your overall Smart Home Automation ecosystem.
- Safety Temperature: Set a Safety Temperature in the app to prevent pipes from freezing in winter, even if your thermostat is off.
- Airwave / Eco Modes: Explore features like Airwave (which reduces AC usage by utilizing residual cold air) and Eco Modes for additional energy savings.
- Firmware Updates: Ensure your Nest Thermostat is always running the latest firmware. These updates often bring new features, performance improvements, and crucial Digital Security patches. Nest usually updates automatically when connected to Wi-Fi.
Common Troubleshooting:
- No Power/Display Blank: Double-check the circuit breaker. Re-examine wiring connections; a loose C-wire or insufficient power can be the culprit.
- Wi-Fi Disconnection: Ensure your router is working and within range. Try restarting your router and the Nest Thermostat. Check for network interference.
- Temperature Inaccuracy: Make sure the Nest’s location isn’t affected by direct sunlight, drafts, or heat sources (like lamps) that could skew readings.
- System Not Responding: If your heating/cooling system isn’t turning on, ensure all wires are securely connected and refer to your system’s manual or Nest’s support resources.
Embracing your Nest Thermostat isn’t just about controlling temperature; it’s about adopting a smarter, more efficient, and more connected way of living.
Conclusion
Installing a Nest Thermostat is a tangible step towards a smarter, more efficient, and ultimately more comfortable home. What might initially seem like a technical hurdle is, in fact, a straightforward process that empowers you to take control of your indoor climate and energy consumption. By following this comprehensive guide, you’ve equipped yourself with the knowledge and confidence to seamlessly integrate this powerful piece of technology into your living space.
From the moment you power on your Nest, you unlock a world where advanced Tech—like AI-driven learning, geofencing, and remote control via intuitive apps—works tirelessly to adapt to your lifestyle. This isn’t just about futuristic gadgets; it’s about practical innovations that enhance your daily Productivity and peace of mind.
More importantly, your Nest Thermostat is a smart investment in your Money. Its ability to intelligently optimize heating and cooling translates directly into significant energy savings, offering a clear return on investment that continues to pay dividends year after year. Coupled with potential utility rebates, it’s a decision that benefits your personal finance and contributes to a more sustainable environmental footprint.
Finally, by choosing Nest, you’ve opted for a device backed by a robust Brand known for its elegant design, user-friendly interface, and unwavering reliability. You’re not just installing a thermostat; you’re integrating a piece of a larger, intelligent ecosystem that promises to evolve and enhance your home for years to come.
As our homes continue to embrace the digital age, devices like the Nest Thermostat stand as prime examples of how technology can simplify our lives, save us money, and provide unparalleled comfort. Welcome to the era of the smart home—where your comfort is as intelligent as the technology that powers it.
aViewFromTheCave is a participant in the Amazon Services LLC Associates Program, an affiliate advertising program designed to provide a means for sites to earn advertising fees by advertising and linking to Amazon.com. Amazon, the Amazon logo, AmazonSupply, and the AmazonSupply logo are trademarks of Amazon.com, Inc. or its affiliates. As an Amazon Associate we earn affiliate commissions from qualifying purchases.