In the rapidly evolving landscape of technology, where data is the new oil and the ability to extract meaningful insights from it is paramount, graph databases have emerged as a powerful and increasingly popular solution. Among these, Neo4j stands out as the leading native graph database, offering unparalleled performance and flexibility for complex relationship modeling. For developers and IT professionals working with the CentOS 7 operating system, a robust and stable platform for server deployments, understanding how to effectively install and configure Neo4j is a crucial skill. This comprehensive guide will walk you through the process, ensuring you can harness the power of Neo4j for your data-driven projects.
The ability to effectively manage and query interconnected data is no longer a niche requirement; it’s becoming a cornerstone of modern application development and data analysis. Whether you’re building recommendation engines, fraud detection systems, social networks, or knowledge graphs, Neo4j’s property graph model excels at representing and traversing these complex relationships. CentOS 7, with its long-term support and enterprise-grade stability, provides an ideal environment for hosting such demanding applications.
This article will delve into the intricacies of installing Neo4j Community Edition on CentOS 7, covering everything from prerequisite checks and repository setup to the actual installation, basic configuration, and initial verification. We’ll also touch upon some best practices and considerations for ensuring a smooth and efficient Neo4j deployment on your CentOS 7 server.
1. Prerequisites and Initial Setup: Laying the Foundation for Neo4j
Before diving into the installation process, it’s essential to ensure your CentOS 7 environment is adequately prepared. A well-configured system will prevent potential conflicts and ensure a seamless installation.
1.1 System Requirements and Updates
While Neo4j is generally lightweight, it’s always good practice to start with a system that is up-to-date.
- Operating System: CentOS 7 (or a compatible RHEL-based distribution).
- Java Development Kit (JDK): Neo4j is written in Java and requires a compatible JDK. Neo4j Community Edition typically supports JDK 8 or later. It’s recommended to use OpenJDK for its open-source nature and broad compatibility.
- Sufficient RAM: The amount of RAM required will depend on the size of your graph data and the complexity of your queries. For development and testing, 4GB of RAM is a reasonable starting point. For production environments, significantly more might be needed.
- Disk Space: Ensure you have ample disk space for the Neo4j installation files, database files, and logs.
- Network Access: You’ll need internet access to download the Neo4j package and its dependencies.
Let’s begin by updating your system’s package list and installing any available updates. Open your terminal and execute the following commands:
sudo yum update -y
This command will refresh your package repository and install all available updates for your system.
1.2 Installing Java Development Kit (JDK)
As mentioned, Java is a prerequisite for Neo4j. We’ll install OpenJDK 8, a widely supported and stable version.
sudo yum install -y java-1.8.0-openjdk-devel
After the installation, you can verify the Java version by running:
java -version
You should see output indicating the OpenJDK 8 version installed on your system.
2. Installing Neo4j Community Edition: The Core Process
With your CentOS 7 system prepared, we can now proceed with installing Neo4j Community Edition. The recommended method for installing Neo4j on Linux distributions like CentOS is by using the official Neo4j package repositories. This ensures you receive updates easily and have access to the latest stable versions.
2.1 Adding the Neo4j Yum Repository
Neo4j provides a dedicated YUM repository that simplifies the installation and management of Neo4j packages.
First, create a new repository file for Neo4j:
sudo tee /etc/yum.repos.d/neo4j.repo <<EOF
[neo4j]
name=Neo4j
baseurl=http://yum.neo4j.com/enterprise
enabled=1
gpgcheck=0
EOF
Important Note: The baseurl above points to the enterprise repository, which will allow you to install either the Community or Enterprise editions. When you install neo4j-community, it will correctly pull the community version. If you intended to install the Enterprise edition, you would proceed with the neo4j package.
Now, update your YUM cache to include the newly added repository:
sudo yum makecache
2.2 Installing Neo4j Community Edition
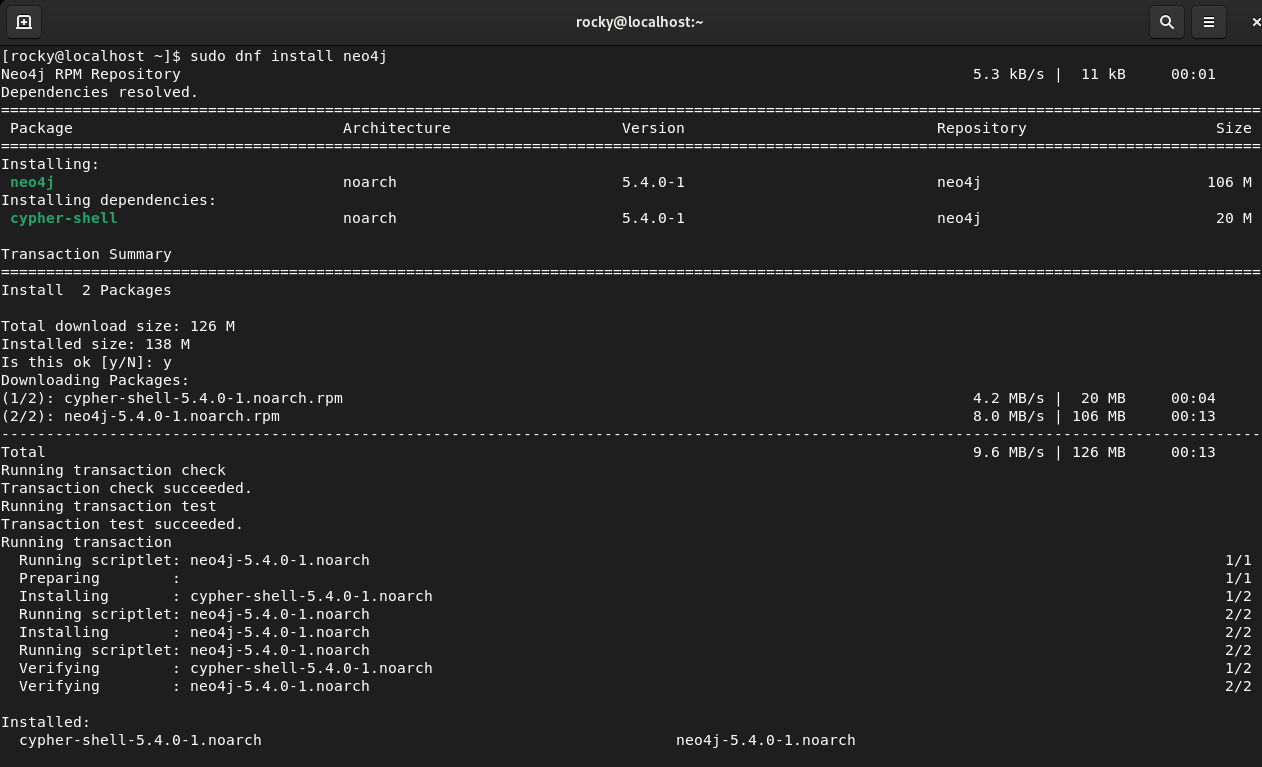
With the repository configured, installing Neo4j Community Edition is as simple as using the yum install command:
sudo yum install -y neo4j-community
This command will download and install Neo4j Community Edition along with its necessary dependencies.
3. Configuring and Running Neo4j: Bringing Your Graph Database to Life
Once Neo4j is installed, the next steps involve configuring it for your specific needs and starting the service.
3.1 Starting and Enabling the Neo4j Service
Neo4j is managed as a systemd service on CentOS 7. You can start the Neo4j service with the following command:
sudo systemctl start neo4j
To ensure Neo4j starts automatically on system boot, enable the service:
sudo systemctl enable neo4j
You can check the status of the Neo4j service to confirm it’s running:
sudo systemctl status neo4j
You should see output indicating that the service is active and running.
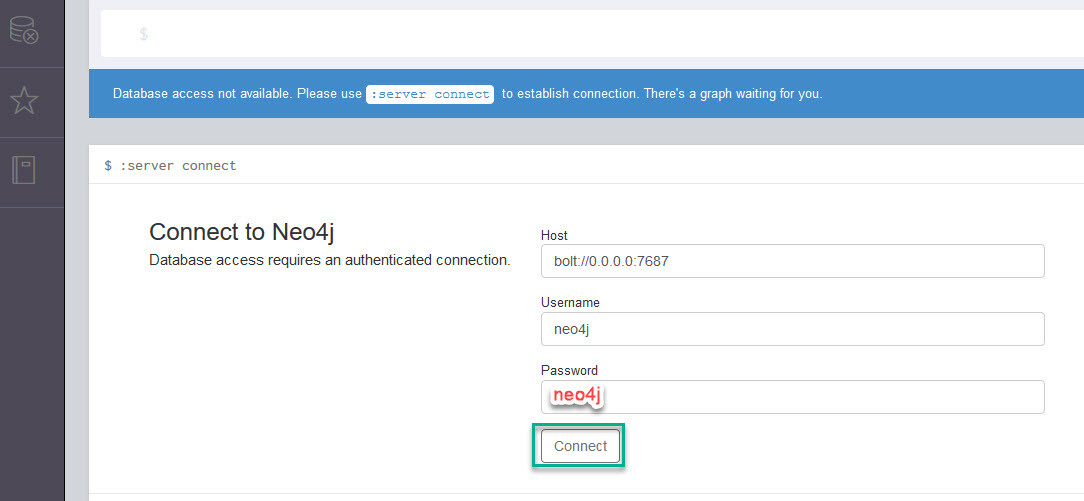
3.2 Accessing the Neo4j Browser
Neo4j comes with a user-friendly web interface called Neo4j Browser, which allows you to interact with your graph data, write Cypher queries, and visualize your graph. The Neo4j Browser runs on port 7474 by default.
To access the Neo4j Browser, open your web browser and navigate to:
http://your_server_ip:7474
Replace your_server_ip with the IP address of your CentOS 7 server.
Upon your first login, you will be prompted to change the default password for the neo4j user. It is highly recommended to set a strong, unique password for security purposes.
3.3 Basic Configuration (neo4j.conf)
Neo4j’s configuration is managed through the neo4j.conf file, typically located at /etc/neo4j/neo4j.conf. This file contains numerous parameters that allow you to fine-tune Neo4j’s behavior, performance, and security.
Some important parameters you might consider adjusting include:
dbms.memory.heap.initial_size: The initial size of the Java heap.dbms.memory.heap.max_size: The maximum size of the Java heap.dbms.connector.http.enabled: Whether the HTTP connector is enabled (default is true).dbms.connector.bolt.enabled: Whether the Bolt connector is enabled (default is true).auth.procedures.default_realm: The default authentication realm.
To edit the configuration file, use your preferred text editor with root privileges:
sudo nano /etc/neo4j/neo4j.conf
After making any changes to neo4j.conf, you must restart the Neo4j service for the changes to take effect:
sudo systemctl restart neo4j
4. Verifying the Installation and Next Steps: Ensuring Functionality
After successfully installing and configuring Neo4j, it’s crucial to verify that everything is working as expected and to understand where to go next.
4.1 Initial Verification and Cypher Queries
Once you’ve logged into the Neo4j Browser, you can perform a simple verification by running a basic Cypher query. Cypher is Neo4j’s declarative query language for graphs.
In the Neo4j Browser’s query input area, type the following command:
MATCH (n) RETURN n LIMIT 25
This query will attempt to find up to 25 nodes in your database and return them. If Neo4j is running correctly and accessible, you should see a visual representation of any existing nodes (or an empty graph if it’s a fresh installation) in the results pane.
You can also try creating a simple node and relationship to further test:
CREATE (a:Person {name: 'Alice'})-[:KNOWS]->(b:Person {name: 'Bob'})
RETURN a, b
If this query executes without errors, your Neo4j installation is functioning correctly.
4.2 Firewall Configuration
For external access to Neo4j, you’ll need to ensure that the necessary ports are open in your firewall. The default ports for Neo4j are:
- Bolt (driver traffic): 7687
- HTTP (Neo4j Browser and REST API): 7474
- HTTPS (Neo4j Browser and REST API): 7473
To open these ports in firewalld on CentOS 7, you can use the following commands:
sudo firewall-cmd --zone=public --add-port=7687/tcp --permanent
sudo firewall-cmd --zone=public --add-port=7474/tcp --permanent
sudo firewall-cmd --zone=public --add-port=7473/tcp --permanent
sudo firewall-cmd --reload
This will make Neo4j accessible from other machines on your network or the internet, depending on your server’s network configuration.

4.3 Exploring Further: Resources and Next Steps
Congratulations! You have successfully installed Neo4j Community Edition on your CentOS 7 server. Now, the real adventure of graph data begins.
- Learn Cypher: The Neo4j Browser is your playground for learning and mastering Cypher. Refer to the official Neo4j documentation for comprehensive Cypher tutorials and reference materials.
- Neo4j Documentation: The official Neo4j documentation is an invaluable resource for understanding Neo4j’s features, best practices, and advanced configurations.
- Community and Support: The Neo4j community is active and helpful. If you encounter issues or have questions, the Neo4j community forum is a great place to seek assistance.
- Drivers and Integrations: Explore Neo4j drivers for various programming languages (Python, Java, JavaScript, etc.) to integrate Neo4j into your applications.
By following this guide, you’ve established a solid foundation for leveraging the power of Neo4j on your CentOS 7 infrastructure. This setup is ideal for developers exploring new technologies, building proof-of-concepts, or even deploying smaller-scale production applications that benefit from the intuitive and powerful graph data model. As your projects scale, consider the Neo4j Enterprise Edition for advanced features like clustering, security enhancements, and dedicated support.
aViewFromTheCave is a participant in the Amazon Services LLC Associates Program, an affiliate advertising program designed to provide a means for sites to earn advertising fees by advertising and linking to Amazon.com. Amazon, the Amazon logo, AmazonSupply, and the AmazonSupply logo are trademarks of Amazon.com, Inc. or its affiliates. As an Amazon Associate we earn affiliate commissions from qualifying purchases.