In today’s data-driven world, robust database management systems are the backbone of virtually every application, website, and business process. Among these, MySQL stands out as a pre-eminent open-source relational database management system (RDBMS), renowned for its reliability, performance, and ease of use. Whether you’re a seasoned developer building complex web applications, a data analyst managing intricate datasets, or a budding tech enthusiast exploring the foundations of backend development, having MySQL installed and properly configured on your Mac is an essential step.
This comprehensive guide will walk you through the entire process of installing MySQL on your macOS device, covering the most popular and efficient methods. We’ll delve into the benefits of using MySQL, explore the prerequisites for a smooth installation, detail step-by-step instructions for both the Homebrew package manager and the official DMG installer, and provide crucial information on post-installation setup, verification, and common troubleshooting tips. By the end of this article, you’ll not only have MySQL running on your system but also a foundational understanding of how to manage it, empowering you to unlock new possibilities in your tech journey, enhance your brand’s digital presence, and potentially boost your income through advanced data management skills.
Introduction: Why MySQL Remains Indispensable in the Tech Landscape
Before we dive into the nitty-gritty of installation, let’s briefly underscore why MySQL continues to be a cornerstone technology in the ever-evolving digital realm. Understanding its significance can motivate even the most reluctant installer to embrace this powerful tool.
What is MySQL?
At its core, MySQL is an open-source relational database management system. Developed by Oracle, it uses SQL (Structured Query Language) for managing and querying data. Unlike simple file storage, an RDBMS organizes data into tables with predefined relationships, ensuring data integrity, consistency, and efficient retrieval. This structured approach makes it ideal for handling vast amounts of interconnected information.
Key Benefits and Use Cases
MySQL’s popularity stems from a myriad of advantages that cater to a wide range of users and applications:
- Reliability and Performance: MySQL is known for its stability and high performance, even under heavy loads. It’s engineered to handle concurrent access from multiple users and applications without compromising speed or data integrity, making it suitable for high-traffic websites and critical business systems.
- Scalability: From small personal projects to large-scale enterprise applications, MySQL can scale to meet diverse demands. Its architecture allows for flexible growth, whether through vertical scaling (more powerful hardware) or horizontal scaling (distributing data across multiple servers).
- Security Features: Data security is paramount, and MySQL offers robust features including user access control, encrypted connections, and various authentication methods to protect sensitive information.
- Ease of Use: Despite its power, MySQL is relatively straightforward to learn and use, especially with intuitive tools like MySQL Workbench. Its SQL interface is standardized, making it accessible for developers coming from other SQL databases.
- Open-Source and Cost-Effective: Being open-source, MySQL community edition is free to use, making it an attractive option for startups, small businesses, and individual developers looking to minimize software costs.
- Wide Compatibility: MySQL supports a multitude of programming languages (PHP, Python, Java, Node.js, Ruby, C#, etc.) and operating systems, ensuring broad compatibility with existing tech stacks.
- Vast Community Support: A large and active global community means extensive documentation, forums, and resources are readily available to assist with learning, troubleshooting, and advanced usage.
For businesses and individuals, mastering MySQL translates directly into tangible benefits. For Tech professionals, it’s a critical skill for backend development, data engineering, and system administration. For those focused on Brand, it underpins e-commerce platforms, content management systems (like WordPress), and customer relationship management (CRM) tools, which are vital for online presence and customer engagement. In terms of Money, proficiency in database management can lead to higher-paying job opportunities, enable the creation of lucrative online ventures, or optimize business operations to save costs and increase revenue.
Preparing Your Mac for MySQL Installation
Before initiating the installation process, a few preparatory steps can ensure a smooth and error-free experience. Taking these into account will save you time and frustration later on.
System Requirements and Compatibility
MySQL is generally compatible with recent macOS versions. While specific version requirements might vary slightly with new MySQL releases, ensuring your macOS is up to date is a good practice. As of writing, macOS Catalina (10.15) and newer are typically well-supported. You’ll need sufficient disk space (several GBs for the installation and your future databases) and at least 4GB of RAM for comfortable operation, though more is always better for development.
Choosing Your Installation Method: Homebrew vs. Official Installer
There are two primary ways to install MySQL on your Mac, each with its own advantages:
- Homebrew (Recommended for Developers): Homebrew is a free and open-source package manager for macOS. It simplifies the installation and management of software by providing command-line tools to fetch, compile, and install packages. For developers, Homebrew offers unparalleled convenience, allowing easy updates, uninstalls, and management of multiple software versions.
- Official DMG Installer (Recommended for Beginners or GUI Preference): The official MySQL Community Server DMG (Disk Image) installer is a graphical installer provided by Oracle. It’s straightforward, guided, and integrates MySQL as a service into your system preferences, making it easy to start and stop without the command line for basic usage.
We will cover both methods in detail, allowing you to choose the one that best suits your comfort level and workflow.
Essential Tools: The Terminal and Homebrew (if applicable)
Regardless of your chosen method, familiarity with the macOS Terminal application is beneficial. You can find it in Applications/Utilities/Terminal.app.
If you opt for Homebrew, you’ll need to install it first. Open your Terminal and paste the following command:
/bin/bash -c "$(curl -fsSL https://raw.githubusercontent.com/Homebrew/install/HEAD/install.sh)"
Follow the on-screen prompts, which may include entering your macOS password and installing Xcode Command Line Tools. This process might take a few minutes. Once installed, verify Homebrew by typing brew help.
Method 1: Installing MySQL on Mac Using Homebrew (Recommended for Developers)
For developers, Homebrew is often the preferred method due to its flexibility and integration with the command-line workflow. It provides an efficient way to manage not just MySQL but a host of other development tools.
What is Homebrew and Why Use It?
Homebrew bills itself as “the missing package manager for macOS.” It allows you to install Unix tools, libraries, and applications not natively available on macOS or difficult to install manually. Its main advantages include:
- Simplicity: Install software with a single command (
brew install package). - Version Control: Easily switch between different versions of software.
- Dependency Management: Automatically handles software dependencies.
- Updates: Keep all your installed software up to date with
brew upgrade.
Step-by-Step Installation via Homebrew
Assuming you have Homebrew installed as per the previous section, here’s how to install MySQL:
-
Update Homebrew:
It’s always a good practice to update Homebrew before installing new packages to ensure you get the latest formulae and bug fixes.brew update -
Install MySQL:
Now, install the MySQL server. Homebrew will fetch the latest stable version and its dependencies.brew install mysqlThis command downloads and installs the MySQL server. The process may take several minutes depending on your internet connection and system speed. Once complete, Homebrew will display important information, including how to start/stop the service.
-
Start the MySQL Service:
MySQL runs as a background service. You can start it immediately using Homebrew’s services command:brew services start mysqlTo check if it’s running, you can use:
brew services listYou should see
mysqllisted with astartedstatus. -
Secure Your MySQL Installation:
For security, it’s crucial to run themysql_secure_installationscript. This script guides you through setting a root password, removing anonymous users, disallowing remote root login, and removing test databases.mysql_secure_installation- When prompted for the root password, press Enter (as there’s none set initially).
- Follow the prompts. It’s highly recommended to set a strong root password.
- Answer
Y(Yes) to the questions about removing anonymous users, disallowing remote root login, removing the test database, and reloading privilege tables.
-
Add MySQL to Your PATH (Optional but Recommended):
Homebrew usually links MySQL binaries correctly, but sometimes you might need to manually add MySQL’s bin directory to your shell’s PATH environment variable for easier command access from any directory. This allows you to runmysqlormysqladmincommands directly without specifying their full path.- Identify your shell (e.g.,
echo $SHELLwill show/bin/bashor/bin/zsh). - Open your shell configuration file (
.bash_profile,.zshrc, or.profile) with a text editor:
bash

nano ~/.zshrc # if you use zsh

# or

nano ~/.bash_profile # if you use bash
- Add the following line to the end of the file:
bash

export PATH="/usr/local/opt/mysql/bin:$PATH"
- Save the file (Ctrl+O, Enter, Ctrl+X for nano) and then source it to apply changes:
bash

source ~/.zshrc # or source ~/.bash_profile
Now, you should be able to execute MySQL commands from anywhere in your terminal.
- Identify your shell (e.g.,
Method 2: Installing MySQL on Mac Using the Official DMG Installer (For Beginners and GUI Preference)
If you prefer a graphical installation process or want MySQL to integrate directly with your macOS System Preferences, the official DMG installer is an excellent choice.
Downloading the MySQL Community Server
- Visit the Official MySQL Website: Go to the MySQL Community Downloads page:
https://dev.mysql.com/downloads/mysql/. - Select macOS: Choose
macOSfrom the operating system dropdown menu. - Download the DMG Archive: Look for the “macOS (ARM64)” for newer Apple Silicon Macs (M1/M2/M3) or “macOS (x86, 64-bit)” for Intel-based Macs. Download the
.dmgarchive. You don’t need to log in or sign up; just click “No thanks, just start my download.”
Executing the Installer Package
- Open the DMG File: Once downloaded, locate the
.dmgfile in your Downloads folder and double-click it to mount the disk image. - Run the Installer: Inside the mounted disk image, you’ll find a
.pkginstaller file. Double-click it to start the installation wizard. - Follow the Installation Wizard:
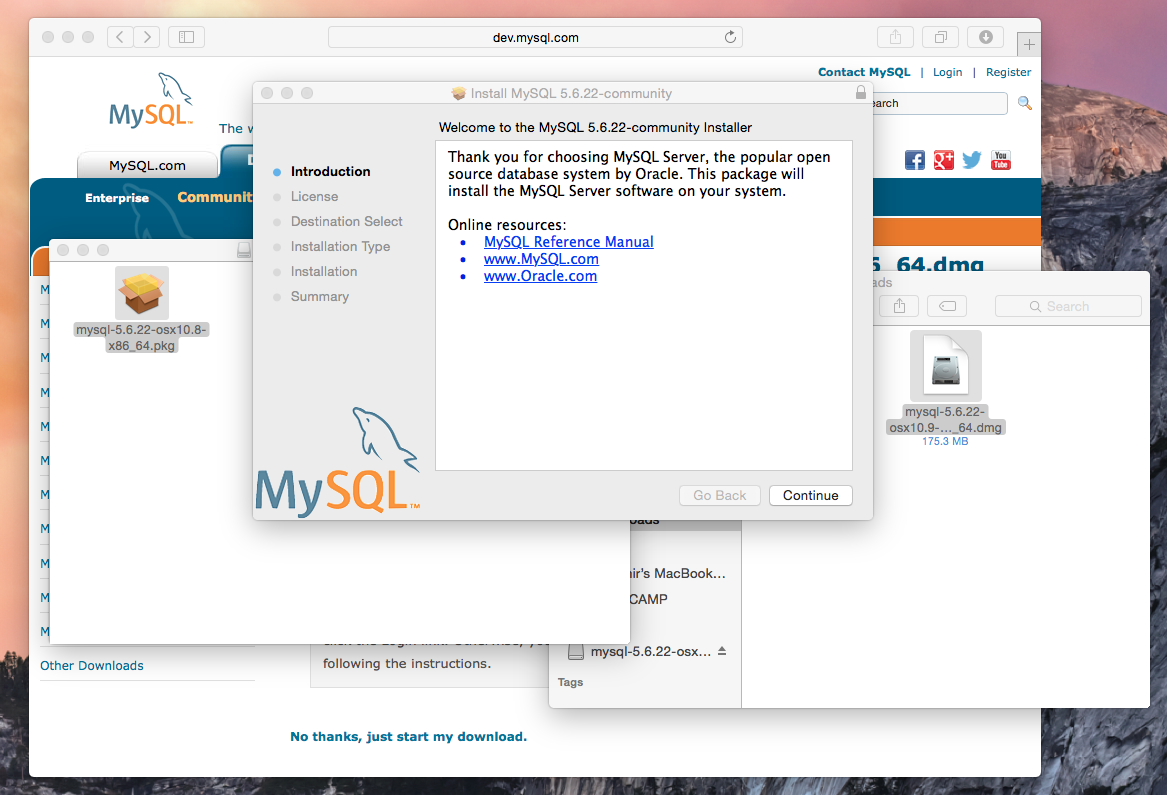
- Introduction: Click
Continue. - License: Read the license agreement and click
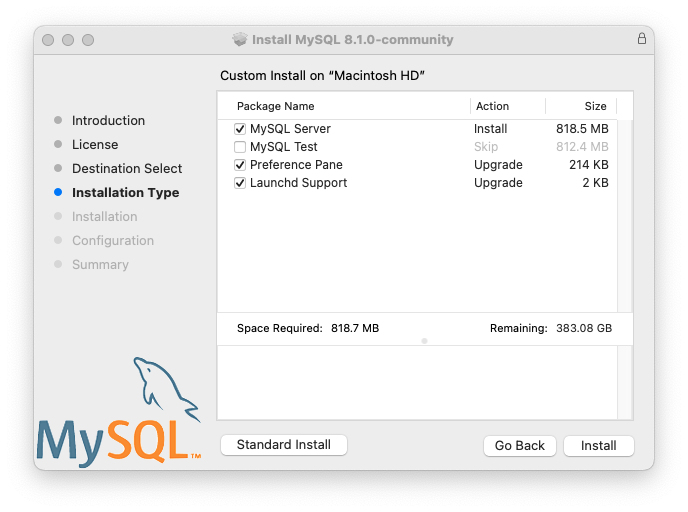
Continue, thenAgree. - Installation Type: Click
Installto proceed with the standard installation. You may be prompted for your macOS user password. - Configuration: This is a crucial step. The installer will ask you to choose a configuration type.
- Use Strong Password Encryption (Recommended): This uses SHA256-based password methods for enhanced security. This is the default and recommended option.
- Use Legacy Password Encryption: For compatibility with older MySQL clients. Only choose this if you know you need it.
- Set Root Password: You’ll be prompted to set a password for the MySQL
rootuser. Choose a strong, memorable password. Do not forget this password! This is your administrative password for the database server. - Startup: The installer might ask if you want MySQL to start automatically on system startup. It’s usually a good idea to enable this.
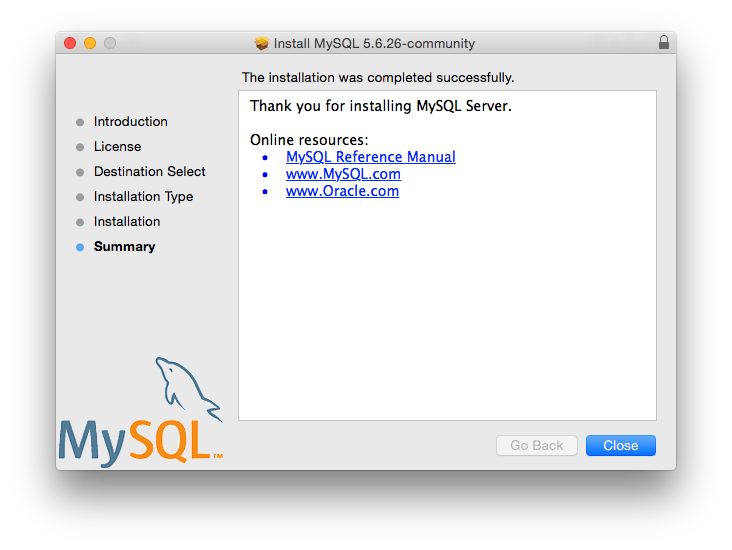
- Summary: Once the installation is complete, you’ll see a summary. Close the installer.
- Introduction: Click
Managing MySQL via System Preferences
After installation, MySQL integrates with your macOS System Preferences:
- Open
System Preferences(orSystem Settingson newer macOS). - You will find a new
MySQLpreference pane at the bottom. - Click on the
MySQLpane. Here, you can easily:- Start/Stop MySQL Server: Click the “Start MySQL Server” or “Stop MySQL Server” button.
- Configure Automatic Startup: Toggle “Start MySQL Server when your computer starts up.”
- See the MySQL Server status.
This GUI provides a convenient way for users who prefer not to use the command line for basic server management.
Post-Installation: Verifying and Connecting to MySQL
With MySQL installed, the next critical step is to verify that it’s running correctly and learn how to connect to it. This confirms your installation was successful and prepares you to start interacting with your databases.
Verifying MySQL Server Status
For Homebrew installations:
Use the brew services command:
brew services list
Look for mysql and ensure its status is started.
For DMG installations:
Go to System Preferences > MySQL and check if the server status is green and says “MySQL Server is running.”
Connecting to MySQL via Terminal (MySQL Client)
The most fundamental way to interact with MySQL is through its command-line client.
- Open your Terminal.
- To connect as the
rootuser, type:
bash

mysql -u root -p
- You will be prompted for the password you set during installation. Enter it and press Enter.
- If successful, you will see the MySQL prompt (
mysql>). You can now execute SQL commands.- To check the current version:
SELECT VERSION(); - To list databases:
SHOW DATABASES; - To exit:
exit;
- To check the current version:
Installing MySQL Workbench (Graphical User Interface Tool)
While the terminal is powerful, many prefer a graphical interface for database administration and development. MySQL Workbench is the official tool provided by Oracle for this purpose.
- Download MySQL Workbench: Go to
https://dev.mysql.com/downloads/workbench/. Download the macOS version (ARM64 or x86 depending on your Mac). - Install Workbench: Open the downloaded
.dmgfile and drag theMySQL Workbenchicon to yourApplicationsfolder. - Launch and Connect: Open MySQL Workbench from your Applications folder.
- On the Welcome screen, click the
+icon next to “MySQL Connections” to create a new connection. - Give your connection a name (e.g., “Local MySQL”).
- Set the
Hostnameto127.0.0.1(orlocalhost). - Set the
Portto3306(default). - Set the
Usernametoroot. - Click “Store in Keychain…” next to “Password” and enter your root password.
- Click “Test Connection” to verify. If successful, click
OKto save the connection. - Double-click your new connection to open it.
- On the Welcome screen, click the
MySQL Workbench allows you to visually design databases, write and execute SQL queries, manage users, and perform various administrative tasks with ease, significantly boosting your productivity.
Basic MySQL Commands to Get Started
Once connected, here are a few fundamental SQL commands you’ll use regularly:
- Create a new database:
CREATE DATABASE mydatabase; - Use a database:
USE mydatabase; - Create a new user:
CREATE USER 'myuser'@'localhost' IDENTIFIED BY 'mypassword'; - Grant privileges to a user:
GRANT ALL PRIVILEGES ON mydatabase.* TO 'myuser'@'localhost'; - Flush privileges (apply changes):
FLUSH PRIVILEGES; - Show tables in current database:
SHOW TABLES; - Describe a table’s structure:
DESCRIBE mytable;
These commands form the basic building blocks for any database project.
Managing and Troubleshooting Common MySQL Issues
Even with a smooth installation, you might encounter situations where you need to manage your MySQL server or troubleshoot issues. Knowing these procedures can save you a lot of time and potential headaches.
Starting, Stopping, and Restarting MySQL
For Homebrew installations:
- Start:
brew services start mysql - Stop:
brew services stop mysql - Restart:
brew services restart mysql - Check Status:
brew services list
For DMG installations:
Use the MySQL pane in System Preferences to start, stop, or configure automatic startup.
Alternatively, for DMG installations, you can use the command line if MySQL was added to your PATH or by using the full path to the mysqld command:
- Start:
sudo /usr/local/mysql/support-files/mysql.server start - Stop:
sudo /usr/local/mysql/support-files/mysql.server stop - Restart:
sudo /usr/local/mysql/support-files/mysql.server restart
(You’ll need to enter your macOS user password for thesesudocommands).
Resetting MySQL Root Password
Forgetting your root password is a common mishap. Here’s a general procedure to reset it (this can vary slightly between MySQL versions):
- Stop the MySQL server. (Use
brew services stop mysqlor the System Preferences pane). - Start MySQL in safe mode (without password checking):
bash

sudo mysqld_safe --skip-grant-tables &
The&puts the process in the background, allowing you to use the terminal. - Connect to MySQL as root (no password needed):
bash

mysql -u root
- Update the root password:
sql

ALTER USER 'root'@'localhost' IDENTIFIED BY 'YourNewStrongPassword!';

FLUSH PRIVILEGES;

exit;
(ReplaceYourNewStrongPassword!with your desired new password.) - Stop the safe mode MySQL process: Find the process ID (PID) using
ps aux | grep mysqld_safeand thenkill <PID>, or simply restart your terminal and proceed to the next step. - Restart MySQL normally: (Use
brew services start mysqlor System Preferences). - Test the new password:
mysql -u root -p
Uninstalling MySQL (for both Homebrew and DMG methods)
If you need to completely remove MySQL from your Mac, here’s how:
For Homebrew installations:
- Stop MySQL service:
brew services stop mysql - Uninstall MySQL:
brew uninstall mysql - Remove any lingering files: Homebrew usually cleans up well, but you might want to manually check and remove any data directories (e.g.,
/usr/local/var/mysql).
bash

rm -rf /usr/local/var/mysql

sudo rm -rf /Library/LaunchDaemons/homebrew.mxcl.mysql.plist # Might not exist
For DMG installations:
- Stop MySQL service: Through System Preferences > MySQL pane.
- Remove the MySQL preference pane:
bash

sudo rm /Library/PreferencePanes/MySQL.prefPane
- Remove MySQL installation files:
bash

sudo rm -rf /usr/local/mysql*

sudo rm -rf /Library/StartupItems/MySQLCOM # Older versions

sudo rm -rf /Library/Receipts/mysql* # Older versions

sudo rm -rf /private/var/db/receipts/*mysql* # Older versions
- Remove MySQL data directory:
bash

sudo rm -rf /var/db/mysql # Or /usr/local/mysql/data if it exists
- Remove related launch daemons/agents:
bash

sudo rm -rf /Library/LaunchDaemons/com.oracle.mysql.mysqld.plist
- Empty Trash
It’s crucial to be cautious with sudo rm -rf commands, as they permanently delete files. Double-check your paths.
Common Errors and Solutions (e.g., “Can’t connect to local MySQL server through socket”)
- “Can’t connect to local MySQL server through socket ‘/tmp/mysql.sock'”: This is a very common error.
- Solution 1: MySQL Server is Not Running. Ensure the MySQL server is actually running. Use
brew services listor check the System Preferences pane. Start it if it’s stopped. - Solution 2: Incorrect Socket Path. Sometimes, MySQL clients look for the socket in a different location than where the server created it.
- Homebrew: Homebrew often uses
/tmp/mysql.sock. Ensure your client is looking there. - DMG: The DMG installer might place it elsewhere (e.g.,
/var/mysql/mysql.sock). You can specify the socket path when connecting:mysql -u root -p --socket=/tmp/mysql.sock(or wherever your socket is).
- Homebrew: Homebrew often uses
- Solution 3: Permissions Issues. Check permissions on the socket file and its parent directories.
- Solution 1: MySQL Server is Not Running. Ensure the MySQL server is actually running. Use
- Access Denied for user ‘root’@’localhost’ (using password: NO/YES):
- Solution: You’re using the wrong password or no password when one is required. Re-enter the correct password, or if you forgot it, follow the “Resetting MySQL Root Password” steps.
- Server Quit Unexpectedly: Check the MySQL error logs. For Homebrew, these are usually in
/usr/local/var/mysql/<your_mac_name>.err. For DMG, look in/usr/local/mysql/data/<your_mac_name>.err. The logs often pinpoint the exact cause of the crash.
Conclusion: Harnessing the Power of MySQL for Your Projects
Successfully installing MySQL on your Mac is more than just completing a technical task; it’s unlocking a powerful tool that is central to modern software development, data analysis, and digital infrastructure. By following the detailed steps outlined in this guide, you’ve equipped your macOS environment with a robust relational database management system, ready to tackle a vast array of projects.
Whether you chose the developer-friendly Homebrew method for its command-line efficiency and flexibility, or the straightforward official DMG installer for its graphical ease, you now have the foundation to build dynamic web applications, manage complex datasets, power e-commerce sites, or simply explore the fascinating world of database administration.
Embracing technologies like MySQL is crucial for anyone looking to stay relevant in the fast-paced Tech industry. It’s a skill that directly contributes to your professional growth and can open doors to new career opportunities. For entrepreneurial minds, understanding database architecture is fundamental for creating scalable and resilient digital products, thereby strengthening your Brand and potentially generating substantial Money through online ventures.
Your journey with MySQL doesn’t end with installation. The next steps involve learning SQL deeply, exploring advanced database design, integrating MySQL with your chosen programming languages (Python, PHP, Node.js, Ruby on Rails, etc.), and delving into tools like MySQL Workbench to maximize your productivity. The world of data is vast and full of possibilities, and with MySQL now running on your Mac, you’re perfectly positioned to explore it and build something truly impactful.
aViewFromTheCave is a participant in the Amazon Services LLC Associates Program, an affiliate advertising program designed to provide a means for sites to earn advertising fees by advertising and linking to Amazon.com. Amazon, the Amazon logo, AmazonSupply, and the AmazonSupply logo are trademarks of Amazon.com, Inc. or its affiliates. As an Amazon Associate we earn affiliate commissions from qualifying purchases.