In today’s interconnected world, nearly every aspect of our homes is becoming “smart,” and the garage is no exception. A smart garage door opener, powered by technology like MyQ, transforms a mundane access point into a secure, convenient, and integrated part of your smart home ecosystem. Gone are the days of wondering if you left the garage door open or fumbling for a remote. With MyQ, control is at your fingertips, offering peace of mind and enhanced accessibility. This guide will walk you through the entire process of installing your MyQ garage door opener, from initial setup and physical installation to app configuration and advanced features, ensuring a smooth transition to a smarter, more secure garage.
As a core aspect of modern “Tech” integration and “Productivity” enhancement, installing a MyQ system aligns perfectly with the pursuit of a more streamlined and secure lifestyle. It’s an investment in convenience that pays dividends in both time saved and worries diminished.
Phase 1: Preparation and Compatibility Checks
Before you embark on the journey of transforming your traditional garage door into a smart, connected gateway, a few crucial preliminary steps are necessary. Proper preparation ensures a smooth installation process and prevents common frustrations down the line. This phase focuses on compatibility, gathering resources, and setting up your digital environment.
Verifying Your Garage Door Opener’s Compatibility
The first and most critical step is to confirm that your existing garage door opener is compatible with the MyQ system. While MyQ is designed to work with a wide range of garage door openers, there are specific requirements to ensure seamless integration.
Most garage door openers manufactured after 1993, which utilize standard safety sensors (the pair of eyes near the bottom of the garage door track), are generally compatible. The key indicator for compatibility is the presence of a “learn button” on your garage door opener’s motor head. This button, usually colored red, orange, green, purple, or yellow, is essential for pairing the MyQ Smart Garage Hub with your opener.
However, certain brands or models might have unique requirements:
- Chamberlain®, LiftMaster®, Craftsman®: Many of these brands, especially those made after 1993, are directly compatible. Some older Security+ systems might require a specific MyQ Internet Gateway (MyQ-G0201) rather than the newer Smart Garage Hub (MyQ-G0401/MyQ-G0301).
- Genie®, Overhead Door®: Most models from these brands, post-1993, are compatible.
- Wayne Dalton®, Ryobi®, Linear®, and others: Compatibility for these brands often depends on specific models and their age.
How to check:
- Locate the Learn Button: Physically inspect the motor unit of your garage door opener. The learn button is usually on the back or side panel, sometimes hidden under a light cover.
- Check Safety Sensors: Ensure your garage door opener has working safety sensors. These are mandatory for MyQ to function correctly, adhering to federal safety standards.
- Consult MyQ Compatibility Tool: For definitive confirmation, visit the MyQ website and use their compatibility checker tool. Input your opener’s brand and model number to receive an accurate assessment.
Understanding your opener’s compatibility beforehand will save you valuable time and ensure you have the correct MyQ device for your setup.
Essential Tools and Materials for Installation
Once compatibility is confirmed, it’s time to gather your supplies. Having all necessary tools and components within reach will make the physical installation much smoother and more efficient.
What you’ll need:
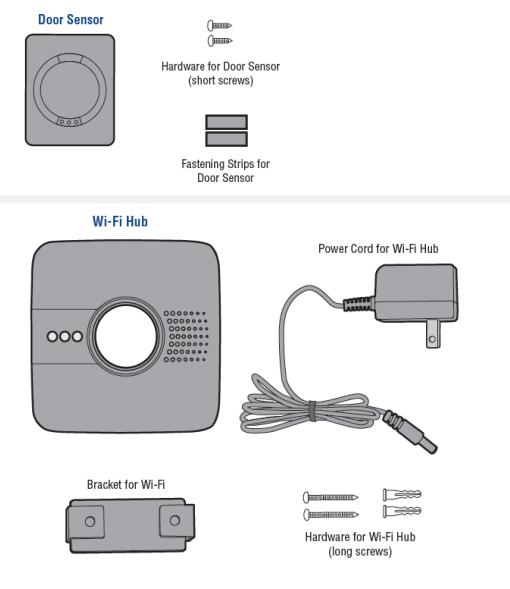
- MyQ Smart Garage Hub Kit: This typically includes the MyQ Smart Garage Hub, a door sensor, mounting hardware (screws, adhesive strips), and a power adapter. Ensure you have all components from the box.
- Smartphone: Your smartphone is crucial for downloading the MyQ app, setting up your account, and configuring the system.
- Stable Wi-Fi Connection: The MyQ Hub requires a stable 2.4 GHz Wi-Fi network connection to communicate with the app and the internet. Ensure your garage has adequate Wi-Fi signal strength.
- Ladder: You’ll need a sturdy ladder to reach the garage door opener motor unit, which is typically mounted on the ceiling.
- Pencil or Marker: For marking drill holes if you choose to mount the hub or sensor with screws.
- Drill (Optional): If you opt for screw mounting for the door sensor or hub, a drill with appropriate bits will be necessary.
- Screwdriver: A Phillips head screwdriver is usually sufficient for most mounting hardware.
- Clean Cloth: To clean the surface where the door sensor will be attached, ensuring proper adhesion.
- Internet Access: To download the MyQ app and create an account.
Having these items ready before you start will prevent interruptions and streamline the process.
Downloading and Preparing the MyQ App
The MyQ app is the command center for your smart garage. It’s where you’ll perform the digital setup, control your door, receive alerts, and manage all MyQ features.
Steps to prepare the app:
- Download the MyQ App: Go to the Apple App Store (for iOS devices) or Google Play Store (for Android devices) and search for “MyQ.” Download and install the official MyQ app.
- Create an Account: Open the MyQ app. If you’re a new user, you’ll need to create an account. This typically involves providing an email address, creating a password, and agreeing to the terms of service. You might also be asked for your location to help with device setup.
- Familiarize Yourself: Take a moment to explore the app’s interface. While you won’t be able to control anything yet, understanding the general layout can be helpful.
Completing these preparatory steps will ensure you’re fully equipped and ready for the physical installation of your MyQ system.
Phase 2: Physical Installation of MyQ Components
With the groundwork laid, it’s time to physically integrate the MyQ components into your garage. This phase involves attaching the door sensor, positioning the MyQ Smart Garage Hub, and powering up the system. Careful attention to placement and connection is key for optimal performance.
Attaching the MyQ Door Sensor
The door sensor is a vital component that detects the open or closed status of your garage door. Accurate placement ensures reliable monitoring and operation.
- Clean the Surface: Choose the top panel of your garage door, preferably towards the center. Use a clean cloth to wipe down the area thoroughly to remove any dust or grease. This ensures the adhesive strips will bond effectively.
- Mount the Sensor:
- Adhesive Mounting (Recommended): Peel the backing off the adhesive strips provided with the sensor and firmly press the sensor onto the cleaned surface. Hold it in place for 30 seconds to ensure a strong bond.
- Screw Mounting (Optional): If you prefer a more permanent attachment, use the included screws to fasten the sensor to the garage door panel. You may need to pre-drill pilot holes.
- Orientation: Ensure the sensor is mounted horizontally, with the arrow on the sensor pointing towards the garage door opener’s motor unit. The sensor’s primary function is to detect movement and position, so a level and secure attachment is crucial.
The door sensor communicates wirelessly with the MyQ Hub, so ensure there are no metallic obstructions directly between the sensor and where you plan to place the hub that could interfere with the signal.
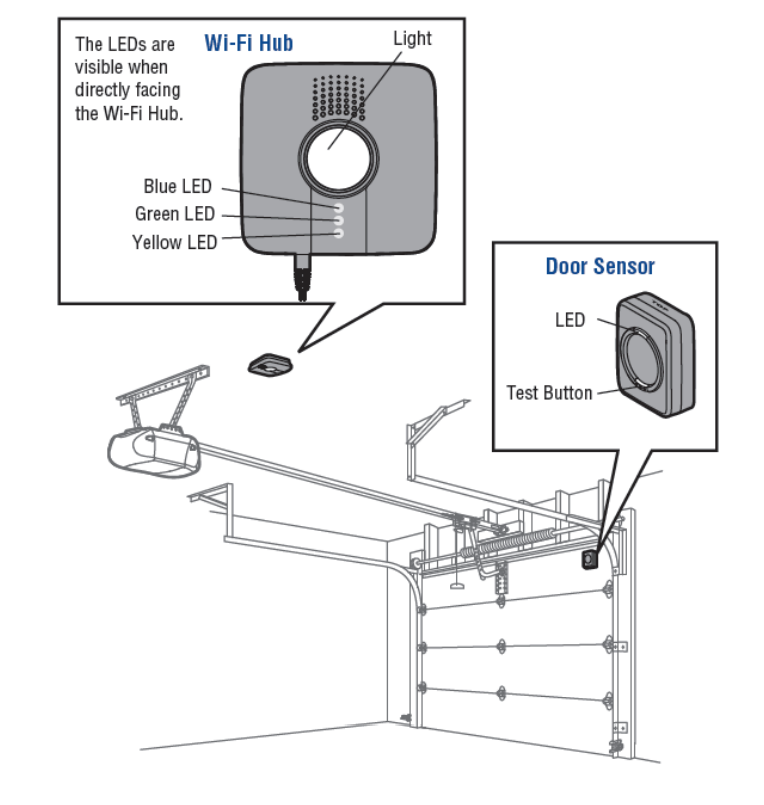
Strategically Placing and Powering the MyQ Smart Garage Hub
The MyQ Smart Garage Hub acts as the central brain of your smart garage system, connecting your door opener to your home Wi-Fi and the MyQ app. Its placement is critical for strong Wi-Fi signal and reliable communication with your garage door opener.
- Identify Optimal Location:
- Proximity to Opener: The hub should be within line of sight or very close proximity (within 10-20 feet) of your garage door opener’s motor unit to ensure strong signal transmission.
- Wi-Fi Coverage: The hub needs to be within good range of your home’s 2.4 GHz Wi-Fi router. If your garage has a weak Wi-Fi signal, consider a Wi-Fi extender or moving your router closer. You can test signal strength using your smartphone in the intended location.
- Power Outlet Access: The hub requires constant power, so choose a location near a standard electrical outlet.
- Clear Line of Sight (Optional but Recommended): While not strictly required, having a relatively clear line of sight between the hub and the opener’s “learn button” can sometimes aid in the initial pairing process.
- Plug In the Hub: Connect the power adapter to the MyQ Smart Garage Hub and plug it into the chosen electrical outlet.
- Mount the Hub (Optional but Recommended): While you can place the hub on a shelf, mounting it securely to the ceiling or a wall (away from direct interference from metal objects like support beams) is often recommended for stability and optimal signal. Use the provided screws and anchors (if needed) to secure it.
Once powered, the hub’s LED indicator lights will begin to flash, signaling it’s ready for digital configuration.
Establishing Initial Communication: The Learn Button
The MyQ Smart Garage Hub communicates with your existing garage door opener by mimicking a remote control signal. This requires a brief interaction with your opener’s “learn button.”
- Locate Your Opener’s Learn Button: As identified in the compatibility check, find the learn button on the motor head of your garage door opener. It might be behind a light cover.
- Be Ready for App Instructions: While you won’t press the learn button just yet, it’s important to know its location. The MyQ app will guide you through this step during the digital setup phase, instructing you precisely when to press it. This initial physical step is merely about knowing its whereabouts and ensuring it’s accessible.
By completing these physical installation steps, you’ve laid the groundwork for your smart garage system. The MyQ components are now in place and powered, ready for the digital configuration that will bring them to life.
Phase 3: Digital Configuration and App Setup
With the MyQ hardware physically installed, the next phase focuses on the digital setup through the MyQ app. This involves connecting the hub to your home Wi-Fi, pairing it with your garage door opener, and customizing your settings. This is where the “Tech” really comes into play, transforming simple hardware into a smart, controllable system.
Connecting Your MyQ Hub to Your Home Wi-Fi Network
A stable internet connection is paramount for your MyQ system to function. The hub needs to connect to your home’s Wi-Fi network to communicate with the MyQ cloud and your smartphone.
- Open the MyQ App: Launch the MyQ app on your smartphone and log in to your account.
- Add a Device: Tap the “+” icon or “Add Device” option within the app. Select “Smart Garage Hub” from the list of device types.
- Start Setup Wizard: Follow the on-screen prompts provided by the app. It will guide you through connecting the hub.
- Initiate Wi-Fi Connection on Hub: The app will instruct you to locate the MyQ Hub’s Wi-Fi setup button (often the learn button on the hub itself, or a dedicated Wi-Fi button). Press and release this button as instructed. The hub’s LED will change to indicate it’s in Wi-Fi pairing mode (often a blue blinking light).
- Connect Your Phone to Hub’s Temporary Wi-Fi: Your smartphone will temporarily disconnect from your home Wi-Fi and connect to a specific Wi-Fi network broadcast by the MyQ Hub itself (e.g., “MyQ-XXXX”). The app will typically manage this transition automatically. If not, go to your phone’s Wi-Fi settings and manually select the MyQ network.
- Select Your Home Wi-Fi: Once connected to the MyQ Hub’s temporary network, the app will present a list of available Wi-Fi networks. Select your home’s 2.4 GHz Wi-Fi network and enter your Wi-Fi password.
- Confirm Connection: The hub will then attempt to connect to your home Wi-Fi. This process can take a few moments. The hub’s LED will change (often to a solid green light) once successfully connected to your network and the MyQ cloud.
Troubleshooting Tip: If the connection fails, double-check your Wi-Fi password, ensure you’re on a 2.4 GHz network, and verify that your Wi-Fi signal strength in the garage is adequate. Restarting your router or the MyQ Hub can sometimes resolve minor glitches.
Pairing the MyQ Hub with Your Garage Door Opener
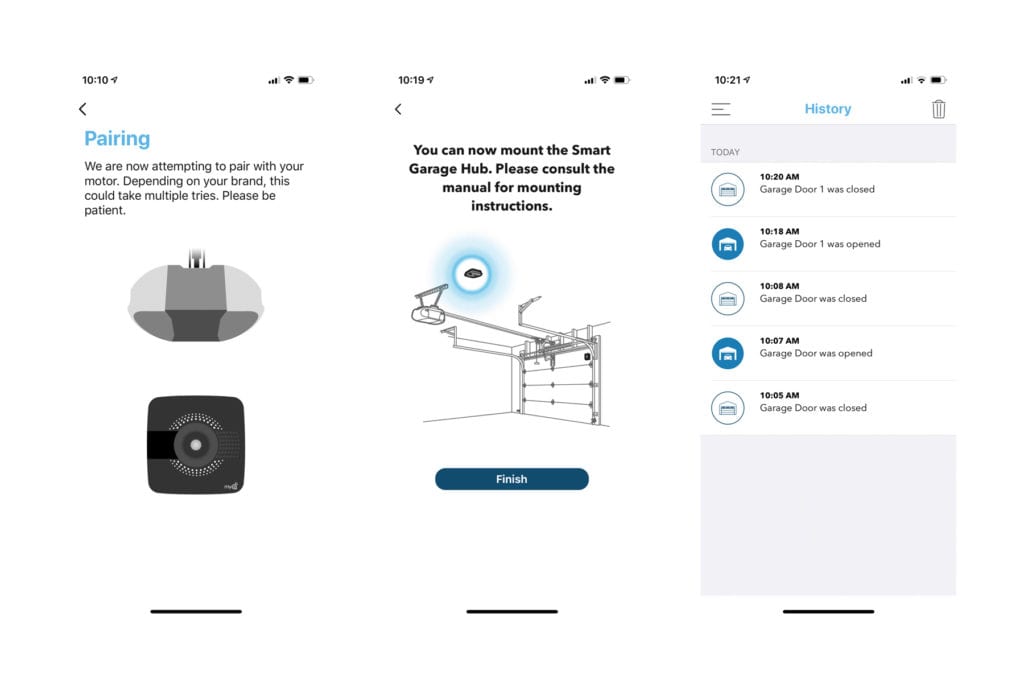
Once the MyQ Hub is online, the next crucial step is to pair it with your garage door opener. This teaches the hub how to activate your specific opener.
- Return to MyQ App: The app should automatically progress to the garage door opener pairing stage after Wi-Fi setup.
- Press Opener’s Learn Button: The app will instruct you to press and immediately release the “learn button” on your garage door opener’s motor unit. The opener’s indicator light will usually illuminate or flash, signaling it’s in learning mode. You typically have about 30 seconds to proceed with the next step.
- Activate Hub’s Test Button: The MyQ app will then prompt you to press the “test” button on the MyQ Smart Garage Hub. This sends a signal that the opener recognizes.
- Confirm Pairing: If successful, your garage door opener lights should flash, or you might hear a click from the opener, confirming that the MyQ Hub has successfully paired with it. The MyQ app will also confirm the successful pairing.
- Test Operation: The app will then guide you to test the garage door’s operation. Tap the garage door icon in the app. Your garage door should open or close. Pay attention to the MyQ hub’s beeping sound and flashing light (required for safety during remote operation) as the door moves.
If the pairing fails, repeat the steps, ensuring you press and release the learn button quickly and press the hub’s test button within the time limit.
Personalizing Your MyQ App Settings and Features
With your MyQ system installed and operational, you can now personalize its settings to maximize convenience and “Digital Security.”
- Name Your Garage Door: In the MyQ app, you can rename your garage door (e.g., “Main Garage Door,” “Workshop Door”) for easier identification, especially if you have multiple MyQ-controlled doors.
- Set Up Notifications: Navigate to the “Alerts” or “Notifications” section in the app.
- Open/Close Alerts: Configure the system to send you push notifications whenever your garage door opens or closes. This is a powerful “Digital Security” feature, allowing you to monitor activity even when you’re away.
- “Door Left Open” Alerts: Set up alerts to notify you if your garage door has been left open for a specified period (e.g., 10, 30, 60 minutes). This prevents accidental prolonged openings and saves energy.
- Schedule Closures (Optional): Some MyQ systems allow you to set schedules for your garage door to close automatically at a certain time each day. This adds an extra layer of “Productivity” and security.
- Guest Access (Optional): If you need to grant temporary access to family, friends, or service providers, MyQ often allows for sharing access through the app, providing controlled entry without needing to share physical keys or codes.
By customizing these settings, your MyQ system becomes more than just a remote opener; it becomes an intelligent guardian of your garage, tailored to your lifestyle.
Phase 4: Optimizing Your Smart Garage Experience
Installing the MyQ system is just the beginning. To truly leverage its capabilities and integrate it seamlessly into your smart home, there are further steps you can take. This phase focuses on advanced features, integration with other platforms, and crucial troubleshooting tips.
Setting Up Intelligent Alerts and Activity Notifications
Beyond basic open/close notifications, MyQ offers robust alert customization that enhances “Digital Security” and peace of mind.
- Customizing Notification Triggers: Dive deeper into the alert settings in the MyQ app. You can often specify:
- Time-based Alerts: Receive alerts only during certain hours (e.g., if the door opens between midnight and 6 AM).
- Duration Alerts: Get notified if the door stays open for an unusually long time.
- Person-specific Alerts: If you share access, some systems can differentiate who opened or closed the door.
- Integrating with Email/SMS: While push notifications are standard, explore options to receive alerts via email or SMS for critical events, ensuring you don’t miss important security updates.
- Reviewing Activity History: The MyQ app maintains an activity log, allowing you to review when the garage door was opened or closed and by whom (if multiple users are configured). Regularly checking this log is a good “Digital Security” practice to monitor unauthorized access or unusual patterns.
These intelligent alerts transform your MyQ system into a proactive security monitor, keeping you informed about the most vulnerable entry point to your home.
Integrating MyQ with Other Smart Home Ecosystems
The true power of smart technology lies in its ability to work together. MyQ can often integrate with popular smart home platforms, expanding its functionality and creating a unified “Tech” experience.
- Google Assistant & Amazon Alexa: MyQ offers integration with voice assistants, allowing you to open or close your garage door with simple voice commands. Note that for security reasons, you might need to provide a PIN code when using voice commands to close (and sometimes open) the door.
- Setup: Typically involves enabling the MyQ skill/action within the Google Home or Amazon Alexa app and linking your MyQ account.
- IFTTT (If This Then That): For advanced users, IFTTT allows you to create custom applets that link MyQ to hundreds of other smart devices and services. For example:
- “If I leave my geo-fenced area, then close the garage door.”
- “If my security camera detects motion, then check if the garage door is closed.”
- Ring Integration: MyQ can integrate with Ring smart home security devices, allowing you to see your garage door status within the Ring app and sometimes trigger actions based on Ring events.
- Other Smart Hubs: Depending on the specific MyQ model and firmware, it might also integrate with other smart home hubs like Apple HomeKit (via a HomeKit Bridge accessory) or Samsung SmartThings. Check the MyQ website for the latest integration partnerships.
Integrating MyQ enhances convenience, “Productivity,” and overall home automation, making your smart home truly cohesive.
Proactive Troubleshooting and Maintenance Tips
Even with a perfect installation, occasional issues can arise. Knowing how to troubleshoot and maintain your MyQ system ensures long-term reliability.
- Common Issues and Solutions:
- Door Not Responding:
- Check Wi-Fi connection (MyQ Hub LED should be solid green).
- Ensure the MyQ Hub is powered.
- Verify the door sensor battery is still good (check in app).
- Re-pair the MyQ Hub with the garage door opener (if connection was lost).
- Check for physical obstructions blocking the garage door’s safety sensors.
- “Door Open” Alerts When Closed: The door sensor might be misaligned or its battery is low. Check sensor mounting and replace battery if needed.
- Wi-Fi Connectivity Problems:
- Restart your home router and the MyQ Hub.
- Ensure the hub is within strong Wi-Fi signal range.
- Verify you’re connected to a 2.4 GHz network.
- Door Not Responding:
- Battery Replacement: The door sensor uses a coin-cell battery (e.g., CR2450) that typically lasts 1-2 years. The MyQ app will usually notify you when the battery is low. Replace it promptly to ensure accurate door status reporting.
- Firmware Updates: Ensure your MyQ Hub’s firmware is always up-to-date. The MyQ app usually handles these updates automatically, but check periodically for manual updates if advised by support. Firmware updates often include performance improvements, bug fixes, and new features.
- Cleanliness: Keep the MyQ Hub and door sensor free of dust and debris, especially the lens on the hub if it has one.
- MyQ Support: Don’t hesitate to contact MyQ’s customer support if you encounter persistent issues. They can provide specific troubleshooting steps tailored to your situation.
Regular maintenance and familiarity with troubleshooting basics will keep your MyQ system running smoothly and reliably.
Unlocking the Value: Why MyQ is a Smart Investment
The decision to install a MyQ garage door opener goes beyond mere convenience; it’s a strategic move to enhance your home’s “Tech” capabilities, bolster “Digital Security,” and inject significant “Productivity” into your daily routine. It’s an investment that pays dividends in various aspects of modern living.
Enhanced Security and Real-time Monitoring
One of the most compelling reasons to adopt MyQ is the significant boost it provides to your home’s security posture.
- Remote Monitoring: The ability to check your garage door’s status from anywhere in the world provides unparalleled peace of mind. No more driving back home to double-check if you closed the door. This immediate insight is a powerful deterrent to potential intruders and a safeguard against accidental oversight.
- Activity Logs: Every open and close event is recorded in the MyQ app’s activity history. This detailed log serves as a security audit trail, allowing you to monitor who accessed your garage and when, even if you weren’t home.
- Customizable Alerts: Beyond simply knowing the door is open, MyQ’s intelligent alerts can notify you if the door remains open for an unusual duration or if it opens during unexpected hours. This proactive warning system can alert you to potential security breaches or simply remind you to close the door on a chilly evening.
- Controlled Access: For families, delivery services, or home maintenance, MyQ allows for secure, temporary, or scheduled access. Instead of sharing physical remotes or keys, you can grant and revoke access digitally, maintaining precise control over who enters your garage. This minimizes the risk associated with lost or stolen keys.
MyQ transforms your garage from a vulnerable entry point into a securely monitored and controlled access zone, significantly enhancing your overall home “Digital Security.”
Unparalleled Convenience and Time Savings
Beyond security, the convenience offered by MyQ is a major draw for enhancing daily “Productivity.”
- Smartphone Control: Your smartphone is always with you, making it the most convenient garage door remote. Whether you’re pulling into the driveway, letting a family member in from work, or simply need to open the door from inside your house, the app provides instant control.
- No More Lost Remotes: The days of hunting for a bulky remote control or worrying about replacing batteries in multiple units are over. Your phone becomes the universal remote.
- Integrated Routines: When integrated with other smart home systems, MyQ can be part of broader routines. Imagine arriving home, and as your phone connects to your Wi-Fi, the garage door automatically opens, the lights turn on, and your smart thermostat adjusts. This level of automation saves countless small moments, adding up to significant “Productivity” over time.
- Voice Control: The ability to open or close your garage with a simple voice command through Google Assistant or Amazon Alexa adds another layer of hands-free convenience, especially when your hands are full.
The seamless control and automation offered by MyQ free up mental bandwidth and streamline daily tasks, contributing directly to a more productive and less stressful lifestyle.
Future-Proofing Your Home with Smart Tech
Investing in a MyQ system is also a step towards “future-proofing” your home. As “Technology Trends” continue to evolve, integrating smart solutions like MyQ ensures your home remains modern and functional.
- Part of the Smart Home Ecosystem: MyQ is designed to be a component of a larger smart home. Its compatibility with various platforms means it can grow and adapt with your other smart devices, contributing to a truly integrated living space.
- Enhanced Property Value: Homes equipped with modern smart technology features, including smart garage openers, are often more attractive to potential buyers, potentially increasing your property’s market value.
- Continuous Improvement: MyQ, like many smart “Gadgets,” benefits from regular firmware updates and app enhancements. This means your system can gain new features and improved performance over time without needing to replace hardware.
- Environmental Awareness: By receiving “door left open” alerts, you can prevent unnecessary heat or air conditioning loss, contributing to energy efficiency and a smaller carbon footprint.
Embracing MyQ means embracing innovation. It’s about moving beyond traditional functionality and integrating your garage into the intelligent, connected future of your home.
Conclusion: Step Into the Future of Garage Management
Installing a MyQ garage door opener is a straightforward yet impactful upgrade that brings a host of benefits to any modern home. From the initial compatibility checks and physical installation to the digital configuration and personalization of alerts, each step is designed to integrate this smart “Tech” seamlessly into your life.
By following this comprehensive guide, you’ve not only learned “how to install myq garage door opener” but also unlocked a new level of “Digital Security,” enhanced “Productivity,” and unparalleled convenience for your garage. With real-time monitoring, remote control, and integration with your broader smart home ecosystem, MyQ transforms a simple utility into an intelligent guardian and a valuable asset.
Embrace the future of home management. Enjoy the peace of mind that comes with knowing your garage is always secure, accessible, and perfectly integrated into your smart world. Welcome to the era of the smart garage.
aViewFromTheCave is a participant in the Amazon Services LLC Associates Program, an affiliate advertising program designed to provide a means for sites to earn advertising fees by advertising and linking to Amazon.com. Amazon, the Amazon logo, AmazonSupply, and the AmazonSupply logo are trademarks of Amazon.com, Inc. or its affiliates. As an Amazon Associate we earn affiliate commissions from qualifying purchases.