In the ever-evolving landscape of Android technology, users are constantly seeking ways to personalize their devices beyond factory defaults. While Android offers a commendable level of customization out of the box, true power users often hit a ceiling. This is where Magisk comes into play, a revolutionary tool that has redefined the concept of Android rooting. Far from the traditional, intrusive methods of the past, Magisk provides a “systemless” approach, allowing for deep modifications without altering the core system partition. This guide, tailored for the tech-savvy individual, will walk you through the intricacies of installing Magisk, unlocking a world of possibilities for your Android device, from performance tweaks to enhanced digital security features and unparalleled productivity tools.
Understanding Magisk and Its Transformative Benefits
Before diving into the installation process, it’s crucial to grasp what Magisk is and why it has become the go-to solution for millions of Android enthusiasts globally. Its ingenuity lies in its ability to modify the system without touching the /system partition, a feature that addresses many of the limitations and drawbacks associated with older rooting methods.
What is Magisk? A Systemless Revolution
At its core, Magisk is an open-source suite of tools designed to grant “root” access to your Android device in a systemless manner. What does “systemless” mean? In essence, Magisk makes all its modifications, whether it’s granting root permissions or applying modules, in the boot partition rather than directly altering the /system partition. This innovative approach offers several critical advantages:
- Preservation of System Integrity: The original system partition remains untouched. This means your device’s integrity check might still pass, and you can more easily receive Over-The-Air (OTA) updates, although full compatibility isn’t always guaranteed and often requires uninstallation or specific steps.
- Bypassing SafetyNet: Google’s SafetyNet Attestation API is a security measure designed to ensure a device hasn’t been tampered with. Traditional rooting methods often trip SafetyNet, preventing access to apps like Google Pay, Netflix, and various banking applications. Magisk, with features like Zygisk (formerly Magisk Hide), is specifically designed to bypass SafetyNet checks, allowing rooted users to continue using these critical applications.
- Module-Based Customization: Magisk’s true power lies in its module system. Users can install a vast array of modules that offer functionalities ranging from aesthetic tweaks, performance enhancements, battery optimizations, ad-blockers, to even camera modifications. These modules are installed systemlessly, making them easy to manage, enable, or disable without risking a system breakdown.
In an era where digital security and productivity are paramount, Magisk offers a unique blend of control and convenience. It empowers users to take ownership of their devices, tailoring them precisely to their needs without sacrificing access to essential, security-conscious applications.
Why Root Your Android with Magisk? Unlocking Potential
The decision to root your Android device with Magisk is often driven by a desire for enhanced control, customization, and functionality. For many, it’s about transforming a general-purpose gadget into a personalized powerhouse.
- Unrestricted Customization: Beyond launchers and icon packs, Magisk allows for deep UI modifications, font changes, custom boot animations, and system-wide themes. You can truly make your Android device feel unique.
- Bloatware Removal: Manufacturers and carriers often pre-install apps that consume storage, RAM, and battery life without offering significant value. With root access, you can uninstall or freeze these “bloatware” applications, freeing up resources and improving performance.
- Advanced App Functionality: Many powerful Android applications require root access to unleash their full potential. Task automation tools, advanced firewall apps, complete backup solutions, and network analysis utilities are just a few examples that benefit immensely from Magisk.
- Ad-Blocking: System-wide ad-blocking is a popular reason for rooting. Magisk modules can effectively block ads across all apps and browsers, leading to a cleaner, faster browsing experience and reduced data consumption.
- Performance and Battery Optimizations: While modern Android devices are powerful, rooting allows for finer control over CPU governors, kernel settings, and memory management. Users can optimize their devices for either maximum performance or extended battery life, depending on their priorities.
- Digital Security Enhancements: Paradoxically, while rooting sometimes reduces out-of-the-box security guarantees, it also opens doors to advanced digital security tools. Root-level firewalls, privacy managers, and tools to monitor system processes can give you granular control over your device’s data flow and permissions, enhancing your overall digital security posture.
For those interested in software development, tech reviews, or simply maximizing their gadgets’ potential, Magisk provides an invaluable platform for exploration and optimization, aligning perfectly with the ethos of technology trends and productivity.
Essential Prerequisites Before You Begin
The journey to installing Magisk and rooting your Android device requires careful preparation. Skipping any of these crucial steps can lead to frustrating issues, including bootloops or even bricking your device. It’s imperative to understand and complete each prerequisite thoroughly.
Unlocking Your Bootloader: The Gateway to Customization
The very first and most critical step in modifying your Android device beyond basic settings is unlocking its bootloader. The bootloader is a piece of software that loads the operating system when you power on your device. Manufacturers typically lock it to ensure users only run authorized software.
- Why it’s necessary: Unlocking the bootloader allows you to flash custom images, including custom recoveries and ultimately, a Magisk-patched boot image. Without an unlocked bootloader, you cannot modify the device at this fundamental level.
- Implications:
- Data Wipe: Unlocking the bootloader almost always performs a factory reset, wiping all data on your device. Back up everything important before proceeding.
- Warranty Void: Most manufacturers consider unlocking the bootloader a violation of warranty terms.
- Security Risk: While providing flexibility, an unlocked bootloader can theoretically make your device more vulnerable if it falls into malicious hands, as system partitions can be more easily tampered with.
The process for unlocking the bootloader varies by manufacturer (e.g., Google Pixel devices use fastboot flashing unlock, OnePlus has a similar process, while Samsung devices often require flashing a custom odin file). Always research the specific steps for your device model.
Installing a Custom Recovery (e.g., TWRP) or Understanding Alternatives
A custom recovery environment, such as Team Win Recovery Project (TWRP), is an indispensable tool for advanced Android customization. It replaces the stock recovery and offers a graphical interface to flash custom ROMs, kernels, Magisk ZIPs, create full backups, and perform system wipes.
- Role in Magisk Installation: While the primary Magisk installation method often involves patching and flashing the boot image via
fastboot(which doesn’t strictly require TWRP), a custom recovery makes subsequent flashing of Magisk updates, modules, or uninstallation much simpler. It’s also crucial for making Nandroid backups (full system backups). - If TWRP isn’t available/preferred: For many newer devices, TWRP might not be readily available, or users might prefer a more minimalist approach. In such cases, the “patching the stock boot image” method (detailed below) directly uses
fastbootto flash the modified boot image, bypassing the need for a custom recovery entirely during the initial Magisk install. However, having a custom recovery is highly recommended for safety and ease of future modifications.
Obtaining Your Device’s Stock Boot Image
This step is absolutely critical, especially if you plan to use the recommended “patching the stock boot image” method.
- What it is: The
boot.imgfile is part of your device’s firmware and contains the kernel and ramdisk necessary to boot your Android operating system. Magisk modifies this specific image to achieve its systemless root. - Why it’s important: You must obtain the
boot.imgthat precisely matches your device’s current firmware version and build number. Using an incorrectboot.imgcan lead to a bootloop, forcing you to re-flash your entire stock firmware. - How to get it:
- Extract from your device’s full firmware package: This is the most reliable method. Download the exact firmware package for your device model and build number from your manufacturer’s support site or reputable third-party firmware archives.
- Ask in device-specific forums: XDA Developers forums are an excellent resource for finding device-specific files and guidance.
- Advanced users (less common): You might be able to extract it directly from your device if you already have root or a custom recovery, but this is often more complex.
Backing Up Your Data: A Non-Negotiable Step
We’ve mentioned it before, but it bears repeating: back up all your important data before attempting any modifications to your device.
- What to back up: Photos, videos, documents, contacts, messages, app data, and anything else you deem valuable.
- How to back up:
- Cloud services (Google Drive, Dropbox, etc.)
- Local storage (PC, external hard drive)
- Samsung Smart Switch, Google Backup, or other manufacturer-specific tools.
- If using TWRP, create a Nandroid backup of your system partition.
Remember, technology trends emphasize data security and recovery. Taking proactive measures here will save you immense grief if anything goes wrong during the installation process.
Step-by-Step Magisk Installation Methods
With all prerequisites met and your device prepared, it’s time to install Magisk. There are two primary methods, each suited for slightly different scenarios. The “patching the stock boot image” method is generally recommended for most users and is often the only option for devices without a custom recovery or those that are newly purchased.
Method 1: Patching the Stock Boot Image (Recommended for Most Users)
This method involves using the Magisk Manager app to modify your device’s original boot image, then flashing this patched image using fastboot. This is the most robust and commonly used method, especially for initial installations.
Requirements:
- Unlocked bootloader.
- Your device’s exact stock
boot.imgfile. - A computer with Android SDK Platform-Tools (ADB & Fastboot) installed and configured.
- USB debugging enabled on your device.
- Magisk app (APK) downloaded on your device.
Steps:
- Download the Magisk App: On your Android device, download the latest Magisk APK from the official Magisk GitHub repository. Install the APK. You might need to allow installation from unknown sources.
- Transfer
boot.imgto Your Device: Copy the stockboot.imgfile (that matches your device’s current firmware) from your computer to your device’s internal storage, ideally in an easily accessible folder like “Downloads.” - Patch the
boot.imgwith Magisk:- Open the Magisk app on your device.
- If Magisk isn’t installed, you’ll see a “Install” button next to “Magisk.” Tap it.
- Select “Select and Patch a File.”
- Navigate to where you saved your stock
boot.imgfile and select it. - Magisk will begin patching the image. This process is usually quick. Once complete, a new file named
magisk_patched-xxxx.img(or similar) will be saved in the same directory as your originalboot.img(usually/Download/magisk_patched-xxxx.img).
- Transfer Patched
boot.imgto Your Computer: Connect your device to your computer via USB. Copy themagisk_patched-xxxx.imgfile from your device back to your computer. Place it in the same folder where you have your ADB & Fastboot tools. For convenience, you can rename it topatched_boot.img. - Reboot Device to Fastboot Mode:
- Open a command prompt or terminal on your computer in the directory where your
patched_boot.imgandfastbootexecutable are located. - Reboot your Android device into fastboot mode. This typically involves powering off the device, then holding a specific button combination (e.g., Volume Down + Power) while powering it on. The exact combination varies by manufacturer. Alternatively, you can use the ADB command:
adb reboot bootloader. - Verify your device is recognized by running
fastboot devices. You should see your device’s serial number.
- Open a command prompt or terminal on your computer in the directory where your
- Flash the Patched
boot.img:- In the command prompt/terminal, execute the following command:
bash

fastboot flash boot patched_boot.img
(Replacepatched_boot.imgwith the actual name of your patched file). - You should see messages indicating success.
- In the command prompt/terminal, execute the following command:
- Reboot Your Device: Once the flashing is complete, reboot your device using the command:
bash

    fastboot reboot
Your device should now boot up with Magisk installed. The first boot after flashing can sometimes take a little longer than usual.
Method 2: Direct Install via Custom Recovery (for Existing Custom ROMs or Custom Recoveries)
This method is simpler if you already have a custom recovery like TWRP installed. It directly flashes the Magisk ZIP file.
Requirements:
- Unlocked bootloader.
- Custom recovery (e.g., TWRP) installed.
- Magisk ZIP file downloaded on your device.
Steps:
- Download Magisk ZIP: On your Android device, download the latest Magisk ZIP file from the official Magisk GitHub repository. Place it in an easily accessible location on your internal storage or an SD card.
- Reboot to Custom Recovery: Power off your device and then boot into your custom recovery (e.g., TWRP). This usually involves holding a specific button combination (e.g., Volume Up + Power or Volume Down + Power) while powering on.
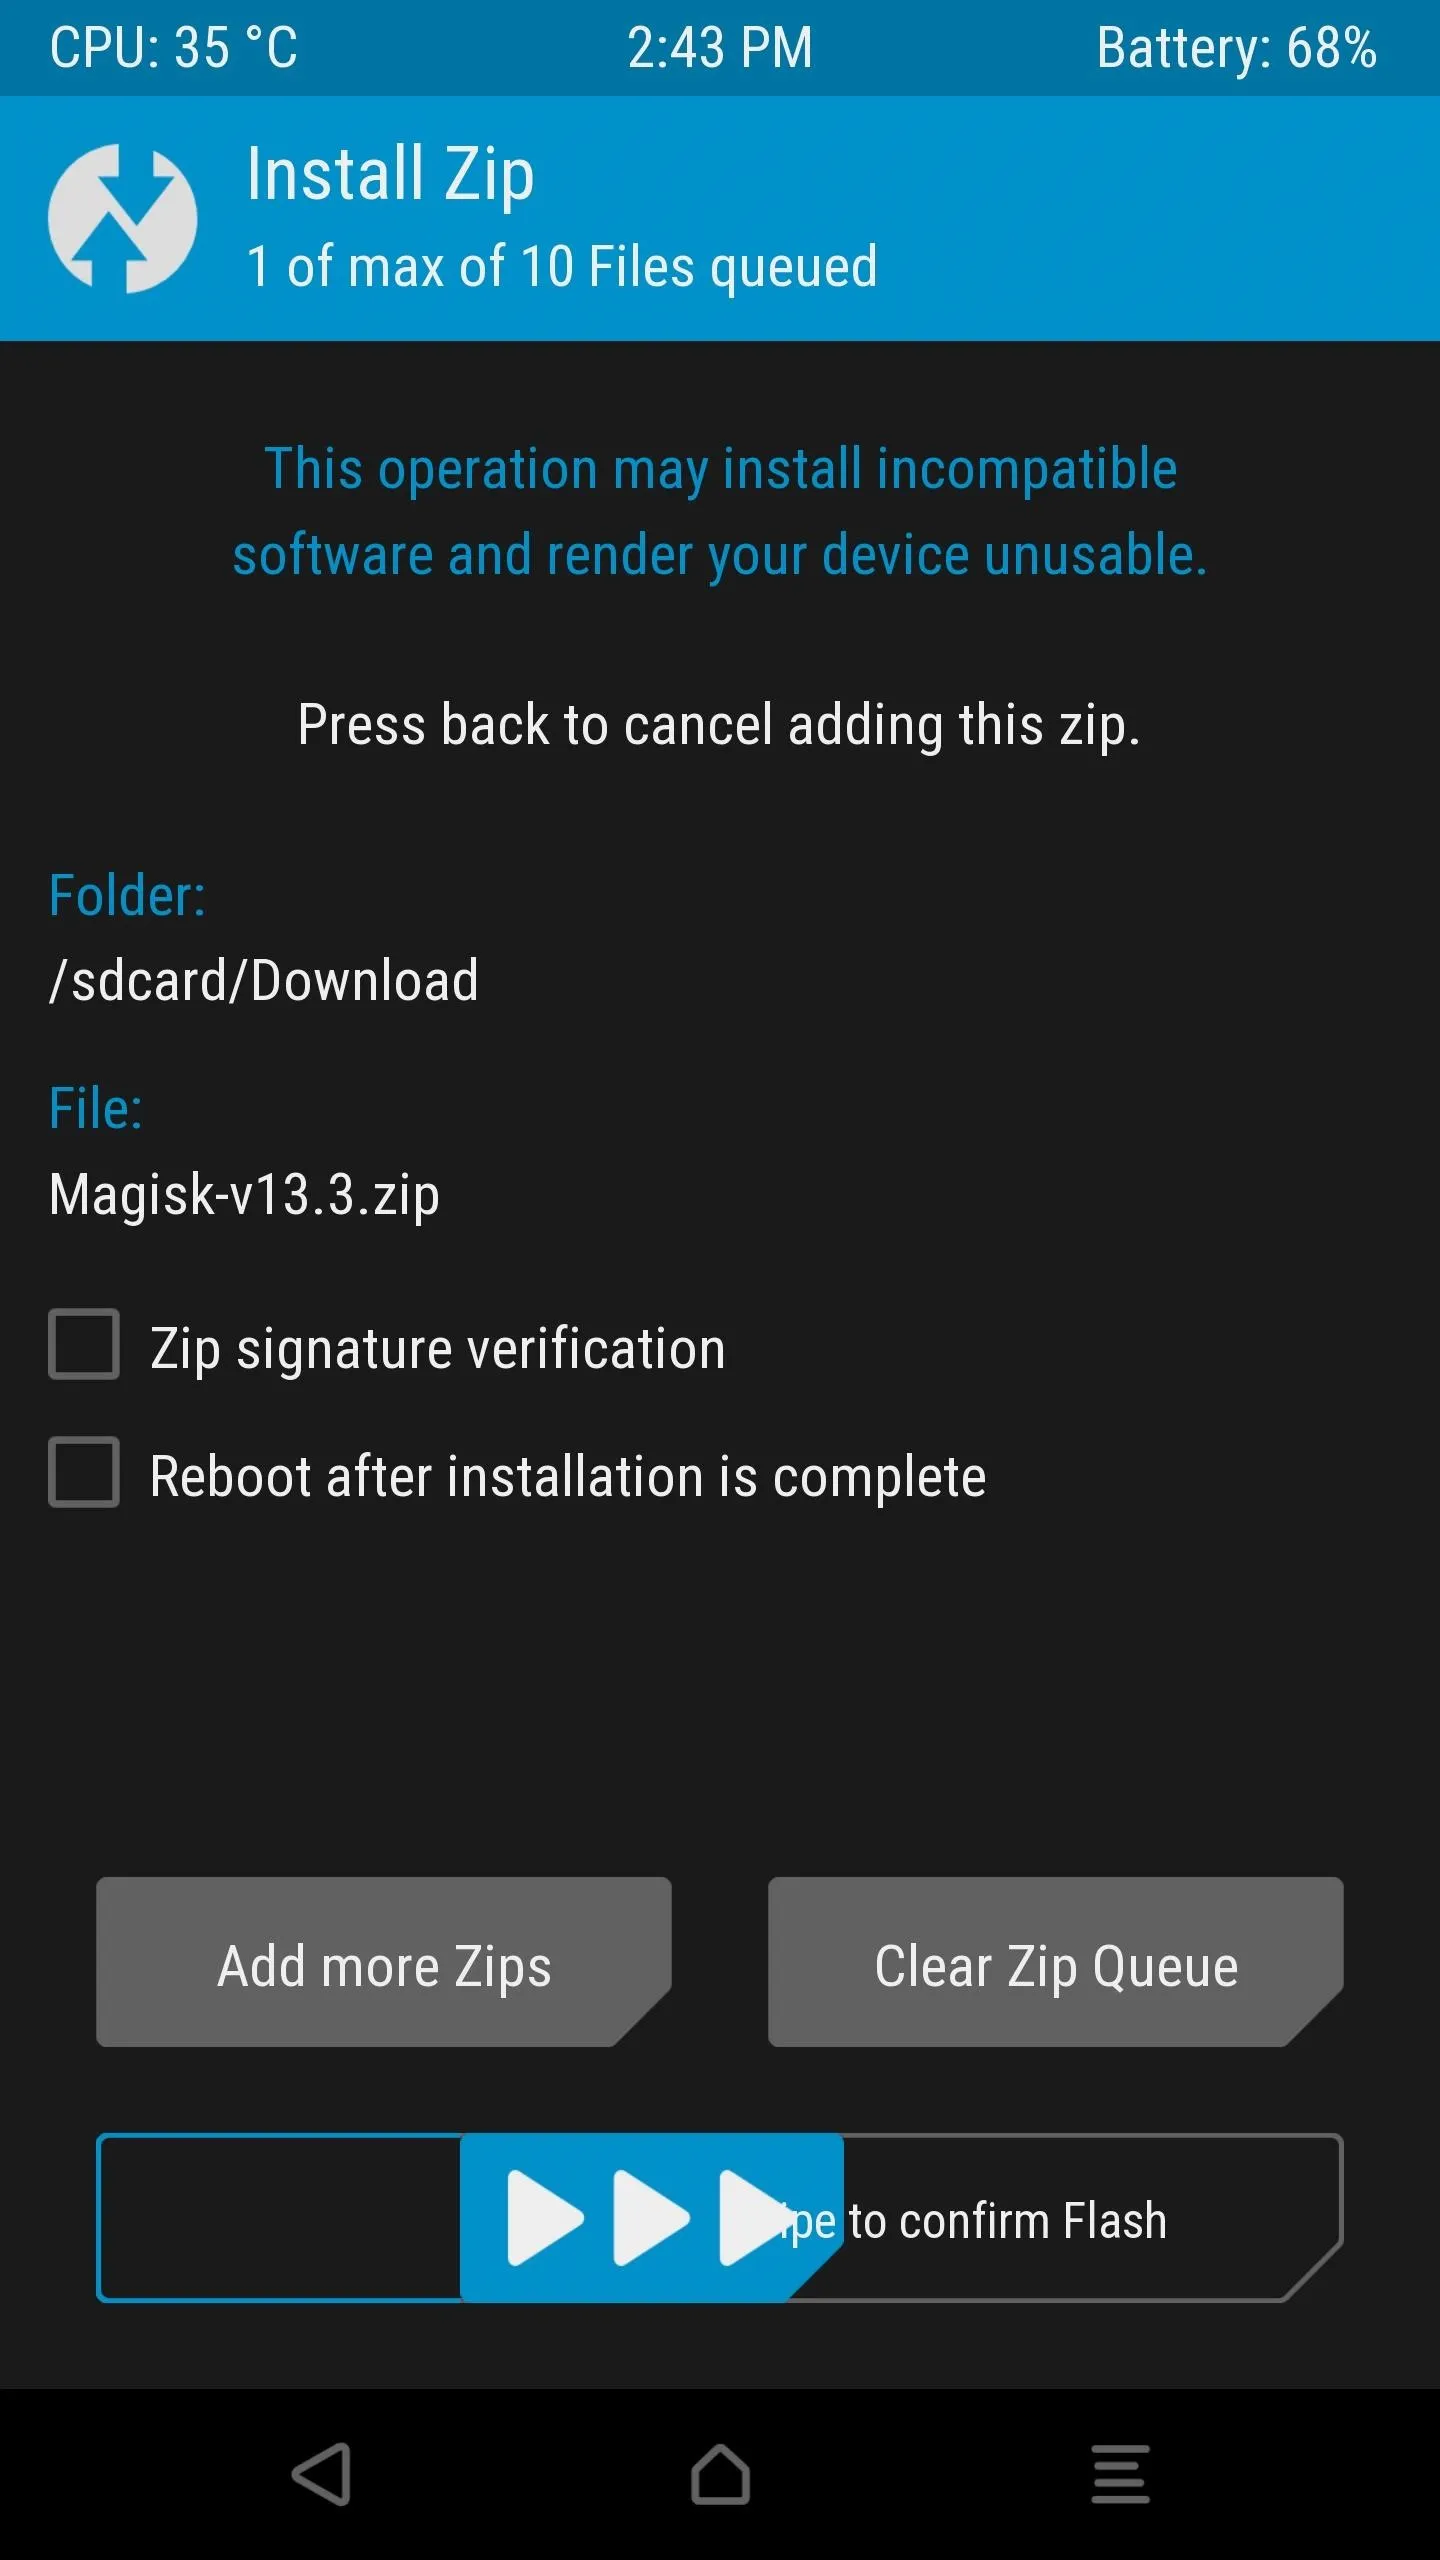
- Flash the Magisk ZIP:
- In TWRP, tap “Install.”
- Navigate to the location where you saved the Magisk ZIP file.
- Select the
Magisk-vXX.X.zipfile. - Swipe to confirm Flash.
- TWRP will flash Magisk to your device.
- Wipe Dalvik/Cache (Optional but Recommended): After flashing, it’s often a good practice to wipe Dalvik/ART Cache. In TWRP, tap “Wipe” -> “Advanced Wipe” -> select “Dalvik / ART Cache” and “Cache” -> Swipe to Wipe.
- Reboot System: Tap “Reboot System” to boot back into Android.
Initial Setup and Verification
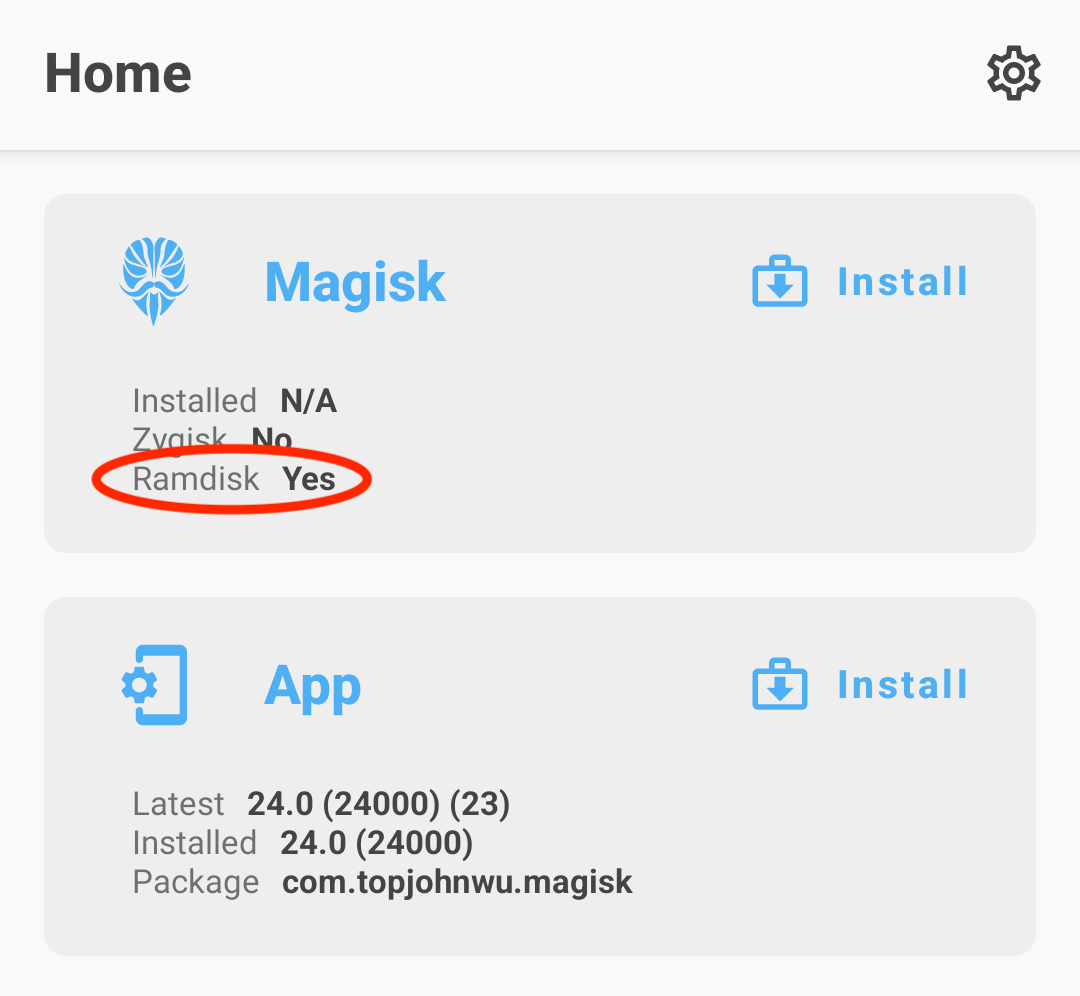
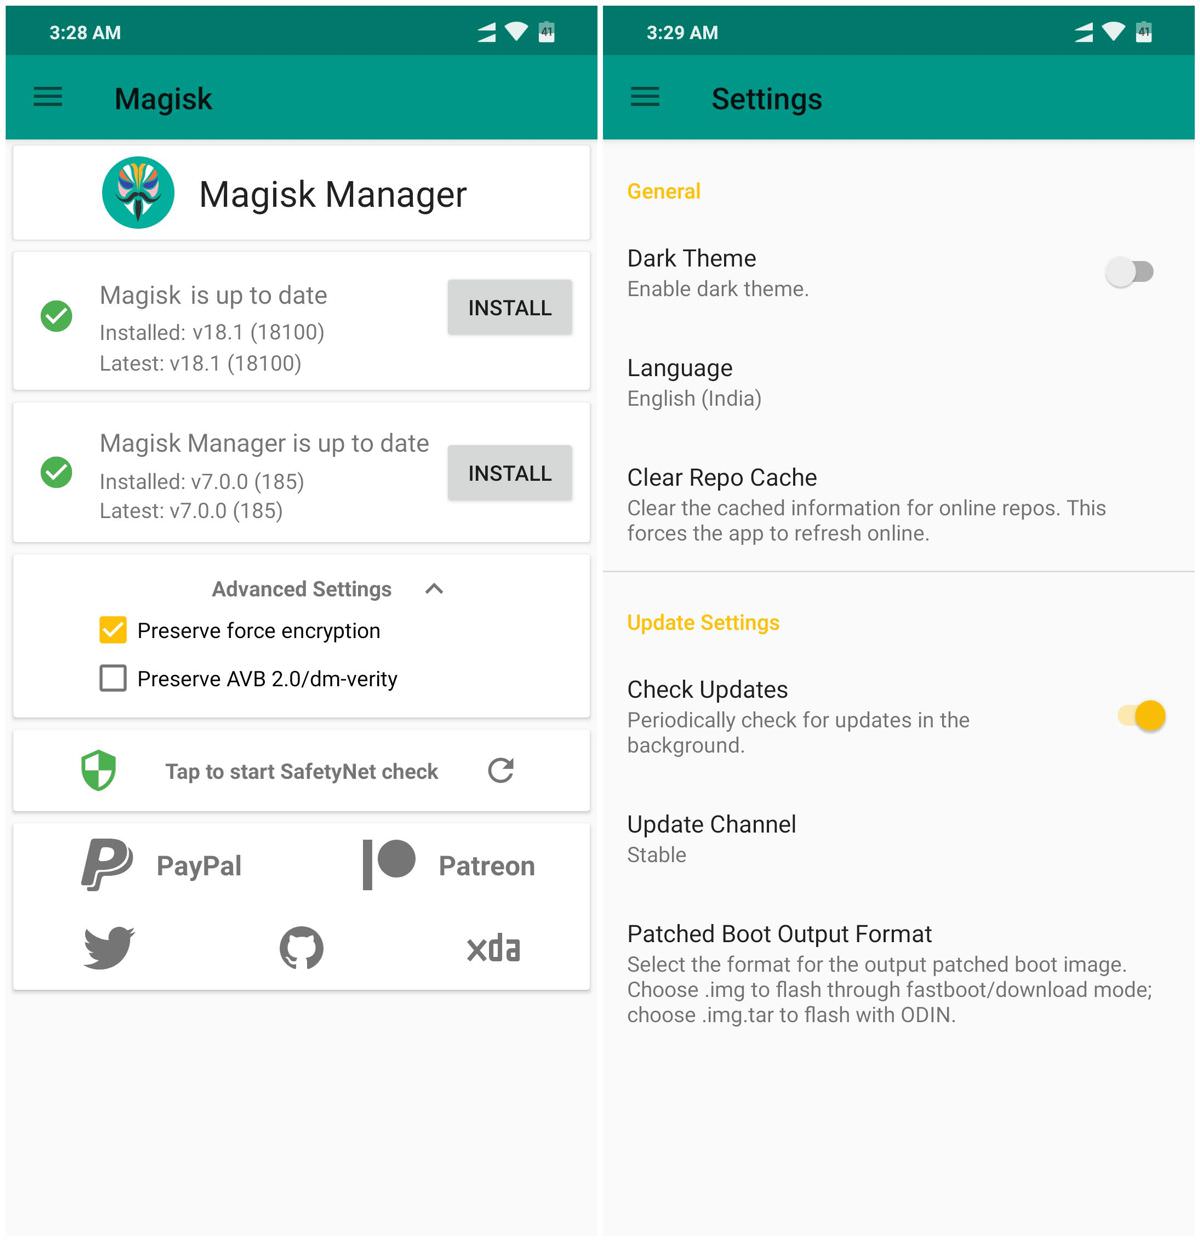
After either installation method, open the Magisk app on your device. It should now show “Magisk is installed” with a version number. If it prompts for additional setup or a reboot, follow the instructions. This confirms that Magisk is successfully integrated into your system.
Post-Installation: Unleashing Magisk’s Potential
With Magisk successfully installed, your Android device is no longer just a gadget; it’s a powerful tool ready for unparalleled customization and optimization. The journey doesn’t end with installation; it truly begins with leveraging Magisk’s capabilities.
Verifying Root Access: Confirming Your Power
While the Magisk app itself indicates successful installation, it’s good practice to verify root access with a dedicated application.
- Using a Root Checker App: Download a “Root Checker” app from the Google Play Store (e.g., “Root Checker Basic” by joeykrim). Open the app and tap “Verify Root.” It should confirm that root access is properly installed and working. You might be prompted to grant superuser access by Magisk; always grant it for legitimate requests.
Installing Magisk Modules: Tailoring Your Experience
The Magisk module system is where much of the power and flexibility lies. Modules are small packages that add features, modify system behavior, or apply specific tweaks, all systemlessly.
- Finding Modules:
- Within the Magisk App: The “Modules” section in the Magisk app offers a repository of official and community-approved modules. Browse, search, and install directly from here.
- XDA Developers Forum: This is an invaluable resource for finding a vast array of unofficial but highly functional modules, often accompanied by detailed discussions and troubleshooting tips.
- Installing Modules:
- Via Magisk App: In the “Modules” section, tap “Install from Storage” to flash a downloaded
.zipmodule, or browse the online repository and tap “Install” for a module you found there. - Via Custom Recovery (TWRP): If a module causes issues and prevents your device from booting, you can boot into TWRP, go to “Install,” and flash the module’s
.zipfile. Most modules are designed to be flashable through both methods.
- Via Magisk App: In the “Modules” section, tap “Install from Storage” to flash a downloaded
- Managing Modules: The Magisk app allows you to enable, disable, or uninstall modules easily. If a module causes instability, you can quickly disable it and reboot to rectify the issue. This systemless approach makes experimentation much safer.
- Popular Module Examples:
- AdAway: System-wide ad-blocking.
- Dolby Atmos/Viper4Android: Enhanced audio processing.
- Font Changers: Apply custom fonts system-wide.
- Camera Mods: Unlock advanced features in your device’s camera app.
- Performance Tweaks: Modules designed to optimize CPU, GPU, or RAM usage.
Passing SafetyNet Attestation: Maintaining App Compatibility
One of Magisk’s most significant advantages is its ability to help rooted devices pass Google’s SafetyNet Attestation, allowing access to banking apps, Google Pay, Netflix, and other services that block rooted devices.
- Zygisk: Magisk v24.0 and newer introduced Zygisk, a re-architected systemless interface that replaced the older Magisk Hide. Zygisk runs code in the Zygote process, allowing it to hide root from specific apps more effectively.
- Configuring DenyList:
- Open the Magisk app.
- Go to “Settings” and enable “Zygisk.”
- Tap “Configure DenyList.”
- Select all the apps you want to hide root from (e.g., banking apps, Google Play Services, Google Pay, Netflix). Ensure that all components of Google Play Services and your sensitive apps are checked.
- Reboot your device.
- Checking SafetyNet Status: Within the Magisk app, tap the “Check SafetyNet” button. You should ideally see both “basicIntegrity” and “ctsProfile” as
true. If they fail, recheck your DenyList configuration, ensure Zygisk is enabled, and try rebooting. Sometimes, an extra module specifically designed to help pass SafetyNet might be required, especially for some heavily secured banking apps.
Successfully passing SafetyNet ensures that your device remains fully functional in the ecosystem of apps that demand high security, marrying the freedom of rooting with the convenience of modern digital services.
Troubleshooting Common Issues and Uninstalling Magisk
Even with careful preparation, issues can arise during or after the Magisk installation. Knowing how to troubleshoot and, if necessary, revert changes is crucial for any tech enthusiast.
Common Installation Problems
- Bootloops: The most common and dreaded issue. If your device gets stuck on the boot animation after flashing Magisk, it often means the
boot.imgwas incorrect or corrupted, or a module is causing conflicts.- Solution: Reboot to fastboot mode (or TWRP if installed) and re-flash your original, unpatched stock
boot.img. If you have a Nandroid backup, restore it.
- Solution: Reboot to fastboot mode (or TWRP if installed) and re-flash your original, unpatched stock
- “Magisk not installed” or “Magisk Manager not found”: After rebooting, the Magisk app might not show Magisk as installed or might prompt for installation.
- Solution: Ensure you’re running the latest Magisk app. Sometimes, simply reinstalling the Magisk APK and letting it perform additional setup (which might require another reboot) resolves the issue. Verify the
fastboot flash bootcommand was successful.
- Solution: Ensure you’re running the latest Magisk app. Sometimes, simply reinstalling the Magisk APK and letting it perform additional setup (which might require another reboot) resolves the issue. Verify the
- SafetyNet failures: Even after configuring the DenyList, some apps or SafetyNet itself might still detect root.
- Solution: Double-check that Zygisk is enabled and all relevant apps (including Google Play Services components) are selected in the DenyList. Ensure no other modules are interfering. Sometimes, using an older version of Magisk might temporarily help, or a specific SafetyNet Fix module might be required (consult XDA for device-specific solutions).
- Device not recognized by Fastboot/ADB:
- Solution: Reinstall ADB/Fastboot drivers on your computer. Try a different USB port or cable. Ensure USB debugging is enabled on your device and you’ve authorized your computer.
How to Uninstall Magisk: Reverting to Stock
There might come a time when you need to uninstall Magisk, whether it’s for an OTA update, warranty purposes, or simply to revert to an unrooted state.
- Method 1: Using the Magisk App (Recommended for Clean Uninstall)
- Open the Magisk app.
- Tap the “Uninstall” button next to “Magisk.”
- Select “Complete Uninstall.”
- The app will perform the uninstall process and reboot your device. This method attempts to restore your original boot image automatically.
- Method 2: Flashing Original Stock Boot Image (If Magisk App is Inaccessible or Fails)
- Reboot your device to fastboot mode.
- Using the command prompt/terminal on your computer, flash your original, unpatched stock
boot.imgfile:
bash

fastboot flash boot stock_boot.img
(Replacestock_boot.imgwith the actual name of your original boot image). - Reboot your device:
fastboot reboot.
- Method 3: Flashing Magisk Uninstaller ZIP (Via Custom Recovery)
- Download the official Magisk Uninstaller ZIP file from the official Magisk GitHub repository.
- Transfer the ZIP file to your device.
- Reboot your device to custom recovery (e.g., TWRP).
- Tap “Install,” navigate to the uninstaller ZIP, and flash it.
- Wipe Dalvik/Cache (optional, but recommended).
- Reboot system.
Always have your original stock boot image readily available, as it serves as your primary safety net for recovering from boot-related issues. For serious problems, you may need to flash your device’s entire stock firmware package to fully restore it to factory settings.
Conclusion
Installing Magisk is a gateway to unlocking the true potential of your Android device, transforming it into a personalized powerhouse tailored to your exact needs. From deep aesthetic customizations to robust performance optimizations, advanced digital security tools, and productivity enhancements, Magisk empowers you with unparalleled control. Its systemless approach has revolutionized Android rooting, allowing enthusiasts to modify their devices without sacrificing essential functionalities like banking apps or OTA updates, thanks to features like Zygisk and the DenyList.
While the process requires careful attention to detail and adherence to specific steps, the rewards for the tech-savvy user are immense. Remember to always back up your data, understand the implications of unlocking your bootloader, and use the correct firmware files for your device. With this comprehensive guide, you are now equipped to confidently embark on your Magisk journey, pushing the boundaries of what your Android device can do and stepping further into the exciting world of advanced mobile technology. Embrace the power, customize responsibly, and enjoy the freedom Magisk brings to your digital life.
aViewFromTheCave is a participant in the Amazon Services LLC Associates Program, an affiliate advertising program designed to provide a means for sites to earn advertising fees by advertising and linking to Amazon.com. Amazon, the Amazon logo, AmazonSupply, and the AmazonSupply logo are trademarks of Amazon.com, Inc. or its affiliates. As an Amazon Associate we earn affiliate commissions from qualifying purchases.