Your MacBook Pro is more than just a laptop; it’s a vital tool for productivity, creativity, and connectivity. Over time, however, even the most robust machines experience wear and tear, and the battery is often the first component to show its age. A declining battery can lead to frustratingly short work sessions, performance throttling, and even unexpected shutdowns, severely impacting your workflow and overall user experience. While Apple offers professional battery replacement services, many users find the cost prohibitive or prefer the satisfaction and savings of a do-it-yourself repair.
This comprehensive guide will walk you through the process of replacing your MacBook Pro battery, empowering you to breathe new life into your cherished device. We’ll cover everything from the signs that indicate a failing battery and the essential tools you’ll need, to a detailed, step-by-step installation process, post-installation tips, and crucial safety precautions. By tackling this repair yourself, you not only save money but also gain a deeper understanding of your technology, extending the lifespan of your device and contributing to a more sustainable tech ecosystem.
Why Replace Your MacBook Pro Battery? Recognizing the Signs of Decline
Before diving into the replacement process, it’s crucial to understand why your battery might need replacing. Recognizing the symptoms of a failing battery can help you decide if it’s time for an upgrade and prevent potential issues from escalating. Ignoring a deteriorating battery can lead to more than just inconvenience; it can impact your MacBook Pro’s performance and even pose safety risks.
Identifying a Failing Battery: Performance and Physical Cues
The most obvious sign of a dying battery is a drastically reduced battery life. If your MacBook Pro used to last 8-10 hours on a charge but now barely makes it through 2-3, it’s a clear indicator. macOS provides helpful insights into your battery’s health:
- Cycle Count: Batteries have a finite number of charge cycles. You can check yours by holding
Optionand clicking the Apple menu () > System Information > Power. Look for “Cycle Count.” Most MacBook Pro batteries are designed for 1,000 cycles before significant degradation. - Condition Status: In System Settings (or System Preferences for older macOS versions) > Battery, you’ll see a “Battery Health” or “Condition” status. If it says “Service Recommended,” “Replace Soon,” or “Replace Now,” it’s time to act.
Beyond software indicators, look for noticeable performance degradation. When a battery ages, its ability to deliver stable power diminishes. This can cause the CPU to “throttle” its speed to compensate, leading to a slower, more sluggish machine, especially under heavy loads. Apps might launch slower, videos might stutter, and overall responsiveness will decrease. This isn’t just an inconvenience; it can severely hamper your productivity.
Perhaps the most alarming symptom is physical battery swelling. This occurs when gases build up inside the battery cells, causing them to expand. Swelling can manifest as a bulging bottom case, a trackpad that feels “stiff” or difficult to click, or even a keyboard that lifts in the middle. A swollen battery is a serious safety hazard; it can damage internal components, crack the case, and even pose a fire risk. If you notice any signs of swelling, immediate replacement is imperative.
The Financial and Environmental Impact of DIY Repair
Opting for a DIY battery replacement isn’t just about restoring your MacBook Pro’s performance; it’s a smart financial decision and an environmentally conscious choice. A professional battery replacement can range from $150 to $300 or more, depending on your model and service provider. By purchasing a quality replacement battery and the necessary tools yourself, you can often cut this cost by half or more, making it a compelling personal finance move.
From an environmental perspective, extending the life of your existing device through repair is far more sustainable than buying a new one. Manufacturing new electronics consumes vast resources and generates significant e-waste. By replacing a single component like the battery, you reduce your ecological footprint, contribute to the circular economy, and get more mileage out of your initial investment. It’s a win-win for your wallet and the planet.
Before You Begin: Essential Preparations and Safety Protocols
Embarking on any electronic repair requires careful preparation and adherence to safety guidelines. A MacBook Pro battery replacement is a delicate procedure that, if rushed or performed improperly, can lead to damage to your device or even personal injury. Taking the time to prepare thoroughly will significantly increase your chances of a successful and safe repair.
Gathering Your Arsenal: Tools and a Quality Replacement Battery
Before you unscrew anything, ensure you have all the necessary components and tools. Attempting to improvise can lead to stripped screws, damaged connectors, or ineffective adhesive removal.
- Replacement Battery: This is the most critical component. Do not compromise on quality for a cheaper price. Source your battery from a reputable supplier known for high-quality, safe, and compatible MacBook Pro batteries. Look for batteries that match your MacBook Pro model number exactly (e.g., A1xxx). A good quality battery will have safety certifications and positive reviews. Cheaper, generic batteries can have poor performance, shorter lifespans, and even pose safety risks.
- Pentalobe Screwdriver (P5/P6): MacBook Pro bottom cases are secured with pentalobe screws, which require a specific five-point star bit. The size varies by model (P5 for Retina, P6 for some older models).
- Torx Screwdriver (T5/T6): Internal screws, especially those securing the battery connector or other components, often use Torx bits.
- Plastic Opening Tools (Spudger): Essential for safely prying open cases, disconnecting delicate ribbon cables, and separating components without scratching or shorting anything. Never use metal tools for prying inside your MacBook Pro.
- Adhesive Remover (Isopropyl Alcohol 90%+): Many MacBook Pro batteries are glued in place. High-concentration isopropyl alcohol (IPA) is excellent for weakening adhesive without damaging electronics.
- Microfiber Cloth: For cleaning surfaces, especially after adhesive removal.
- Tweezers: Useful for handling tiny screws or connectors.
- Heat Gun or Hair Dryer (Optional but Recommended): Gentle heat can significantly soften battery adhesive, making removal much easier. Use with extreme caution and low heat settings.
- Magnetic Mat or Screw Organizer: To keep track of the numerous tiny screws. Misplacing or mixing up screws can lead to problems during reassembly.
- Anti-Static Wrist Strap: Critical for preventing electrostatic discharge (ESD) which can permanently damage sensitive electronic components. Connect it to a grounded metal object.
Pre-Installation Checklist: Maximizing Safety and Success
With your tools ready, take these vital preparatory steps:
- Back Up Your Data: This cannot be stressed enough. While a battery replacement is generally straightforward, accidents can happen. Always have a complete, current backup of your data (Time Machine, cloud service, external drive) before performing any internal repair.
- Discharge the Old Battery: Before opening your MacBook Pro, try to drain the old battery as much as possible, ideally below 25%. This significantly reduces the risk of thermal events or short circuits if the battery is accidentally punctured during removal.
- Power Off and Disconnect: Fully shut down your MacBook Pro (do not just close the lid). Disconnect the power adapter and any other peripherals (USB drives, external monitors).
- Work in a Clean, Well-Lit, and Static-Free Environment: A clean workspace prevents dust and debris from entering your MacBook Pro. Good lighting helps you see tiny components. Wear your anti-static wrist strap and work on an anti-static mat if possible. Avoid carpets or wool clothing, which can generate static electricity.
- Review Guides for Your Specific Model: MacBook Pro models vary significantly in design. While this guide provides general steps, always search for specific video tutorials or repair guides for your exact model number (e.g., MacBook Pro 13-inch, M1, 2020 or MacBook Pro 15-inch, Mid 2012) on sites like iFixit. This ensures you’re aware of any model-specific quirks, screw types, or adhesive patterns.
A Step-by-Step Guide to MacBook Pro Battery Replacement
This section provides a detailed walkthrough of the battery replacement process. Take your time with each step, exercise caution, and refer to your model-specific resources as needed.
Opening Your MacBook Pro: Accessing the Core
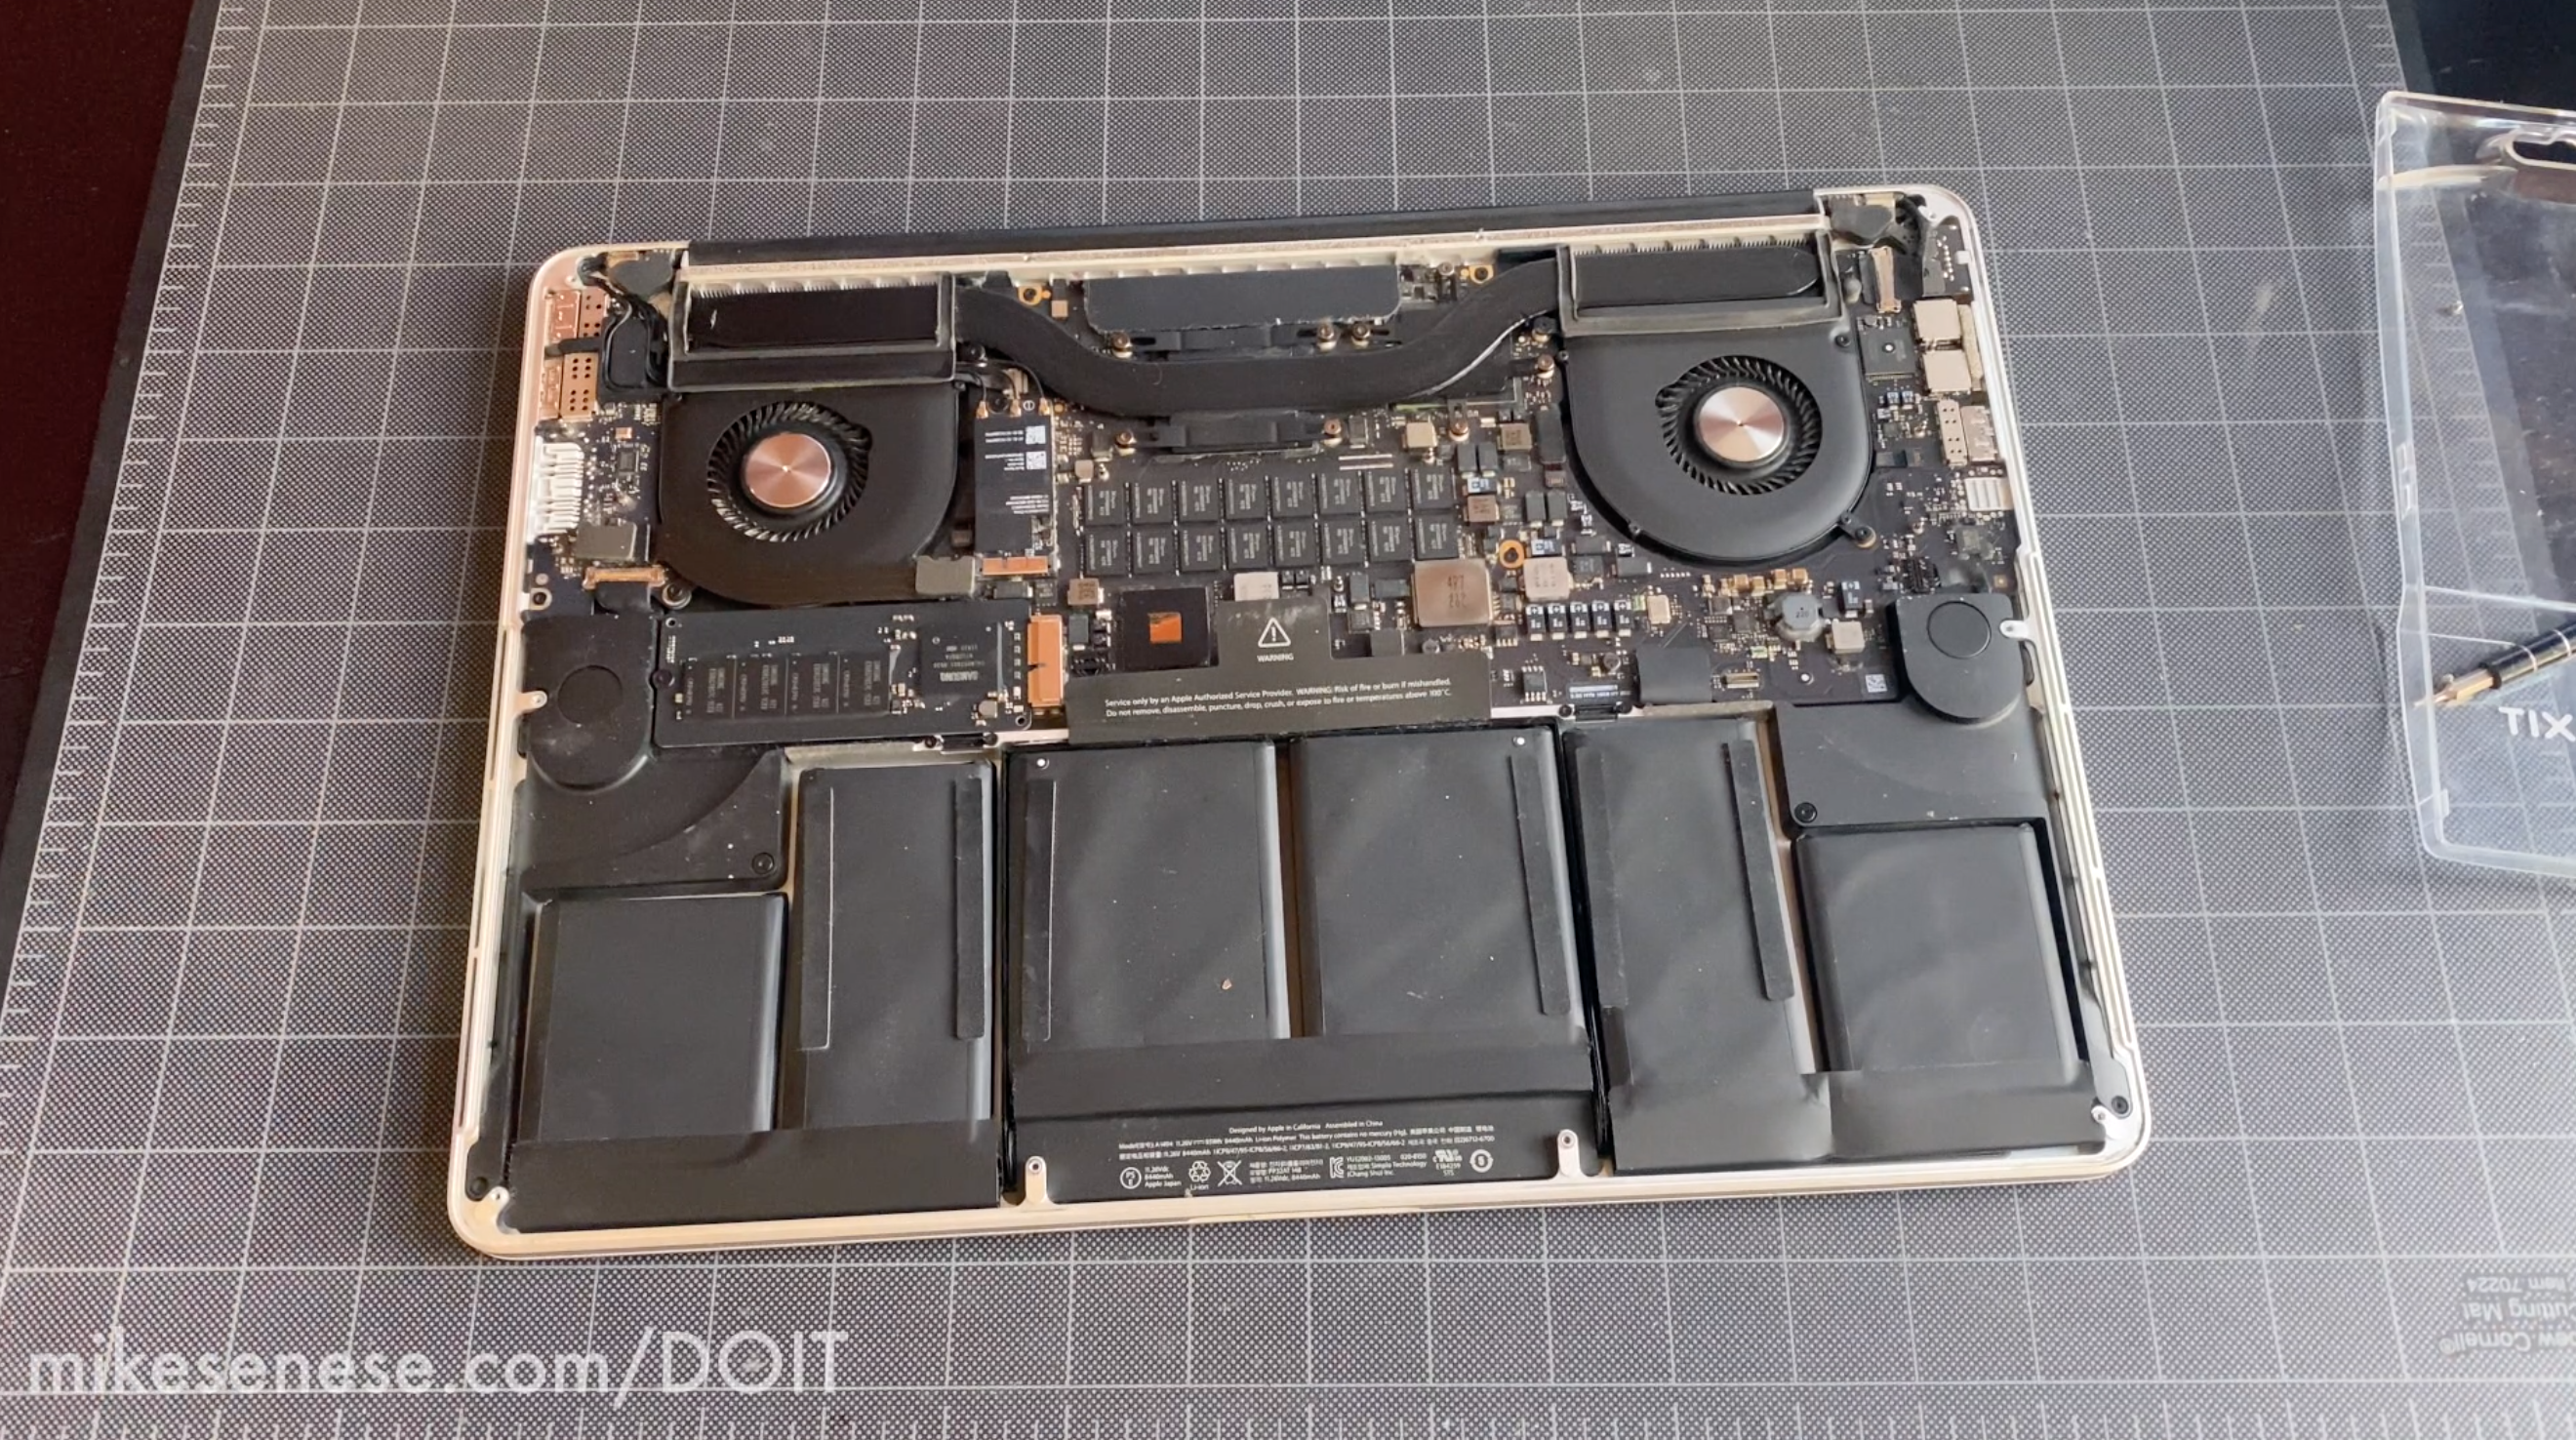
- Place Your MacBook Pro Face Down: Lay your MacBook Pro on a soft, clean surface (like a microfiber cloth) with the bottom case facing up.
- Remove the Bottom Case Screws: Using your Pentalobe screwdriver, carefully remove all screws securing the bottom case. Note that screw lengths can vary; some models have two longer screws near the hinge. Keep them organized on your magnetic mat to ensure they go back in their original positions.
- Gently Pry Open the Bottom Case: Once all screws are removed, use a plastic opening tool to carefully pry along the edges of the bottom case. There might be some clips or mild adhesive holding it in place. Apply gentle, even pressure until the case detaches. Set it aside safely.
Disconnecting the Lifeline: The Old Battery
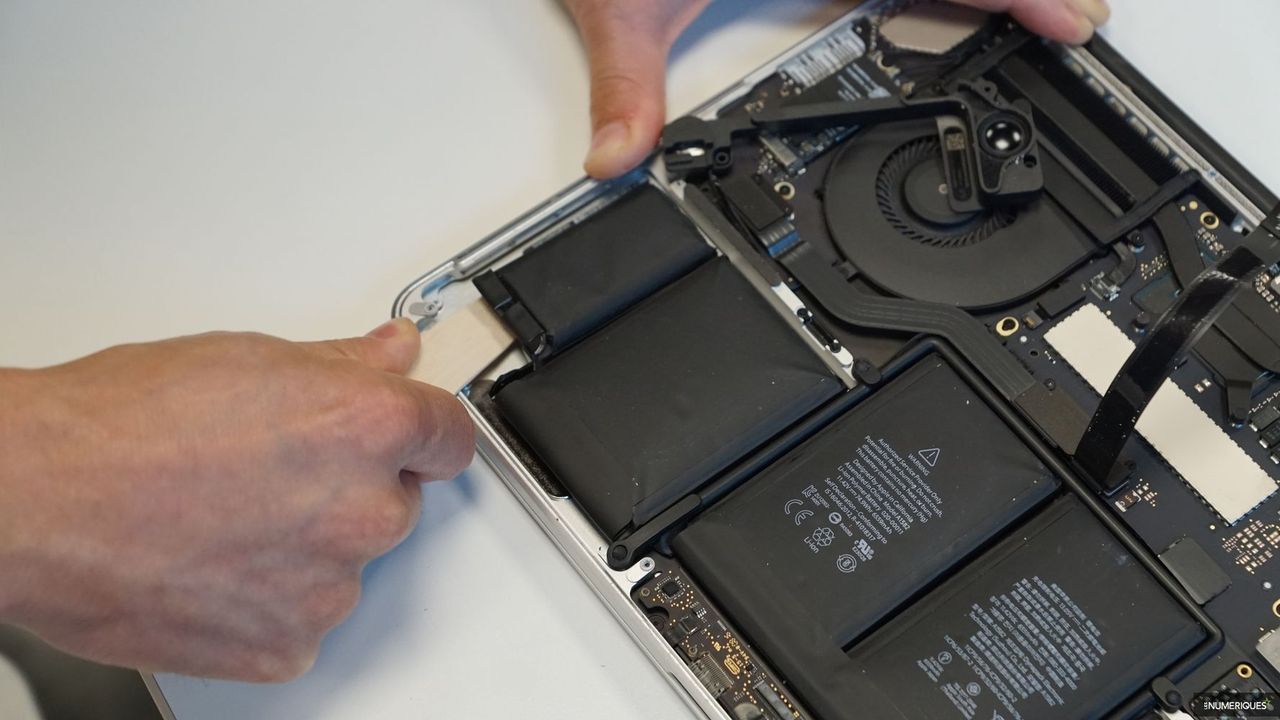
- Locate the Battery Connector: The battery connector is typically a rectangular plug connecting the battery to the logic board. Its exact location varies by model (it might be covered by a small bracket).
- Disconnect the Battery: This is a crucial step to prevent accidental short circuits.
- For “pull-tab” connectors: Some models have a tab you can gently pull to lift the connector straight up from its socket.
- For “flip-up” connectors: Use a plastic spudger to carefully flip up the retaining flap or disconnect the connector by prying it straight up from the sides.
- For screw-secured connectors: Some older models have a small bracket secured by a Torx screw (T5) that you’ll need to remove first, then disconnect the connector.
- Crucially: Never pull on the wires. Always manipulate the connector body itself.
The Adhesive Challenge: Removing the Old Battery
This is often the most challenging part of the process, as Apple uses strong adhesive to secure the battery cells.
- Identify Adhesive Locations: Observe how the battery cells are arranged and where they are glued to the chassis.
- Apply Heat (Optional but Recommended): If you’re using a heat gun or hairdryer, apply gentle, even heat to the bottom of the MacBook Pro (the external case directly beneath the battery cells) for about 30-60 seconds. This helps soften the adhesive from underneath. Be extremely cautious not to overheat the battery or other components.
- Apply Isopropyl Alcohol: Using a dropper or small syringe, carefully apply a few drops of high-concentration isopropyl alcohol (90% or higher) underneath the edges of the battery cells where they meet the chassis. Let it sit for a minute or two to penetrate and weaken the adhesive. Repeat as necessary.
- Pry Gently and Methodically: Using a plastic spudger (or a specialized battery adhesive removal tool if you have one), begin to gently pry the battery cells away from the chassis. Work slowly and methodically. Never pry directly on a battery cell itself, especially not with sharp metal tools, as puncturing a battery can cause it to vent smoke, catch fire, or even explode. Focus on prying between the battery and the aluminum chassis.
- Remove All Cells: Continue applying IPA and prying until all individual battery cells are detached. Some models have adhesive strips that can be slowly pulled out (like Command Strips); if so, use that method. Be patient, as this can take time.
- Safely Dispose of the Old Battery: Once removed, place the old battery in a non-conductive bag and take it to an electronics recycling center. Do not throw it in regular trash.
Preparation for the New Powerhouse: Cleaning and Inspection
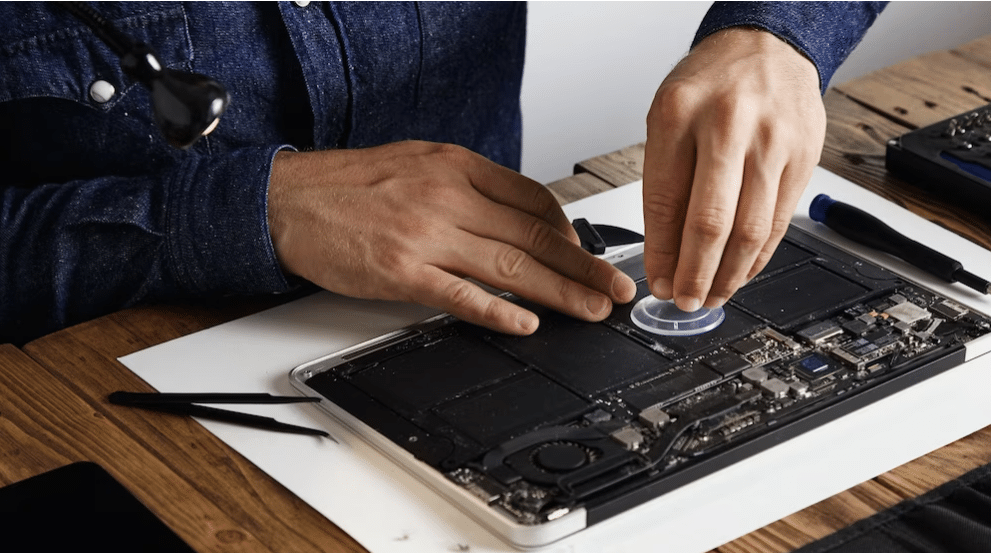
- Clean the Battery Cavity: Once the old battery is out, thoroughly clean the area where it sat. Use isopropyl alcohol and a microfiber cloth to remove any leftover adhesive residue, dust, or debris. A clean surface ensures the new battery sits flush and secures properly.
- Inspect for Damage: Briefly inspect the logic board and surrounding components for any accidental damage during the removal process. Ensure all connectors are intact.
Seating the New Battery: Precision and Care
- Test Fit (Optional): Before removing the protective film from the new battery’s adhesive, gently place it into the cavity to ensure it fits correctly.
- Apply New Adhesive (If Not Pre-Applied): If your new battery doesn’t come with pre-applied adhesive, you might need to apply double-sided adhesive strips (e.g., 3M VHB tape) to the underside of the battery cells. Follow the new battery’s instructions.
- Position and Secure: Carefully remove the protective film from the adhesive (if applicable) and align the new battery in its designated spot. Press down firmly and evenly on each cell to ensure good contact with the chassis adhesive.
Reconnecting and Securing: The Final Touches Inside
- Reconnect the Battery Connector: Carefully align the new battery’s connector with the socket on the logic board. Apply gentle, even pressure until it clicks into place. If there was a retaining flap or bracket, re-secure it. Double-check that the connection is firm.
- Verify All Internal Connections: Briefly scan the interior of your MacBook Pro to ensure no other cables or components were accidentally dislodged.
Closing Up Shop: Reassembling Your MacBook Pro
- Replace the Bottom Case: Carefully position the bottom case back onto your MacBook Pro, ensuring all clips and tabs align. Gently press down around the edges until it sits flush.
- Re-insert Screws: Using your Pentalobe screwdriver, re-insert all the bottom case screws into their original holes. Remember to put any longer screws back in their correct positions. Do not overtighten the screws.
Post-Installation: First Boot, Calibration, and Optimization
Congratulations! You’ve successfully replaced your MacBook Pro battery. Now, it’s time for the final steps to ensure optimal performance and longevity for your new power source.
The Initial Power-Up and Calibration Process
- First Boot: Connect your MacBook Pro to its power adapter. Press the power button. It might take a moment to boot up, as the system needs to recognize the new hardware.
- Battery Calibration: Apple recommends a calibration cycle for new batteries to help the operating system accurately estimate battery life and percentage.
- Charge your MacBook Pro to 100% and keep it plugged in for at least two more hours.
- Unplug the power adapter and use your MacBook Pro normally until the battery completely drains and the computer shuts down.
- Let the MacBook Pro rest in the drained state for several hours (e.g., overnight).
- Plug it back in and charge it uninterrupted to 100%.
This process helps the battery management system learn the new battery’s full capacity.
Tips for Extending the Life of Your New Battery
To maximize the lifespan and performance of your newly installed battery, consider these best practices:
- Avoid Extreme Temperatures: High heat is a battery’s worst enemy. Don’t leave your MacBook Pro in direct sunlight, a hot car, or on soft surfaces that block vents. Similarly, extreme cold can also degrade battery health.
- Optimize Charging Habits: While modern batteries are smart, avoiding consistently draining to 0% and charging to 100% can be beneficial. Many experts suggest keeping the battery charge between 20% and 80% for daily use. macOS Big Sur and later include “Optimized Battery Charging,” which learns your charging habits and delays charging past 80% until closer to when you need it.
- Manage Power-Hungry Applications: Identify and close applications that consume a lot of power. You can check battery usage in Activity Monitor (under the “Energy” tab) or in the Battery section of System Settings.
- Adjust Screen Brightness: The display is a major power drain. Lowering screen brightness can significantly extend battery life.
- Keep macOS Updated: Apple frequently releases software updates that include power management improvements. Keep your operating system up to date to benefit from these optimizations.
Troubleshooting Common Issues and When to Seek Professional Help
While a DIY battery replacement is often successful, you might encounter minor hiccups. Knowing how to troubleshoot and when to call for professional assistance is crucial.
Addressing Minor Post-Installation Problems
- Battery Not Recognized/Showing 0%:
- Double-check Connection: The most common cause is a loose battery connector. Open your MacBook Pro again and ensure the battery connector is fully seated.
- SMC Reset: Resetting the System Management Controller (SMC) can often resolve battery and power-related issues. The process varies by model (e.g., for T2 chip models, shut down, hold power button for 10 seconds, then release and boot). Consult Apple’s support pages for your specific model’s SMC reset instructions.
- Rapid Draining: Ensure you performed the calibration cycle. Also, check Activity Monitor for any background processes consuming excessive power.
- MacBook Pro Doesn’t Turn On: Re-verify all internal connections, especially the battery and power button flex cable. If you have another power adapter, try it. If still no response, there might be a more serious issue (e.g., logic board damage), which usually requires professional diagnosis.
Knowing When to Call a Professional
There are situations where attempting further DIY troubleshooting is not advisable:
- Persistent Issues After Troubleshooting: If your MacBook Pro still exhibits severe battery or power issues after carefully following all troubleshooting steps, it’s best to consult a professional Apple Authorized Service Provider or a reputable independent repair shop.
- Physical Damage During Repair: If you accidentally damaged a ribbon cable, connector, or any other component during the installation, seeking professional repair is often the safest and most cost-effective option in the long run.
- Safety Concerns: If you notice any smoke, unusual smells, or further battery swelling (especially with the new battery), immediately power down the device, unplug it, and seek professional help. Do not attempt to fix it yourself if there are safety concerns.
Conclusion
Replacing your MacBook Pro battery is a rewarding and practical DIY project that can significantly extend the life and improve the performance of your device. By following this comprehensive guide, you’ve not only saved money and gained a deeper understanding of your technology but also contributed to a more sustainable approach to electronics consumption. The satisfaction of successfully completing this repair, coupled with the renewed power and speed of your MacBook Pro, makes it a truly worthwhile endeavor. Embrace the power of self-reliance, and enjoy your revitalized machine!
aViewFromTheCave is a participant in the Amazon Services LLC Associates Program, an affiliate advertising program designed to provide a means for sites to earn advertising fees by advertising and linking to Amazon.com. Amazon, the Amazon logo, AmazonSupply, and the AmazonSupply logo are trademarks of Amazon.com, Inc. or its affiliates. As an Amazon Associate we earn affiliate commissions from qualifying purchases.