In the dynamic world of technology, understanding how to perform fundamental system operations is a valuable skill for any Mac user. While most macOS updates and installations are straightforward through the App Store, there are critical scenarios where installing macOS from a bootable USB drive becomes not just convenient, but absolutely essential. This comprehensive guide will walk you through every step of the process, ensuring a smooth and successful macOS installation, whether you’re performing a clean install, troubleshooting an issue, or upgrading an older system.
This tutorial aligns perfectly with the “Tech” focus of our website, specifically under “Software,” “Tutorials,” and “Digital Security.” Mastering this skill not only enhances your technical proficiency but also empowers you to maintain and optimize your Apple devices effectively.

Why You Might Need to Install macOS from USB
Before diving into the technicalities, it’s worth understanding the primary reasons why creating and using a bootable macOS USB installer is a powerful tool in your digital arsenal. This method offers flexibility and control that standard App Store installations often don’t.
Clean Installation for Optimal Performance
Over time, any operating system can accumulate digital clutter, broken preferences, orphaned files, and remnants of uninstalled applications. This can lead to decreased performance, slower boot times, and general system instability. A clean installation, often referred to as a “fresh start,” involves completely erasing your Mac’s startup disk and installing a brand-new copy of macOS.
Using a bootable USB installer is the gold standard for a clean install. It ensures that no old system files or user data interfere with the fresh operating system, often resulting in a noticeably snappier and more responsive Mac. This is particularly beneficial for users who have upgraded their macOS multiple times without a clean slate, or for those experiencing persistent, unexplained performance issues. It’s akin to giving your Mac a complete factory reset, but with the specific macOS version of your choosing.
Troubleshooting and System Recovery
One of the most critical applications of a bootable macOS USB is for troubleshooting and system recovery. Imagine a scenario where your Mac refuses to boot, gets stuck in a boot loop, or your hard drive becomes corrupted. Standard macOS Recovery (accessed by holding Command + R at startup) might fail if the recovery partition itself is damaged or inaccessible.
In such dire circumstances, a bootable USB acts as an independent lifeline. It allows you to boot your Mac into a fully functional macOS environment, from which you can use Disk Utility to repair or erase your internal drive, restore from a Time Machine backup, or perform a fresh macOS installation. It’s an indispensable tool for diagnostics and repair, providing a crucial fallback when your internal system fails to cooperate.
Upgrading or Downgrading Your macOS Version
While the App Store is the primary channel for macOS upgrades, using a bootable USB offers more control, especially for older macOS versions or specific scenarios. For instance, if you want to upgrade multiple Macs to the same macOS version without downloading the installer repeatedly, a USB drive saves time and bandwidth. Similarly, if you’re working with a Mac that has limited or no internet access, the USB installer is the only viable option.
Furthermore, if you ever need to downgrade your macOS version (e.g., if a newer version causes compatibility issues with critical software or hardware), a bootable USB is often the only practical way. Apple typically only provides the latest macOS installer through the App Store, making it difficult to download older versions directly. With a bootable USB of an older macOS, you can erase your current system and revert to a previous, stable iteration (provided your Mac officially supports that older version).
Essential Prerequisites Before You Begin
Preparing adequately is half the battle won. Before you even think about creating your bootable USB or initiating an installation, there are a few crucial steps and items you need to gather. Skipping these can lead to frustration, data loss, or an incomplete installation.
Gathering Your Tools: Hardware and Software
To successfully create a bootable macOS USB installer and perform the installation, you’ll need the following:
- A Mac Computer: This Mac will be used to create the bootable USB drive. It should be in working order and capable of running the target macOS version you intend to install.
- A USB Flash Drive: This is perhaps the most critical piece of hardware. It needs to have at least 16GB of storage capacity. While 8GB might suffice for older macOS versions, 16GB is a safer bet for modern macOS installers like Ventura, Sonoma, or even older Big Sur/Monterey. Ensure this drive is empty or contains data you’re willing to erase, as the process will completely wipe its contents. USB 3.0 or newer drives are recommended for faster creation and installation times.
- The macOS Installer Application: This is the actual software package for macOS. You’ll download this from the Apple App Store. It typically appears as an application named “Install macOS [Version Name]” (e.g., “Install macOS Sonoma”) in your Applications folder after download.
- Important Note for Older macOS versions: If you need an older macOS installer that isn’t readily available in the App Store (e.g., High Sierra, Mojave), you might need to find direct download links provided by Apple support pages or through an older Mac that previously downloaded it. Always ensure you download installers directly from Apple or trusted sources to avoid corrupted or malicious software.
- Reliable Internet Connection: You’ll need this to download the macOS installer from the App Store. The installer files are large, often ranging from 12GB to 14GB, so a stable and reasonably fast connection is advisable.
- Power Adapter: If you’re creating the USB on a laptop, ensure it’s plugged into power to prevent it from sleeping or shutting down during the process, which can take some time. The same applies when performing the installation on the target Mac.
The Critical Importance of Backing Up Your Data
This cannot be stressed enough: Before you perform any major system operation, especially a clean installation that involves erasing your entire hard drive, you MUST back up all your important data. Losing precious photos, documents, projects, or financial records due to an oversight or unexpected error can be devastating.
Here are the most common and recommended backup methods:
- Time Machine: This is Apple’s built-in backup solution. Connect an external hard drive (at least twice the size of your Mac’s internal storage) and let Time Machine create a complete, bootable backup of your entire system. This allows for easy restoration of individual files or even your entire system to a previous state.
- Cloud Storage: Services like iCloud Drive, Google Drive, Dropbox, or OneDrive are excellent for backing up essential documents, photos, and files. Ensure your critical data is synced and accessible from the cloud.
- Manual Copy: For extremely critical files, manually copy them to another external hard drive, a secondary USB drive, or another computer. This provides an additional layer of security.
Assume that everything on your target Mac’s internal drive will be erased. A robust backup strategy ensures that even if something goes wrong during the installation, your data remains safe and recoverable. Take the time to verify your backups before proceeding.
Crafting Your Bootable macOS USB Installer
With your prerequisites in order, the next major step is to transform your ordinary USB drive into a powerful macOS installer. Apple provides a built-in command-line tool called createinstallmedia, which makes this process straightforward and reliable.
Downloading the macOS Installer
- Open the App Store: Launch the “App Store” application on your working Mac.
- Search for macOS: Use the search bar to find the macOS version you wish to install (e.g., “macOS Sonoma,” “macOS Ventura”).
- Download the Installer: Click the “Get” or “Download” button. The App Store will begin downloading the large installer file. This can take a significant amount of time depending on your internet speed.
- Do NOT Run It: Once the download is complete, the installer application will typically launch automatically. DO NOT PROCEED WITH THE INSTALLATION. Simply quit the installer (Command + Q) and ensure the application remains in your
Applicationsfolder. Its full name will be something like “Install macOS Sonoma.app”.
Preparing Your USB Drive
- Connect Your USB Drive: Plug your 16GB (or larger) USB flash drive into your working Mac.
- Open Disk Utility: You can find this by searching in Spotlight (Command + Space and type “Disk Utility”) or navigating to
Applications > Utilities > Disk Utility. - Show All Devices: In Disk Utility, go to the “View” menu at the top left of the screen and select “Show All Devices.” This is crucial, as you need to select the entire USB device, not just a volume under it.
- Select Your USB Drive: From the sidebar, carefully identify and select your USB drive. It will usually appear as an external device with its manufacturer’s name or a generic “External USB Media” label. Double-check that you are selecting the correct drive, as erasing the wrong one will lead to data loss on that device.
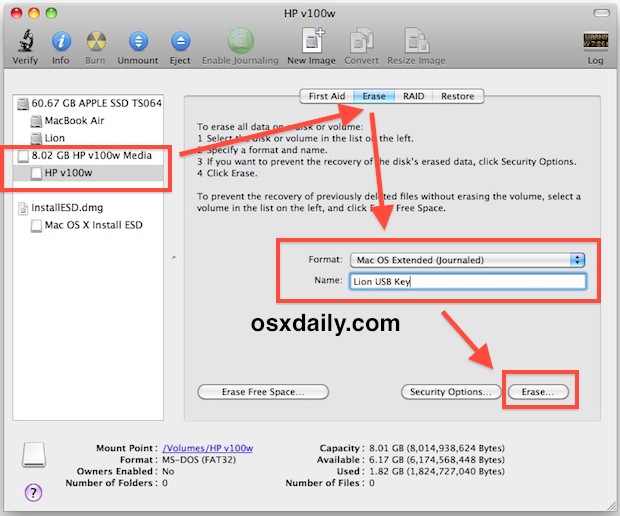
- Erase the Drive: Click the “Erase” button in the Disk Utility toolbar.
- Configure Erase Options:
- Name: Name the drive something simple and recognizable, like
MyInstaller(this name will be used in the Terminal command). - Format: Choose “Mac OS Extended (Journaled)” (HFS+). For newer macOS versions like Big Sur, Monterey, Ventura, or Sonoma, you can also choose “APFS” if your Mac supports it. However, Mac OS Extended (Journaled) is generally compatible across more macOS versions for installer creation.
- Scheme: Select “GUID Partition Map.”
- Click “Erase” to format the drive. Confirm the action when prompted.
- Name: Name the drive something simple and recognizable, like
Executing the ‘createinstallmedia’ Command in Terminal
This is the core step where the magic happens. You’ll use the Terminal application to run Apple’s createinstallmedia tool.
-
Open Terminal: Find Terminal in
Applications > Utilities > Terminal, or search for it via Spotlight. -
Locate the Installer: Ensure the downloaded macOS installer (e.g., “Install macOS Sonoma.app”) is in your
Applicationsfolder. -
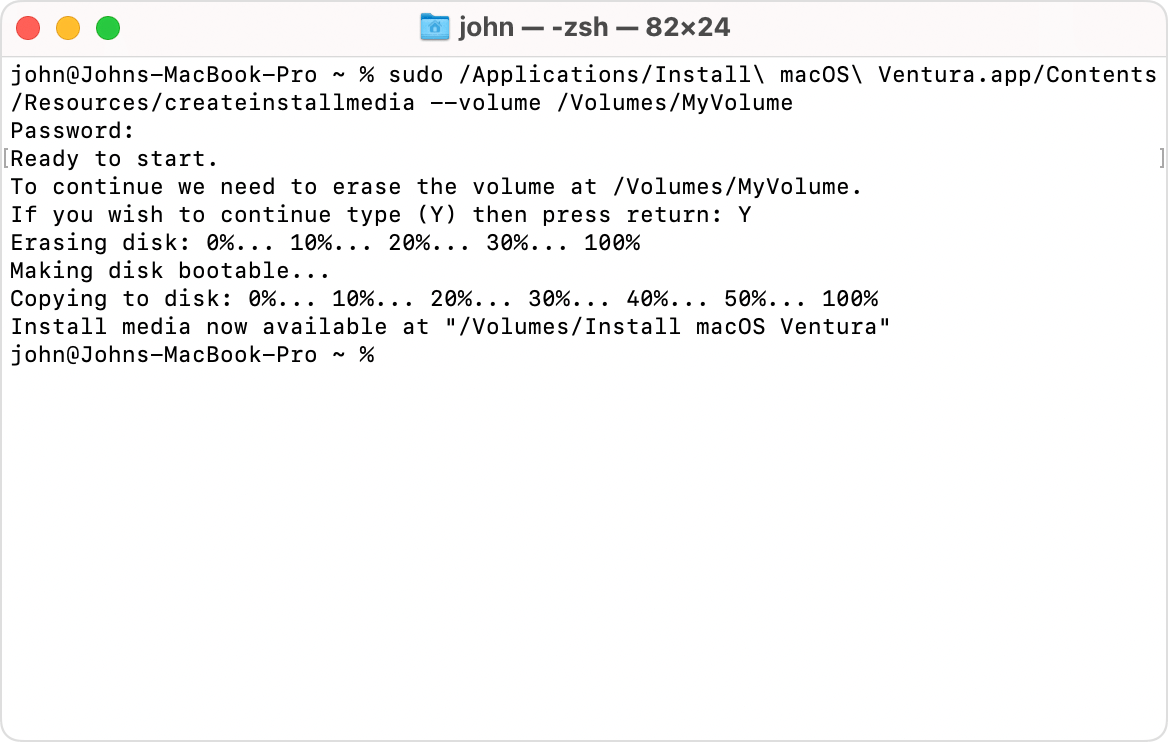
Construct the Command: The command structure is generally:
sudo /Applications/Install macOS [Version Name].app/Contents/Resources/createinstallmedia --volume /Volumes/[YourUSBName] --nointeractionReplace
[Version Name]with the exact name of your installer (e.g.,Sonoma,Ventura,Monterey,Big Sur,Catalina,Mojave,High Sierra). Thebefore spaces is important to correctly handle file paths with spaces.
Replace[YourUSBName]with the name you gave your USB drive in Disk Utility (e.g.,MyInstaller).Examples for common macOS versions:
- macOS Sonoma:
sudo /Applications/Install macOS Sonoma.app/Contents/Resources/createinstallmedia --volume /Volumes/MyInstaller --nointeraction - macOS Ventura:
sudo /Applications/Install macOS Ventura.app/Contents/Resources/createinstallmedia --volume /Volumes/MyInstaller --nointeraction - macOS Monterey:
sudo /Applications/Install macOS Monterey.app/Contents/Resources/createinstallmedia --volume /Volumes/MyInstaller --nointeraction - macOS Big Sur:
sudo /Applications/Install macOS Big Sur.app/Contents/Resources/createinstallmedia --volume /Volumes/MyInstaller --nointeraction
- macOS Sonoma:
- Execute the Command: Paste the appropriate command into Terminal and press Enter.
- Enter Your Password: Terminal will prompt you for your administrator password. Type it in (you won’t see characters appear, which is normal for security) and press Enter.
- Wait for the Process: The
createinstallmediatool will now erase your USB drive again, copy the installer files, and make it bootable. This process can take anywhere from 20 minutes to over an hour, depending on your Mac’s speed and the USB drive’s performance. You’ll see progress updates in the Terminal window. - Completion Message: Once finished, Terminal will display a message like “Install media now available at /Volumes/Install macOS [Version Name]”. You can then quit Terminal.
Your bootable macOS USB installer is now ready!
Booting Your Mac from the USB Installer
With your bootable USB created, the next step is to instruct your Mac to start up from this external drive instead of its internal one. This is a critical step to access the macOS Recovery environment for installation.
Accessing the Startup Manager
- Connect the USB Drive: Ensure your newly created bootable USB drive is securely plugged into the Mac you wish to install macOS on.
- Shut Down Your Mac: Go to the Apple menu () and select “Shut Down…”
- Power On and Hold Option Key: Immediately after pressing the power button, press and hold the Option (⌥) key on your keyboard. Keep holding it down until you see the Startup Manager screen.
- Select the USB Installer: The Startup Manager will display all available bootable volumes. You should see your internal hard drive (e.g., “Macintosh HD”) and your USB drive, which will typically be named “Install macOS [Version Name]” (e.g., “Install macOS Sonoma”). Use your mouse or arrow keys to select the USB installer.
- Press Enter: Once the USB installer is highlighted, press Enter or click the arrow below its icon. Your Mac will now begin booting from the USB drive, which will take you to the macOS Recovery environment. This might take a few minutes, potentially showing a progress bar or an Apple logo.
Navigating the macOS Recovery Environment
Once your Mac boots from the USB, you’ll be greeted by the macOS Utilities window. This is the central hub for managing your Mac’s system. Here are the main options you’ll typically see:
- Restore From Time Machine Backup: If you have a Time Machine backup, you can use this option to restore your entire system to a previous state.
- Install macOS [Version Name]: This is the option you’ll use to install a fresh copy of macOS onto your internal drive.
- Safari (Get Help Online): Provides a basic web browser to access Apple support pages or other online resources if you encounter issues.
- Disk Utility: This indispensable tool allows you to erase, format, partition, and repair your hard drives. You’ll use this tool before installing macOS, especially for a clean installation.
Take a moment to familiarize yourself with these options. Our primary focus will be on “Disk Utility” first, followed by “Install macOS.”
Performing the macOS Installation
Now that you’re in the macOS Recovery environment, it’s time to prepare your internal drive and initiate the installation process. This is where your careful backup planning pays off.
Preparing Your Disk with Disk Utility
For a clean installation, you need to completely erase your Mac’s internal drive. Remember, this will delete all data on the selected drive.
- Open Disk Utility: From the macOS Utilities window, select “Disk Utility” and click “Continue.”
- Show All Devices: Just like when preparing the USB, go to “View” > “Show All Devices” in Disk Utility to ensure you see the physical drive, not just its volumes.
- Select Your Internal Drive: In the sidebar, select your Mac’s main internal drive (e.g., “Apple SSD” or “Fusion Drive”). This is usually the top-level entry for your Mac’s storage. Be absolutely certain you’ve selected the correct drive before proceeding.
- Erase the Drive: Click the “Erase” button in the toolbar.
- Configure Erase Options:
- Name: Give your new startup disk a meaningful name, such as “Macintosh HD.”
- Format:
- For macOS High Sierra and newer (including Mojave, Catalina, Big Sur, Monterey, Ventura, Sonoma), choose APFS. This is the recommended modern file system for SSDs.
- For older macOS versions (El Capitan, Sierra), or if you encounter issues with APFS, choose Mac OS Extended (Journaled).
- Scheme: Select “GUID Partition Map.”
- Click “Erase” and confirm the action. This process might take a few moments.
- Close Disk Utility: Once the erase operation is complete, quit Disk Utility (Command + Q or click the red close button). You’ll return to the macOS Utilities window.
Initiating the macOS Installation Process
With your internal drive properly formatted, you can now proceed with installing macOS.
- Select “Install macOS [Version Name]”: From the macOS Utilities window, choose “Install macOS [Version Name]” and click “Continue.”
- Follow the On-Screen Prompts:
- Welcome Screen: Click “Continue.”
- Software License Agreement: Read and “Agree” to the terms and conditions.
- Select Destination Disk: The installer will ask you to choose where to install macOS. Select the “Macintosh HD” (or whatever name you gave it) volume that you just erased and click “Continue.”
- Installation Begins: The installation process will now start. This involves copying files, verifying the installation, and performing several restarts. The time remaining display might fluctuate, and it can take anywhere from 30 minutes to a couple of hours, depending on your Mac’s model and the speed of your USB drive. Your Mac will restart multiple times during this phase. Do not interrupt the process or shut down your Mac.
- First Boot and Setup Assistant: After the final restart, your Mac will boot into the macOS Setup Assistant. This is where you configure your region, language, Wi-Fi network, create a user account, set up iCloud, and other initial preferences.
Congratulations! You have successfully performed a clean installation of macOS from a USB drive.
Post-Installation Steps and Optimization
Installing macOS is just the beginning. To ensure your Mac is fully functional, secure, and optimized for your workflow, there are several crucial steps to take.
Initial Setup and Configuration
- Complete Setup Assistant: Follow the prompts to configure basic settings:
- Region and Keyboard Layout: Choose your country and preferred keyboard.
- Wi-Fi Network: Connect to your wireless network.
- Data & Privacy: Review Apple’s privacy policy.
- Migration Assistant: This is where you can migrate data from your Time Machine backup. If you want to restore your old files, select “From a Mac, Time Machine backup, or startup disk” and follow the instructions. If you prefer a truly clean slate, choose “Don’t transfer any information now.”
- Apple ID: Sign in with your Apple ID. This will enable iCloud, App Store, and other Apple services.
- Terms and Conditions: Agree to the macOS terms.
- Create a Computer Account: Set up your primary user account with a full name, account name, and password. Do not forget this password!
- Location Services & Time Zone: Enable or disable as preferred.
- Analytics & Screen Time: Configure sharing usage data and Screen Time settings.
- Siri: Enable or disable Siri.
- Touch ID/Face ID: Set up your biometric authentication if your Mac supports it.
- Appearance: Choose your preferred light or dark mode.
- Explore Your New System: Once the Setup Assistant is complete, you’ll land on your fresh macOS desktop. Take a moment to appreciate the clean slate.
Migrating Your Data and Essential Updates
- Migration Assistant (if skipped earlier): If you decided to skip data migration during the initial setup, you can still use Migration Assistant later. Find it in
Applications > Utilities > Migration Assistant. This tool is excellent for bringing over user accounts, applications, and settings from a Time Machine backup or another Mac. - Software Updates: Even though you’ve installed a specific macOS version, there might be incremental updates or security patches released since the installer was created.
- Go to
System Settings(orSystem Preferenceson older macOS versions) >General>Software Update. Install any available updates. This is crucial for security and performance.
- Go to
- App Store Updates: Open the App Store and check for updates to any pre-installed Apple applications (Pages, Numbers, Keynote, Safari, etc.).
Essential Apps and Security Best Practices
- Reinstall Your Applications: Start reinstalling your essential third-party applications. If you migrated from a backup, many might already be there, but it’s good practice to ensure they are up-to-date and functioning correctly.
- Configure Security & Privacy Settings:
- Firewall: Go to
System Settings>Network>Firewalland ensure it’s turned on. - FileVault: Enable FileVault encryption (
System Settings>Privacy & Security>FileVault) to protect your data in case your Mac is lost or stolen. Make sure to save your recovery key or associate it with your iCloud account. - Automatic Updates: While manual updates are good, ensure your Mac is configured to automatically download (and ideally install) security updates in the background.
- Antivirus/Anti-Malware: While macOS has robust built-in security, consider reputable third-party antivirus or anti-malware software for an extra layer of protection, especially if you frequently download files from unknown sources.
- Firewall: Go to
- Review System Settings: Go through
System Settings(orSystem Preferences) and customize your Mac to your liking: trackpad gestures, display settings, notifications, dock preferences, etc. - Test Everything: Ensure all your peripherals (printers, external drives, webcams) are working correctly and that your essential workflows are smooth.
Common Troubleshooting Tips
Even with careful planning, issues can sometimes arise. Here are solutions to some common problems you might encounter during the process:
Installer Verification Issues
- “This copy of the Install macOS [Version Name] application is too old to be opened on this version of macOS.” This usually means you’re trying to open an installer on a Mac with an older OS than the installer itself, or that the installer certificate has expired. Ensure your working Mac is running a compatible (or newer) OS to create the USB, or that your Mac’s date and time are correct (this often fixes certificate issues). You can temporarily set the date via Terminal in Recovery Mode if needed:
date 0101010116(MMDDhhmmYY). - “An error occurred while preparing the installation. Try running this application again.” This often indicates a corrupted download. Delete the installer from your Applications folder and redownload it from the App Store.
USB Drive Not Recognized
- Not appearing in Startup Manager:
- Ensure the USB drive is properly formatted as “GUID Partition Map” and “Mac OS Extended (Journaled)” or “APFS.”
- Try a different USB port on your Mac.
- Use a different USB drive; some drives are not compatible or may be faulty.
- Re-create the bootable USB installer from scratch.
- Ensure you are holding down the Option (⌥) key immediately and continuously after pressing the power button until the Startup Manager appears.
- “No Valid Installer Found”: This means the
createinstallmediaprocess likely failed or the installer files are corrupted on the USB. Re-run thecreateinstallmediacommand. - Mac isn’t booting from USB after selecting: It might take a minute or two to load. If it repeatedly fails, your Mac’s firmware might need an update or the USB drive itself is problematic.
Installation Failed
- “An error occurred installing macOS.”
- Disk Issues: Re-enter Disk Utility and run First Aid on your internal drive. If there are unrepairable errors, the drive might be failing and needs replacement.
- Insufficient Space: Ensure your internal drive has enough space after formatting (the installer usually checks this, but it’s good to confirm).
- Network Issues: While the main installation is offline, some parts might try to connect online for firmware updates. Ensure your Wi-Fi is stable.
- RAM/Hardware: Rarely, faulty RAM or other hardware issues can cause installation failures.
By following these detailed steps and troubleshooting tips, you should be well-equipped to successfully install macOS from a USB drive. This skill is a testament to your growing technical independence and a vital asset for maintaining your Mac’s health and performance. Should you encounter persistent issues, don’t hesitate to consult Apple’s official support documentation or seek assistance from a certified technician.
aViewFromTheCave is a participant in the Amazon Services LLC Associates Program, an affiliate advertising program designed to provide a means for sites to earn advertising fees by advertising and linking to Amazon.com. Amazon, the Amazon logo, AmazonSupply, and the AmazonSupply logo are trademarks of Amazon.com, Inc. or its affiliates. As an Amazon Associate we earn affiliate commissions from qualifying purchases.