Minecraft, the pixelated sandbox phenomenon, has captivated millions with its endless possibilities for creativity and exploration. From humble dirt huts to magnificent mega-builds, players constantly push the boundaries of what can be achieved within its blocky confines. However, even the most seasoned architects sometimes wish for tools that can streamline the construction process, assist with complex designs, or even replicate intricate structures with precision. This is where LiteMatica comes in – a powerful client-side mod that transforms the way you build in Minecraft.
LiteMatica is an indispensable utility, especially for players undertaking large-scale projects, meticulously planning complex redstone contraptions, or aspiring to recreate impressive structures designed by others. It introduces a “schematic” system, allowing users to save sections of their world as blueprints and then load them back into any other world, displaying a holographic projection of the structure. This “ghost build” acts as an invaluable guide, showing you exactly where each block needs to be placed, taking the guesswork and tedium out of intricate constructions. For Mac users, the process of integrating such a powerful mod might seem daunting at first glance due to specific operating system nuances, but with this detailed guide, you’ll be enhancing your building capabilities in no time.
This article will walk you through every step required to install LiteMatica on your Mac, ensuring a smooth and successful setup. We’ll cover the essential prerequisites, a clear step-by-step installation process, common troubleshooting tips, and even a glimpse into how to begin leveraging LiteMatica’s impressive features. By the end, you’ll not only have LiteMatica running but also a deeper understanding of how to manage Minecraft mods on your Apple device, opening up a world of new possibilities for your digital creations.
Laying the Foundation: Understanding LiteMatica and Essential Prerequisites
Before diving into the installation process, it’s crucial to understand what LiteMatica offers and to ensure your Mac system is ready for modding. Properly preparing your environment will prevent most common installation issues and set you up for a seamless experience.
What is LiteMatica and Why is it a Game-Changer?
LiteMatica is far more than just a simple building aid; it’s a comprehensive suite of tools designed to enhance efficiency and precision in Minecraft construction. At its core, LiteMatica allows you to:
- Load and Display Schematics: Import schematic files (
.litematicor.schem) from other players or your own past projects. These schematics appear as transparent, holographic overlays in your world, indicating exactly where each block should go. This is incredibly useful for replicating builds, creating exact copies, or following detailed plans. - Save Your Own Schematics: Select any area in your world and save it as a schematic. This is perfect for backing up complex builds, sharing your creations with friends, or easily transporting structures between different worlds or servers (where permitted).
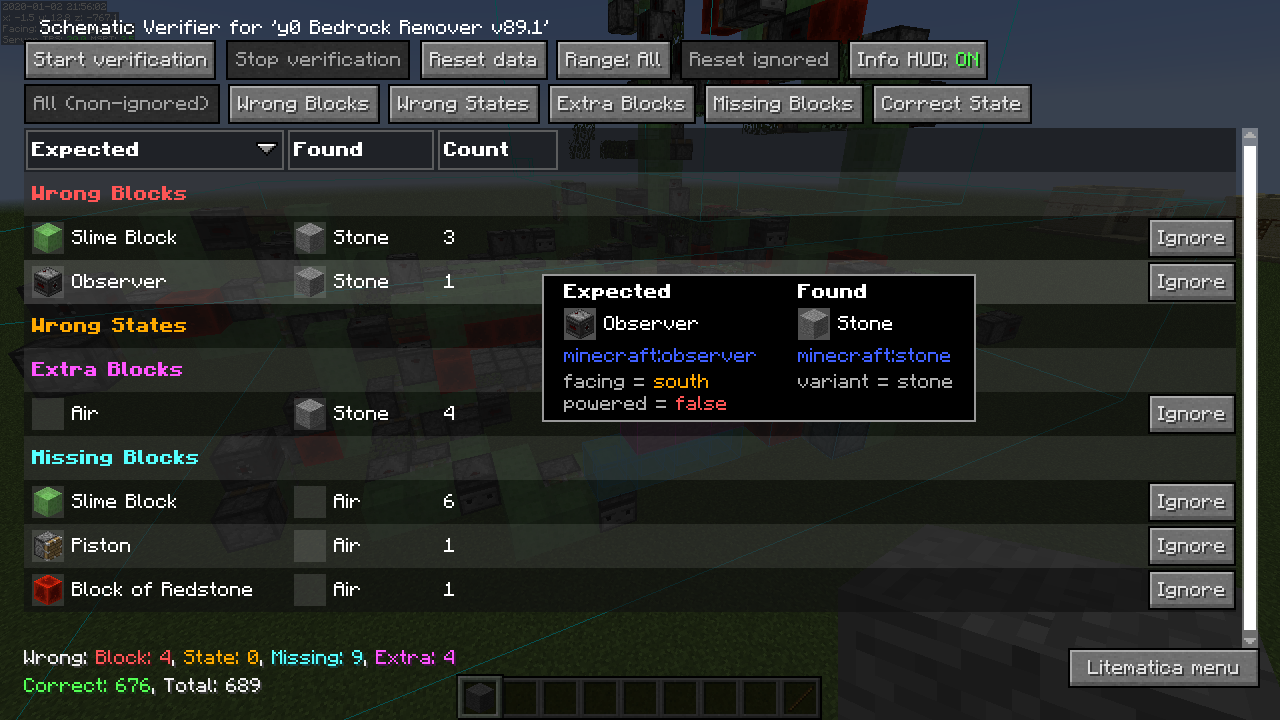
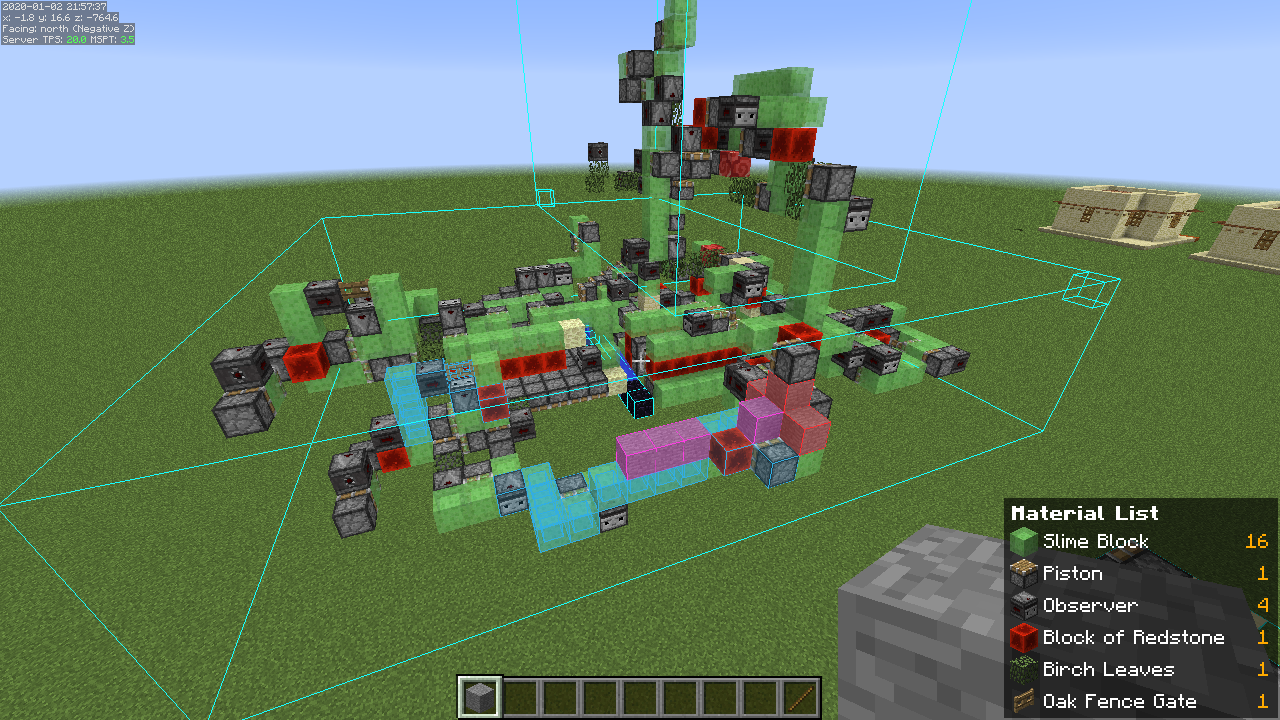
- Material List Generation: LiteMatica can analyze a loaded schematic and generate a comprehensive list of all the blocks and items required to build it, including the exact quantities. This feature is a massive time-saver for resource gathering, allowing you to stock up on materials efficiently before starting a large project.
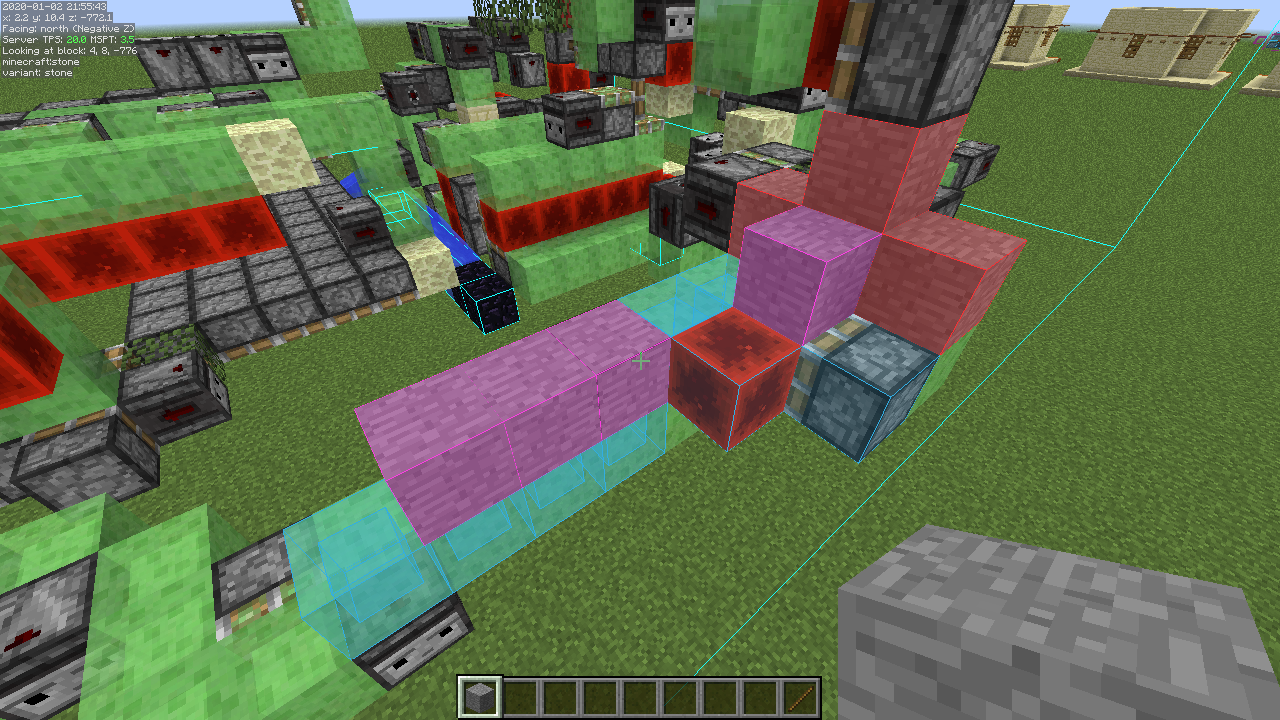
- Placement and Build Modes: The mod offers various modes for placing and interacting with schematics, allowing you to fine-tune alignment, rotation, and mirror effects. Build mode can even help you identify missing blocks or incorrect placements.
- Measurement Tools: LiteMatica includes handy on-screen measurement tools, allowing you to quickly determine distances, areas, and volumes within your builds without needing to count blocks manually.
For builders, redstone engineers, and even mapmakers, LiteMatica acts as a powerful productivity tool, significantly reducing the time and effort involved in complex builds. It transforms tedious, error-prone manual construction into a guided, precise, and enjoyable process.
Essential Components Before You Begin
To install LiteMatica on your Mac, you’ll need a few key components in place. Ensuring these are correctly set up beforehand will streamline the entire process.
- Minecraft Java Edition: LiteMatica is a client-side mod exclusively for Minecraft Java Edition. If you own the Bedrock Edition (available on consoles, mobile, and Windows 10/11 through the Microsoft Store), this guide will not apply, as Bedrock has a different modding infrastructure. Make sure you have a legitimate copy of Minecraft Java Edition installed and have run it at least once to generate its necessary game files.
- Java Runtime Environment (JRE) / Java Development Kit (JDK): Minecraft itself runs on Java, and so do its mods. Your Mac should already have a compatible Java version installed if you’ve been playing Minecraft. However, sometimes mod loaders require specific or newer versions. It’s good practice to ensure your Java is up to date. You can check your Java version by opening Terminal (search for it in Spotlight) and typing
java -version. If it’s outdated or you encounter issues, consider installing the latest JDK from Oracle or adoptopenjdk.net. - A Mod Loader (Fabric or Forge): Minecraft mods like LiteMatica don’t just “plug in” to the game directly. They require a “mod loader” that alters the game code to allow mods to function. For modern Minecraft versions, the two most popular mod loaders are Fabric and Forge. LiteMatica primarily supports Fabric for newer versions of Minecraft, and it’s generally recommended for its lightweight nature and speed for recent updates. Forge is an older, more established loader but might be less compatible with the very latest LiteMatica versions. For this guide, we will focus on Fabric, as it’s the most common choice for LiteMatica.
- MaLiLib (Masa’s Library): LiteMatica is developed by “Masa” and, like many complex mods, relies on a shared library for some of its functionalities. This library is called MaLiLib. Think of it as a prerequisite mod that LiteMatica needs to function. You must download and install MaLiLib alongside LiteMatica; otherwise, LiteMatica will not work.
Having these prerequisites understood and ready is the first crucial step towards successfully installing LiteMatica and embarking on your journey of optimized Minecraft building.
Your Pathway to Enhanced Building: Step-by-Step LiteMatica Installation
With the prerequisites covered, we can now proceed with the core installation process. Follow these steps carefully to integrate LiteMatica into your Minecraft setup on Mac.
Step 1: Preparing Your Mac with the Fabric Mod Loader
The Fabric Loader is the bridge between Minecraft and LiteMatica. Installing it correctly is paramount.
- Download the Fabric Installer:
- Open your web browser and navigate to the official Fabric website:
fabricmc.net. - Click on the “Download” button.
- You’ll likely be presented with a universal
.jarfile for the installer. Download this file to a memorable location, such as yourDownloadsfolder.
- Open your web browser and navigate to the official Fabric website:
- Run the Fabric Installer:
- Locate the downloaded
fabric-installer-0.X.X.jarfile. - Double-click the
.jarfile. If your Mac tries to open it with an archiving tool or gives a security warning, you might need to adjust settings:- Right-click (or Control-click) the
.jarfile and select “Open With” > “Java Launcher.” - If a security warning appears (e.g., “Cannot be opened because it is from an unidentified developer”), go to
System Settings(orSystem Preferenceson older macOS versions) >Privacy & Security. You should see an option near the bottom like “Open Anyway” next to the blocked Fabric Installer. Click it, then confirm by clicking “Open” in the pop-up window.
- Right-click (or Control-click) the
- The Fabric Installer window will open.
- Select the Minecraft Version: Ensure the “Client” tab is selected. From the “Minecraft Version” dropdown, choose the exact version of Minecraft you intend to play LiteMatica on (e.g., 1.20.1, 1.19.2, etc.).
- Select the Loader Version: Usually, the latest stable “Loader Version” is fine, but if a guide or server specifies a particular one, choose that.
- Installation Location: The installer usually defaults to your correct
.minecraftfolder path (~/Library/Application Support/minecraft). Do not change this unless you have a custom setup. - Click the “Install” button.
- You should see a message confirming “Successfully installed Fabric Loader.” Click “OK” and close the installer.
- Locate the downloaded
You now have a new Fabric profile created in your Minecraft Launcher, ready for mods.
Step 2: Acquiring the LiteMatica Mod and MaLiLib
With Fabric installed, the next step is to download LiteMatica and its required library, MaLiLib.
- Download MaLiLib:
- Go to a trusted mod repository like CurseForge (
curseforge.com) or Modrinth (modrinth.com). Search for “MaLiLib.” - Navigate to the “Files” section for MaLiLib.
- Crucially, download the version of MaLiLib that matches your Minecraft version AND is compatible with Fabric. For example, if you’re installing LiteMatica for Minecraft 1.20.1 Fabric, download MaLiLib for 1.20.1 Fabric.
- Download the
.jarfile.
- Go to a trusted mod repository like CurseForge (
- Download LiteMatica:
- While on CurseForge or Modrinth, search for “LiteMatica.” (Note: The official spelling is often “Litematica” or “LiteMatica”).
- Go to its “Files” section.
- Equally crucial, download the version of LiteMatica that matches your Minecraft version AND is compatible with Fabric. This must be the same Minecraft version you selected for Fabric and MaLiLib.
- Download the
.jarfile.
You should now have two .jar files in your Downloads folder: one for MaLiLib and one for LiteMatica, both compatible with the same Minecraft version and Fabric.
Step 3: Integrating LiteMatica and MaLiLib into Your Minecraft Setup
Now, you need to place these downloaded mod files into the correct folder so Minecraft can find them.
- Locate Your Minecraft
modsFolder:- Open your Minecraft Launcher.
- Go to the “Installations” tab.
- Find your newly created Fabric profile (e.g., “fabric-loader-1.20.1”).
- Hover over it, and you’ll see a folder icon appear to the right. Click this folder icon. This will open your
.minecraftdirectory in Finder. - Inside the
.minecraftdirectory, look for a folder namedmods. - If the
modsfolder does not exist: You need to create it manually. Right-click in an empty space within the.minecraftfolder, select “New Folder,” and name itmods(all lowercase).
- Move the Mod Files:
- Open your
Downloadsfolder (or wherever you saved the.jarfiles). - Select both the MaLiLib
.jarfile and the LiteMatica.jarfile. - Drag and drop both selected files into the
modsfolder you just located or created within your.minecraftdirectory.
- Open your
Step 4: Launching and Verifying Your Installation
The final step is to launch Minecraft and confirm that LiteMatica is working correctly.
- Launch Minecraft with the Fabric Profile:
- Close and reopen your Minecraft Launcher to refresh it.
- On the “Play” tab, ensure the selected profile is your Fabric Loader profile (e.g., “fabric-loader-1.20.1”). If it’s not, click the dropdown arrow next to the play button and select it.
- Click the “Play” button.
- Verify LiteMatica in-Game:
- Once Minecraft loads, create a new single-player world or join an existing one.
- LiteMatica often adds a small indicator to the bottom-left or top-left corner of your screen, or you can check for its presence by pressing the default LiteMatica hotkey, which is usually
M(for “M”od options). - Pressing
Mshould open the LiteMatica main menu. If it does, congratulations! LiteMatica is successfully installed. - If you don’t see the menu or an indicator, try typing
/modsin the chat. This command, often provided by Fabric API, lists installed mods. LiteMatica and MaLiLib should appear in that list.
Troubleshooting Common Installation Issues on Mac
Even with careful steps, sometimes things don’t go as planned. Here are common issues Mac users might encounter and their solutions.
Mod Not Appearing or Not Working in Game
- Incorrect Version Compatibility: This is the most frequent issue. Double-check that LiteMatica, MaLiLib, and the Fabric Loader are all for the exact same Minecraft version (e.g., 1.20.1 for all three).
- Missing MaLiLib: Remember that LiteMatica requires MaLiLib. Ensure you have both
.jarfiles in themodsfolder. - Wrong
modsFolder: Verify that the.jarfiles are placed inside themodsfolder located directly within your.minecraftdirectory. Sometimes users mistakenly put them elsewhere. - Corrupted Download: Re-download LiteMatica and MaLiLib. Sometimes files get corrupted during download.
- Fabric Not Selected: Ensure you’ve selected the
fabric-loader-X.X.Xprofile in the Minecraft Launcher before clicking Play.
Game Crashing on Startup
- Incompatible Mods: If you have other mods installed, one of them might be conflicting with LiteMatica or MaLiLib. Try removing all other mods from the
modsfolder and testing LiteMatica by itself. If it works, reintroduce other mods one by one to identify the culprit. - Outdated Java: Ensure your Java is up to date, or that Minecraft is configured to use the correct Java version (usually managed by the launcher).
- Insufficient RAM Allocation: For modded Minecraft, especially with multiple mods, you might need to allocate more RAM. In the Minecraft Launcher, go to
Installations, select your Fabric profile, click the three dots (...), thenEdit. Under “More Options,” you’ll find “JVM Arguments.” Change-Xmx2G(or similar) to-Xmx4Gor-Xmx6Gif your Mac has 8GB or more RAM. Do not allocate more than half of your system’s total RAM.
macOS Security and Permissions Issues
- “Unidentified Developer” Warnings: As mentioned in Step 1, macOS’s Gatekeeper security feature often blocks applications from “unidentified developers.” If you encounter this, go to
System Settings>Privacy & Securityand click “Open Anyway” for the respective application (e.g., Fabric Installer or Java process). - Folder Permissions: Although rare, sometimes macOS folder permissions can cause issues. If you suspect this, right-click your
.minecraftfolder, select “Get Info,” and check the “Sharing & Permissions” section to ensure your user account has “Read & Write” access.
By systematically going through these troubleshooting steps, you should be able to resolve most common issues and get LiteMatica up and running on your Mac.
Maximizing Your Building Potential with LiteMatica: Beyond Installation
Once LiteMatica is successfully installed, the real fun begins! While this guide focuses on installation, it’s worth briefly touching upon the vast potential LiteMatica unlocks.
- Learning the Hotkeys: LiteMatica relies heavily on hotkeys for efficient use. The default hotkey to open the main menu is
M. From there, you can navigate toConfigurationto view and customize all keybinds. Essential hotkeys typically include:M + Left Click: Open main menu (default).M + Scroll Wheel: Cycle through different LiteMatica tools (e.g., area selection, schematic placement).M + Right Click: Context-sensitive action (e.g., confirm selection).Numpad 0-9: Often used for quickly switching between different loaded schematics.
- Loading Your First Schematic: Head to the LiteMatica main menu (
M), thenSchematic Manager. Here you can load existing schematic files from yourschematicsfolder (inside your.minecraftdirectory). Once loaded, you can place it in your world using the placement tool. - Saving Your Own Creations: To save a part of your world, use the
Area Selectiontool (often activated withM + scroll wheeluntil you find it). Define two corner points to mark a rectangular prism of blocks, then use the schematic manager to save it. This is invaluable for transferring builds, creating custom templates, or backing up important structures. - Understanding Build Layers: For complex schematics, LiteMatica allows you to view them layer by layer, which simplifies the building process. This feature, combined with the material list, makes even the most daunting projects manageable.
- Community and Resources: The LiteMatica community is active and full of resources. You can find countless schematics shared online, detailed video tutorials, and active Discord servers where you can ask questions and get help. Engaging with the community can significantly enhance your experience and building skills.
LiteMatica truly transforms the Minecraft building experience on Mac, turning it from a potentially arduous task into a guided, satisfying, and highly productive endeavor. It’s a tool that respects your time and effort, allowing you to focus on the creative vision rather than the repetitive manual labor.
Elevate Your Minecraft Creations
Installing LiteMatica on your Mac is a straightforward process, but it opens the door to an entirely new dimension of creativity and efficiency within Minecraft. By meticulously following the steps outlined in this guide – from preparing your system with Fabric to correctly placing the mod files and troubleshooting any hiccups along the way – you’ve successfully equipped yourself with a professional-grade building assistant.
No longer will you have to meticulously count blocks or struggle with complex alignments. LiteMatica empowers you to tackle ambitious projects with confidence, replicate intricate designs with precision, and streamline your workflow in a way that truly respects your time and creative energy. Whether you’re constructing a sprawling medieval castle, engineering an elaborate redstone farm, or simply refining your survival base, LiteMatica will prove to be an invaluable asset.
So, fire up your Minecraft, dive into a world of endless possibilities, and start building smarter, not harder. Your Mac is now ready to unleash your full architectural potential, transforming your wildest Minecraft dreams into tangible, block-by-block realities. Happy building!
aViewFromTheCave is a participant in the Amazon Services LLC Associates Program, an affiliate advertising program designed to provide a means for sites to earn advertising fees by advertising and linking to Amazon.com. Amazon, the Amazon logo, AmazonSupply, and the AmazonSupply logo are trademarks of Amazon.com, Inc. or its affiliates. As an Amazon Associate we earn affiliate commissions from qualifying purchases.